Saturday, September 21, 2013

Lizard Skins DSP 2.5mm Bar Tape

How many contact points do you have with your bicycle? There are 3 main contact points: The hands, the feet and the butt. For comfort over longer distances, it is important to have good components at these contact areas, to prevent soreness or numbness.

Let's start with the feet. The feet are like your engine pistons, transferring your muscle power through the pedals to the bike. Therefore, the interface between the feet and the pedals is very important for good power transfer. For comfortable and good power transfer, the pedal platform should be large enough for your feet to step on comfortably, without feeling like the side of your feet are falling off the edge of the pedals.

For further power improvement, you can install clipless pedals and use clipless shoes. Click here to read more about SPD pedals and shoes!

Beginner's Guide to Clipless Pedals
Beginner Friendly SPD Pedals - Shimano PD-T400
Dual Platform Pedals for Versatility - Shimano PD-A530
Comfortable SPD Touring Shoes - Shimano RT-82

Next, we have the saddle. This supports most of your body weight, especially when you are pedaling at a leisure pace. It is difficult to recommend a suitable saddle for other people, especially when everyone's butt shape is different. The only sure way to find the right saddle is to try it out, and for at least a 5 km ride. Here is a couple of saddles that I tried before.

Rido LT Saddle for the speedster
Bontrager Evoke RL for all-rounded performance

Lastly, we have the hand contact points. There are two main types of handlebars, flat handlebar and drop bars. For flat handlebars, I find Ergon-style grips to be really comfortable as they support your palm and prevent numbness.

Ergon Grips 1
Ergon Grips 2

As for drop bars, the contact point for the hands would be the bar tape. There are so many types of bar tape out there, that it is difficult to know which one is good. From what I see, most bar tapes are pretty decent. As long as they can provide a decent grip, it should be fine. The quality shows only when you are installing or removing the bar tape.

Cheap bar tape use poor adhesives that leave sticky marks all over the handlebar and the bar tape itself. This makes removal a pain. They also tend to roll up at the edges, creating uncomfortable ridges.

Better bar tape would use good adhesives that don't leave a mark when they are removed, making it easy to put on fresh bar tape. The edges are also less likely to roll up. Thicker bar tape would make it more comfortable for the hands due to the additional cushioning available.

For myself, I have found the ideal bar tape. It is thick and comfortable, preventing numbness over longer rides. The grip is also very good, maintaining its tackiness even in wet conditions. I have been using it for about a year, and recently I decided to put on a fresh roll of the same bar tape.

The Lizard Skins DSP Bar Tape is unlike any other bar tape out there. Instead of being made of some synthetic fiber, cork or foam, it is actually rubber-like. This rubber material, together with its generous thickness, creates a bar tape that is very comfortable and grippy.

You can feel the rubber for yourself before you buy it!

Comes in 1.8mm, 2.5mm and also 3.2mm (new). Many colours are available!

Don't over stretch the bar tape when installing it, as you may tear the bar tape.

Comes with the finishing tape and also 2 small strips for taping the area behind the shifters.

Bontrager IsoZone Bar Padding for extra cushioning! Not necessary if you already have good thick bar tape. I just wanted to see how cushy I can make it.

Put the gel pads on the drop section...

...and also on the top of the drop bar.

However, I found that with the gel pads, the drop bar diameter becomes thicker, and the bar tape is not long enough to reach the top of the handlebar! This is also partly because I like to overlap the bar tape more at the bends, to prevent gaps from appearing when the bar tape shifts during normal usage.

To solve the problem, I decided to remove the gel pads on the top section of the handlebar, using only those on the drop section.

Bar tape is not long enough!

Re-wrapping the bar tape, with gel pads on the drop sections only. I don't use the short sections to tape behind the shifters, as it is unnecessary.

The finishing tape with the Lizard Skins logo! It has the same texture as the bar tape, which is a really nice touch.

Fully wrapped bar tape

 Extra thick at the drop section for better comfort. Not really necessary, but good to have.

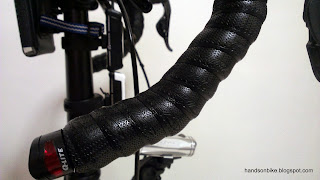
Freshly wrapped bar tape can really revitalize the bike! Makes the bike look and feel new again.

I highly recommend this bar tape for all users, as it is really grippy and comfortable, which is what you should be looking for in a bar tape. Not the cheapest bar tape around, but to me it is worth the money. No more numb hands!

Monday, September 16, 2013

Tacx Brake Shoe Tuner

A quick review of a tool that I tried out recently. Normally when setting brake pads, there are two main things to look out for. Brake pad position/alignment and toe-in.

First, there is the alignment of brake pads on the rims. The brake pads need to be resting entirely within the brake track on the rim, and not be touching the tires. The idea is to maximize the contact area between the brake pad and tires, for maximum braking power.

After the alignment is set, the toe-in needs to be set. Toe in means that the front part of the brake pad will contact the rim just slightly before the rear of the brake pad. This will largely eliminate any squealing during braking. A toe in amount of 0.5mm is probably sufficient. However, setting this toe-in is tricky as the brake pad will move about during the alignment. Too much toe in is also not ideal, as it will create a spongy feeling at the brake levers due to excessive flexing of the brake pads.


A simple and clear illustration about the toe-in on brake pads.

While shopping online, I came across this Tacx Brake Shoe Tuner that was designed to simplify the alignment of brake pads. It is really simple to use, as shown below.

Usage method as shown on the box

Turn the black knob to clamp the tool on the rim

The tool flexes to cater to different rim widths

As seen on my Wheelsport rims. Does not work if you can't fit it between the spokes!

Set the top edge of the tool so that it goes over the rim, and into the small groove between the tire and the rim.

Align the brake pad flat and against the top edge of the tool. The front side of the tool is thinner, so that when the brake pad is set against the tool, the toe-in will be set at the same time. Once this is done, just tighten the brake pad holder. Simple!
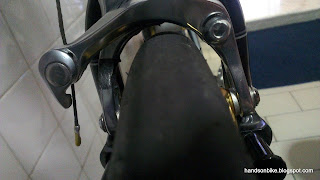
 However, the brake pad is set about 2mm below the top of the rim brake track. This is due to the lip of the tool which is rather thick.

This causes the bottom of the brake pad to be unused as it cannot contact the rim at all.

On the bright side, the toe-in setting is perfect! As seen from the picture, the front of the brake pad is touching the rim, but the rear is still about 0.5-1.0 mm away.

Due to the unsuitable alignment of the brake pad to the rim, I can't really use this tool for these wheels. However, it is noted that Wheelsport rims have narrower brake tracks that some other wheels. Kinetix Comp wheels have a wider brake track (confirmed by actual inspection/comparison), and this tool would be perfect for those wheels. It would most likely be suitable for most, if not all full sized wheels.

Overall, I would recommend this tool as the brake pad setting is made really easy. Clamp on the tool, and align the brake pads to the top edge. Tighten the brake pad holder and it is done! Perfect alignment and toe-in all done at the same time.

The only thing to take note is that not all rims can use this tool properly. It is not suitable for rims with narrow brake tracks such as Wheelsport wheels.

Saturday, September 14, 2013

3M Reflective Bicycle Spoke Clips

Just sharing a little accessory that I recently got to try out. It is a very simple add-on to your bike that can increase your side visibility at night.

 Authentic 3M reflective spoke clips. Comes in a pack of 8.

Clips on rather easily to the spokes. Not for flat bladed spokes though.

Slightly loose, but it does not move about when cycling.

As seen without flash from the camera

With flash! The view that cars see when you go past on the zebra crossing. The words on the Schwalbe tires are also reflective.

Very simple to install, but really improves visibility at night, especially when the wheels are spinning! Adds practically no weight at all. They clip on securely and don't move about or make any noise when cycling. Looks better than traditional rectangular spoke reflectors. Why not add them to your bike?

Wednesday, September 11, 2013

Journey of the Boardwalk: Part 33 - Ultegra BR-6800 Caliper Brakes

In the previous 2 parts of this upgrade, the Elosix front brake adaptor was used to mount a standard reach caliper brake to the Dahon Boardwalk. The front fender was then modified to be compatible with the new front brake configuration.

At that time, I was merely experimenting with the new front brake mounting, thus I was just using a basic Shimano Tiagra caliper brake. After it was proven that this upgrade is feasible and works well, I decided to get a better caliper brake.

The new series of road components by Shimano are the Dura-Ace 9000 and Ultegra 6800 series. Amongst the new components are newly designed caliper brakes, designed to be even more powerful than the previous Dura-Ace 7900 and Ultegra 6700 versions. Without question, the brakes that I decided to get was the Ultegra 6800 brakes, as the colour matches the rest of the components on my bike (Ultegra 6700/6770).

A quick comparison of the Ultegra 6700 vs Ultegra 6800 caliper brakes:

Ultegra 6700 brakes

Ultegra 6800 brakes

From the pictures above, you can see that the new Ultegra 6800 brakes has an additional section on the top brake arch. This is due to the new cam mechanism in the brakes, designed to improve braking power.

Both the brakes are of dual pivot design, but the pivot locations are different. The 6700 brakes has one of the pivots on the centre mounting bolt itself, while the 6800 is a symmetrical dual pivot design, with the 2 pivots at both sides of the brake caliper. Again, this is designed to improve braking power.

Let us now take a closer look at the brake new Ultegra 6800 brakes which I bought! I only bought the front brake (with the longer mounting bolt) as I can only change the front brake. The rear brake will remain as the Tektro R559 Extra Long Reach caliper brakes.

Beautiful packaging for the Ultegra 6800 brakes

Possible to buy just a single brake (instead of a pair) online

 Same colour scheme as the Ultegra 6700 series! 
Matches the rest of my Ultegra 6700/6770 components.

Long mounting bolt for secure mounting to the Elosix front brake adaptor

Comes with an additional 4 recessed brake nuts of different lengths, to suit different frames.

 Centering adjustment bolt on top, for adjusting the pad clearance for one side.
Spring tension adjustment bolt in the middle, to increase or decrease the spring tension. 
 The roller cam mechanism as seen hidden between the 2 brake arms.

The main features of this new brake design is the improved symmetrical dual pivot design, which puts both the pivots at the sides. The closer the pivot to the brake shoe, the higher the leverage and that improves the braking power.

Also, the roller cam mechanism uses the motion of one brake arm to push the other brake arm, increasing the force and therefore also increasing the braking power.

Tight clearance between the brakes and the 20x1.35" Kojak tires. Even smaller clearance compared to the Tiagra caliper brakes. Note the locations of the dual pivots.

Tire clearance on the previous Tiagra brakes.Slightly more than the Ultegra 6800 brakes. Note that there is no independent pivot on the left side of the picture.

 Used the default Ultegra 6800 brake pad holder, but changed to the SwissStop brake pads. Could not get proper pad alignment with the gold coloured brake pad holders.
 
Just for comparison. Similar reach for the Tiagra and Ultegra brakes.

The Tiagra brake's cable adjust bolt is at a much higher position than the Ultegra cable adjust bolt. The centering alignment bolt is also located at different positions.

Installed and aligned properly on the front fork of the Dahon Boardwalk

Overall view of the new Ultegra 6800 front caliper brakes!

After a couple of test rides today (20+ km in total), the new front brake is performing flawlessly. Not only is the braking action light (due to lighter brake return spring and roller bearings in the brakes), the brakes feel super smooth too. There is noticeably less flex in the brake arms (compared to Tektro R559) when the brake lever is fully depressed. This gives a very solid and firm feeling when the brake pads contact the rim.

As for the braking power, it feels slightly better than the Tiagra caliper brakes, but without any measurable data, I cannot confirm it. However, it is a great improvement over the previous Tektro R559 brakes.

I am really satisfied with this front brake upgrade. Although I was not able to upgrade the rear brakes, it is better to upgrade one than none at all. After all, it is definitely advantageous to have one good brake and one average brake, rather than just 2 average brakes.

If you are thinking of buying new road caliper brakes, you may want to consider getting the newer Dura-Ace 9000 or Ultegra 6800 brakes for the improved performance.

Info: Ultegra 6800 brakes are available at Hup Leong for $205 a pair (dated 4 Sep 2013).

Tuesday, September 10, 2013

Elosix Rear Caliper Brake Adaptor (For kickstand mounting plate)

Just a quick introduction to this Elosix rear caliper brake adaptor. This adaptor is used to mount caliper brakes behind the seat tube on 20" folding bikes, using the kickstand mounting plate. By mounting the brakes at this hidden location, it does give the bike a cleaner look and is perhaps more aerodynamic than mounting it on top of the seat stays.

Elosix adaptor, comes with an M8 bolt, a washer, a spring washer and a square nut.

Mounted on a Dahon Mu Uno, with 1.75" tires on 20" wheels.

Using the double nut method of securing the bolt to prevent self-loosening.

Stock kickstand can still be mounted. A longer M8 bolt is required to thread through the kickstand and the Elosix adaptor.

Sufficient clearance with the left side crankarm

This mod is necessary for this Dahon Mu Uno, as the frame does not have any V brake mounts. Caliper brakes also cannot be mounted on the bridge between the seat stays as the seatstays are very tall and blocks the caliper brake arms. In the end this is the only viable method of mounting a rear brake on the Mu Uno frame.

Using this adaptor for 451 wheels might be possible, if slim tires are used. The frame may also affect the fitting of this adaptor. I have heard that this adaptor does not work on Tern bikes with 451 wheels due to interference. However, it may still work for Dahon bikes with 451 wheels.

The adaptor is made of aluminium, but it does look a little weak. It has been tested by riding and it works nicely, but I am not sure of the strength. Perhaps it would be a better idea to make the adaptor out of thicker aluminium or steel. After all, this adaptor is critical for braking and it must not crack or deform under load.

Monday, September 9, 2013

Journey of the Boardwalk: Part 32 - Mini Front Fender Modification

After removing my front fender to cater for the new front caliper brakes, I kind of miss having the front fender around. Although it is not as important as the rear fender, it is still good to have. I rode on wet roads without the front fender, and the entire bottom of the bike frame and the BB area ended up being dirty.

Perhaps I could still have part of the front fender, alongside the new front caliper brakes? It is actually quite a simple idea, and it only requires some basic hands-on skills. Here is how I did it.

I first removed the front plastic cap on the front fender. It came out with surprising ease, seems that it was just a snap fit with hardly any glue.

Sawed off the front part of the fender! I discovered that there is a thin layer of metal molded within the polycarbonate shell. So this is why the fender is so light yet strong.

Shape the remaining front end to have a curved shape, similar to the front fender cap.

Apply some super glue and fit on the fender front cap! Looks as good as new with no trace of modification. Now I have a mini front fender!

Oops the mounting bolt is too short to secure the fender. Instead of using a longer bolt, I removed the extra spacer/nut near the bolt head.

Now the mounting bolt is long enough for me to fix on the fender. Secured with a nylon locknut!

Mini front fender modification done! I now have the front fender back on the Boardwalk, to protect me and the bike against road spray. This mini fender can co-exist with the new Elosix front brake adaptor.

A simple modification to the front fender allowed it to be mounted on the Boardwalk again! The only tools required are a simple hand saw to cut the fender, a file to smoothen the rough edges, and some super glue to fix back the fender cap.