Monday, October 28, 2013

Avanti Inc 3: Special Crankset Setup

After I got my new Avanti Inc 3 a few weeks ago, I have been preparing it for proper service. It is not that easy to get it ready, as it is not a normal bike. This was not helped by the fact that the internal hub gears were not adjusted properly. All the adjustments and crankset installations described below are done over several days as it is very time and energy consuming.

When I was testing the new bike after delivery, I found that there were only 10 selectable gears, instead of the 11 gears in the Alfine 11. I found that the shifter inner cable was not connected properly at the internal hub end, which caused one gear to be lost. Normally the internal hub gear indexing is done at gear 6 for Alfine 11, by ensuring that the yellow lines are aligned. However, I found that the yellow lines actually match up at gear 5! This means that the initial setting wasn't done properly. Re-adjusting the inner cable took a bit of time, but it was eventually set up properly at gear 6.

Yellow lines match at gear 6! For Alfine 11, this means that the gear indexing has been done correctly.

There was also an intermittent creaking of the bike whenever I pushed hard on the pedals. This could be due to many reasons. It could be the pedals itself, the pedal threads, the chainring bolts, the crankarm attachment to the BB, the BB in the eccentric BB unit, the eccentric BB in the frame bottom bracket shell, and so on. It was only solved after much tweaking, which will be described in the next blog post.

One thing which I didn't like about the bike was the crankset. The FSA Vero crankset looks pretty decent, but it is actually quite flexible under load. I found that just by stepping on the pedal when the crankarm is at the 6 o'clock position, I could feel the crankarm bending inwards. This was not acceptable for me, so I decided to get a better crankset for the bike.

The best crankset to match the Alfine 11 internal hub is of course the Alfine crankset. It is a single chainring Hollowtech II crankset, using the Hollowtech II BB. This system will definitely be stiffer than the ISIS system used by the FSA Vero (at least it wasn't using square taper BB).

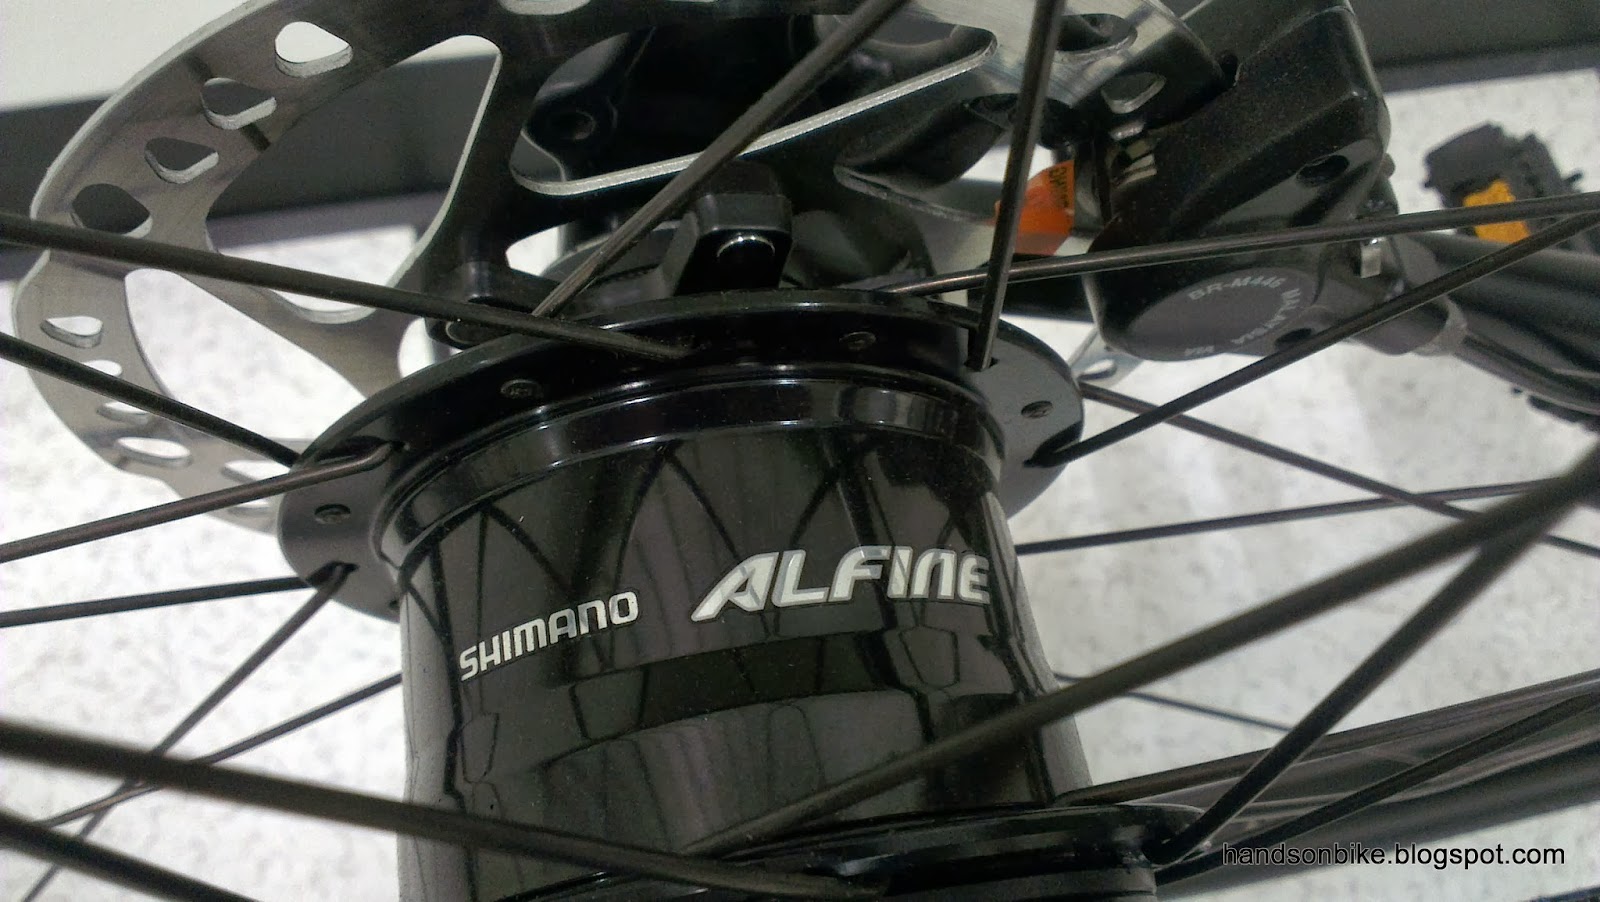
New Alfine crankset!

Black colour spec with 45T chainring. I will actually only require the crankarms as I am using the Gates belt drive front pulley.

Removing the existing crankarms and pedals are always a pain, and those who do their own bike maintenance will know how troublesome it is. The pedals came off rather easily, which was quite surprising. Next, the crankarms came off only with much effort, even though I used the proper crankarm extractor tool to pry the crankarms off the BB spindle.

After that, the ISIS BB itself needs to be removed from the eccentric BB. This required the BB tool plus a long leverage pipe to remove the BB. Again, it took quite a bit of effort to get it off.

Once the FSA Vero crankset has been removed, I removed the Gates front pulley from the FSA Vero crankset, and installed it on the Alfine crankset. This is again troublesome as it means removing 10 chainring bolts that are stubbornly stuck on both the crankarms.

Sorry that I don't have any pictures of all these, as my hands were pretty much covered in grease throughout these operations.

Next, the Hollowtech II BB (105 BB from previous crankset) was installed onto the bike. I had initially planned to extract the eccentric BB from the frame to take a look, but it was stuck really tightly. The pin spanner that I had got to turn the eccentric BB did not fit at all, thus it could not be used.

Pin spanner for adjustment of eccentric BB

The two pins are supposed to go into 2 holes on the eccentric BB, allowing you to rotate the eccentric BB in the frame. But it does not fit anywhere and cannot be used at all.

Finally, I could install the Alfine crankset! However, as soon as I put the crankset spindle through the BB, I realised that I had a big problem. The other end of the spindle that sticks out from the left side was too short! There was no way I could tighten the left crankarm onto the short length of spindle that was sticking out. I could not even screw in the left hand crank cap as it was too far out to engage the thread in the spindle.

After some investigation, I found that the BB shell width on the Avanti (eccentric BB) was 73mm! I had assumed that it was 68mm, since it came with a 5-arm crankset which is typical for a road crankset. Road cranksets normally use a standard 68mm bottom bracket width, which would have accepted the Alfine crankset without any problems. This meant that I was 5mm short in spindle length.

At this point, I was stuck. There was no way I could continue to use the Alfine crankset as the spindle is too short. No way to fit a crankset meant for a 68mm BB width onto a BB of 73mm width. I had two options: To reinstall the FSA Vero crankset, or to get a MTB crankset (with longer spindle). Using a MTB crankset would require getting a 4-arm Gates front pulley, which adds on to the cost. I decided to put everything on hold and think about it.

The graphics below show the approximate measurements for a few crankset and BB setups. It will help you to understand the differences and how I eventually managed to solve the issue.

1) Standard Road Double Crankset in Standard 68mm BB Shell Width


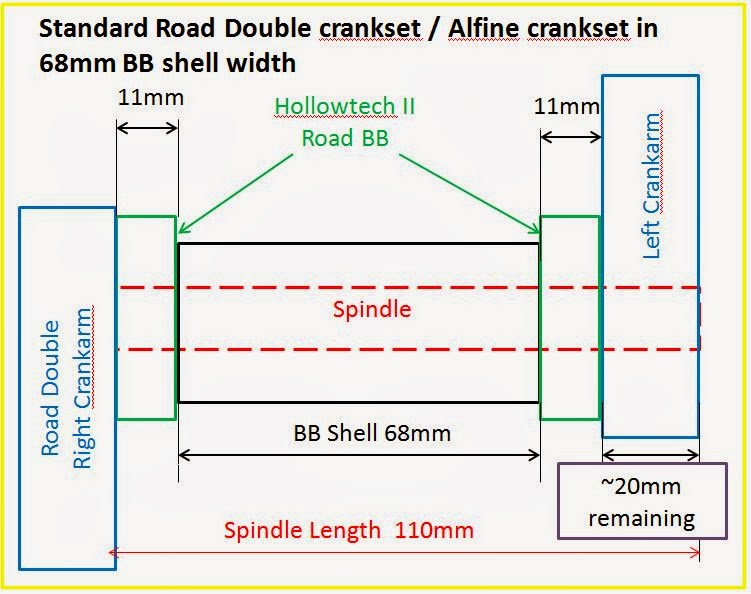
This is the ideal setup, with a standard BB shell width of 68mm for road, and the usage of a road double crankset. The spindle length of a road double crankset is about 110mm. This leaves about 20mm of protrusion at the left side for the fixing of the left side crankarm. This would have been the ideal case if the Alfine crankset was installed into a BB width of 68mm.

2) Alfine Crankset in 73mm BB Shell Width


This turned out to be the actual case for the Avanti Inc 3. I attempted to fit a 110mm spindle through a 73mm BB shell, which gave me only 15mm remaining at the left side. This was due to the BB shell which was 5mm wider (73mm vs 68mm).

Through some research, I found that the difference between a road Hollowtech II BB and a MTB Hollowtech II BB is actually the width of the BB cups. The MTB BB cups are actually about 1mm narrower on each side! I also knew that a road triple crankset has a longer spindle, to accomodate the larger chainline required for a triple chainring setup. I realised that by combining these two features, I could actually make it work!

2) Road Triple Crankset with MTB BB in 73mm BB Shell Width


This was the final solution which I thought of. I found a road triple crankset, and measured the spindle length to be 112.5mm, which is 2.5mm longer than the road double or Alfine crankset. I also used a MTB BB, which have BB cups of 10mm wide on each side, instead of the 11mm of a road BB. Together, I managed to get an extra 2.5+1+1 = 4.5mm of spindle length on the left side! This is almost the same as the required 20mm, which means that I did not have to reinstall the FSA crankset or to use a MTB crankset (which will greatly affect the chainline).

Difficult to see, but the road BB cup on the left is about 1mm wider than the MTB BB cup on the right.
 
Using the MTB BB, together with the road triple crankset, there is sufficient spindle length on the left side for proper fixing of the left crankarm.

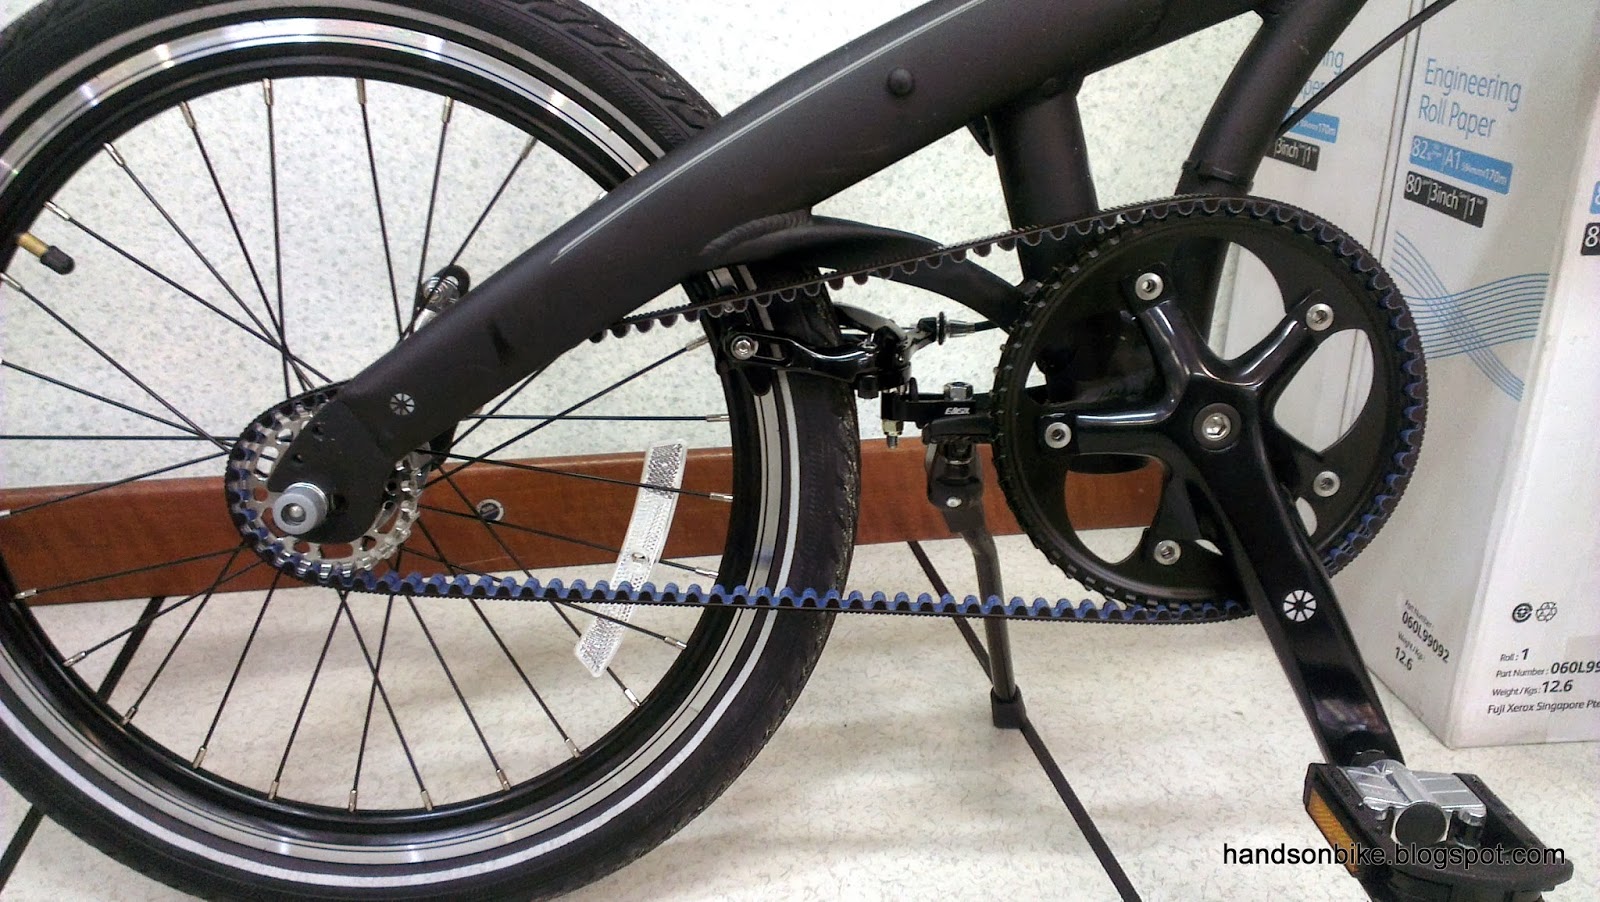
Final setup with a Sora triple crankarm, Gates front pulley and Shimano PD-A530 pedals.

For optimum chainline, the front pulley needs to be installed on the inside of the crankarms.

At this point, the crankarm has finally been installed successfully, but other problems have surfaced. Somehow the belt tension has decreased after I removed and installed the new crankset. Also, the creaking sound is still present. Seems that I have no choice but to try adjusting the eccentric BB, both to increase the belt tension and to also eliminate the creaking sound. This will be continued in the next blog post!

Extra Info: Standard MTB Triple Crankset with MTB BB in a Standard MTB 73mm BB Shell Width


A MTB crankset spindle is much longer than a road crankset, to allow it to pass through the wider BB shell, and also to have a more secure attachment to the left crankarm (24mm, more than 20mm for road).

Note that all these length and width measurements are approximate measurements and calculations, and are not official design dimensions. They may vary from my calculations.

Saturday, October 19, 2013

Avanti Inc 3: Alfine 11 Internal Hub + Gates Carbon Belt Drive

After thinking about the features that should be found in an ideal commuting bike, I set out to find one for myself! It is not easy to find a bike that has all the features listed.

Features that I look for in a good commuting bike:
1) Aluminium bike frame to prevent rusting.
2) Hydraulic disc brakes to avoid dirty brake pads and rims. Works well in the wet too.
3) Internal hub gear to avoid cleaning the RD and cassette. Single speed is not for me, as I like to pedal at a comfortable and optimum cadence, which cannot be achieved if there is undulating terrain.
4) Belt drive system, to avoid chain cleaning, chain lubrication and rusty chains.
5) Frame mounts for fenders and rear rack.

There are many bikes out there that can fulfill most of the criteria, except for the one about the belt drive. It is rare to see a belt drive bike in Singapore. Nevertheless, I asked around to see if anyone has any idea where to find a bike with these features in Singapore.

With the info gathered, I narrowed down my choices to 3:
Scott Sub 10
Focus Planet TR 1.0
Avanti Inc 2 or 3

These 3 bikes has all the required features, the problem now is whether they are available locally? I heard that the Focus Planet TR 1.0 is currently not in stock and that means one option down. The Scott Sub 10 can be found at Kian Hong Cycle at Vertex, and I went there to check out the bike.

I was pleasantly surprised to find that they had a new model in store! The 2013 Scott Sub 10 with Alfine 8 and a Gates belt drive system. The price was SGD 1599, which was a reasonable price. The new colour was outstanding too. However, I was unable to test out the bike as the road was wet after rain.

Orange coloured 2013 Scott Sub 10 in KH Cycles

Keeping the Scott Sub 10 in mind, I went to check out the next bike: The Avanti Inc 2 or 3 (unsure at this point) was available at BikePlus, Midview City.

When I reached BikePlus, I immediately asked about the Avanti Inc and found that the only one left in store is the Avanti Inc 3. As such, it was available for a good deal at SGD 1799 (Original 2399). This bike is equipped with Alfine 11 and the latest Gates CDX CenterTrack belt drive system. It also comes with Shimano hydraulic disc brakes and hubs.

After riding two rounds around the car park, I decided to get the bike! Yusri from BikePlus was also very kind to send the bike to my place at no additional cost.

With that, let me introduce the latest addition to my bike stable, the Avanti Inc 3! Refer to the link for the full specifications.

This bike ticks all the boxes in my feature list for an ideal commuter bike:
1) Aluminium frame - Yes
2) Hydraulic disc brakes - Yes. Shimano BL-M445 and BR-M446.
3) Internal hub gear - Yes. Shimano Alfine 11
4) Belt drive system - Yes! Gates CDX CenterTrack belt drive system
5) Fender and rear rack mounting - Yes

Bike is full matte black for stealth commuting! Hides dirt well too.

Comes with Alfine 11 shifters (Two-way release, Multi-release) which have a similar top normal design as MTB Rapidfire shifters. Mid-range Shimano hydraulic brake levers BL-M445.

Shimano Alfine 11 internal gear hub!

Yup it is 11 speeds. More than enough for commuting.

Yet another view of the Alfine 11 internal gear hub. Note the oil port for easy oil replacement.

Gates CDX CenterTrack Carbon Belt Drive system! Shown here is the front pulley of 50 teeth.

Rear pulley of 24 teeth. The yellow markings should be aligned at Gear 6.

Also note the split in the rear triangle, at the seatstay area.

2 bolts at the bottom of the seatstay split allows the joint to be opened or closed for belt installation.
Small sized frame. According to the Avanti website I am in-between Small and Medium for this frame. The 57 cm refers to the horizontal top tube length (distance from stem to seatpost).

Subtle graphics on the bike

Even the brand logo is placed subtly near the bottom of the downtube, instead of being splashed across the frame. Love the stealthy look!

Eccentric bottom bracket for chain tensioning. Have not figured out how to adjust this eccentric BB yet.

OK quality FSA Vero crankset. But I find that the crankarms flex too easily, and I will change them out soon. Same for the cheap plastic pedals.

Shimano hydraulic brake calipers BR-M446, with Shimano hub, QR and Centrelock rotors.

View of the rear brake caliper. Neatly hidden inside the rear triangle, which means that normal rear racks can be used, instead of needing disc brake specific rear racks.

Mounting on the front fork for fenders. Good clearance to fit in the fenders.

Clearance between rear tire and the rear seatstay bridge. Also note the mounting point for the rear rack.

Continental SportContact tires. 700x37C (37-622) tire size.

Rim dimensions. Recommended tire width is between 28 to 38mm.

With a belt drive system, I no longer have to clean and lubricate the chain regularly, even after wet rides! The belt performs best when washed clean, so it actually cleans itself automatically when you ride through a puddle. What is really nice is that this is the newest CDX belt system, instead of the older and more problem-prone CDC. No more rusty chains!

The internal gear hub is also quite impervious to wet conditions, as long as I don't submerge the whole bike in water. The only maintenance I need is probably to adjust the shifter cable tension occasionally, or to replace it if it rusts. Might need to replace the oil in the internal hub after 1000km. No more rusty/dirty RD, FD or cassette!

I also like the hydraulic brake system, which retains its braking performance even in wet weather. No more cleaning of brake pads and rims!

Of course, this internal gear hub + belt drive is not all advantages and no disadvantages. The major disadvantage (and probably the only significant one) is the additional weight over a standard mechanical drivetrain.

Comparing the weight of an Alfine 11 speed setup with a Ultegra 2x10 setup:

Alfine 11 + Belt Drive
Alfine 11 speed internal hub gear - 1665g
118T CDX belt - 92g
Front pulley 50T - 97g
Rear pulley 24T - 76g
Alfine 11 speed shifter - 130g
Alfine Crankset (no chainring) + BB - About 600g
Total: 2660g

Ultegra 2x10 (Flat Handlebar setup)
Rear hub - 354g
Chain - 267g
Cassette - 230g
Rear Derailleur - 190g
Front Derailleur - 90g
SL-R780 Shifter (left + right) - 260g
Crankset (double chainrings) + BB = 790g
Total: 2181g

The actual weight will differ based on your actual setup, but this is the estimated weight of these 2 different setups. In summary, the internal hub gear system will be heavier than an equivalent 2x10 speed system by about 500 grams.

Why do I say equivalent? This is because I am comparing these two setups based on equivalent gear range. You may be surprised, but the Alfine 11 gear range is actually comparable to a 2x10 drivetrain on a road bike. Although there are 20 speeds in a 2x10 speed system, there are actually many overlapping gears, which reduces the actual number of unique gears available. On the other hand, the Alfine 11 has 11 different gear ratios that don't overlap.

Let's take a look at the gearing comparison between an Alfine 11 and a 2x10 system:

Gearing comparison between Alfine 11 and compact 2x10 road system.

For the Alfine 11 system, I used the gear ratios as found on my Avanti Inc 3. As for the 2x10 road bike, I used a compact crankset (50/34T) as it is more realistic. A top gear of 53/11T on a standard crankset is normally only used by the professional cyclists while going downhill. As such, I used a compact crank of 50/34 and a cassette of 11-28T for comparison.

Notice that the gear range for these two systems are actually very similar. The Alfine 11 is pretty impressive as it can match the lowest and highest gears of a compact 2x10 road bike drivetrain!

As for the gears in the middle, just match the colours to find the matching gears between the two systems. You can see that the Alfine 11 gearing pretty much covers the gearing provided by the 10 speed cassette, save for a couple of bigger jumps at the higher end of the gear range.

I am now waiting for the add-on accessories (fenders, rear rack, lights, etc) to go on the bike, before it is put into proper service. Will report on the ride quality and other riding feedback in the next few blog posts!

Features To Look For In An Ideal Commuting Bike

What defines a good commuting bike? To me, a good commuting bike is a bike that can move you reliably from Point A to Point B without fuss. It should allow you to carry a load on the bike without weighing down your back. It also needs to be relatively impervious to wet weather, so that you can ride it safely and comfortably even in light rain. Lastly, it needs to be low maintenance, so that you can ride the bike every other day without needing to commit too much time to bike cleaning or maintenance.

So how can this objectives be achieved? To get you from point to point reliably, it needs to have reliable components that works every time. In other words, this means that the components need to be of decent quality, so that they don't get stuck or malfunction with regular usage.

Unlike a sport cyclist, a bike commuter is usually headed to or from work/school, and there is usually a need to carry some stuff along. Be it a change of clothes or work documents, a laptop or a pair of shoes, it is best to have a carrier on the bike to carry all these things for you. You should not lug it on your back as it can be really uncomfortable in hot weather.

When commuting by bike to work regularly, it is common to encounter wet weather, especially in Singapore. Of course, if there is a huge downpour or thunderstorm, it is best to skip riding for that day as it can be dangerous to ride in heavy rain with low visibility. No need to be so hardcore! However, a good commuting bike should be able to deal with wet roads or light rain without any issues. This means having waterproofed carriers and full fenders to deal with the wet conditions. The bike components should also be made of material that does not rust easily.

Rear rack for carrying stuff, fenders to protect you in wet weather

Most importantly, the bike should function well with very little maintenance. In dry weather, minimal maintenance such as chain lubrication is usually sufficient. However, wet weather riding will require a lot more maintenance for the bike to run nice and smooth. Drivetrains will need to be cleaned, chains will need to be cleaned and lubricated to prevent rusting. Brake pads and rims will need to be cleaned to prevent squealing and poor braking performance. Derailleurs will need to be cleaned to prevent rusting or pivots from seizing. Folding joints (if any) will need to be dried and lubricated to prevent seizing, steel frames will need to be dried to prevent rusting too. A well designed commuting bike will try to eliminate as many of these issues as possible.

I have been using the Dahon Boardwalk for commuting, but I am usually unable to ride it more than a couple of days a week due to frequent wet weather. In dry weather the Boardwalk is great, but after riding on wet roads or light rain, quite a substantial amount of maintenance is required.

Folding joints will need to be opened up and dried; seatpost will need to be removed and dried; chain needs to be dried and re-lubed; drivetrain parts such as RD, cassette and chainrings will need to be wiped clean. Rims and brake pads will need to be cleaned as the brake pads leave a lot of residue when used in the rain. Chromoly steel frame will need to be dried to prevent rust. All these is a lot of work, and the trouble cleaning up after every wet ride outweighs the benefits of commuting with this bike.

Because of these issues, I have been looking for a proper commuting bike that is rain resistant and low maintenance. This will allow me to continue bike commuting even when there is light rain.

Features that I look for in a good commuting bike:
1) Aluminium bike frame to prevent rusting.
2) Hydraulic disc brakes to avoid dirty brake pads and rims. Works well in the wet too.
3) Internal hub gear to avoid cleaning the RD and cassette. Single speed is not for me, as I like to pedal at a comfortable and optimum cadence, which cannot be achieved if there is undulating terrain.
4) Belt drive system, to avoid chain cleaning, chain lubrication and rusty chains.
5) Frame mounts for fenders and rear rack.

Most of the criteria above can be satisfied easily, except for the belt drive system. Conventional bike frames cannot use a belt drive, as the rear triangle needs to have a split in it to install the one-piece looped belt. The other way to install a belt is to have a bike frame that does not have a chainstay, such as a Dahon Mu Uno. Here is a very informative website about belt drive systems.

I have successfully converted a stock chain drive Mu Uno into a belt drive system, and through that process I have learnt more about belt drive systems. Besides having a split triangle / no chainstay, the frame also needs to have a way of tensioning the belt. Common ways to tension the belt or chain is to use a horizontal dropout, a sliding rear dropout or an eccentric BB.

Belt drive Dahon Mu Uno!

Horizontal dropout enables belt tensioning

Front chainring goes on using a standard 5-arm 130mm BCD mounting

 Barely sufficient clearance for the belt! A Gates CDX Carbon Belt is about 5mm wider than a 9 speed chain.

It is actually quite challenging to look for such an ideal commuting bike, especially in Singapore where internal hub gear bikes are uncommon, much less belt drive bikes. Through the help of many friends, I have finally managed to find the ideal bike that satisfies all the conditions!

An introduction to my ideal commuting bike has been made in the next post!

Avanti Inc 3: Alfine 11 Internal Hub + Gates Carbon Belt Drive

Thursday, October 17, 2013

Finish Line No Drip Chain Luber

Part of the regular maintenance required for a bicycle is chain lubrication. With proper and regular chain lubrication, the chain will be able to operate smoothly and quietly. Noisy chains will squeak and have stiff links, which can lead to poor shifting performance.

Besides lubricating the chain links and rollers, chain lube also protects the chain from rust. In humid weather, rust spots can appear on an unlubed chain within half a day. Cycling in rain or on wet roads will also wash away chain lube easily. Therefore, it is important to perform chain maintenance after every wet ride, or every month, whichever comes first.

If you want to have a completely clean chain, you will need to remove the chain entirely from the bike, and use degreaser to clean it. All other parts of the bike that touches the chain should also be cleaned at the same time, or the chain will get dirty again very quickly. These other parts are the rear cassette, front chainrings and rear derailleur pulleys.

For myself, I am quite lazy to use degreaser to clean everything. Therefore I just use a rag to clean all of these parts, and just wipe the dirt off. There is probably still about 20% of dirt on it, but for regular basic maintenance this is quite sufficient for me.

After installing the chain back onto the bike, it is time to lubricate the chains! The best way to lube the chain is to actually drip a drop of chain lubricant onto each roller as you move the chain. Turn the cranks slowly to let the lube seep into all the gaps in the chain, and wipe away the excess.

I had the chance to try this new device by Finish Line, which is a new way of lubricating the chain. Instead of putting a drop of chain lube individually on each chain roller, it uses a sponge to wet each roller as it passes the device. Let's take a look at how it works!

No Drop Chain Luber, for quick and easy chain lubrication with no mess.

Best thing is that you can fill it with the lube of your choice!

The sponge pad for applying chain lube onto the chain links.

How it works: Pedal and move the chain, and squeeze the bottle to dispense the lubricant onto the sponge pad as the chain travels across the sponge pad.

My favourite chain lubricant is the Prolink Chain Lube, which is smooth and non messy. It does not have Teflon (PTFE) particles which will turn black after usage.

Filled the bottle with a little of the Prolink Chain Lube

Using this device is really simple! Pedal to move the chain, and press the sponge pad against the chain. Squeeze the bottle gently to dispense the chain lube onto the chain. Do the same for the other side of the chain for even lubrication.


I found that using this chain luber is really simple. Just press the sponge against the chain, squeeze the bottle and pedal! It is possible to lubricate the chain really quickly as there is no need to lubricate each link individually.

The excess lube also does not drip as it is spread evenly across the chain by the sponge pad. There is still a need to wipe away the excess lube with a rag, but that is easily done.

Overall I am quite happy with this chain lubricating device! It is really easy to apply a fresh round of chain lubricant. However, if the chain is dirty, it is best to clean the chain first, or the sponge pad will get dirty very easily.

I don't see this device in the shops yet, this is actually a sample from the recent Eurobike show. If it is so useful, it should be available in the shops soon!

Tuesday, October 15, 2013

Journey of the Boardwalk: Part 34 - Custom Chris King/Novatec/LitePro Wheelset

After assembling all the parts for the new wheels, the wheelbuilding can now begin! I had already received the Chris King R45 11 speed rear hub, the Novatec 74mm front hub and also the 20" LitePro rims. However, I am unable to build the wheel myself due to a lack of skill. Thus I brought the parts to the bike shop for the professionals to build the wheel.

I went to Gee Hin Chan as they are very experienced in wheelbuilding. The uncle there has been building wheels for many many years and is vastly experienced. Also, they have their own spoke cutting and threading machine, so they can cut the spokes to the correct length even if they don't have the required length in stock.

The wheelbuilding was surprisingly fast, as I sent in the wheels on Friday at noon, and the wheels were already ready the next day at 2pm! I was probably very lucky that the shop was not too busy during that period. I heard that the uncle built one of the wheels on Friday, and completed the other on Saturday.

This will be a long blog post, as I will be comparing it to the current Wheelsport wheelset. Along the way, I also discovered some interesting aspects about the Wheelsport wheelset. My final verdict on the quality of the Wheelsport wheelset will be given at the end of this post!

First look at the custom Chris King R45 + Novatec + LitePro wheelset!

Custom wheelset with black spokes
 
Wheelsport wheelset. I must admit that the Wheelsport wheels look better with the spoke pattern and the decals!

 The front wheel with the Novatec front hub and 20 hole LitePro rim

Close up view of the Novatec front hub 

Chris King R45 rear hub with 24 hole LitePro rim

Close up view of the Chris King R45 rear hub

View of the rear wheel. The dishing of the rear wheel can be seen clearly here!

Before installing the cassette and tires onto the new wheel, I have to first remove the current Wheelsport wheels from the frame. While doing that, I also did some maintenance for the Dahon Boardwalk.

Wheels and crankset off! Took the chance to clean the frame, crankset, chain and cassette.

Rarely seen part of the bike; inside of the rear drop out.

Replaced the Aerozine Ceramic BB! Found an exact replacement at Scootz at a fair price. Old BB on the left, with faded gold colour.

Old BB on the left, new BB on the right. Old BB actually feels smoother than the new BB, probably due to less grease inside, and also because it has been run in nicely. Will probably transfer it onto another bike, while the Dahon Boardwalk gets the new BB!

New gold coloured BB installed! Good to go again...

Sorry for the sidetrack, let us now go back to the wheelset. This time, I weighed all the wheels again, with the same weighing scale for an accurate weight comparison.

New Novatec front wheel without rim tape, 476 grams.

New Chris King R45 rear wheel, without rim tape. 639 grams. This gives a total wheelset weight of  1115 grams.

Since the Wheelsport wheels already have rim tape on it, I decided to first put on rim tape on the new wheelset for a fair weight comparison. I use cloth rim tape to prevent punctures caused by the tube squeezing through the holes in the rim.

Zefal cloth rim tape. Much better quality than the common plastic/rubber type.

Fresh double layer of rim tape on the new wheelset!
 
Novatec front wheel with double layer of cloth rim tape. 494 grams.

Chris King R45 rear wheel with double layer of cloth rim tape. 658 grams.
This gives a total wheelset weight (inclusive of rim tape) of 1152 grams.

Wheelsport front wheel with double layer of cloth rim tape. At 452 grams, it is acually quite a bit lighter than the Novatec front wheel!

Wheelsport rear wheel with double layer of cloth rim tape. At 692 grams, it is heavier than the Chris King R45 rear wheel.

In summary, the wheel weights (inclusive of rim tape):

Novatec front wheel with LitePro rim: 494 grams
Chris King rear wheel with LitePro rim: 658 grams
Total weight of new custom wheelset: 1152 grams

Wheelsport front wheel: 452 grams
Wheelsport rear wheel: 692 grams
Total weight of Wheelsport wheelset: 1144 grams

It is found that the Wheelsport wheels are actually lighter than the new custom wheelset! This is despite the taller rim of the Wheelsport wheels and the heavier rear hub. The heavier weight of the Wheelsport rear hub is offset by the lighter Wheelsport front hub.

While comparing the wheels, I also noticed some other differences and similarities between these wheels.

1) Appearance
Let the pictures do the talking!

Front wheel comparison

Rear wheel comparison


Rim profile comparison. LitePro rim (25mm) on the left, Wheelsport rim (30mm) on the right.

2) Type of spokes used
The Wheelsport wheelset uses double butted spokes, that have a diameter of 2.0mm at the ends and 1.8mm in the middle. This gives strength at the ends where it is needed without extra weight in the middle.
The spokes used in the new custom wheelset is of straight gauge 2.0mm throughout, which means greater strength but of course slightly heavier weight.

3) Material of freehub body
In the previous post on the Chris King R45 rear hub, I indicated that I was not too impressed by the use of an aluminium freehub body, as it may be more prone to damage by the steel sprockets. However, I noticed that the Wheelsport rear hub actually also has an aluminium freehub body! And there isn't too much damage on it after 2 years, so I guess an aluminium freehub body is fine for my usage.

Very slight notching on the aluminium freehub body of the Wheelsport wheelset. Nothing serious though.

4) Type of sealed bearings for the front hub
While taking apart the front hubs, I noticed that the size of the sealed bearings used are different. After checking out the type of bearings used and measuring the size, I Googled for the bearing info. I wanted to compare the load ratings for these different sized bearings. For more info on bearing loads, check out this link.

Wheelsport Front Hub:

R4-2RS Sealed Bearing by NBK

Outer diameter of about 15.85mm

This bearing has a Dynamic Load Rating (Cr) of 333, and a Static Load Rating (Cor) of 131.

Novatec A551SB Front Hub:

669LB Sealed Bearing by TPI

Outer bearing diameter is larger, at about 19.95mm.

The Novatec front hub uses sealed bearings that have a Dynamic Load Rating of 550, and Static Load Rating of 236.

I am not an expert on bearings, but it should be safe to say that based on the load ratings of the bearings, the Novatec hub uses bearings that have a much higher load capacity than the Wheelsport front hub. This means that if subject to the same bumpy roads, the Novatec front hub should fare better over a period of time. Please correct me if I am wrong.

My final verdict on the Wheelsport wheels:
If you have a pair of Wheelsport wheels, hold on to it! It is a really good pair of wheels that roll really well, it is lightweight, and best of all, it looks good! Just ensure proper freehub maintenance and it should last you for many many miles. You will be hard-pressed to find a better set of 20" wheels at such a price.

Finally, after comparing these wheelsets, I can finally fix on the cassette and tires, and install the wheels onto the bike!

Use both the 1.85mm and 1mm spacer, when installing a Shimano 10 speed road cassette onto an 11 speed freehub.

Both spacers resting at the back of the cassette.

New rear wheel!

Clean wheels, cassette and chain. New Kojak tire for the rear wheel too.

New front wheel

More reflective spoke clips!

Seems to be better than the 3M spoke clips I got a while ago

Reflective spokes!

Reflective front wheel

Reflective rear wheel

Spinning rear wheel with reflective spoke clips!

Sorry for the ultra-long blog post, but there are just so many things and info to share! Hope it has been useful and informative to those who are planning to get Wheelsport wheels or are already using Wheelsport wheels.

I am pretty happy with the Chris King hub so far, it gets louder the more I ride! But I will only be able to review the hub properly after more riding.

Final picture with new wheels!

Update: 28 March 2015
After almost 1.5 years on the Chris King custom wheelset, here are my feelings on this wheelset.

1) Rims are still true, this is a result of solid wheel building by the experienced wheel builder at the former Gee Hin Chan bike shop.
2) Rolling resistance is noticeably more than the Wheelsport wheelset. This refers to freewheeling when spinning the wheels in the workstand. The Chris King hub does not rotate as long as the Wheelsport hubs.
3) Buzzing sound from the Chris King hub gets louder the more I use it.
4) I have had to tighten the bearing pre-load on the Chris King hub about 3 times, as I noticed some slight wobbling of the rear wheel on the axle.
5) No other problems detected during this period, which is good.

Overall, the Chris King R45 rear hub is a solid rear hub, but it is not the smoothest hub available. There are many hubs out there which can out-roll the Chris King, and are also cheaper. Being a custom rear wheel, it also means that it is very difficult to actually sell off the wheelset if I want to.