Thursday, April 17, 2014

How to Build an Affordable, High Performance, Lightweight Folding Bike: Part 4

This is the fourth and last part of this upgrading guide! As mentioned in Part 1 of this guide, the aim of this project is to build an Affordable, High Performance, Lightweight folding bike.

Target: < SGD 2000, 20 speeds, < 9.3 kg without pedals
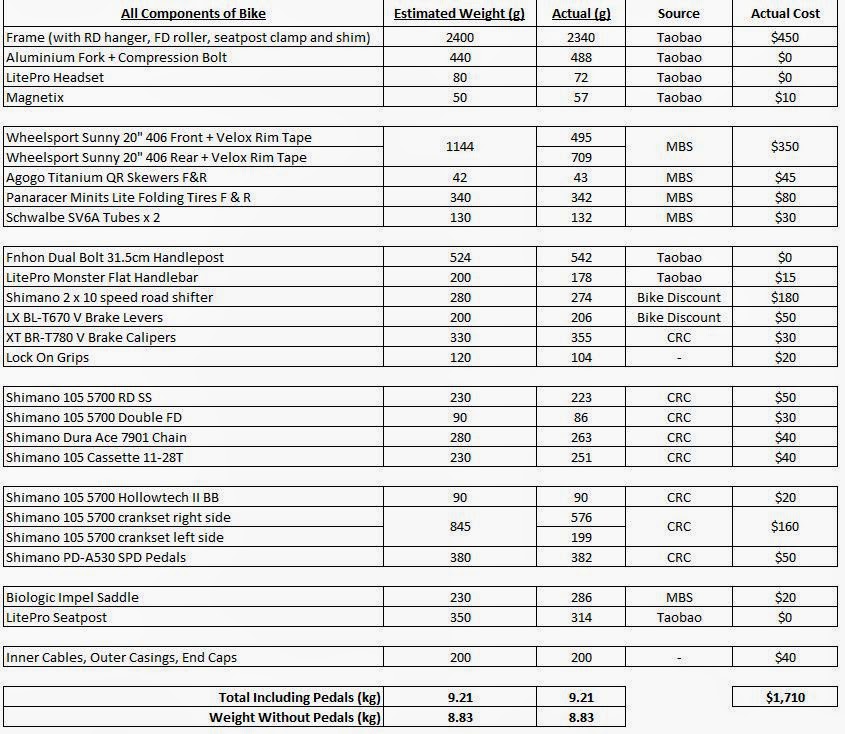
Final Result: SGD 1700, 20 speeds, 8.8 kg without pedals

The target has been achieved and with a considerable margin too. Overall I would say that this project is quite successful as it has been proven that it is possible to custom assemble a bike that is better, cheaper and lighter than a stock bike.

Before reading this fourth part of the guide, I would suggest reading the first 3 parts to get the whole story.

Part 1, Part 2 and Part 3 here!

As stated in the previous part of the guide, there are some changes which I would like to make to improve the ride quality and/or appearance of the bike. But before that, I will highlight some of the challenges that I faced when building this bike from scratch.

Problems encountered during bike installation:

1) When the RD hanger is installed onto the frame, the RD hanger is unable to rest flat against the frame. This slant angle means that when the RD is installed, the RD pulleys are not parallel to the cassette.

When the frame was delivered, the RD hanger was not installed, so it is not due to damage during transportation. From what I see, the problem is that the surface on the rear dropout area is not flat, which causes the RD hanger to tilt to one side when the hanger fixing bolt is tightened.

To remedy this, I had to bend the aluminium dropout to make the RD pulleys parallel to the cassette. This is quite tricky as over-bending the dropout will crack or break it.
 
RD hanger was not aligned parallel to the frame and cassette

2) FD not securely fixed to FD hanger
On the rear of the FD hanger, there is a curvature for the braze-on FD to mount onto it. However, this curvature is quite small, which means that the FD cannot be fitted nicely to the FD hanger. Under high loads, the FD can still twist to the side. To minimize this possibility, I had to tighten the bolt on the FD such that the FD is fixed really tightly to the FD hanger.

Curvature at the rear of the FD hanger and the curvature on the bracket of the FD does not match

3) Chain rubbing FD chainguide in rear lowest 3 gears
Despite adding a spacer under the right side BB to push out the crankset and the chainline, the chain will still rub on the inner wall of the chainguide when the chain is in the front-low and rear gear 1,2,3 positions. I believe this is due to the FD hanger which is welded on slightly too far out from the seat tube. Even when the low limit screw on the FD is fully loosened, the FD does not go in far enough to prevent chain touching.

Although there is some noise, there is no serious issue as the touching is quite gentle and not very rough.

4) Low clamping force on seat post by seat tube and shim
I found that to have sufficient clamping force on the seatpost, I had to turn the nut on the seat post clamp really tight, before closing the lever. If not, the QR lever will not be tight enough to clamp the seatpost securely.

I think that the seat tube inner diameter might be a little oversized, as the seatpost shim is also a little loose inside. This means that the seatpost clamp needs to flex more of the seat tube before applying clamping force onto the seatpost. Not a major issue, but just some things to take note.

Additional Changes
Now, for the additional changes that I made to the bike. Some of the changes added weight, but that is not important now as the project target has already been achieved.

To match with the red LitePro headset, I decided to get a red seatpost clamp to see if it fits with the colour scheme. There are many seatpost clamps available, but the original Dahon seatpost clamp still works the best. I found some coloured ones on Taobao, which were most likely anodised from the original silver colour.

Original Dahon seatpost clamp in red colour

Red seatpost clamp mounted on the bike

A closeup look of the seatpost clamp with the seatpost and frame

I didn't really like the red seatpost clamp, as it does not fit in with the seatpost and frame. Also, the red colour is a different shade from that of the LitePro headset. Therefore I decided to change the clamp back to the original black coloured clamp.

The next change that I did was to change out the tires. The previous Panaracer Minits Lite are light and fast rolling, but I don't feel comfortable using them. When riding, there is a "floating" feeling which I don't like. Perhaps this is how it feels riding on really slim tires? I decided to change to the familiar Schwalbe Kojak tires which I have been using on my Dahon Boardwalk for a long time.

Schwalbe Kojak 35-406 tires, folding bead

After changing the tires to Kojaks, the ride feels more comfortable and familiar. There is less of the "floating" feel when riding the bike. Maybe I am not used to riding such a lightweight bike!

Another bling item which I tried out was this red reflector strips that clip onto the spokes on the wheels. Once again, I tried red colour to see if the colour matches the accent on the bike.

Red coloured reflective spoke clips

Kojak tires with red reflective spoke clips on the rear wheel

Front wheel with Kojak tires and red reflective spoke clips

Again, the red coloured spoke clips didn't match with the bike image. The red is too bright and glaring, which I didn't like. Therefore I removed all the reflective spoke clips.

The next item which I put on were some red valve caps. Nothing special here, just a little dash of red to complement the bike.

Red Presta valve caps

Red valve caps installed

These valve caps will remain on the bike as it can fit in with the overall image. Besides red valve caps, I also got some red inner caps for the ends of the brake and shifter cables. These inner caps look quite nice, without being overwhelming.

Red inner cap on the end of the rear derailleur shifter cable

Red inner cap on the end of the brake cable

The last addition to the bike would be some 3M protective stickers. This is really important and useful to prevent scratches to your bike frame. They work really well, as they stick on really securely and don't peel off easily.

3M frame protective stickers from Taobao. Same as the original stickers found on Dahon / Tern frames.

Stick one on the frame here, so that the inner cap of the FD shifter cable does not scratch the frame during shifting.

Stick one here to prevent the handlepost from touching the main tube of the frame when the handlepost is folded down


Stick one here to prevent the brake and shifter outer casings from rubbing against the frame

And that is all for the additions! Overall, the changes I made were to add red valve caps, red cable inner caps, additional frame stickers and changed the tires to Schwalbe Kojaks.

The 406 sized, folding bead Kojaks weighs 230 grams each, which is 60 grams heavier than the Panaracer Minits Lite. A slight weight increase of 120 grams overall.

Lastly, some more pictures of the new bike!

Folding is very easy compared to the Dahon Boardwalk, as the handlebar/handlepost can be kept easily between the wheels.

Compact sized folding, just like the other Dahon / Tern folding bikes

Cable routing is fine even when folded. There is sufficient slack in the cables for folding / unfolding the bike

Final specification of the Dahon MuEX, after changing out some parts, such as the tires.

Overall picture of the completed bike! It is now fully ready to be used!

Saturday, April 5, 2014

How to Build an Affordable, High Performance, Lightweight Folding Bike: Part 3

Here is the third part of the guide! How to build an Affordable, High Performance and Lightweight folding bike. In the first and second part of this guide, most of the components except the drivetrain components have been shown. This third part of the guide will show the drivetrain components and also the completed bike.

Target is to build a 20 speed bike with a weight of <9.3 kg (without pedals) and total cost of < SGD 2000.

Crankset
Model: Shimano 105 5700, 10 speed, 53/39T, 170mm, Black.
Estimated Weight: 845 grams
Actual Weight: 775 grams
Source: ChainReactionCycles (CRC)
Price: $160
Alternatives: Shimano Ultegra 6700 ($220, 80 grams less), Tiagra 4600 ($90)

The Shimano 105 crankset is the most value for money crankset you can get. It has many of the top end features such as hollow forged crankarms, effective shifting profiles on the chainring and also good surface finishing. All this at a very affordable price! In this case, the all black colour scheme suits the bike perfectly.

Upgrading to an Ultegra 6700 crankset is actually a good idea if you can afford it. The Ultegra crankset will have Hollowglide chainrings for even better shifting performance, and weighs about 80 grams less. Looks quite good too. However the colour scheme does not fit the black MuEX frame, which is why I decided to go with the black coloured 105 groupset for this bike. This will keep the cost down too.

Shimano 105 5700 53/39T crankset in black

Bottom Bracket (BB)
Model: Shimano 105 5700, 68mm English Thread
Estimated Weight: 90 grams
Actual Weight: 90 grams
Source: ChainReactionCycles (CRC)
Price: $20
Alternatives: Any other Shimano Hollowtech II Road BB, or compatible BB of other brands

Most of the BB of different grades perform quite similarly. Perhaps the higher end ones have better sealing and better surface finishing, but the difference is quite small. The 105 5700 BB is cheap and good, will just use this for now until I find something better.

Shimano 105 5700 road BB

Rear Derailleur (RD)
Model: Shimano 105 5700, 10 speed, Short Cage, Black
Estimated Weight: 230 grams
Actual Weight: 223 grams
Source: ChainReactionCycles (CRC)
Price: $50
Alternatives: Shimano 10 speed road RD, such as Ultegra 6700 ($80, 190 grams), Tiagra 4600
I chose the 105 RD mainly for the black colour. The Ultegra RD will be about 40 grams lighter in weight, but the performance should be quite similar.

Shimano 105 5700 Short Cage RD

Front Derailleur (FD)
Model: Shimano 105 5700, Double, Braze-On, Black
Estimated Weight: 90 grams
Actual Weight: 86 grams
Source: ChainReactionCycles (CRC)
Price: $30
Alternatives: Shimano 10 speed double road FD, such as Ultegra 6700 ($40), Tiagra 4600
Once again, I chose the 105 FD because of the black colour. The higher end Ultegra FD seems to be very similar to the 105 FD, not sure what is the difference.

Shimano 105 5700 double FD

Cassette
Model: Shimano 105 5700, 10 speed, 11-28T
Estimated Weight: 230 grams
Actual Weight: 251 grams
Source: ChainReactionCycles (CRC)
Price: $40
Alternatives: Shimano 10 speed road cassette, such as Ultegra 6700 ($60, 240 grams), Tiagra 4600
This 105 cassette is a pretty standard 11-28T. For me, this level of cassette is good enough. Upgrading to Ultegra or Dura-Ace would save some grams, but at a higher cost. Shifting performance and durability would be quite similar.

Shimano 105 5700 10 speed cassette, 11-28T

Chain
Model: Shimano Dura-Ace 7901, 10 speed
Estimated Weight: 280 grams
Actual Weight: 263 grams (before cutting to length)
Source: ChainReactionCycles (CRC)
Price: $40
Alternatives: Shimano 10 speed road chain, such as Ultegra 6700, 105 5700, Tiagra 4600
This is where I went for the best, choosing the top end Dura-Ace 7901 10 speed road chain. This is probably the only Dura-Ace component that is more affordable (besides the BB). The reason for using the Dura-Ace chain is not because it is more lightweight, but solely because it has a tough plated surface that is highly rust resistant. So far I have not seen any Dura-Ace chains rust yet while under my usage. Other chains that are not so well protected will rust rather easily. Definitely worth the slightly high cost.

Dura-Ace 7901 10 speed chain

Pedals
Model: Shimano PD-A530 SPD/Platform pedals
Estimated Weight: 380 grams
Actual Weight: 382 grams
Source: ChainReactionCycles (CRC)
Price: $50

Any pedals will do for a folding bike. For the most compact folding size, of course it is best to get folding pedals, such as the high quality MKS FD-6 folding pedals, or removable pedals. I am happy with these SPD/Platform pedals, as they allow both SPD cleated shoes and normal shoes to be used with no problem. Currently I am also using these pedals on my Dahon Boardwalk and Avanti Inc 3.

Note that these pedals are rather heavy, so if you want maximum weight savings then you need to find another pair of lightweight pedals.

Shimano PD-A530 SPD/Platform pedals

Other Components:

Magnetix Clip
Model: Dahon Magnetix Clip
Estimated Weight: 50 grams
Actual Weight: 57 grams
Source: Taobao
Price: $10
You could save some weight by not installing the Magnetix, but I feel that it would be more secure if I can clip the bike frame together when folded. Getting from Taobao is cheap, but you will need special air shipping as it is magnetic.

Dahon Magnetix. Fix the magnet to the rear of the frame, and the metal plate on the front fork.


Inner Cables, Outer Casings, End Caps
Estimated Weight: 200 grams
Price: $40
For shifter inner cables, they come with the SL-R780 shifters. Brake inner cables need to be sourced separately. Shifter outer casings come with the SL-R780 shifters too, but it is only long enough for the FD, not long enough for the RD. Need to get the outer casing for RD and brakes separately. Get stainless steel inner cables as they don't rust and thus can last longer.

The weight of these parts is an estimate as the actual weight can only be found after all these parts are installed and cut to length. This 200 grams estimate is made from previous experience, during the installation of Ultegra Di2 for the Dahon Boardwalk.

Complete Bike

Now for some pictures of the complete bike!

All the components mounted on the bike!

However the bike is not completed yet, it needs some tidying up of the cables and some other small adjustments.

Dahon MuEX logo on the frame

The low profile and easy to operate frame hinge that uses Dahon V-clamp technology

Head tube of the frame with the red Dahon logo and LitePro headset

The Fnhon 31.5cm Dual Bolt handlepost and LitePro Monster handlebar. Very low profile clamp for a clean look.

Shimano SL-R780 10 speed road flat handlebar shifters and Shimano Deore LX 3 finger V brake levers. All in black colour!

Front view of the bike. Note the cable routing I used.

Instead of bunching all 4 of the cables (2 x shifter cables + 2 x brake cables) together like on stock Dahon / Tern bikes, I decided to split up the cables from the left and right side of the handlebar. This allows smoother cable routing, which improves cable efficiency. I had to measure and check the cable lengths to make sure that there is enough slack during folding.

Closeup shot of the shifter and brake lever

The nice aluminium lever of the shifter, and the open clamp design of the brake levers.

Deore XT brake calipers and Panaracer Minits Lite tires

Wheelsport Sunny 406 wheels and front brake calipers. Magnetix clip installed.

No-nonsense Shimano 105 crankset. With 105 FD and PD-A530 SPD/Platform pedals.

I had to use a 1.8mm spacer under the right side BB to push the front chainline out a little, as the chain will rub the FD chainguide when in the largest 4 sprockets at the rear.

FD roller for the FD shifter cable. I had to use a cable tie to fix the rear shifter cable housing to the chainstay, so that it does not touch the FD roller.

Shimano 105 5700 short cage RD

11-28T 105 cassette, with Dura-Ace 7901 chain. Agogo QR skewers.

Final Project Results:
So, did I achieve the target for building an Affordable, High Performance, Lightweight folding bike? I am pleased to say that the target has been achieved!

Affordable:
Target price is < SGD 2000. Final total price of all the bike components is just slightly over $1700 as can be seen from the cost table below. This is quite a fair bit below the target price of $2000. What does this mean?

It means that if I had spent more to get Ultegra level components instead of 105, I would still be below the target of $2000. By my rough calculations, spending about $130 more will get you Ultegra level crankset, BB, cassette, RD and FD. This would reduce the weight by about 130 grams. At cost to weight ratio of about $1/gram, it is entirely up to you and your budget to see if it is worth it.

This would still leave over $100+ in the budget to spend on other components. Changing out the handlebar and seatpost to carbon would use up all of this remaining budget, but with no performance improvements and only slight weight loss. Not worth it in my opinion.

High Performance:
My definition of high performance is to have a good quality drivetrain, high quality shifting components, smooth rolling wheelset and tires, and a good braking system. These have all been achieved with my choice of components.

Obviously all these components are not top level like SRAM Red or Shimano Dura-Ace, but 105 level of components are already of good quality. Wheelsport Sunny wheels are of good quality at a reasonable cost, while other components such as the shifters, brakes and etc. are also of mid to high end level.

Using higher end models will yield slight performance increases and weight loss, but at a significantly higher cost.

Lightweight:
Target weight is < 9.3kg without pedals.

The final weight of this bike, as weighed using a luggage weighing scale, is 9.2kg including pedals (the scale only measures up to 1 decimal place). This is remarkably close to the initial estimated weight of 9.21 kg! If measured without the PD-A530 pedals, the bike would weigh around 8.8kg.

Actual Bike Weight without pedals: 8.8kg
Actual Bike Weight including PD-A530 pedals: 9.2kg

This means that the target weight of <9.3kg without pedals has been achieved with a margin of 0.5kg, as the final bike weight without pedals is only 8.8kg.

Weight and Cost Table:
Check out the weight and cost table shown below for the detailed breakdown of the individual component price and weight. Once again, the source stated only refers to the source of the pricing, it does not necessarily reflect the actual place where I bought the components from, as some were bought from other sources, while some were parts bought some time ago. All prices include shipping costs, and are rounded up to the nearest $5. Labour cost of installing all these parts is obviously not included as I installed everything myself.

Weight and Cost table showing the breakdown of the individual components used on this bike project.

The weight of some components differed quite a bit between the estimated value and the actual value, but somehow the overall positive and negative weight differences cancelled each other out equally, giving an actual weight that is practically the same as the initial estimate.

Comparison with other stock Dahon / Tern folding bikes:
The final product of this project is a 20" high performance 20 speed folding bike with good quality components, with a cost of about $1700 and a weight of 8.8kg without pedals. These are very impressive specs as there is no way you can get a stock bike with these specs at such an affordable price.

Consider the newly launched 2014 Tern Verge P20. For a similar price of SGD $1700, you also get a 20 speed folding bike. However, almost all of the components are of lower grade, with the exception of perhaps the frame, handlepost, saddle and tires which I deem to be of equal quality. The bike is also quite a lot heavier at 11 kg, compared to my folding bike which weighs 9.2kg including pedals. That said, the Verge P20 is by itself a nice bike that has pretty decent specifications for its price. One of the best platforms for folding bike upgrading.

How about the Tern Verge X20? It is the top end folding bike in Tern's range of models, and rightly so. Boasting excellent components and parts all round, it deserves its place at the top. Comparing it to my new folding bike, and you would find that the performance is actually quite similar. Both bikes use good quality drivetrain and shifting components, and good brake components. The Verge X20 might have lighter (but less durable) wheels, but race the same rider on both bikes and the end result would be quite similar. As mentioned earlier, high end components will be lighter and better than components a couple of grades down, but the difference is slight. The difference in performance between SRAM Red and 105 is way smaller than the difference between Ultegra and Tiagra.

Note that my new folding bike costs about 2.5 times less than the Verge X20, yet it has probably 90-95% of the quality and yet still weighs 0.5 kg less than the Verge X20 (9.3kg without pedals). Despite using heavier wheels (Wheelsport Sunny vs Kinetix Pro) and heavier drivetrain components (Shimano 105 vs SRAM Red), the final bike weight is still lower than the Verge X20 weight.

Putting it in another way, this new bike is almost as good as the Verge X20, but costs $1700 (vs $4200 of Verge X20) and weighs 0.5 kg less. Much cheaper, more lightweight, and almost as good. A pretty good deal!

Now, this is not the end of this guide! There is still a Part 4, where other small but important issues that I encountered during the installation will be discussed. Also, there are also some other changes that I will be making to this bike, as I am still not 100% satisfied with it. Will be swapping out some components to improve the ride.

Part 4 of this guide is now available! Click here to continue.