Saturday, August 20, 2016

Avanti Inc 3: DIY Steering Stabilizer

Do you ride a bike that has a heavy front? By heavy front I mean that when the bicycle is parked, the handlebar tends to tilt to the side, and over-rotate. This causes the whole front wheel to flip to the side, and if the front of the bicycle is heavy, the whole bike will fall over, even if it is resting on a kickstand or resting against the wall.

For most road bikes, they can be supported easily against a wall or on the kerb using the pedals, as they are lightweight. Mountain bikes are usually placed with the bar end against the wall, or just laid down on its side on the ground. Other bikes may have kickstands to hold the bike up when parked.

In my case, I have some problem with parking the Avanti Inc 3 when outside. As there is no kickstand, I will rest the bar end of the Ergon GP3 grips against the wall when parked. However, the bike will sometimes roll forward or backwards due to a slight incline of the ground. This causes the handlebar to rotate and the whole bike will fall over.

When there is no wall to lean against, I will rest the bike against my body when stopping for a short while. Even then, the heavy front end will rotate and cause the bike to fall over easily. This is due to the wide handlebar and the many accessories on the handlebar.

To solve this issue, I decided to get a steering stabilizer to prevent over-rotation of the handlebar. It looks like a very simple device, with just a spring to prevent the fork from rotating too much to either side. After failing to get it from Taobao as it was out of stock, I decided to DIY my own steering stabilizer from some common parts.

The basic component of a steering stabilizer is the spring, together with the mounting brackets at each end that mount to the front fork and the downtube of the frame respectively. The spring has to be sufficiently strong to hold the front fork, yet have some play to allow normal steering.

The spring comes from an unused kickstand, which seems to have a suitable length and spring force.

The L-shaped mounting bracket is something that I found from my box of random hardware, and it fits nicely on the back of the front fork.

Basic construction of the DIY steering stabilizer. One end of the spring is held to the front fork by a bracket, while the other end is fixed to the cable holder.

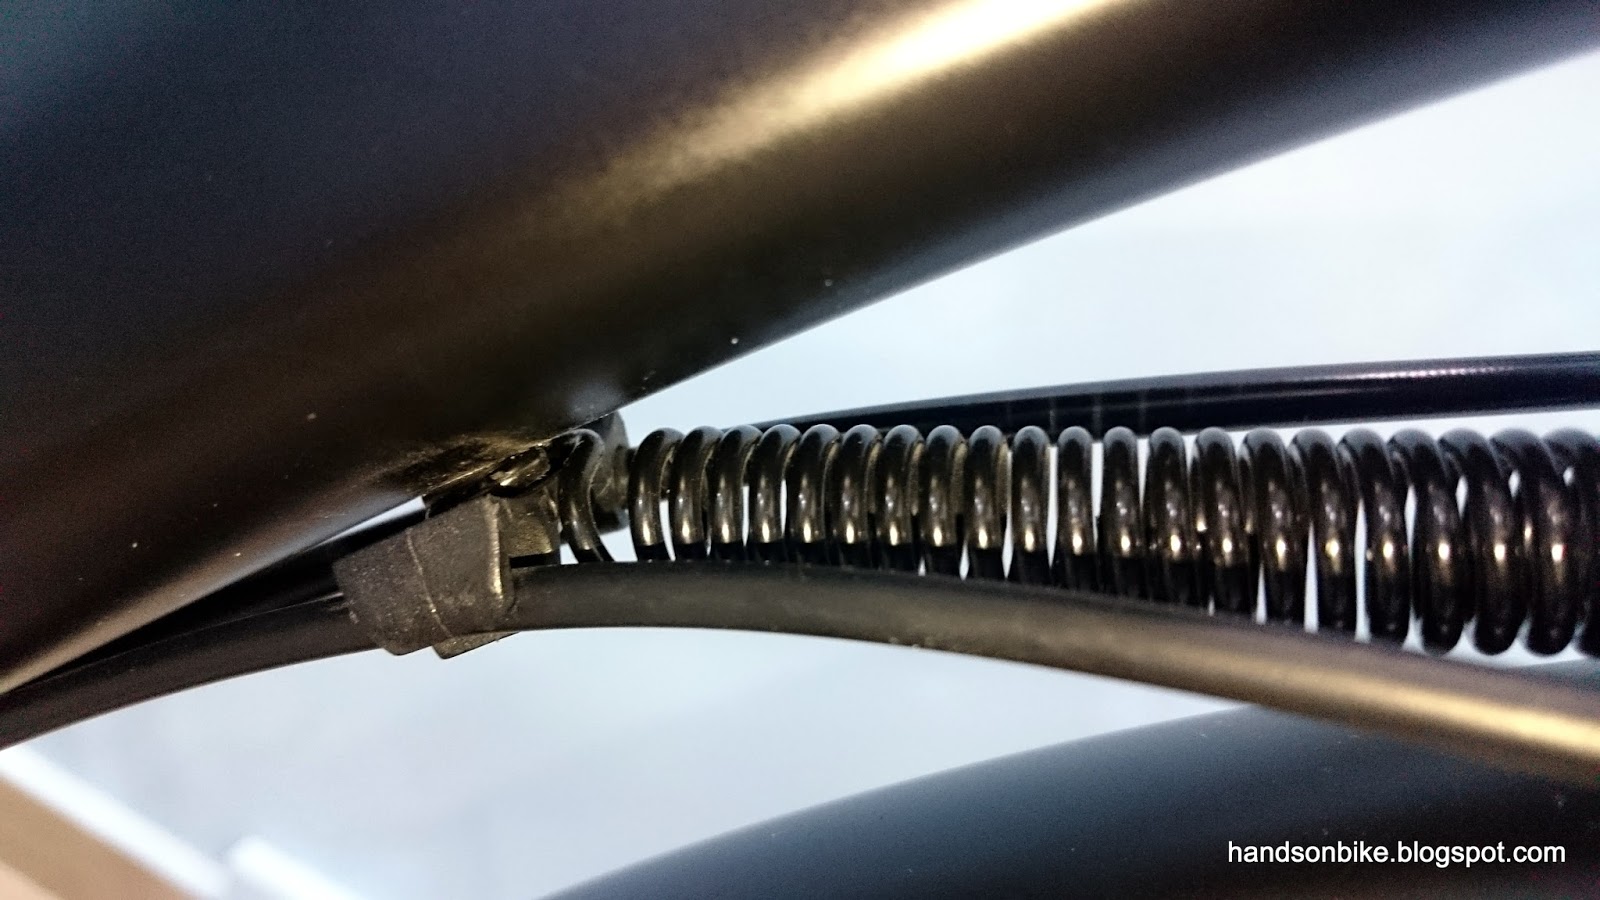
One end of the spring is hooked around the bolt that fixes the cable holder to the frame. Since the force is transmitted through the metal bolt, there is no strength issue here.

The other end of the spring hooks onto the L-shaped bracket, and is fixed to the front fork using the fender mount.

After that, it is a matter of adjusting the spring force to ensure that there is little or no spring resistance during normal steering. On the other hand, the spring force will be activated when the handlebar is rotated beyond a certain angle. This is adjusted by stretching and deforming the spring.

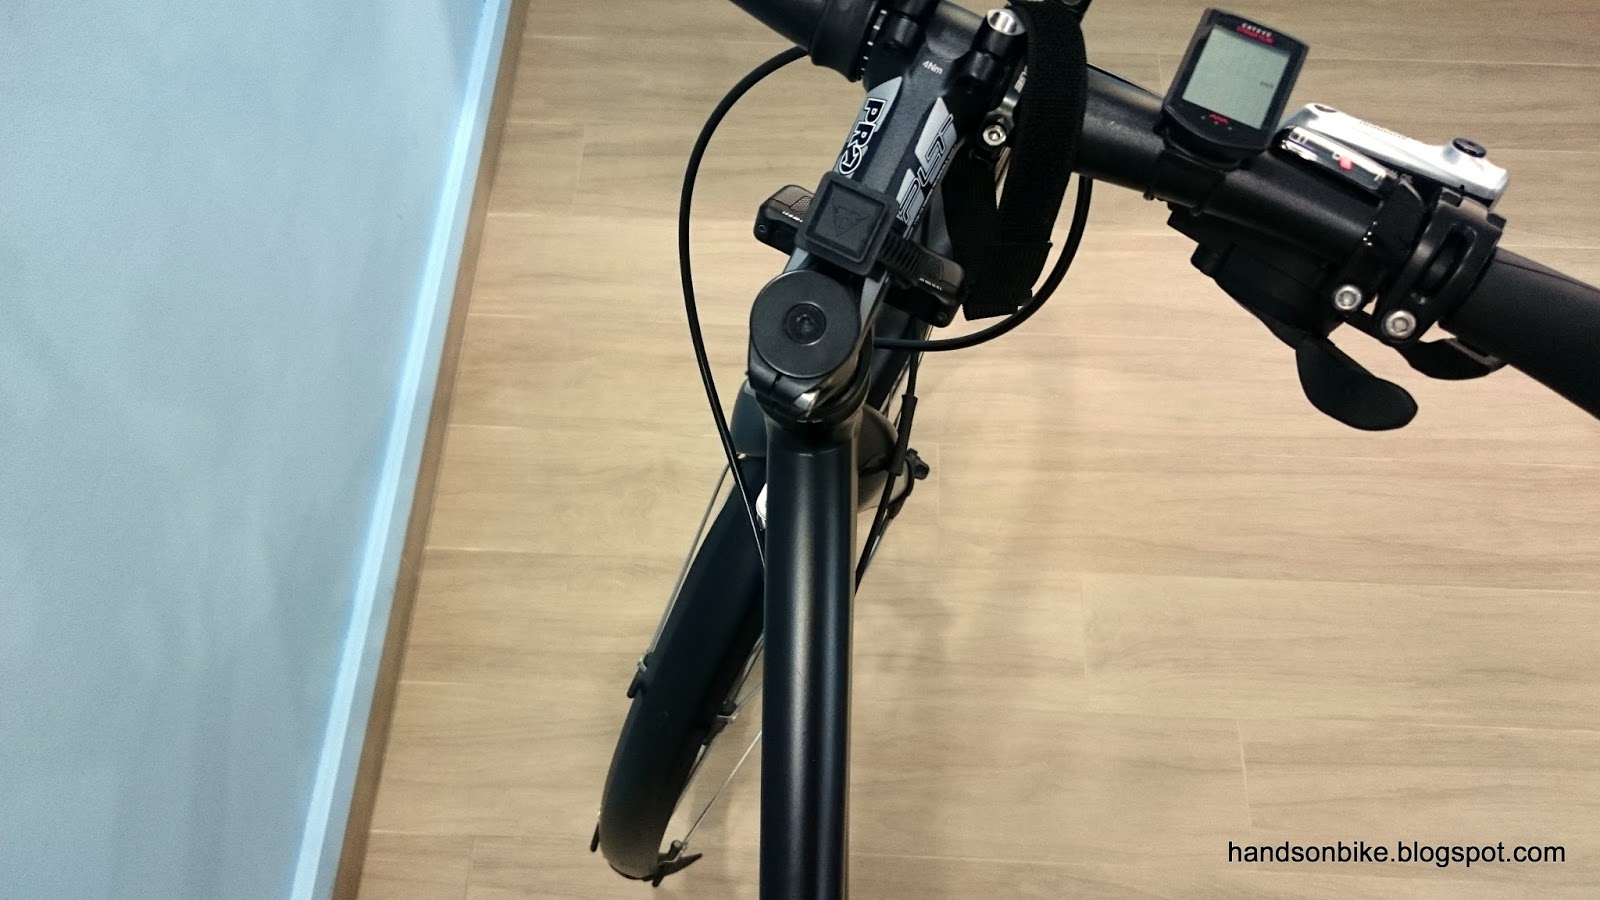
After installing the spring, the handlebar will encounter resistance when rotated beyond 20 degrees to either side. This is more than the steering angle required for normal riding.

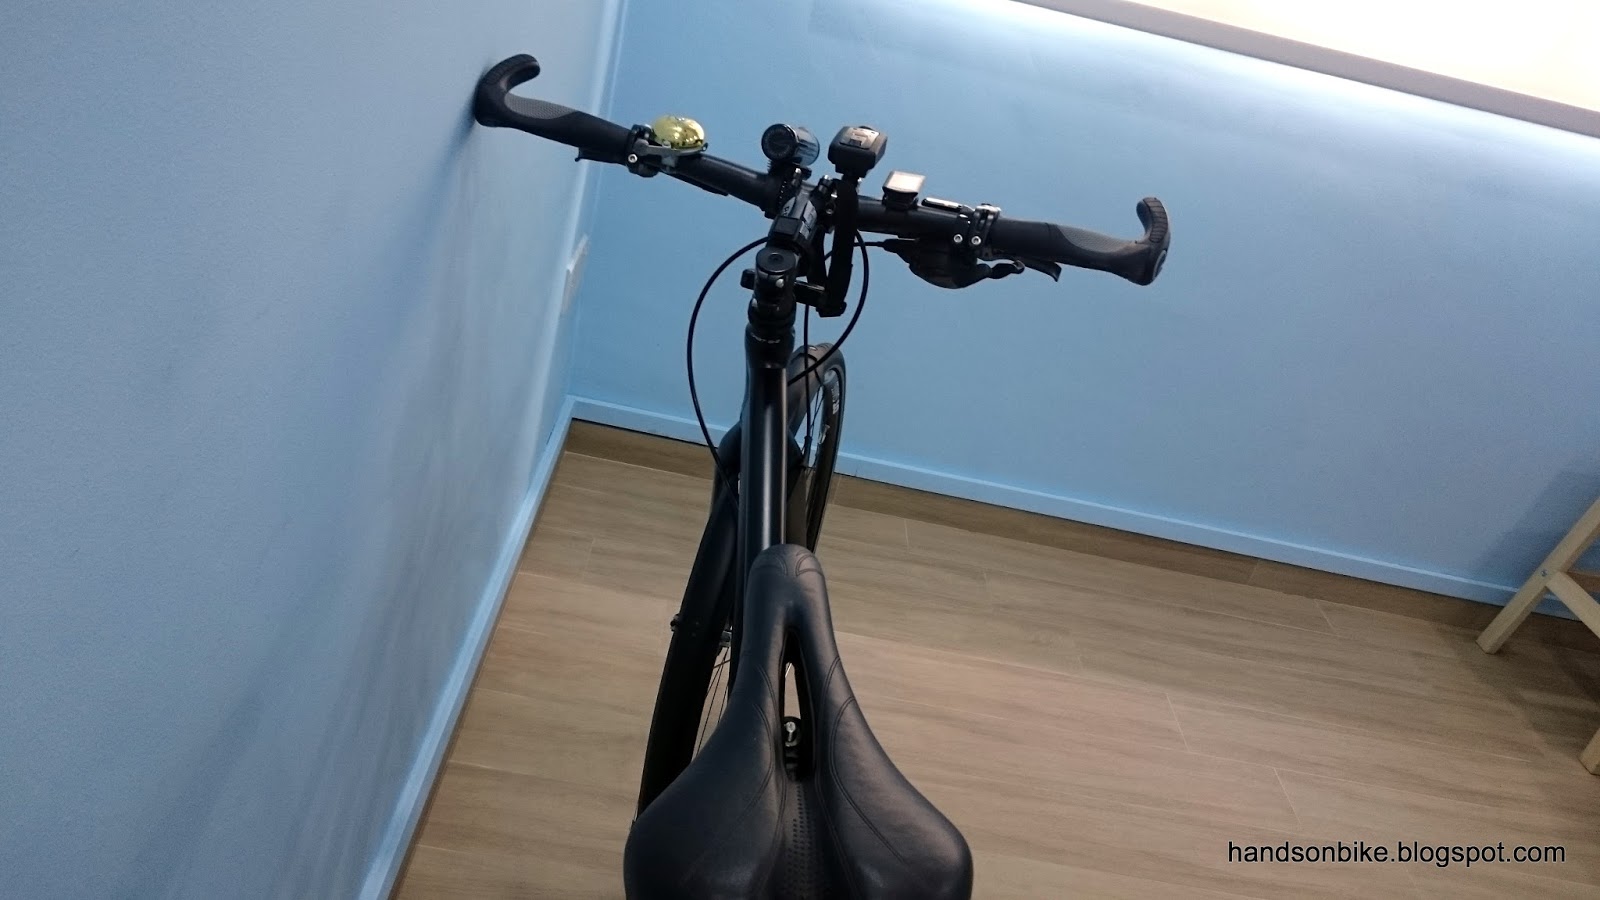
As shown here, the spring prevents further movement of the handlebar, which enables the bike to be parked this way without falling over.

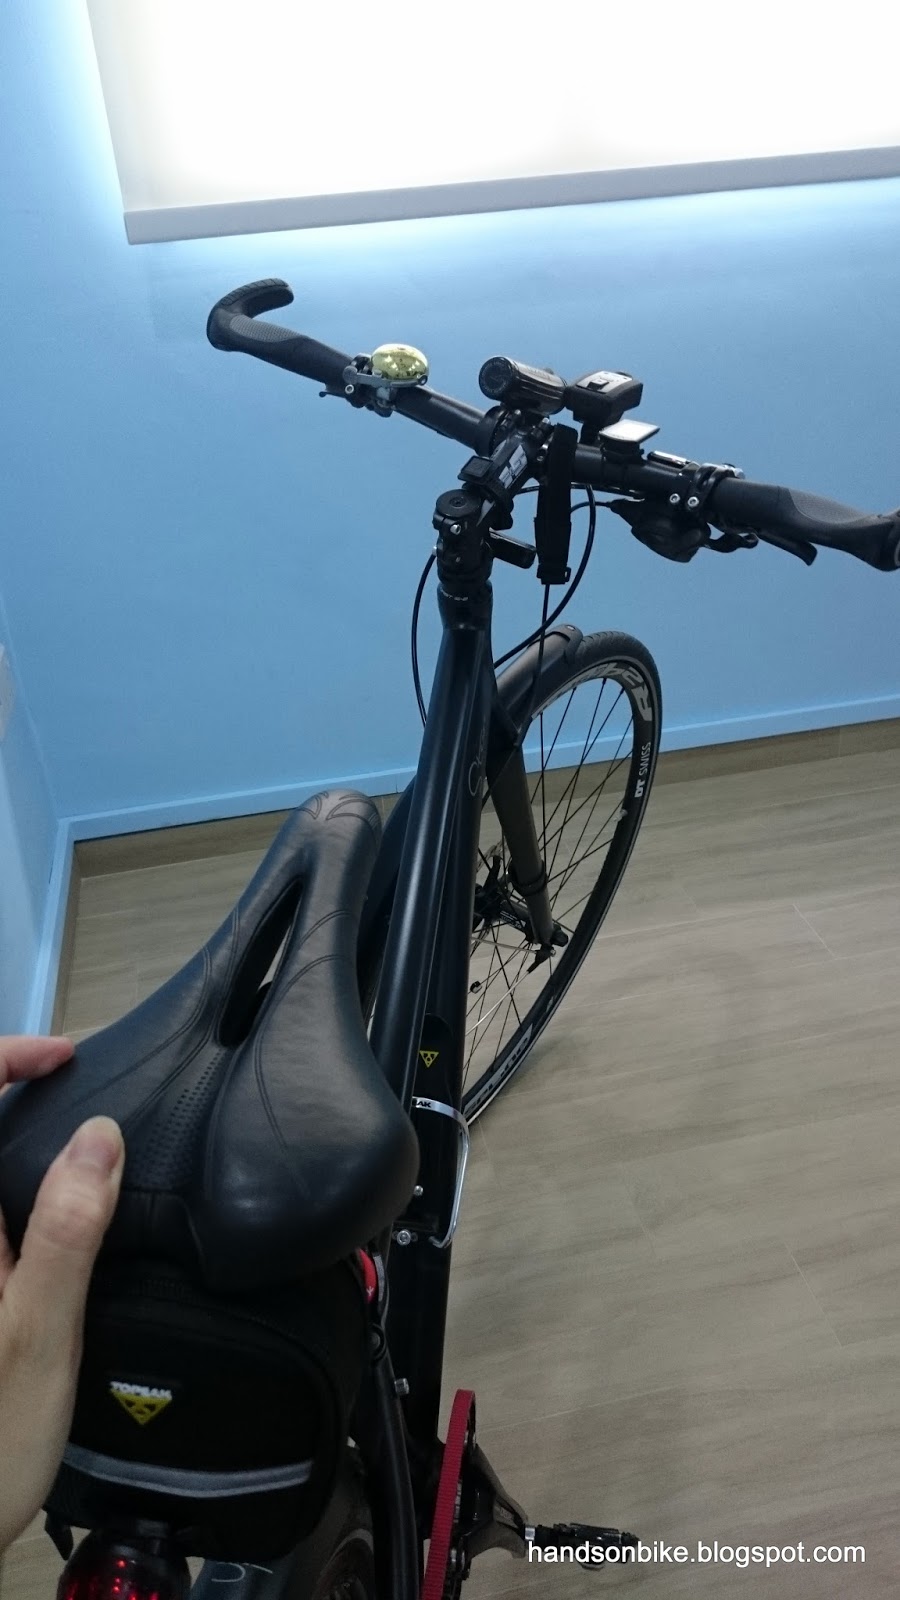
When the bike is held by the saddle, the handlebar can only rotate naturally 20 degrees to either side. Does not affect steering at all.

DIY steering stabilizer fixed under the downtube of the bike, and is not obvious at all.

With this steering stabilizer installed, parking this bike is now easy, with little risk of the bike tipping over. Riding and steering of the bike is not affected at all because there is almost no spring resistance at normal steering angles.

If you have the same problem with your bike, this steering stabilizer will solve the issue!

Saturday, August 13, 2016

Merida Scultura 5000: Di2 Battery Draining Issue

The Ultegra Di2 upgrade was recently done on the Merida Scultura 5000 road bike, and I really like the effortless and easy shifting offered by the electronic shifting system. It was working well for a few weeks, but one day I realised that the battery was flat just as I was going out for a ride.

This is a very unusual situation, as I always charge the Di2 battery once the battery level drops to 50% or less. Also, the Di2 battery is supposed to last a long time, even more so if you are not using it often. As I have been using Di2 since I upgraded the Dahon Boardwalk 3 years ago, I am well aware of the battery life of the system.

My first suspicion was that one of the shifter buttons had been depressed continuously during storage, as there was a chance that another of my bike could be pressing on the shifter buttons on the Merida road bike. However, upon charging up the battery to 100% and leaving it for a couple of days, the battery level dropped to 60% even without touching the bike.

The next suspicion was a faulty battery. This was a possibility as the battery was already 3 years old, and there was a chance that the battery life has been compromised. I swapped the battery with the other one on the Dahon MuEX, and monitored the battery level on both the bikes for a few days. With both batteries at 100%, we will see if it is the battery issue or some other problem.

The result was that the battery (from the Merida) remained at 100% on the Dahon MuEX, which ruled out a faulty battery. On the other hand, the battery (from the MuEX) that was installed on the Merida went down to 80% after just one day, without any usage. Further monitoring saw the battery level drop by about 20% every day.

With the battery level dropping rapidly, by around 20% a day, this was definitely not normal. Something was wrong with the system, but it is going to be tricky to diagnose the source of the problem. Most of the components are ported over from the Wheelsport Fantasy mini velo, and it had worked perfectly. The only differences are the wiring in between the components, as I have used different lengths of wires. For some unknown reason, there is a problem with the Di2 system on the Merida road bike that is causing serious battery drain.

Current Di2 wiring layout on the Merida road bike

In order to troubleshoot the battery draining issue, I had to isolate the components one by one to see which is the component causing the battery drain. The obvious place to start would be from the battery. Since I have already confirmed that the battery is working fine, the next component to test would be the battery mount.

I plugged the battery into the battery mount, and disconnected the battery mount from the rest of the system. Wait one day, reconnect the wiring, and check the battery level with the Garmin Edge 510. The good thing of having the Garmin to check the battery level is that it has a digital readout of the battery level, at every 10% intervals. This is more precise than having to read the blinking lights on Junction A to determine the approximate battery level.

No battery drainage detected with just the battery mount connected, so I continued by connecting more components to the battery (through the battery mount).

Connect battery mount to Junction B, disconnect all RD, FD and Junction A from Junction B. No battery drainage, so I moved on to connect just the FD, followed by just the RD, and so on until the entire system has been tested individually for battery drain.

This is very time consuming, as it takes one day to detect any battery drain, so testing the entire system component by component took more than one week.

I eventually found that there is battery drainage when Junction A is connected to the system, but the RD, FD and shifters are not connected. It seems that Junction A might be the one causing the problem. In order to test the hypothesis, I borrowed a new Junction A to swap with my current Junction A.

The new Junction A is the three port type, unlike the older Y-junction EW67 type that has two integrated wires for the shifters. With this new EW90 Junction A, there is a need for two separate wires to connect Junction A to the two Di2 shifters.

New 3 port Junction A, SM-EW90-A

With the new Junction A wired up, I monitored the Di2 system for a few days, and was glad to see that the battery is no longer draining fast. Under normal circumstances, the Di2 battery level can stay at 100% for at least a couple of weeks if it is not used. I did not wait that long, but the battery level did stay at 100% after a few days, which is much better than the 20% drain per day.

I was glad to see that the Di2 components are working fine, and that the problem was actually due to a faulty Junction A. Not sure why this problem will surface suddenly after working fine for these few years, but I am glad that this can be easily solved with a new Junction A.

After waiting for a few more days to confirm the diagnosis, I was sure that the old Junction A was the problematic component. With that, it is time to formally swap in the new Junction A onto the bike!


New 3 port Junction A with the mounting bracket and the rubber strap. This will normally be installed on the stem. 3 more wires are needed to connect Junction A to the two shifters.

Original Ultegra EW67 Junction A, with the two wires for the shifters built into it

3 port Junction A installed onto the Merida bike for testing and monitoring

Rubber strap with bracket mount installed on the stem. The rubber strap needs to be cut to the correct length.

Junction A clipped in under the stem. There is a charging port on this Junction A, but it only works if the new internal Di2 seat post battery is used.

Two wires lead to the two shifters, while the third wire leads to Junction B.

The other side of Junction A has the LED indicator lights, for indicating the derailleur adjustment mode or to indicate battery level.

Similar wire routing with the new Junction A, using the cable wrap to keep things neat and tidy

With the new Junction A, there is no longer any battery draining issue. The Di2 battery can last a really long time with some light usage. Glad to be able to find the source of the issue and solve it with a change of Junction A.