Tuesday, April 30, 2013

Moon Comet Front Light Review

As you may already know, I am always interested in bicycle lights. No matter how many lights I already have on my bikes, I will still want to check out new lights to see if they are better than what I already have. It seems that the recent trend for bicycle lights is to use USB recharging, so that there is no need to keep changing batteries when the light goes dim. For myself, I try to use lights that can use standard rechargeable AA or AAA batteries, while minimizing the use of lights that use button cells.

At the recent OCBC Cycle exhibition, I came across this new brand of lights called "Moon". Although I have read about the brand in magazines, I did not know much about the lights until then. What surprised me was how bright it was, given its small size! Let's take a look at the Moon Comet Front Light which I bought.

Transparent packaging showing the product clearly

6 different lighting modes, each with its estimated runtime

Diagram showing the spread of light at different distances.

The accessories that came with the light. A standard mini USB cable for charging, plus a rubber strap mounting.

The power button located on the side of the light. Pressing on the button for 1.5 seconds turns the light on or off.

New type of LED packaging technology, called COB (chips on board) LED. 
Read more about it here and here.

This is the special LED that caught my eye, and this is what differentiates it from the other thousand and one lights out there. The traditional LED is a single chip that sits within a small bulb, and it can be found on almost every other LED light out there.

However, the new COB LED technology used in this Moon Comet front light embeds these LED chips within a panel, creating a flat light source and high chip density. What this means is more LED chips within the same amount of space, enabling higher brightness and more uniform lighting. On this light, there are 32 LED chips embedded in the panel.

Rubber cover for the USB charging port.

USB port covered to protect against dust and rain.

Very impressive lighting!

This light has 6 lighting modes, which can be separated into 2 different types, constant and flashing.

For constant mode, you can choose between 20%, 50% and 100%. 20% is quite OK for city use where the path is well lighted. 100% is really bright and is surprisingly blinding. Good enough for on the road usage. 50% is for anything else in between.

As for the blinking mode, there are also 3 types. Flashing at 50% brightness, flashing at 100% brightness, and a strobe type of flash. For myself, I use 50% flashing when I cycle on the road, as it gives me a good balance between brightness and runtime (up to 5 hours). I find that the strobe mode which flashes something like 5 times per second is too seizure-inducing to use. It is probably useful if you wish to irritate somebody with this light.

 Orange LED showing the battery level of the light. When it blinks, it is time to charge the battery.

Mounted vertically on my handlepost. It can also be mounted horizontally by rotating the light 90 degrees.

This light suits a folding bike well as it can be nicely mounted on the handlepost, freeing up space on the handlebar.

Gives off a uniform glow that has a wide viewing angle, without the use of any reflectors. Note that even my shifters which are way off to the side of the light has a shadow cast on the wall.

Soft glow when projected against the wall

What I like about this light:
1) Small and lightweight.
2) Wide viewing angle. Great as a to-be-seen light.
3) USB charging. No need to bother about batteries.
4) Versatile rubber mount. Can be mounted almost anywhere on the bike. Easy to remove when not required.
5) Sturdy casing, feels well built and not flimsy.
6) COB LED packaging gives off a nice glow that looks like a solid bar of light.
7) Many different lighting modes to suit different riders/situations.

What I dislike about this light:
1) Runtime is a bit too short. Charging is probably required after every 2~3 night rides, depending on the length of the ride. A bit troublesome to keep removing the light and reinstalling on the clamp.
2) Rubber seal for USB port feels a little loose. May not be able to keep out the rain effectively.
3) Difficult to switch between modes easily.

To elaborate on the switching of modes, the modes are separated into two different groups, constant and blinking. When you are in the constant mode, pressing the power button for 0.5 seconds will cycle through the 3 constant lighting modes. Same for when you are in the blinking mode. However, the tricky part is switching between constant and blinking modes. It seems that you need to press for 1.5 seconds to switch between modes. Sounds easy according to the manual, but for me, it operates rather inconsistently. Sometimes it works, sometimes it just turns the light off. Even now I find it difficult to switch quickly between modes, most of the time it is trial and error.

This light cannot be used as a to-see light, as the light beam is too diffused to light up the road effectively. However, because of the diffused lighting, it is great as a to-be-seen light as you can be spotted easily due to the wide viewing angle.

Overall, I am quite pleased with this light as it replaces my previous to-be-seen light by Cateye. Not only is this light brighter, it also looks much sleeker on the handlepost. For those who are interested in this light, it also has a rear version with red COB LED.

Sunday, April 21, 2013

How to Convert Shimano Shadow Plus RD to Direct Mount (Shimano SLX RD-M675)

Recently, Shimano came out with a new RD mounting standard called "Direct Mount". What it does is to free up space around the rear dropout area, allowing frame designers more leeway to design a larger thru-axle or to play around with the frame geometry. As a bonus, this direct mount design also makes it easier to remove the rear wheel, as there is a clearer path for the wheel axle to exit the frame dropout.

Polygon MTB frame with Direct Mount RD dropout

As you can see from the picture above, the Direct Mount RD hanger sticks out behind the frame dropout, making it easier to remove the rear wheel without the hanger or RD getting in the way.


The Polygon Cozmic CX 3.0 MTB that I got a couple of months ago came with this type of RD mount. It was equipped with a Shimano SLX M670 Shadow RD with Direct Mount. This gave me a chance to learn more about this type of RD mounting.

The SLX RD that came with the bike is the new SLX M670 RD, but it is not the Shadow Plus version with the clutch. To learn more about the Shadow Plus technology, click here. As for myself, I was also quite curious about the Shadow Plus technology, having heard about it but not had the chance to try it out.

The Shadow Plus RD was first introduced at the XTR level about 2 years ago, but its price tag made it prohibitively expensive for most people. Luckily for us consumers, the Shadow Plus technology has been trickling down the product lineup of Shimano, and for 2013, SLX also has the Shadow Plus version of the RD! In fact, it will also be available for Deore in 2014, making it affordable for a much larger market.

The new SLX RD comes with a standard RD mounting, but with an option to convert to Direct Mount. Since I also wanted to try out the Shadow Plus feature, I decided to buy a SLX Shadow Plus RD, so that besides trying out Shadow Plus, I can also learn to convert the RD from standard mounting to Direct Mount.

Ordered from CRC. Came in a special shrink-wrapped packaging. Guess it was repackaged from OEM stocks.

Comes with the standard RD mounting as seen from the mounting bolt at the top of the RD.

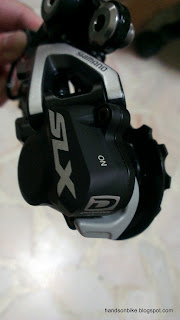
Rear view of the SLX RD-M675.

 Shadow Plus switch set to OFF

Switch set to ON position! One way clutch activated.

Now, in order to mount the new SLX RD on my Direct Mount dropout, I will need to convert the mounting on the RD, from the standard mounting to the new Direct Mount.

Without removing anything, this RD can be bolted onto a standard RD hanger, but not a Direct Mount RD hanger.

To convert to Direct Mount, the extra link plate shown needs to be removed.

First, use a flat tool to pry open the E-ring. Surround the E-ring with your hand so that the E-ring doesn't spring away and disappear.

How it looks with the E-ring removed

Next, unscrew the bolt shown above with an M5 Allen key. Note that this bolt is VERY tight!

With the bolt unscrewed but not removed yet.

From left to right: Spacer, link plate, bolt, E-ring. May differ between different RD models.

With the extra link plate removed, this is how it looks like.

Finally, put back the bolt that was just removed. The RD has been converted into a Direct Mount RD!

When installing, first remove the bolt from the RD. Slide the RD onto the Direct Mount RD hanger as shown.

Once the holes are aligned, put back the bolt and screw it onto the RD hanger as per normal.

Ta-Da! New SLX Shadow Plus RD with Direct Mount. Looks sweet!

Shadow Plus switch on the RD. Currently in OFF mode.

I have not had the chance to bring the bike out onto the trails, to try out the Shadow Plus feature. Will write another post about the Shadow Plus feature after some testing. Also, in the next writeup I will also show how to adjust the clutch mechanism inside the Shadow Plus RD. Watch this space!

Sunday, April 14, 2013

Journey of the Boardwalk: Part 29 - Alfine Di2 Digital Gear Display

When you ride your bike, do you check the gear display on your shifters? For road bikes, the higher end Shimano models (105, Ultegra, Dura-Ace) do not have gear displays, whereas the mid range components (Tiagra, Sora, Claris) have a gear display to let you know which gear you are in. The reason for the lack of gear displays on higher end models is because of weight savings, and also because riders who use high end components are presumed to be more professional, and thus do not need a gear display to tell them which gear they are in. They just shift the gears according to how it feels while riding.

Same for mountain bike shifters. High end mountain bike shifters such as SLX, XT and XTR have no optical gear displays (or have removable versions), as the riders are unable to check the gear display anyway when they are bouncing along the trail and tackling tough off-road conditions.

It has been almost 3 months since I upgraded the components on my Dahon Boardwalk to the Ultegra Di2 system. During this time, I have had plenty of chances to test out the system and get used to the new system. However, the system is not complete yet. Although it is fully functional, there is actually one more component (optional) in the Di2 system that has not been installed yet.

This component is the digital display of the Alfine Di2 system. Strictly speaking, this digital display is not part of the Ultegra Di2 system. The original Ultegra Di2 system is a road system with no gear display. Besides the Ultegra/Dura-Ace Di2 system, there is also the Alfine Di2 system.

Alfine Di2 is designed more for touring or urban bikes, with a rear internal hub. With Alfine Di2, shifting the internal hub is now even easier, as it is an electronic gear shifting system. This digital display comes with the Alfine Di2 system, providing a clear gear display for the rider. Through experimentation by other users, it is found that the Alfine Di2 digital display can actually be used on the Ultegra Di2 display. This is probably because of similar system architecture between the two Di2 systems.

Alfine Di2 Digital Display. Individual packaging.

 Only the display inside! Model number is SC-S705.

Small display size, with the Alfine name on top of the LCD screen.

 2 ports on the display. This display is connected in series on the Ultegra Di2 system. As such, one of it is the IN port, the other is the OUT port. Either port can be used as the IN port.

The special cable ties and rubber shim that comes with the display. Used to mount the digital display onto the handlebar.

One problem I faced when connecting up the display is that I need an additional wire! As this display will go between two components, one additional wire is needed to connect up the system. I had to borrow an extra wire to try out the system.

Also, it was not clear where the display should be installed in the system. There is no manual as this display is not officially part of the Ultegra Di2 system. Initially I thought it should be installed between the right shifter and Junction A. However, when I connected it up that way, the shifting still works but nothing is displayed on the screen. Subsequently I connected it between Junction A and Junction B, only then did it work and display the gear number!

Yes it works! The screen came alive!

So, the Alfine Di2 digital display needs to be connected between Junction A and B. The good news is that I don't need to remove my bar tape to re-route the wires. The bad news is that not only did I need an extra wire (which should have come with the display), I need a new longer wire between Junction A and B!

The current wire length between Junction A and Junction B is already a pretty long 1200mm. However, since the wire (between Junction A and B) now needs to go into the display before the display connects to Junction A, I need a longer (1400mm) wire! An additional wire of 300mm is also required to connect from the display to Junction A.

Normal Ultegra Di2 wiring on my Boardwalk:
Junction B > (1200mm) Junction A > L&R Shifters

Ultegra Di2 wiring with Alfine Di2 display:
Junction B > (1400mm) Alfine Di2 Display > (300mm) Junction A > L&R Shifters

Thus I had to wait while I ordered the 2 new wires (300mm and 1400mm) from Evans Cycles. Finally, after about 10 days, the new wires have arrived!

2 new wires (300mm and 1400mm) from Evans Cycles

With these new wires of proper and suitable length, I could finally wire up the Di2 system properly. At the same time I also changed the outer casing for the rear brake from grey colour to black, to better camouflage the Di2 wires.

Before: Testing the Alfine Di2 display with inappropriate wire lengths, messy!

 After: With the new wire lengths, the wiring is now neater than before.

The wire from Junction B first goes up to the digital display located on the handlebar extension mount, before another wire connects from the display down to Junction A.

The digital display is fixed to the extension mount by the use of cable ties. I did not use the special cable ties that came with the display as I found that normal cable ties are good enough.

Wires running in and out of the digital display

 Alfine Di2 display right in the middle of the handlebar, above the handlebar clamp.

Wires running around Junction A.

So, what is so good about this display? The main attraction for me is that it looks really good! As you will see in the pictures below, the gear display is really bright and sharp, and gives a really nice high tech feel to the bike. In fact, it looks much better when you see the real thing as compared to seeing it in the picture.

It is also very useful at night, where all other gear displays cannot be seen properly as they are not lighted. Besides showing the gear number, it also has a battery indicator. Probably not so important, as you can already use Junction A to check the battery life. But a nice touch of convenience nonetheless.

For the racers who don't need a gear display, this would not be a useful accessory. But for myself, I still frequently check the gear that I am currently pedaling in. Before I got the display, I would try to identify the gear by looking downwards and back at the cassette, but this is tricky and difficult. With such a prominent gear display right in the middle of the handlebar, checking the selected gear is now super easy!


Displays the current selected gear on the cassette. 

I love the secondary cockpit on my Boardwalk handlebar! With additional secondary brake levers and satellite shifters, I get both a road bike and a flat handlebar setup on the same bike.

Clean cable and wire management on my Dahon Boardwalk. With only one cable+wire running to the rear of the bike, it eliminates messy cabling!

Of course, there are also downsides to having the Alfine Di2 digital gear display. For one, the battery life will be shorter, since the display also consumes some power. Not sure how much it will affect the battery life, it can only be found by experimentation. In any case, the digital display only turns on when you shift gears, and it will turn off after a few minutes of inactivity. I'm loving the new Alfine Di2 Digital Gear Display on my Dahon Boardwalk!

Thursday, April 4, 2013

Handlebar Extension Mount

Is your handlebar overcrowded? No space to add more accessories? Then you will need a handlebar extension mount! Normally MTB handlebars are pretty long, at >650mm long, so there is no problem putting multiple lights / bell / speedometer / GPS / speaker and etc all onto the MTB handlebar.

However, road handlebars such as drop bars are much narrower, at <440mm wide. This means a very limited space on the handlebar for you to mount accessories. Of course, you wouldn't usually mount many items on a drop bar, since a bike with a drop bar is probably meant to go fast and it would have a minimum number of accessories on it.

For my Dahon Boardwalk, I am using a drop bar, and the space on the handlebar is quite restricted. As you can see from this picture, I have secondary brake levers, which takes up quite a bit of space. Also, I have the satellite shifter for my Ultegra Di2 system, which takes up the entire right side of my handlebar. The Cateye Strada Wireless speedometer takes up some of the remaining space on the left side of the handlebar.


Very limited real estate space on my handlebars.

Besides the powerful Lezyne Super Drive XL front light that is mounted on the front fork, I have also installed a Cateye front blinker on the handlepost. You can spot it at the pictures above. This means that the front lights are already located away from the handlebar.

I have a new accessory that I plan to install on the handlebar, but given the limited space, where can I install it? The Di2 satellite shifter cannot be moved, and the speedometer needs to be there or I will not be able to see and use it. The only solution I can think of is to create more space on the handlebar! But how?

This situation calls for the handlebar extension mount! I think this is the generic name for this type of handlebar extension, as there is no standard name for it. Let's take a look at what it is and how it works.

Handlebar extension mount. Comes with an aluminium clamp for 31.8mm handlebars, a 22.2mm carbon fibre tube and 2 sets of shims (for 25.4mm and 26mm handlebars).

The carbon fibre tube is of diameter 22.2mm, similar to the diameter of a flat handlebar. If you need a longer one, just cut from a standard handlebar.

 Side view of the installed extension mount.

The base of the extension mount is clamped onto the handlebar. My Cateye speedometer takes up half of the extension.


 Half of the extension mount is now unused. Awaiting the installation of a new accessory!

Many people have asked about the handlebar extension mount, and where it can be found. Since I am not sure where it can be found locally, and I have no time to go search for it, I decided to search and buy it online. Here are 3 sources where you can get the extension mount.

Dashboard Genie by BDOP Cycling
Quite pricey, but the quality is good. Ships from Taiwan via FedEx and is super fast. I got the mount from this website.

Pro Carbon Computer Mount
Exactly the same mount, ships from US, and thus will be pricey and also take longer.

From Taobao
I only found this at Taobao after I had already ordered from BDOP Cycling. This is cheaper, and the anodised coloured aluminium mounts look really good. Great for adding some coloured bling to your bike!

So what is the accessory that will be installed on the extension mount? It is not a Garmin GPS unit or a GoPro camera (although these are good suggestions!). It will be revealed once the trial is successful!