Friday, January 28, 2022

Fnhon DB12: SRAM eTap AXS 12 Speed Drivetrain

With much effort, the modification of the Fnhon folding bike has been completed! Since it has been converted from 11 speed to 12 speed, the name will change accordingly to Fnhon DB12.

Check out the previous posts for all the parts that are necessary to make this modification. For this post, I shall let the pictures do most of the talking instead of writing too much.

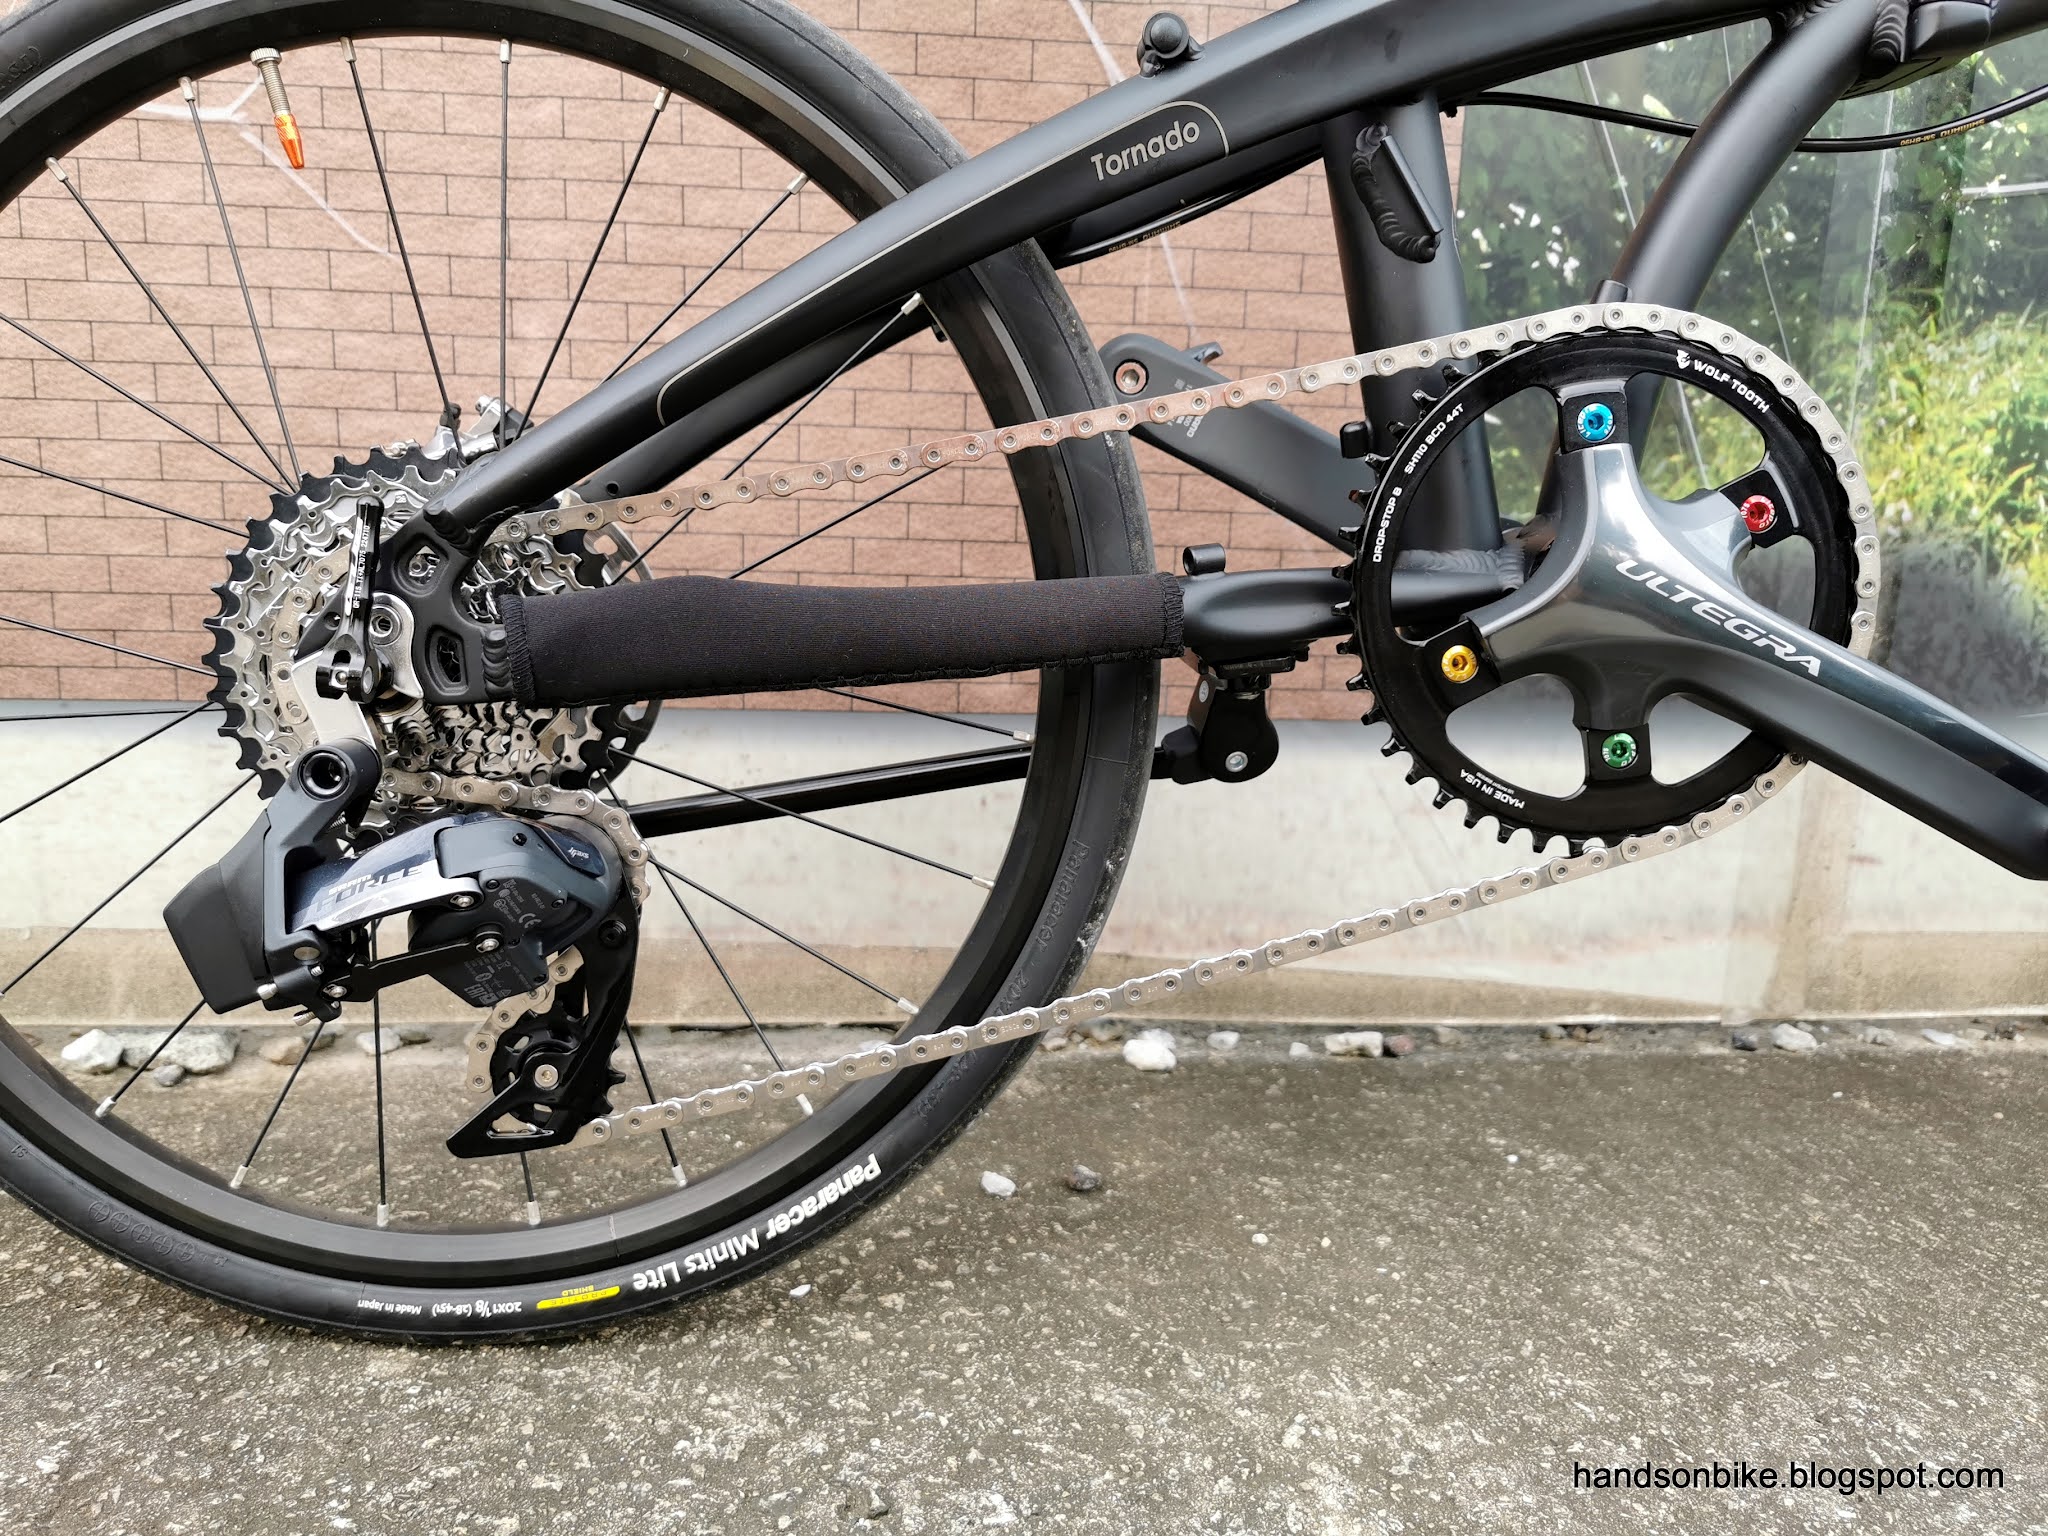
Full 1x12 speed setup completed! Minimal wire/cable routing, with only brake hoses required.

Unholy alliance of SRAM AXS drivetrain parts with an Ultegra 6800 crankarm.

Wolf Tooth 44T chain ring that is compatible to the SRAM 12 speed Flattop chain

Flattop chain gives a distinctive look to the drivetrain, this can be spotted from far away.

Heart of the SRAM AXS system! The 12 speed cassette and the Force AXS 12 speed wireless rear derailleur.


As mentioned in the earlier post, I made the chain as long as possible, without going slack in the smallest sprocket. This is opposite to the official recommendation, where the chain is made as short as possible, without over-stretching the rear derailleur in the largest sprocket. 

My intention of using a longer chain is to reduce the amount of tension on the rear derailleur cage, especially in the lower gears. There are pros and cons to this approach, which I will explain using the pictures below.

This is the rear derailleur in the top gear (smallest 10T sprocket). The chain is sized such that it just puts a bit of tension on the rear derailleur cage, without the chain going slack.

There is minimum chain tension and rear derailleur cage tension at this gear, which can lead to chain slap when riding on uneven terrain. This is where the clutch is supposed to do its job to minimize chain slap.

The rear derailleur sticks out quite a lot from the frame, unlike the Shimano shadow type rear derailleur where it is a lot closer to the frame.

At the lowest gear (largest 36T sprocket), the chain tension and rear derailleur cage tension does not go too high, as the cage is not stretched till it is almost straight.

Still a healthy clearance between the rear derailleur cage and the wheelset rim.

Pros of using a long chain:
1) Less chain tension can improve shifting performance.
2) Less rear derailleur cage tension means improved cage spring durability.

Cons of using a long chain:
1) With a lower chain and cage tension, the rear derailleur cage tends to bounce more when riding over uneven ground. This can be mitigated if your rear derailleur has a clutch.
2) Slightly more weight.

Pros of using a short chain:
1) Higher chain and cage tension can help to reduce chain slap.
2) Slightly lower weight.

Cons of using a short chain:
1) High chain tension can cause poorer shifting performance.
2) High cage tension can cause reduced cage spring durability.

Both ways will work fine, it is just that I usually prefer the long chain method for a front single drivetrain, where it is possible due to excess chain capacity (without front double chain ring).

Next, I will move on to the handlebar side, where the sole highlight is the new GX AXS wireless shifter. All other components such as the XTR brake levers and Ergon grips remain the same.

Final position of the shifter, after making a few adjustments to find the optimum position with good ergonomics.

Just a pod hanging off the brake lever clamp band, without any wire or cable coming out of it.

From the rider's point of view. I like how it looks with just two clamp bands, with no wires running around.

Looks good from the front as well, with just two brake levers and two hydraulic hoses visible.

Again, another unholy alliance where the SRAM shifter is attached to the Shimano brake lever with a third-party adapter.

Final bike specifications and weight! It actually gained about 70 grams over the previous version, mainly due to the heavier saddle, rear derailleur and bottom bracket.

The weight comparison is not entirely fair, as I changed other items at the same time, along with the 12 speed components.

For example, the non-related components that I also changed are the bottom bracket (+35 grams) and saddle (+65 grams). This contributed to a 100 gram increase, which is not related to the 11 to 12 speed change.

Therefore, if we exclude this non-related 100 grams, changing from the previous 11 speed Di2 setup to this 12 speed AXS setup saves about 30 grams. I would say there is no significant increase or decrease in weight from this modification.

Lowest gear ratio of 27 gear inches makes it easier to climb Lorong Sesuai.

Extended testing on the Green Corridor.

Went all the way to Peirce Reservoir for slope testing!

Here is a good look at the 1x12 speed drivetrain. Rear triangle looks very neat without any wires or cables.

The Flattop chain really gives the drivetrain a distinctive look. From far, I can see that this is a AXS 12 speed drivetrain, just by looking at the chain.

I am quite happy with this successful modification, as I have managed to increase the gear range, while tidying up the bike with no cables or Di2 wires. The overall weight difference is negligible as well. Most important of all, I have learnt quite a lot from this modification, as I was not familiar with the SRAM AXS system.

However, the downside of this SRAM AXS modification is poorer shifting performance, compared to the Shimano Di2 drivetrain. There are occasional mis-shifts at the smaller sprockets, which I am unable to resolve even with  rear derailleur adjustments. Solving the mis-shift issue at some gears would cause other gears to develop noise or mis-shifts instead.

On the other hand, the shifting performance at the lower gears (larger sprockets) are very smooth. In fact, sometimes it is so smooth that I cannot feel the gear change from the pedals! The lack of a gear indicator or display also forces me to look down at the cassette often to know which gear I am in. On the previous Di2 system, the Di2 display would show the gear number, and also emit a beep sound when I am at the extreme gears (1st or 11th gear)

Finally, there is more driving noise and chain vibration that can be felt through the chain and pedals, especially in the smaller sprockets.

That said, I don't regret changing to this AXS wireless system. It is something that is unique and good to try.

Friday, January 21, 2022

Fnhon DB12: Installation of SRAM eTap AXS

With all the new 12 speed components in place, it is now time to assemble them onto the Fnhon folding bike! This is an ambitious modification, where there is no existing bike to take reference from. Also, I would not know if everything was going to work, until I actually install them. And this is why I took on this challenge, as it is new to me, and allows me to learn many new things.

All the new components needed for the 12 speed AXS drivetrain conversion!

Force AXS 10-36T 12 speed cassette, mounted on the XDR freehub body.


Force AXS wireless rear derailleur, rated for up to 36T cassettes.

GX AXS wireless shifter, taken from the MTB side to be used on this flat handlebar bike.

New 44T Wolf Tooth narrow wide chain ring, with a revised teeth profile to work with the Flattop chain that has larger chain rollers. I will be using the same Shimano Ultegra 6800 crankset.

New bottom bracket from Ascent Bikes. Not necessary for this 12 speed modification, but I took the chance to try out this new bottom bracket.

Before I could install the new 12 speed components, I had to remove all the existing 11 speed Di2 components. During removal of these components, I found it liberating, as I no longer need to attach a battery to the seat post, nor run Di2 wires along the handlebar and frame.

All these Di2 components can be removed!

Existing Di2 handlebar setup, with a display (Junction A), a Di2 switch and wires running around.

It felt good to remove all these wires and Di2 parts from the bike, as the handlebar looks so much neater. One thing I would miss is the Di2 gear display, which shows me the selected gear and also the battery level. Technically this can be done by pairing the AXS system with a Garmin head unit, much like the Di2 version, but this would require a Garmin to be added to the folding bike, which I think is not necessary.

After installing the wheelset, now with the 10-36T 12 speed cassette, next is to install the Force AXS wireless rear derailleur. As there are no wires or cables, I just had to secure it on the hanger, that's all! Extremely easy and convenient to do.

To optimize the shifting performance, the guide pulley of the rear derailleur should be adjusted to the recommended distance from the cassette sprocket. In this case, I need to set it to 5 mm.

A tool is helpfully supplied together with the rear derailleur, for setting the distance. You could also do it with a ruler.

Using the printed markings, adjust the B-tension bolt on the rear derailleur, to adjust the distance as required.

Chain length would be pretty important as well. In this case, I plan to keep the chain as long as feasible, to reduce chain tension, so I did not follow the recommendations.

Only 4 links left, as I made the chain as long as possible (without chain slack), instead of as short as possible (without overstretching the rear derailleur). This is possible only because it is a front single drivetrain, where the rear derailleur cage has extra chain capacity.

Using the full chain weight + box (299 grams) minus off the remaining chain + box (47 grams), gives the actual chain weight that is on the bike as 252 grams.

Comparing the stock clamp band with the third-party adapter (I-Spec EV type).

On the I-Spec EV brake lever, this nut needs to be installed onto the clamp band first. The shifter will then be attached to it.

Some problem with tool access, making it difficult to tighten the bolt at certain positions.

Handlebar looks clean with only one clamp band per side. I added loctite to the bolt to prevent self-loosening.

Final shifter position, after multiple trials and adjustments.

Lastly, the rear derailleur position will need some fine-tuning, to align the guide pulley with the sprocket. On the previous Di2, this was done by pressing the function button on Junction A, to enter adjustment mode.

On this AXS system, it is done by holding the function button on the shifter, and pressing the upshift or downshift button for small adjustments in either direction. Off the bike this can be done with one hand. However, it is nearly impossible to do adjustments while riding, as my fingers cannot press both the function button and shifting button simultaneously.

Instructions for adjusting the rear derailleur position, from the shifter side.

Additional function to shift the rear derailleur without a shifter!

While fiddling with the AXS system, I found that if I pressed the rear derailleur function button once, it would shift the rear derailleur outwards by one gear. A double press shifts it inwards by one gear. I thought this was brilliant, as it can ensure that I can still set my rear derailleur to a preferred "single speed" gear to get home, in the event that the shifter runs out of battery or gets damaged.

In the next post, I will share the final setup on this Fnhon folding bike, along with many more close up pictures. Did I manage to reduce any weight by changing to this wireless 12 speed drivetrain?

Thursday, January 13, 2022

Fnhon DB12: Wolf Tooth Chain Ring for AXS 12 Speed Chain

For this new 1x12 speed drivetrain on the Fnhon folding bike, a new chain ring is required, because of the new Flattop chain used. As shown in detail in the chain comparison post, the Flattop chain has larger rollers, which do not fit onto existing chain rings.

Since I am getting a new chain ring, this is a good chance to adjust the gear ratios that I want. Previously I was using the 48T Wolf Tooth chain ring together with a 11-32T cassette. The gear ratio was a bit too high for my usage, but I did not change the chain ring then, as it was not critical. The lowest gear of 33 gear inches is not quite low enough for steeper slopes.

Previous gear ratios on the 11 speed drivetrain, with 48T chain ring and 11-32T cassette.

I would have preferred to shift the gear range down a bit, as I rarely use the highest gear of 96 gear inches. In fact, even on my Focus Paralane road bike, with a similar top gear of 98 gear inches, this top gear is hardly used except when going downslope.

This time, I decided to get a new 44T chain ring, to go with the new Force 10-36T cassette.

44T chain ring with 10-36T cassette, on 451 wheels.

Actually I could have used an even smaller chain ring, as the highest gear of front 44T and rear 10T is 96 gear inches, almost the same as the previous front 48T and rear 11T gearing.

What is wonderful about this new 10-36T 12 speed cassette is that the gear range is much wider (360%) vs the 11-32T 11 speed cassette (290%). As such, I can afford to keep the highest gear the same, but gain 2 more lower gears as seen above.

New 44T Wolf Tooth chain ring!

Drop Stop B teeth profile is compatible with Flattop chains. This chain ring can be installed on Shimano 4 arm road cranksets, with 110 mm BCD.

44T chain ring on the left is noticeably smaller than the 48T chain ring on the right.

The Drop Stop B teeth profile replaces the older Drop Stop profile.

The new chain rings come with an additional cutout, to match with newer Shimano crank arms. Older chain rings don't have this cutout, so I needed to cut it manually.

Previously it was patent pending, now the patent has been granted.

44T chain ring is 81 grams.

Old 48T chain ring is 103 grams.

For a front single drivetrain, it is important to set the gear range properly, so that all the gears can realistically be used. During climbing, the low gears should be low enough. During sprinting or descending, the high gears should be high enough. There will be some compromises compared to a front double drivetrain, but generally a front single gives sufficient gear range for folding bikes.

One of the most common mistake people make when selecting their chain ring size, is to have a chain ring that is too big for their usage. Many use 52T, 54T, or even up to 60T. On a 451 wheel, these correspond to quite high gear ratios that are rarely used. However, they still use large chain rings, as they mistakenly believe that a large chain ring allow them to go faster without additional effort, without considering that you need strong legs to push high gears.

At the same time, these people struggle up slopes, as the large chain ring means that the low gear is not easy enough. Therefore, the chain ring size selection is very important, to ensure that you can maximize the gear usage across the whole cassette.

When I use my folding bikes, I mainly ride casually for leisure, so I don't need high gears for sprinting. On downslopes, if I run out of gears, I just let the bike roll freely. What is important is that I always have a sufficiently low gear for climbing, and this is done by choosing chain rings that are not too big.

Therefore, the 44T chain ring that I chose is carefully selected after calculations, to make sure that the top gear is not so high that I can't use it. More lower gears are always better for climbing!