Showing posts with label Bottle Cage. Show all posts

Saturday, July 19, 2025

Brompton P Line: Monkii Bottle Cage and Quad Lock Mount

Some accessories to be added to the Brompton P Line! After showing the stock condition, and also the special features of the P Line, now it is time to add some accessories and bring the bike out for a ride.

I decided to keep the accessories to a minimum, which is why the dedicated accessories for the Brompton P Line is only the phone mount and the bottle cage.

The bottle cage is usually mounted on the vertical handlepost of the Brompton, for easy access while riding. However, a permanent bottle cage that is mounted here would affect the folded size. Therefore, I got the Monkii Cage bottle cage, which I first used a long time ago on the Dahon Boardwalk.

What's unique about the Monkii Cage system is that the bottle cage itself can be easily separated from the base, so as not to affect the folding.

Depending on the diameter of the handlepost, and whether it is straight or tapered, use the different spacers accordingly.

After a bit of trial and error, I found that the Brompton handlepost does not require the use of spacers. However, I also did not want to scratch the handlepost by clamping the Monkii Cage directly onto the painted surface. Therefore, I found some thin rubber shims to protect the handlepost.

Weight of Monkii Cage mount, with thin rubber shims, is 35 grams. That is more than the weight of most bottle cages already...

This is the new version of the Monkii Cage, which is called Type V. The way it fits onto the mount is more secure than the original.

New cage design on the right, my old Monkii Cage on the left. From the front you can't really tell the difference.

Old cage on the left just slides straight into the mount. However, it can sometimes jump off on bumpy roads. The new Type V on the right requires some clever movement to prevent self-ejection.

New cage requires the cage to be slid into the top screw boss from the side first, before rotating and then sliding downwards onto the bottom screw boss. This ensure it will never slide off on its own.

Mounted onto the handlepost of the Brompton P Line! When folding the bike, I just slide the bottle cage off, and leave the mount on.

Other than mounting a bottle cage, I also needed to mount my phone onto the bike. As what I have done on all my other bikes, a Quad Lock mount will be used to attach the phone to the bike. I have used Quad Lock for many years since Samsung Galaxy S8, on the Java Freccia carbon mini velo. The Quad Lock design has never failed me and is 100% reliable.

The Brompton Quad Lock mount is a bit special, because it is not sold directly by Quad Lock. Rather, it can only be bought through Brompton retailers.

Collaboration between Brompton and Quad Lock to create this mount that is specifically designed for Brompton handlebars.

Made in UK, with Brompton logo. No surprise that it commands a Brompton premium as well.

Official Quad Lock mount for Brompton!

It's designed to make use of the dead space in between the M or H type handlebars.

Instructions are written in a recognizable Brompton style, if you have seen the Brompton manual before. Adjust the angle to avoid the Quad Lock mount sticking out when bike is folded.

Brompton Quad Lock mount weighs 55 grams.

Quad Lock mount installed! Very stable with two clamps on the handlebar.

Monkii Cage mounted on the handlepost, and Quad Lock mount on top.

When folded, it does not cause interference or take up additional space.

I'm happy with these two accessories, as they fit well and work well. These are pretty costly, but I think its worth the quality that I get.

Here is how it looks with the Monkii Bottle Cage and Quad Lock Mount!

Sunday, January 31, 2016

Wheelsport Fantasy 2x10 Speed: Part 7 - Solving Chain Interference at FD + Extra Bottle Cage

Part 1: Original Bike Components
Part 2: Bike Disassembly and Component Weight
Part 3: Installation of New Components
Part 4: Final Assembly and Comparison

Part 5: Flat Bar to Drop Bar Conversion
Part 6: Geometry Comparison

While upgrading my friend's Wheelsport Fantasy 2x10 speed drop bar mini velo, I noticed that it had the same front derailleur mounting issue as seen on my own Wheelsport Fantasy bike. The angle of the FD mount on the frame is not suited for this small wheeled bike design. As such, there will be interference between the chain and the FD chain guide when the chain is in the small chainring. Let's take a look at the issue here, find out how it happened, and how it can be solved on this frame.

No issue with chain interference when the chain is in the large chainring

However, when the chain is in the small chainring, the chain will rub against the bottom of the FD chain guide in most gears

Close up view of the chain interference with the bottom of the FD chain guide

Chain barely clears the FD chain guide when in the front low and rear gear 3 setting. At gears 4 or higher, the chain will rub the FD chain guide.

After studying the differences between the mini velo and my Merida road bike, I have found the reason why there would be chain interference. The main difference in frame geometry that causes this issue is the position of the rear axle relative to the bottom bracket. More specifically, whether the rear axle is higher or lower than the bottom bracket.

On almost every adult bike, the bottom bracket is around the same distance from the ground, no matter a small wheeled bike or a full sized road bike. This is to maintain sufficient crank arm clearance from the ground, and yet allow the rider to climb on the bike easily.

However, the rear axle's distance from the ground will differ greatly, depending on the size of the wheel. A road bike with large 700C wheels will have the rear axle higher off the ground as compared to that of a 20" wheel folding bike. This affects the angle of the chain relative to the FD chain guide. If the FD mount is located on the mini velo seat tube with the same orientation as that on a road bike, it will cause FD compatibility issues for small wheeled bikes.


On the road bike, the rear axle is much higher than the bottom bracket. As such, the chain slopes more steeply upwards from the small chainring to the cassette. This ensures that the chain does not touch the FD chain guide even when in the front low/rear top gear combination as shown here.

On small wheeled bikes, the rear axle is lower than the BB. The chain is almost straight when in the front low/rear top gear combination. As such, the chain will touch the FD chain guide if the FD mount is not placed correctly on the frame. In the case of this Wheelsport Fantasy mini velo, the chain will touch the bottom of the FD chain guide in the top 7 gears of the cassette. Only when the cassette gear is set at gear 1, 2 or 3 will there be no interference.

Comparing the angle of the chain between road bike and mini velo. See how different the chain angle is, and the different height of the cassette.

For small wheeled bikes, the proper way to locate the FD mount on the frame is to place it behind the seat tube, and tilted to follow the curvature of the chain ring. However, on the Wheelsport Fantasy frame, the FD mount is parallel to the seat tube, and is located along the seat tube and not behind it. This means the FD will be fixed at the wrong position for proper operation.

On the Wheelsport Fantasy frame, the FD mount is placed parallel to the seat tube and right in the middle of it, which is not the correct position.

The correct way is to place it behind the seat tube, and to tilt it so that the FD chain guide can follow the curvature of the chain ring. Example shown here is from a Tyrell mini velo.

As can be seen from the Tyrell bike shown above, the FD mount is placed behind the seat tube and also tilted. This ensures that the FD is angled correctly relative to the chain and the rear axle position. To solve this issue on the Wheelsport Fantasy mini velo, I will need to move the FD to the correct position. As previously done on my own mini velo, I will use the same spacer and angled shims to move the FD position.

Using the spacer and the angled Ridea 4 degree shims

Together with a long bolt and some spherical washers, the new FD mount is created

New position of the FD with the custom mount. The FD has been moved rearwards and also tilted to follow the curvature of the chain ring.

Now, even when the chain is in the front low and rear top position, there is clearance between the chain and the bottom of the FD chain guide

Inner cable fixed up with the FD in the new position

FD support bolt is unable to push against the frame, but the FD is still rigid enough, and front shifting still works well

With the custom FD mount created, there is no more chain interference with the FD chain guide. In fact, the custom FD mount works much better than the stock bike condition. After giving feedback to the bike shop and the frame maker, I am glad to see that Wheelsport has improved their FD mounting on the mini velo for the model year 2016 frames. The FD mount has been moved rearwards on the seat tube, and it should now work without requiring the custom FD mount.

Another small issue with the Wheelsport Fantasy mini velo frame is that there is only one bottle cage mount. Having just one bottle cage mount is quite standard on most mini velo or folding bikes, so it is not really a problem with frame design. However, it is useful to have an extra water bottle when riding long distance, and so I found a way to add an extra bottle cage to the Wheelsport Fantasy mini velo frame, while keeping it neat and unobtrusive.

It is not possible to add an extra bottle cage mount for a standard water bottle within the frame triangle, as there is not enough space. Adding a small tool bottle is possible though, as already done previously on my own mini velo.

To have an extra bottle cage mount, I decided to use the Monkii Cage water bottle mount, which clamps on a round part of the frame and creates an extra bottle cage mounting point. The round clips are not used. Instead, a standard bottle cage is bolted to the Monkii Cage mount.

Monkii Cage mount. The two round clips are not required for this set up.

The Monkii Cage mount fits perfectly in this little triangle on the frame. Without this design element on the frame, it would not be possible to fit the bottle cage mount here.

A second water bottle fits nicely at this location. Although it is difficult to access the water bottle while riding, it is still acceptable as it is much better than having just one water bottle on the bike.

With that, the latest modification to this Wheelsport Fantasy mini velo is complete. The FD mounting issue has been solved, and a second bottle cage has also been fixed to the frame.

Friday, October 23, 2015

Wheelsport Ultegra Di2 2x11 Speed: Part 6 - Accessories and Geometry Comparison

Part 1: Frame Design and Carbon Fork
Part 2: Compatibility Check for Wheelset and Brake Calipers
Part 3: Component Selection
Part 4: Installation Issues and Solutions
Part 5: Final Assembly

With the successful assembly of the Wheelsport Fantasy Ultegra Di2 2x11 Speed Mini Velo, I now have a new bike to ride! This bike replaces the Dahon Boardwalk which has served me extremely well these few years. It was the bike that kick started all these bike upgrading, and helped me learnt so much about bicycles.

Now, on my daily commute to work, I generally rotate between three bikes. The Merida Scultura 5000 road bike, this new Wheelsport Fantasy mini velo, and the Avanti Inc 3 wet weather bike. If the weather is dry and good, I will use the Merida road bike or the Wheelsport mini velo. Occasionally, I will ride the Dahon MuEX Di2 folding bike. Otherwise, if there is wet weather, I will use the all weather Avanti Inc 3 as my commuting bike.

I like to have some accessories on all my bikes, such as lights or mounts for a cycle computer. Also, I find it important to bring along spares and tools, which means the use of a saddle bag or a tool bottle. On this Wheelsport mini velo, I will also need to bring along spares and tools, but I don't want to use a saddle bag as it will spoil the look of the bike for me. Another reason for eliminating the saddle bag is so that I can mount the Fly 6 rear light + camera on the seat post. In this case, the elegant way is to use a tool bottle to carry the stuff, like how it is done on the Merida road bike.

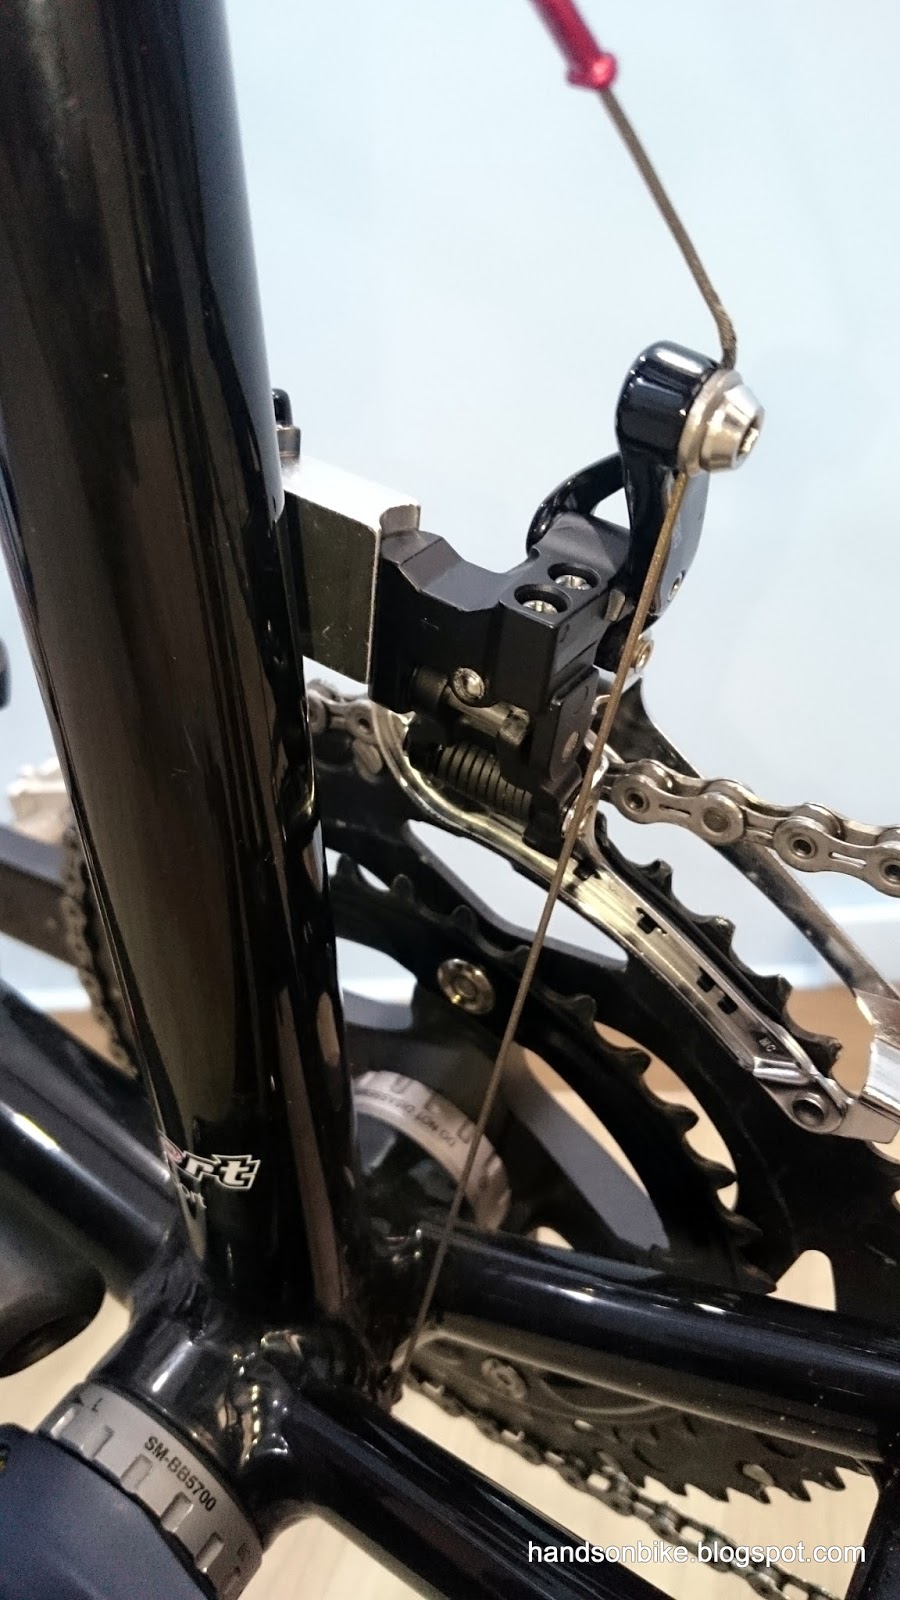
The problem is, the Wheelsport Fantasy frame only comes with one set of bottle cage mounting holes, which is located on the downtube. This is where the water bottle will be mounted, so I need to find somewhere else for the tool bottle. My solution for this is to create an extra set of mounting holes on the seat tube.

Only one set of bottle cage mounting holes on the downtube as shown, no bottle cage mounting anywhere else.

Using this add-on bottle cage mounting, extra bottle cage mounting holes can be strapped onto almost any part of the bike frame

Turning the red plastic piece will miraculously tighten the cable tie, through the ingenious use of a special spiral gear that works like a worm gear.

One set weighs only 29 grams, very simple and effective

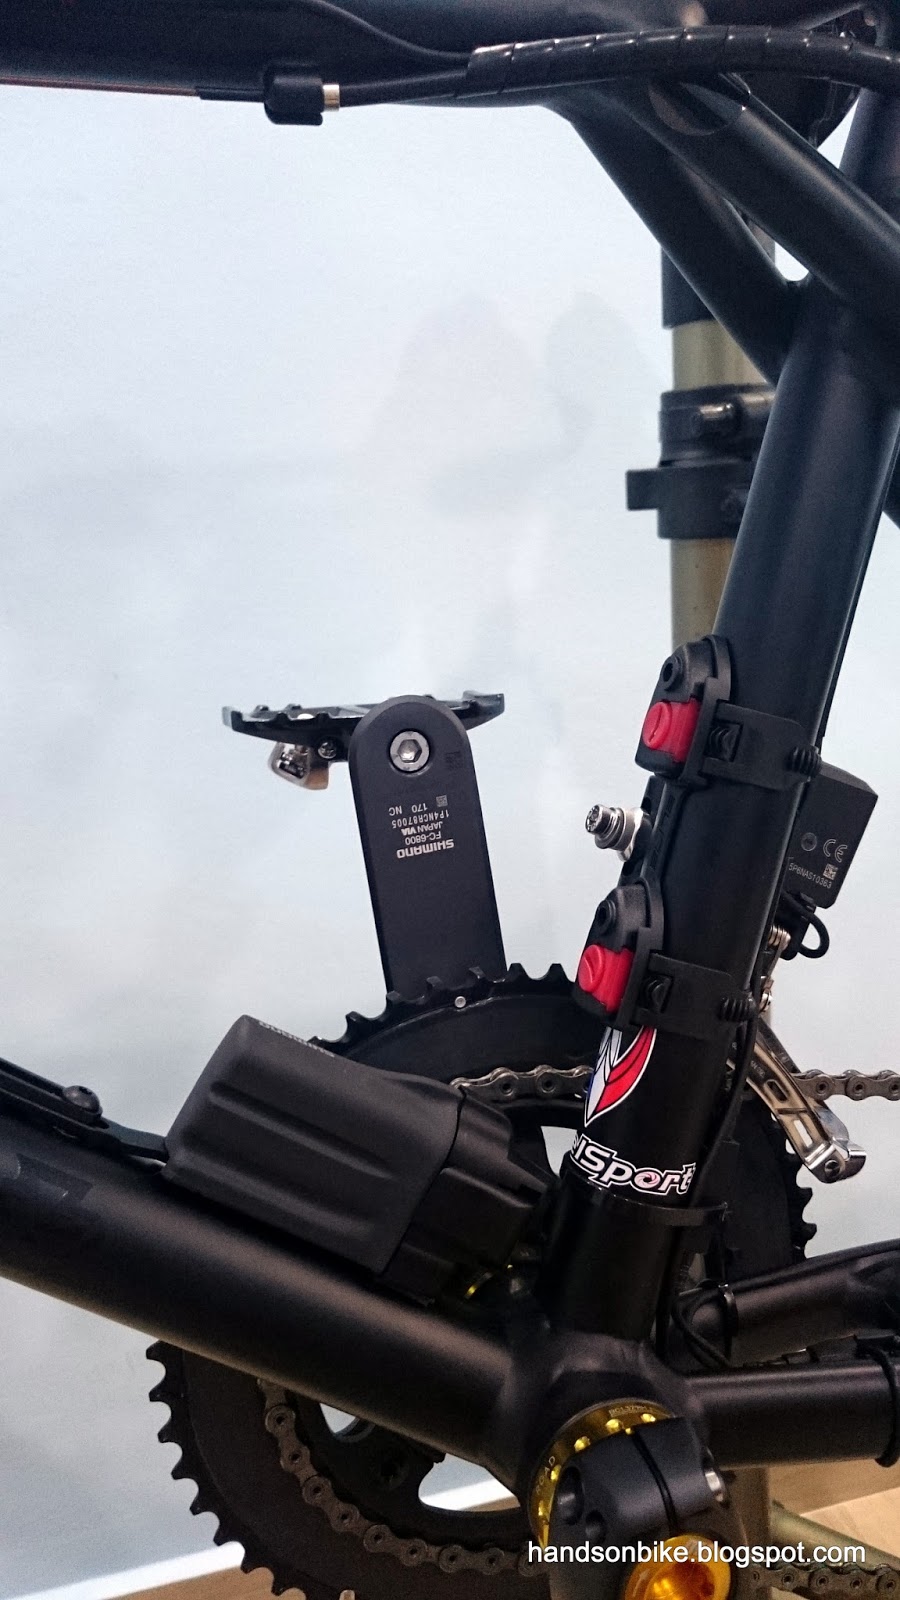
Installed on the seat tube of the Wheelsport frame. The challenge is to put it as low as possible, but also not interfere with the FD or the Di2 battery.

With the new mount, a Merida bottle cage was used to hold the PRO tool bottle and the Lezyne Pressure Drive hand pump

Managed to fit everything I wanted into the compact triangle of the frame!

I am glad that I managed to make this work, so that I can use a tool bottle to carry the spares and tools. However, it must be noted that due to the limited space, it is quite impossible to use a water bottle here, unless it is a really short water bottle, or if the bottle cage allows sideways access.

Next, I would also like to mount the Garmin Edge 510 cycle computer and the Shimano Sport Camera on this bike. To mount these two accessories on the bike, I had previously used the K-Edge Aero mount on the Merida road bike. However, the K-Edge mount was expensive, and I did not want to spend so much again on a K-Edge mount. Luckily, I managed to find a similar one on Taobao which is half the price.

Garmin plus GoPro combo mount from Taobao, works similarly to the K-Edge design

Bottom side of the mount. The mount can be pushed further outwards as required to accommodate the larger Garmin Edge 1000.

A bit heavier than the K-Edge mount, as more material is used on this mount

Seen as mounted on the bike, with the Garmin on top and the Shimano camera below

As neat as possible, without taking up too much space on the handlebar

The most important accessories are the lights, which is necessary for safety, especially when riding in the dark. My current favourite lights are the D-Light USB rechargeable front and rear lights, as they are so small and lightweight, and yet bright enough for on road riding usage.

D-Light rear light, fits perfectly into the small triangle formed by the top tube, seat tube and seat stays. This is the perfect place for a rear light.

Pair of D-Light front lights, mounted the same way as on the Merida road bike.

All the accessories have been installed on the bike! Now, I would like to compare the geometries of this new Wheelsport mini velo with the Merida road bike. Both are built to go fast, and the riding geometry should be similar for me. As always, I use the bottom bracket of both the bikes as the datum for alignment, before comparing them. I had previously compared the Dahon Boardwalk to the Merida Scultura 5000, and now it will be the Wheelsport Fantasy Mini Velo against the Merida road bike.

Aligning the bottom bracket of the bikes to each other

One concern that I have is the ground clearance for the crankarm when cornering. This Wheelsport mini velo frame is designed for 451 wheels, but I have installed 406 wheels which are smaller. This will put the crankarm and pedals closer to the ground during cornering. For comparison, I have measured the BB to ground distance for my other bikes. This distance is somewhat affected by the type of tires used, as wider tires are also taller than narrower tires.

BB to Ground Height:
Wheelsport Fantasy Ultegra Di2 2x11 Speed: 267mm
Dahon MuEX and Dahon Vitesse: 284mm
Merida Scultura 5000: 275mm
Avanti Inc 3: 274mm

Based on the measurements, Dahon folding bikes actually have a pretty high BB to ground distance. The Merida road bike has a BB to ground distance that is almost the same as the Avanti Inc 3, so I guess this is pretty much the standard for a bike meant to be ridden on road. I expect off-road mountain bikes to have more clearance with the ground, to clear obstacles and also to allow for suspension sag.

This leaves the BB to ground distance for the Wheelsport mini velo as the lowest of the lot. It is about 7mm lower than the next lowest. Will this cause pedal strike when I corner more with the Wheelsport mini velo? It is hard to tell until I try it. That said, I have never had pedal strike issues with any of the bikes mentioned above.

Merida bike has a 405mm chainstay length (from the website), while the Wheelsport frame has a 420mm chainstay length (measured). Will this give the mini velo more stability at high speed compared to the road bike?

Wheelsport frame has a BB to front hub length of 580mm, about the same as the Merida road bike

Saddle on the Wheelsport mini velo is set slightly lower than that on the Merida, as the BB height is also lower. Reach from the saddle to the pedals should be similar.

Saddle on the Wheelsport mini velo is set slightly further back, to give sufficient space between the stem and the nose of the saddle for me to stand in.

Handlebar on the Wheelsport mini velo is at about the same reach as the Merida, but is located about 30mm higher.

Slightly higher and nearer reach for the Wheelsport mini velo as compared to the Merida road bike

With this geometry comparison, it can be seen that the geometry of the Wheelsport Fantasy mini velo is quite similar to the Merida road bike. Apart from the slighter shorter reach on the mini velo (with a less aggressive riding posture), most other distances are similar. This also means that this mini velo will feel much like a road bike in terms of riding posture. The only thing left to do now is to ride the bike and enjoy it!

Further improvements were made later on, click here for Part 7!