Showing posts with label Moon Comet. Show all posts

Thursday, June 11, 2020

Moon Comet X Pro Front and Rear Lights

I have been using the Moon Comet lights on my bikes for many years, ever since they were first launched. I think they were one of the first to use COB (chip-on-board) LED lights, which gives a nice glow instead of sharp points of lights.

If you look back at my previous posts, I have been using the Moon Comet front light and also the Moon Comet rear light since year 2013, and they are still working fine! That is very impressive for a bicycle light.

However, recently the plastic Bracket that holds the light to the bike broke, and I had the choice to buy a new Bracket or buy a new light. Although the lights are still working, the battery life is now significantly shorter than before. This deterioration of battery life is to be expected due to repeated charging and discharging cycles. Therefore, I decided to retire these first generation of Moon Comet lights, and get a new set as replacement.

There is a specific reason why I still want to use these Moon Comet lights, as you can see later. Other than being good lights (bright, compact, lightweight, rechargeable), the Bracket that mounts it to the bike is special.

Moon Comet X Pro Front Light. The Pro version means a longer battery life compared to the non-pro version.

Other than being lightweight, there are multiple steady and flashing modes to make any user happy. Claimed runtime is also stated here for future reference.
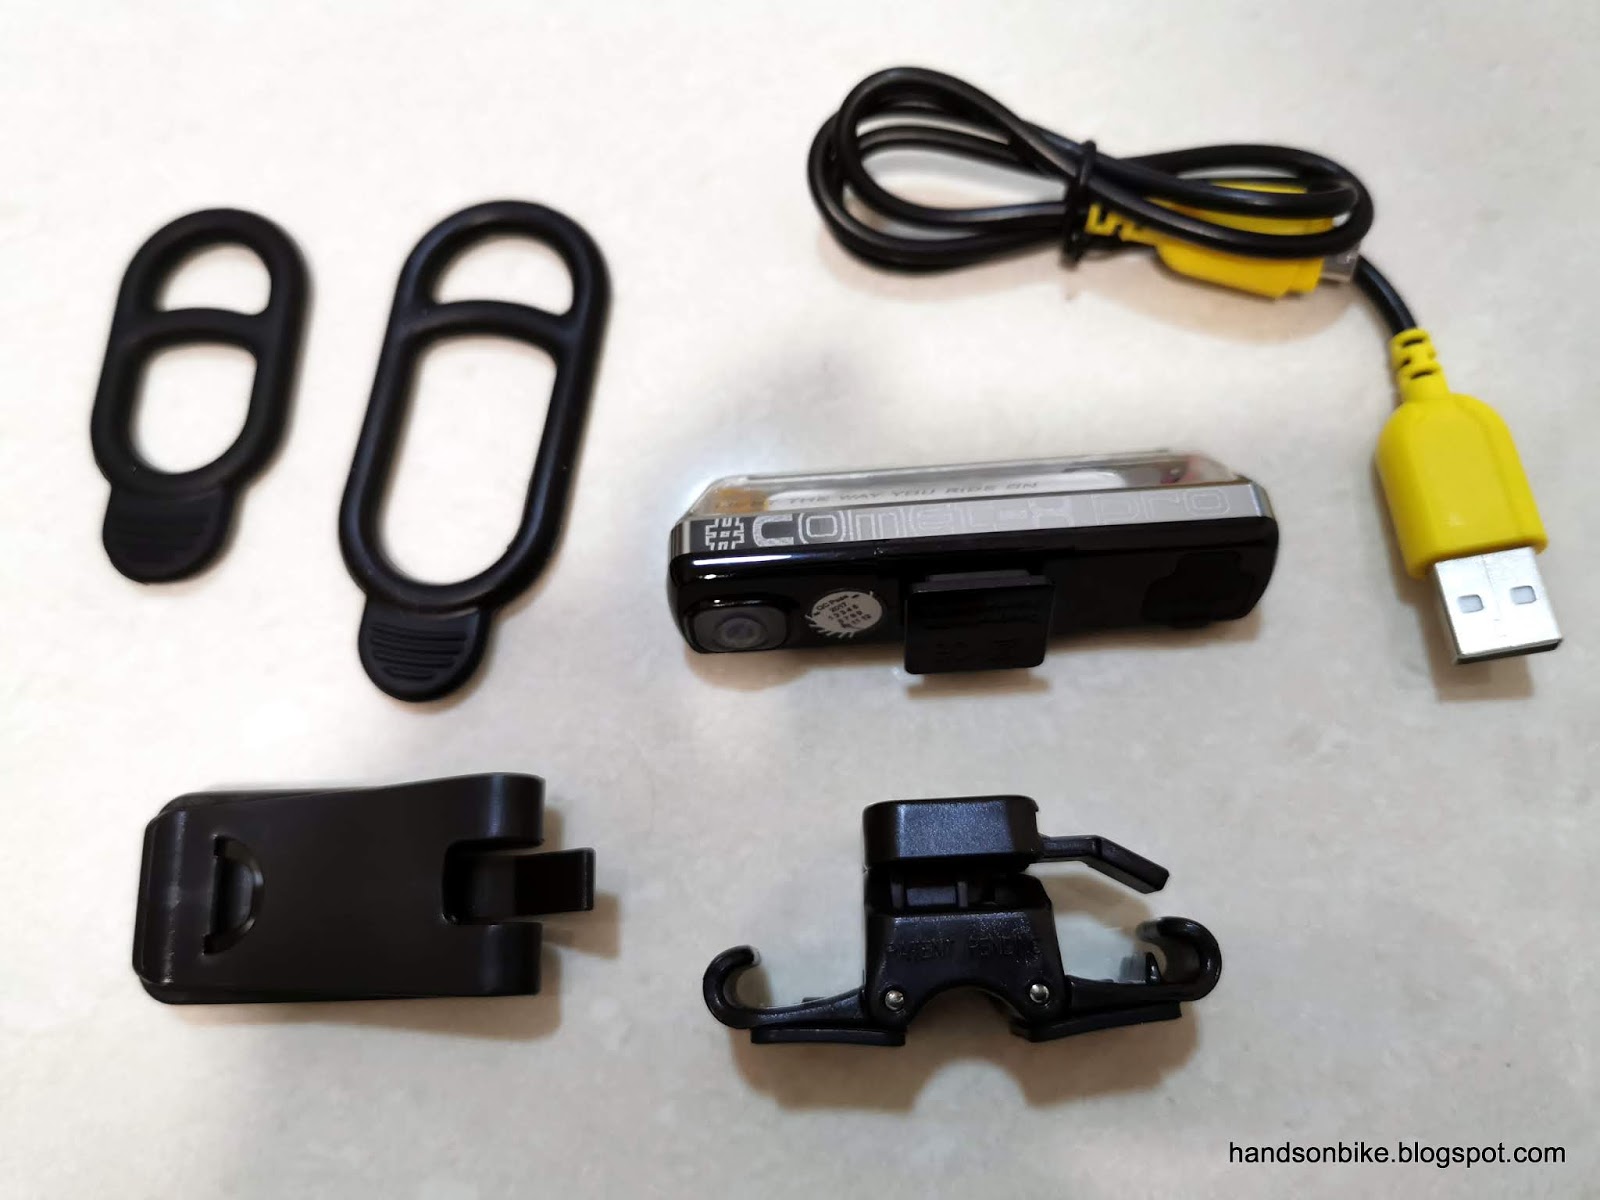
Other than the light, a USB charging cable, 2 rubber bands, a saddle bag clip, and a special mount is included.

The light has a clear transparent casing, so the internal battery and electronics can be seen.

Charging port is covered with a rubber flap, and a Micro USB port is now used instead of the near-obsolete Mini USB port that was used previously. I wouldn't mind if it was the latest USB-C port either.

Light plus special Bracket and rubber band weighs 46 grams.

At the same time, I bought the rear light as well. Although I already have the Cycliq Fly6 CE rear light + camera on my Cervelo Aspero, I wanted to use this rear light as a spare light. As already proven previously and also subsequently, it is necessary to have a spare light to augment the Fly6 CE, as it is not known for long battery life.

Moon Comet X Pro Rear Light, with the Pro version having a longer battery life.

Product information is in a different format compared to the front light. Optional accessories are also listed here.

For the rear light, other than the standard set of accessories provided with the front light, there is an additional saddle Bracket as shown at the top left corner.

Layout is the same as the front light. ON/OFF button located at one end, charging port at the other end.

Instead of having a clear transparent casing, it has a red transparent casing. Most likely it is the same plastic mold as the one for the front light, just with a red dye added. Clever way to save on different injection molding toolings.

Battery runtime and brightness stated clearly in the manual. I'm not too interested in the claimed lumens. If it looks bright enough to my eyes, it is good enough.

Here is the reason why I like these Moon Comet lights, because the innovative Bracket allows the front lights to be mounted on the front fork legs, freeing up space on the handlebars. This was first used on the Avanti Inc 3 commuting bike, where I mounted the Moon Nebula W front light. After that, I used it  successfully on the Canyon Endurace as well.

If I'm going to put front lights on the fork legs, might as well put on a pair for symmetry. Having two also allows built in redundancy, as it is very unlikely that both will run out of battery at the same time.

I mount them low enough so that the light from the opposite fork leg can shine through the wheel, instead of being blocked by the rims.

The special Bracket has a hinged V-shaped clamp that can be fixed on narrow fork legs, aero seat posts, or any round cylinder. Additionally, there is a sideways tilt, which is what makes this Bracket so versatile.

Mounting of the rear light is pretty standard on the seat post. The sideways tilt comes in useful again to shine the light horizontally. Normally the Fly6 CE will be there instead of this rear light.

The light is lightweight, compact, slim and bright. Only downside is the slightly higher price, but I think it is totally worth it.

I highly recommend this light, not just for the innovative Bracket, but for the overall package of compact size, lightweight, good brightness and battery life.

It also solves a problem that many road bikes have, where the front light cannot be mounted on the aero handlebar due to the shape or the size. By mounting the front lights on the front fork legs, visibility is very good, while it does not take up space on the handlebar or under the computer mount.

Wednesday, July 19, 2017

Brompton M6R: DIY Front and Rear Light Mounts

Next, after upgrading the hinge clamps, the rear suspension, and the Eazy wheels, the next modification would be to fix front and rear lights onto the Brompton. Due to the nature of the folding, there are not many places on the frame where you can fix a light permanently and not affect the folding or folded size.

Most people install a light onto the rear of the seatpost, with the light sticking out at the rear. This means that when lowering the seatpost, care must be taken not to lower it all the way down and damage the light clamp. Also, depending on the rear light design, it may or may not interfere with the seat post clamp.

Instead of doing that, I decided to mount a rear light onto the rear rack, using the mounting used for the rear reflector. Of course, this only works for Bromptons that have a rear rack.

Original rear reflector on the Brompton rear rack

It took me quite some time, trying out different brackets and mounting positions before I could find a suitable place to mount the rear light. The main challenge is to mount the rear light without it getting in the way during folding, while still pointing at the correct angle. At the same time, the rear light should be easily removable for charging. The rear light that I want to use is the Moon Comet rear light, which is a compact and bright rear light.

After much trial and error, I finally managed to use the Cateye mount (for saddle rails), and combine it with the Moon Comet rear light mount. The Cateye mount is clamped onto the two original L-shaped brackets used to mount the rear reflector.

L-shaped brackets + Cateye saddle rail mount + Moon Comet mount

Moon Comet rear light mounted at the rear of the rack

At the same time, note that I have managed to reinstall the bungee cords onto the rear rack! Previously they were removed as I could not hook the bungee cords onto the bolt of the rear Eazy wheels, like in the stock condition. However, I realised that since the bungee cords end in a loop, I can just put it through the rear rack as shown. Simple solution!

The light is protected by the Eazy wheels, and also does not protrude out from the rack, making it possible to fold the bicycle without hitting the rear light.

Good clearance with the ground, will not hit objects when rolling the folded bike 

Rear light DIY installation completed!

Next, after installing the rear light, the front light also needs to be installed. The obvious solution is to install the front light on the front bracket, which comes stock with a front reflector.

Front bracket with original front reflector

Studying the position of the front bracket when folded, to see the clearance and space available for mounting a front light

Instead of making a complex bracket mounting due to lack of space, I decided to just bolt on a QR axle extender...

...and wrap the rubber strap of the Moon Comet front light onto it!

No interference with the frame or cables during folding

Compared to the rear DIY mounting, the front mounting is much easier and straightforward. I basically just placed some material on the front bracket for the rubber strap to wrap around.

With this, the DIY front and rear light mounts are completed! There are no protruding parts that will interfere or compromise the compact folding. These DIY mounts also allow me to use the existing spare lights that I have, instead of buying more lights.

Sunday, January 19, 2014

Journey of the Boardwalk: Part 37 - Installing the new Drop Bar, Handlepost and Stem

To follow up on the previous blog post, where the new FSA Vero compact drop bar, new Fnhon handlepost and new stem were introduced, I will now show the installation of these new parts.

Two different 31.8mm stems were shown; the gold coloured stem and the silver coloured one-piece stem. Before I decided on the stem to use, I installed them on the new handlepost and drop bar to try it out.

This is how the gold coloured stem looks. It is very similar to the LitePro stem, with the only difference being the clamp diameter of 31.8mm for oversized handlebars.

Gold coloured 31.8mm stem on the new 27cm Fnhon handlepost

Side view

This is how the new stem will be used. Instead of extending the reach, the stem is used to increase the height of the handlepost. The reason for using the stem this way is because I want to maintain the clamping height of the handlepost. The previous ABR drop bar was clamped directly to the top of the 31.5cm Fnhon handlepost. As I am now using the new stem for mounting an oversized drop bar, the handlepost needs to be shorter in order to maintain the same height. 27cm handlepost + 4.8cm stem gives an overall height of 31.8cm, which is almost the same as the 31.5cm Fnhon handlepost.

Height of the Fnhon handlepost + stem is about 31.5cm, similar to the previous setup.


The gold coloured stem matches nicely with the black colour of the handlepost and drop bar.

I also tried out the other one-piece stem, to see if it is better than the gold coloured stem. This stem is lighter and stronger than the gold stem, due to its one-piece design. The only downside is that the colour does not fit in as nicely with the rest of the bike.

Side view of the one-piece stem. Strictly speaking it is not one piece as there are 2 face plates on top, but the rest of the stem is machined as one-piece.

Open clamp design makes it easy to set up the handlebar

Putting on the new FSA Vero compact drop bar

Another side view of the stem and drop bar

Top view of the stem. Note that there are many clamp bolts here! 8 in total.

Overall height of handlepost + stem is about 31.7cm, which is almost the same as the 31.5cm Fnhon handlepost

Overall view of the drop bar, stem and handlepost.

It was time to make a decision. To use the gold coloured stem, or the silver coloured stem? In the end I decided to go with function over aesthetics. The silver one-piece stem was chosen for its better stiffness and lighter weight. The open clamp design will also be very useful if I need to remove the handlebar from the handlepost.

Before I installed the new components onto the bike, I compared it with the existing setup on the Dahon Boardwalk.

New compact drop bar on the right. See the difference in the angle and height of the drops. The compact drop bar has a much shallower drop which should be more comfortable.

Similar width of 400mm

Another picture comparing the shape of the drop bars.

Side by side comparison of the new setup (on the left) and the old setup (on the right). Distance between the centre of the drop bar and the base of the handlepost is the same.

Old setup before it was taken off the bike

New setup! Just swap the entire handlepost unit, together with the new stem and drop bar. To see how to install the handlepost, check out the guide here.

The drop bar manual says that this drop bar is designed to have the drops parallel to the ground

Fixed the drop bar and stem positions as shown.

Positioned the Ultegra Di2 road shifters such that the hoods are tilted up slightly for better comfort.

Since I had to remove all the brake cables, I took the chance to swap out the brake outer casing for the new Dura-Ace 9000 outer casing. This is to make the braking action even smoother and lighter.

Swapping the brake cable housing

After wiring up everything! The handlebar extension mount was carried over from the previous drop bar and installed on the new drop bar.


New Cane Creek Crosstop levers. Installed slightly nearer to the centre of the drop bar compared to the previous setup,

New stem and 4 bolt handlepost clamp. The Di2 satellite switch is now mounted over the clamp band of the Cane Creek brake levers. It fits perfectly!

Setup looks very similar after the upgrade.

As the handlepost is now shorter, I have to mount the two Moon Comet Front Lights horizontally instead of vertically.

Showing the new curves of the drop bar. Shorter reach to the shifters, and also a more shallow drop. Looks much more comfortable than the previous drop bar!

Front view of the new setup

After trying out the new setup, I found that my riding position has really been improved, to become more comfortable. The shorter reach to the shifters means that I don't stretch out as far, while the shallow drops make it easy for me to stay in the drops for longer distances. In short, the ergonomics and comfort of riding has been improved with this new drop bar setup.

As for the stiffness of the new setup, it feels similar to the previous one-piece 31.5cm handlepost. Although the addition of a stem should make the handling feel less stiff, the wider position of the stem clamps and the oversized drop bar compensates for this. Most importantly, the comfort has been improved!

Overall view of the new setup