Showing posts with label Tiagra. Show all posts

Saturday, November 4, 2017

Dahon Vitesse: 2x10 Speed Flat Handlebar Setup

The Dahon Vitesse has come a long way since I started being interested in folding bikes. From the my first Dahon folding bike, the Dahon Boardwalk, to this Dahon Vitesse, I have learnt so much about folding bikes from modifying these two bikes.

Previously, the Dahon Vitesse had a 2x10 speed bullhorn bar setup, which was great for touring or fast riding due to the aerodynamic riding posture. Now, the focus has changed to just normal recreational riding, which means that the bullhorn bars will be removed to get a more compact fold and simpler setup.

This means that the handlebar area and shifters will be changed, while the drivetrain components such as the rear derailleur, front derailleur, cassette, chain, and crankset will remain. At the same time, I will service the bike by cleaning up the components.

One advantage of this setup is that I can revert to using normal V brakes, instead of the long arm caliper brakes which do not give very good braking power.

Using Tiagra 4600 2x10 speed shifters and brake levers for this flat handlebar setup

LitePro stem is still there to mate the flat handlebar to the T type handlepost

Kickstand and mudguards will remain on the bike as they are still very useful

Changed back to normal V brakes for simple setup and good braking function

Same Shimano 105 drivetrain components, no upgrade required

Colour scheme is generally silver and black. Only stock components are the frame, fork and seatpost.

Still a smart looking bike with Shimano 2x10 speed road components

With a flat handlebar, now it folds compactly as well! A definite plus for storage.

With this restoration, this Dahon Vitesse rides as well as a new bike again! Gear changing is smooth and accurate with good braking power. Rolling resistance is minimised with the smooth rolling PZ Racing wheelset, while the Marathon Racer tires are comfortable yet fast.

Final weight is about 10.5kg without the folding pedals.

Thursday, August 17, 2017

Brompton M6R: Shimano Crankset and Bottom Bracket

Today, I am going to upgrade the stock Brompton crankset. The stock crankset is a square taper crankset, with a 5 arm design and 130mm BCD for the chain ring. What I found was that if you point the crankarm downwards and step hard on the pedal, you can actually see and feel the crankarm flex inwards. To me, this is not acceptable as the excessive flex is unsettling, and also means less efficient pedaling.

I plan to change to a Hollowtech II crankset, where the spindle is integrated with the right side crankarm, and mounted through an external bottom bracket. This setup will be stiffer than a square taper system.

After consulting some friends, I was advised that it will not be a straightforward swap, as the clearances around the crankset and chainring are tight. If the chainline is too inwards, the chainring will interfere with the frame. If it is too outwards, it will interfere with the folding.

This means some trial and error is needed to adjust the chainline and avoid interference. Before installing the new crankset, let's take a look at the original setup.

Original setup has a gap of about 3mm between the chain and chainstay.

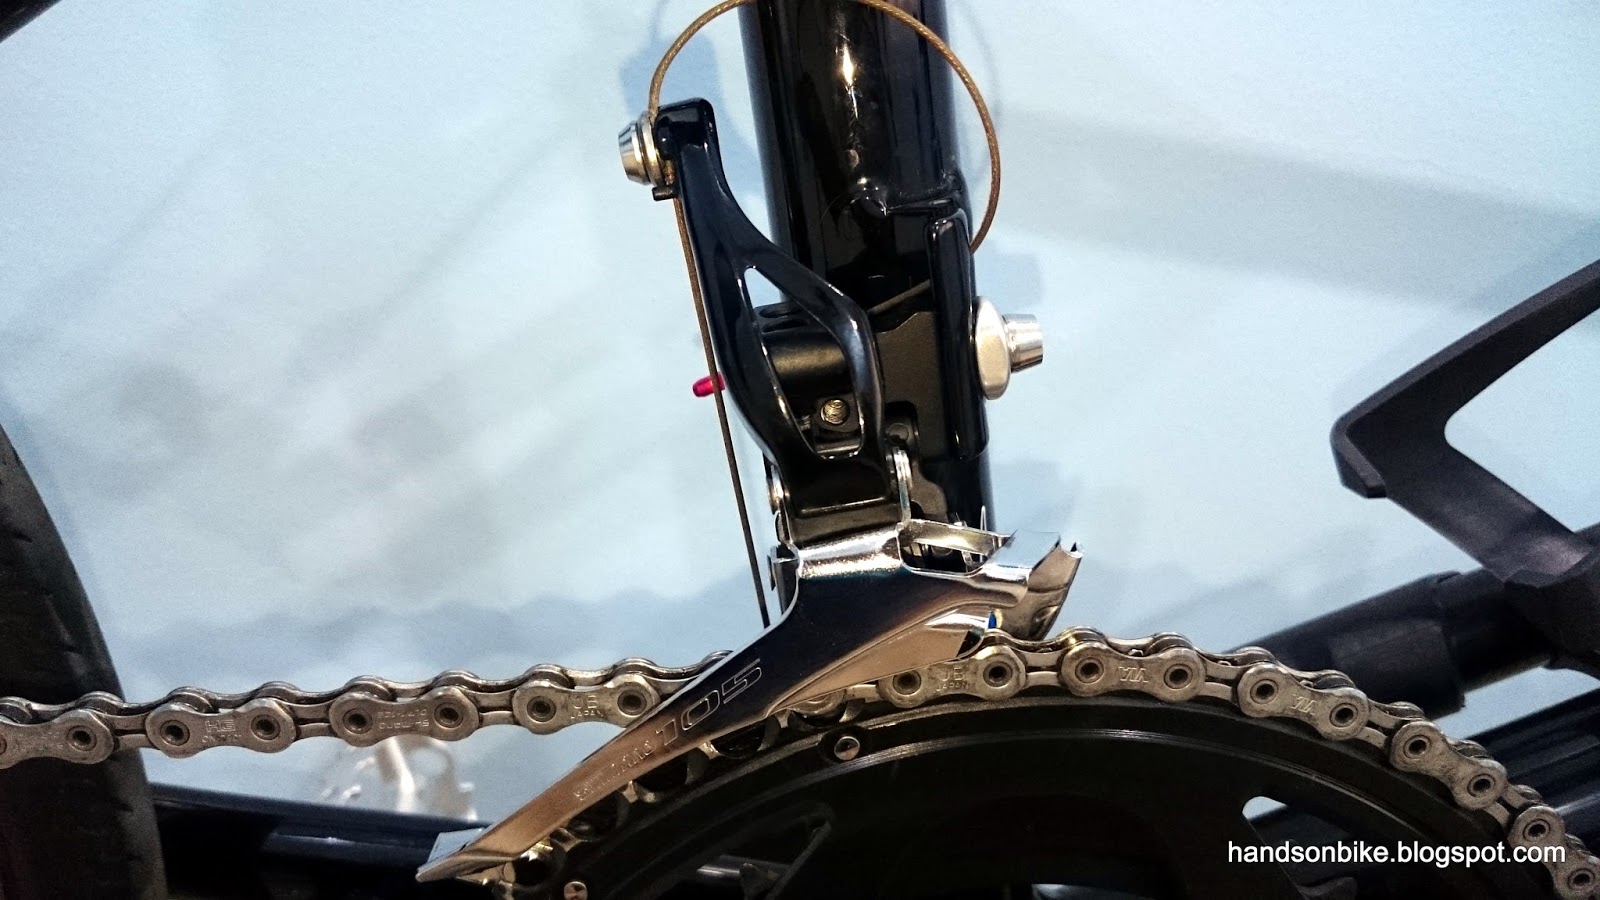
After removing the stock crankset and bottom bracket, the bottom bracket shell is confirmed to be standard 68mm English threaded.

Threads are cleaned and ready to accept a new Hollowtech II bottom bracket

Original 130mm BCD, 44T chainring + chain guard is 89 grams

Original square taper bottom bracket is FAG branded, and weighs 242 grams.

Original Brompton left side crankarm is 213 grams...

...while the original Brompton right side crankarm is 300 grams.

Together, the original crankset (without chainring) is 513 grams.

In order to match the colour scheme of the Brompton, I wanted to get a crankset with polished silver colour to match the rims. A black crankset is nice on its own, but it does not match this Brompton. I tried to get a Dura-Ace 7800 crankset, as the polished finishing is really nice, but it is hard to get a suitable one in good condition as it has already been out of production for almost 10 years, having been replaced by the newer 7900, 9000 and R9100 series.

The closest one that has a similar finishing would be the Tiagra 4600 crankset, which is also in polished silver. Of course it is not as lightweight as the Dura-Ace crankset, but it is OK as weight is not important for this bike.

Tiagra left side crankarm, 250 grams. Heavier than the Brompton left side crankarm as I guess it has more material for stiffness.

Tiagra right side crankarm, 424 grams. Also heavier than the Brompton right side crankarm, as it has more material for stiffness and also includes the weight of the spindle.

Normally, for a road crankset such as Tiagra, if it is installed in a 68mm wide bottom bracket shell, a road bottom bracket will be used, with no spacers required under the bottom bracket cups.

However, with advice from friends who have installed a Hollowtech II crankset on a Brompton before, a spacer of 3 to 4mm is required to push out the right side chainring to clear the frame.

From my experience, it is possible to fit a spacer with maximum thickness of around 2mm under the bottom bracket cups, before the left side crankarm runs out of sufficient spindle length to be safely fixed on. In this case, since I needed more than 2mm, some creative modification is required.

From a modification done previously on the Avanti Inc 3, I know that the MTB Hollowtech II bottom bracket is 1mm slimmer on each side, compared to the road type.

Therefore, I decided to use a MTB Hollowtech II bottom bracket, instead of a road bottom bracket. The slimmer bottom bracket cups will allow me to put an additional 2mm of spacers, enabling a maximum spacer thickness of 4mm.


Summary of crankset + bottom bracket weights (excluding chainring):
Brompton crankset + FAG BB: 752 grams
Tiagra crankset + Hollowtech II BB: 764 grams

The new setup will be a little bit heavier than the stock setup, as the Tiagra crankset has more material for stiffness, and is just a mid range crankset that is not lightweight. As already stated earlier, weight is not important for this bike, so this is no issue at all. If your objective is to reduce weight, you will need to get the higher end cranksets, such as Ultegra or Dura-Ace.

As I have read that the plastic chain guard on the chainring is an integral part of the Brompton folding, I plan to use the original 44T Brompton chainring + chain guard. Installation of this chainring onto the Tiagra crankset is no issue, although the appropriate length of chainring bolts are required.

For a start, I installed a 2.5mm spacer under the right side bottom bracket cup, and installed the right side crankarm to test out the chainline and frame clearance.

With a 2.5mm spacer, there is practically no gap between the chainring bolt and the chain stay when the Brompton rear triangle is folded.

To be safe, a clearance of at least 1mm is necessary. Mixing and matching my stash of spacers generated a spacer of 3.6mm thickness.

Note that this spacer thickness is only possible as I am using MTB bottom bracket cups that are slimmer than road bottom bracket. If not, using this spacer thickness will make it impossible to install the left side crankarm safely on the spindle.

After using 3.6mm spacer, there is a minimum clearance of 1mm

No clearance between the end of the crankarm and the plastic chain tensioner!

Although there is now clearance between the frame and the chainring bolt, I found that there is no clearance between the crankarm and the plastic chain tensioner when folded (as shown above). The crankarm only just manages to slide past the plastic surface. As this condition only occurs when folded and not during pedaling, it is acceptable. Just need to take note of this if you plan to do the same modification. Final spacer thickness installed under the right side bottom bracket cup is 3.6mm.

During installation of the left side bottom bracket cup, I found that the cup did not rest flat against the frame when fully tightened.

As I was afraid that I had cross threaded the left side cup, I reinstalled it, trying to align the cup properly while screwing it in. This time, I ended up really cross threading, causing damage to the threads on the cup.

Damaged threads on the aluminium left side cup due to cross threading

Luckily, this cup is made of aluminium, while the frame is made of steel, so no damage was done to the steel thread on the frame. All I needed to do was to get a replacement left side cup and reinstall it. Although the left side cup did not rest fully flat against the frame, there was no problem installing the crankset, so I left it as it is. The conclusion is that the bottom bracket shell on the Brompton frame is not faced properly to be parallel.

Tiagra crankset with original Brompton chainring installed! Silver colour matches better than a black crankset.

The plastic chainguard allows the front fender stays to rest against it when folded, preventing excessive movement of the front wheel.

This upgrade was a little tougher due to the tight clearances around the crankset, making it more technically challenging. Nevertheless, the crankset has been successfully upgraded to a stiffer Hollowtech II crankset, which provides stiff and efficient pedaling.

In summary, what you need to install a Hollowtech II crankset on the Brompton are as shown:
1) Road Hollowtech II crankset, double (not triple, as the spindle length and chainline are different)
2) MTB Hollowtech II bottom bracket cups
3) Spacer of approximately 3.6mm
4) 5 x chainring bolts for single chainrings
5) The right tools to remove the original crankset and BB, plus tools to install the new BB and crankset

Friday, January 15, 2016

Wheelsport Fantasy 2x10 Speed: Part 6 - Geometry Comparison

Part 1: Original Bike Components
Part 2: Bike Disassembly and Component Weight
Part 3: Installation of New Components
Part 4: Final Assembly and Comparison

Part 5: Flat Bar to Drop Bar Conversion

With the other Wheelsport Fantasy mini velo also converted to a 2x10 speed drop bar set up, it is now the perfect chance to compare it with my own matte black Wheelsport Fantasy mini velo. The wheelbase will of course be the same, since it is the same frame, but other geometries such as the handlebar reach will be different.

2x10 speed Tiagra/105 drivetrain on the bike with red hubs, and 2x11 speed Ultegra Di2 drivetrain on my own matte black frame

Both are using 451 wheelsets, but with different brand of tires

Looks very similar, since it is the same frame design and with similar setup

Pair of Wheelsport Fantasy mini velos!

My matte black mini velo has a longer reach to the handlebar, which gives a more aggressive riding posture

Also, my matte black bike has a shorter handlepost, which also gives a more aggressive riding posture. The stem on the other bike cannot be lowered any further due to limitation of the folding handlepost design.

Close up view of the different handlepost heights and handlebar positions

Even closer view at the reach of the two bikes. My bike with the Ultegra Di2 shifters has a lower and further reach.

Time to finish up the other bike with a good bar tape! I like Lizard Skins bar tape as it is super comfortable, and can be rewrapped many times without getting sticky.

Ta-da! Fresh bar tape on the Wheelsport Fantasy 2x10 speed drop bar mini velo.

Complete view of the Wheelsport Fantasy 2x10 Speed Drop Bar Mini Velo

Close up look at the drivetrain, with Shimano 105 components

Equipped with Tiagra 4700 2x10 speed road shifters, which has the same good shifting ergonomics and feeling of the new generation Dura-Ace/Ultegra/105 shifters.

All ready to roll!

Complete specifications of this upgraded Wheelsport Fantasy 2x10 Speed Drop Bar Mini Velo

With this conversion from flat handlebar to drop bar setup, it is easier to achieve a higher cruising speed as the more aggressive riding posture allows good power transfer to the pedals, and also puts the rider lower down for less air resistance.

We have tried riding our Wheelsport Fantasy mini velos with a group of road bikes at a rolling speed of about 32-35km/h, and this Wheelsport Fantasy mini velo is able to keep up, although it does take more effort compared to a full sized road bike. The setup on these two Wheelsport Fantasy mini velos are as good as it gets if you want to ride fast on a mini velo. Going to more high end components will not improve your speed any further as these components are not the limiting factor.

Friday, January 8, 2016

Wheelsport Fantasy 2x10 Speed: Part 5 - Flat Bar to Drop Bar Conversion

Part 1: Original Bike Components
Part 2: Bike Disassembly and Component Weight
Part 3: Installation of New Components
Part 4: Final Assembly and Comparison


Remember the Wheelsport Fantasy 2x10 Speed flat handlebar mini velo that I built for my friend? It was previously using mostly Shimano 105 5700 components transferred over from my Dahon MuEX. It worked very well and it shifted much better than the stock 1x9 speed drivetrain that came stock with the bike.

However, it was unfortunate that the bike crashed and was damaged. Luckily the rider was OK, but there was some significant damage to a few of the components. At the same time, me and my friend thought that it would be a good idea to convert the Wheelsport Fantasy flat handlebar mini velo to a drop bar set up. This would enable the rider to get down into a more aerodynamic position for more speed.

Therefore, the plan is to repair the damage on the bike, and also convert it from a flat handlebar to a drop bar set up at the same time! First, let's take a look at the damage and see how it can be fixed.

The bike crashed on the right side, which meant that the damage was all on the right side of the bike. Other than the non-critical scratches on the pedal and the end of the handlebar grip, the most critical damage was found at the rear derailleur.

As seen below, there was great impact on the rear derailleur, causing lots of scratches, and most critically, a bent rear derailleur hanger. The rear derailleur itself would probably still work fine despite the scratches, but the bent RD hanger needs to be fixed.

Some deep scratches on the 105 5700 rear derailleur, but probably will not affect the function.

However, the RD hanger was quite badly bent, causing the gear shifting to be all wonky and not fixable. 

The RD hanger is usually designed such that it is soft and will bend during impact, so that the frame itself does not get damaged. A replacement of the RD hanger and maybe the rear derailleur (depending on extent of damage) will be able to fix this issue. As this Wheelsport Fantasy mini velo frame was from MyBikeShop, I went back there to get a replacement RD hanger for this frame. Luckily, they had it in stock and so I could quickly get a replacement.

Replacement RD hanger for the Wheelsport Fantasy mini velo frame!

Comparing the old and new RD hanger side by side, the damage is quite obvious.

With the RD hanger issue fixed, the next step is to gather all the components for converting to a drop bar set up. Normally, converting from a flat handlebar to a drop bar set up is relatively easy. All it takes is a drop bar, a road shifter for the drop bar, and some re-installation of the inner cables.

As the bike already has a 10 speed Shimano 105 5700 RD and a 5700 FD, along with a 10 speed chain and cassette, all it takes is a change of shifters. Compatible 10 speed road shifters would be either Dura-Ace 7900/Ultegra 6700/105 5700 or Tiagra 4600 shifters.

However, these are the previous generation of shifters, which are not as good as the latest generation of shifters (Dura-Ace 9000/Ultegra 6800/105 5800/Tiagra 4700). I would prefer to upgrade to the newest generation of road shifters if possible.

The problem is, the latest Dura-Ace, Ultegra and 105 are all 11 speed groupsets, which requires a totally new drivetrain. Using these 11 speed shifters would require a change of the RD, FD, chain, cassette and maybe the crankset. Also, I am limited by the rear hub on the wheelset, which can only support up to 10 speeds. Going to 11 speeds would require a new wheelset which is a costly investment.

The good news is, the latest Tiagra 4700 road shifters are still 10 speed. The bad news is, the cable pitch for the new Tiagra 4700 series is different from the previous Tiagra 4600 series. In other words, it is still 10 speed, but the RD, FD and shifters operate on a different cable pitch.

What does all these mean? The implication is that the 10 speed cassette, chain and crankset are still perfectly compatible across the old and new 10 speed drivetrains. There is no need to change out these components if I am changing from the current 105 5700 series to the new Tiagra 4700 series.

What I do need is the new Tiagra 4700 road shifters, and the new generation of RD and FD. All other drivetrain components on the bike can remain the same.


First of all, a drop bar is required. This FSA handlebar is either from the Merida Scultura 5000 or the Dahon Boardwalk, I can't remember which bike it came from.

Next, the new Tiagra 4700 2x10 speed road shifters! Construction is based on the latest generation of 11 speed shifters, with lighter shifting and better ergonomics.

Weighs 492 grams per pair, quite decent weight, although it is quite far off the 365 grams of the Dura-Ace 9000 shifters.

The ideal rear derailleur and front derailleur to go with these Tiagra 4700 road shifters would be the Tiagra 4700 RD and FD. However, these are currently (Sep 2015) quite difficult to get hold of as they have just been launched to the market recently, and are only found on OEM bikes for now. As such, I decided to use the 105 5800 RD and FD instead. These are actually 11 speed RD and FD, but I figured that since the construction of these components are similar to the Tiagra 4700 components, they should also work with the Tiagra 4700 shifters, although they may not work perfectly. Besides, the black colour of the 105 5800 RD and FD would better match the black Wheelsport Fantasy frame.

Shimano 105 5800 Double FD, for 11 speed drivetrains. Brazed on type. Similar in design to the higher end Ultegra and Dura-Ace FD.

Weighs 89 grams, which is actually similar in weight to the Ultegra FD.

Shimano 105 5800 11 Speed RD, short cage version. Also similar in construction to Ultegra and Dura-Ace.

Weighs 226 grams, a bit more than the Ultegra RD.

Polymer coated shifter inner cables on the left, normal stainless steel brake cables on the right.

Installing the shifter inner cable on these new shifters require a special nose cap on the shifter to prevent unwanted wear on the inner cable.

Shifters and drop bar installed on the bike. Stem has been lowered slightly for a more sporty riding posture.

After installing the shifters, the next step is to install the new RD and FD. Nothing special here, just remove the old RD and FD and install the new ones. After that, the cabling and the adjustment of the RD and FD can be done.

All inner cables and outer casings installed, including those for the brakes!

FD-5800 installed! Bolted on directly to the FD hanger.

Tucking in the inner cable for the FD through the FD hanger, to prevent the cable from touching the leg during pedaling.

RD-5800 installed! New RD on new RD hanger.

The installation is almost complete! Adjustment of the RD and FD went without any issues, it seems OK to use the 11 speed RD and FD with these 10 speed road shifters. The only thing left is to wrap the bar tape, and to compare it with the other Wheelsport Fantasy Ultegra Di2 mini velo that I have! To be continued in the next part...