Showing posts with label Minoura. Show all posts

Sunday, April 26, 2020

Minoura Thru Axle Adapter for Bike Trainer

As of now (April 2020), it is practically impossible to buy a new bike trainer, as it is sold out everywhere. There are restrictions on outdoors cycling, thus many cyclists are using indoor bike trainers to continue cycling without leaving the house.

I also want to do that, but my Cervelo Aspero is not compatible to the Minoura LR340 Bicycle Trainer. The problem is the rear axle type, which is incompatible between the bicycle and the bike trainer.

The trainer supports a quick release (QR) axle, where it will support the two ends of the QR axle. The QR axle has to be supported firmly to prevent movement during pedaling, and also to prevent damage to the frame or trainer. In fact the trainer comes with its own steel QR axle that must be used, in order to ensure compatibility and safety.

However, many new bikes that use disc brakes come with 12 mm thru axles, as already seen on the Canyon Endurace and also the Cervelo Aspero. It is not feasible to attach the thru axle directly to the Minoura bike trainer, as the interface shape is different and will not be able to hold the bike firmly and safely.

Aluminium nut with internal threads for the 12 mm thru axle, found on the drive side of the Cervelo Aspero. This shape does not match the interface of the Minoura bike trainer.

Thru axle lever on the non-drive side of the Cervelo Aspero. This lever shape does not fit into the bike trainer as well.

So I have a bike trainer and a bike, but no way to match the two of them together. I used to have a setup for small wheeled bikes as shown on the same post for the Minoura bike trainer, but I cannot find the small wheel adapter any more. Therefore I cannot use the folding bikes with this trainer as well.

Fortunately, there is a solution, which is what I want to share with everyone who is facing the same issue. The solution is to buy an adapter for the bike, so that it can be fitted onto the bike trainer. Of course you can also use an old bike with QR axles, or buy a new bike trainer.

I will be using the official Minoura thru axle adapter, with the Minoura bike trainer, so there should be no compatibility issues. If you are using it on other bike trainers, take note that the interface may be different.

Before getting the adapter, it is important to make sure that you get the correct adapter! The Minoura thru axle adapter is for 12 mm thru axles, but it comes in different thread pitches. This is due to the different thread pitch specifications used by different frame manufacturers. It is also another reason why thru axles are almost always included with the frame, as another thru axle may not fit. The normal thread pitches are M12 x 1.0/1.25/1.5/1.75 mm.

I almost bought the wrong adapter, as I thought my Cervelo Aspero uses the more common M12 x 1.5 mm thread pitch. Luckily I double-checked first, as I discovered that the front and rear thru axles have different thread pitches! Front thru axle uses the more common 1.5 mm thread pitch, while the rear has a less common 1.75 mm thread pitch. Since I will need the adapter to match the rear, I will need to get the M12 x 1.75 mm version.

Good that the thread pitches are labelled clearly on the Cervelo Aspero thru axles!

Official Minoura thru axle adapter. This is the spec for 1.75 mm thread pitch. There are basically only 2 parts.

Prior to getting this thru axle adapter, I had no idea how it would work as I could not find any instructions online. I thought I might have to figure it out myself after getting the parts. Luckily the adapter comes with its own instructions which are pretty clear. Here it is for those who are interested.

The two parts of the adapter goes into the two sides of the bike, and it is tightened using the steel QR axle that comes with the Minoura bike trainer.

Everything stays on the bike, except the original 12 mm rear thru axle which will be removed. The rear wheel stays on the bike. This thru axle adapter basically allows the steel QR axle to be installed, so that it can match the Minoura bike trainer.

This part goes onto the non-drive side of the bike, which is normally occupied by the thru axle lever. 

When fully inserted, it supports the rear hub axle by connecting it to the frame dropout. 

This is the other part of the thru axle adapter. The external threads (M12 x 1.75) goes into the female threads on the frame, while the internal threads (M5 x 0.8) will be used by the QR axle threads.

On the drive side, without the original thru axle. The thru axle normally threads into this nut from the other side, through the rear hub axle.

When this thru axle adapter is fully inserted, it will support the hub axle as well. 

Thread in the thru axle adapter until it is fully inserted. I think hand tightening is enough to ensure no play.

I could not find the original Minoura steel QR axle, but I did find a steel QR axle from another brand that looks very similar. Only this part is needed, the nut and springs are not required. 

Insert the steel QR axle from the non-drive side, and tighten to the adapter on the other side. Adjust the lever angle so that it can be tightened normally like a QR axle. The Minoura bike trainer will support this side of the QR axle.

 The other side of the adapter will be supported by the Minoura bike trainer as well.

The steel QR axle fits well into the bike trainer. 

The other side of the adapter also fits securely into the bike trainer. 

The rotating lever on the bike trainer is used to clamp the bike between the two support points. The user manual states that once there is no looseness between the bike and the clamps, tighten the lever 2 more rounds and stop. There is no need to over-tighten the clamps or it will damage the frame or the bike trainer.

Cervelo Aspero installed onto the Minoura LR340 bike trainer! It feels secure and works pretty well. 


Found a corner in my bedroom where there is a direct view of the TV, while being directly under the fan and aircon for good cooling and ventilation.

Signed up for Zwift, and managed to get everything working! So far what I have needed to get was only these Minoura thru axle adapters. I already have everything else needed for virtual cycling.

Zwift Device: Smartphone
Zwift Display: On TV via Chromecast screen mirroring
Bike Trainer: Minoura LR340
Bike: Cervelo Aspero with Minoura thru axle adapter
Power Meter: 4iiii Precision (left side only)
Cadence Sensor: 4iiii Precision
Heart Rate Sensor: Samsung Galaxy Watch

Power meter, cadence and heart rate sensors connected!

Since I am using my smartphone to receive the signals from the sensors, Bluetooth Smart sensors are necessary since the phone does not have ANT+. The 4iiii Precision power meter broadcasts in both ANT+ and Bluetooth which is fantastic. I was lucky that I had the Galaxy watch which can broadcast heart rate over Bluetooth. If I needed an ANT+ signal, I will use my Garmin Forerunner 235 as the heart rate sensor.

One of my first group rides in Zwift! 

Just a 20 minute ride is enough to get me sweating buckets. Very efficient and productive way of training as you can ride consistently at a specific wattage without stopping, unlike when riding outdoors on public roads.

 Lots of rubber bits from the rear tire after riding.

There will be a line on the tire where the roller contacts. Super grippy, like a slick F1 tire that has been warmed up.

Using this kind of bike trainer, where the rear tire touches the roller directly will make the rear tire wear out quite fast. In this case, it is OK for me as I plan to replace the Continental GP4000 tire soon, as I have not changed it ever since it came stock with the Canyon Endurace.

Tuesday, September 15, 2015

Wheelsport Fantasy Flat Handlebar 2x10 Speed: Part 4 - Final Assembly and Comparison

Part 1: Original Bike Components
Part 2: Bike Disassembly and Component Weight
Part 3: Installation of New Components


Finally, this is the last part of the Wheelsport Fantasy 2x10 Speed Flat Handlebar bike upgrade! In the previous posts, the original bike components have been documented, and the stock bike disassembled. After that, the bike was rebuilt with a mixture of stock and new components.

In this post, I will finish up this bike upgrade, and compare it to the Dahon Boardwalk in terms of bike geometry.

Shimano 105 5700 10 Speed Crankset, 53/39T, taken from the Dahon MuEX

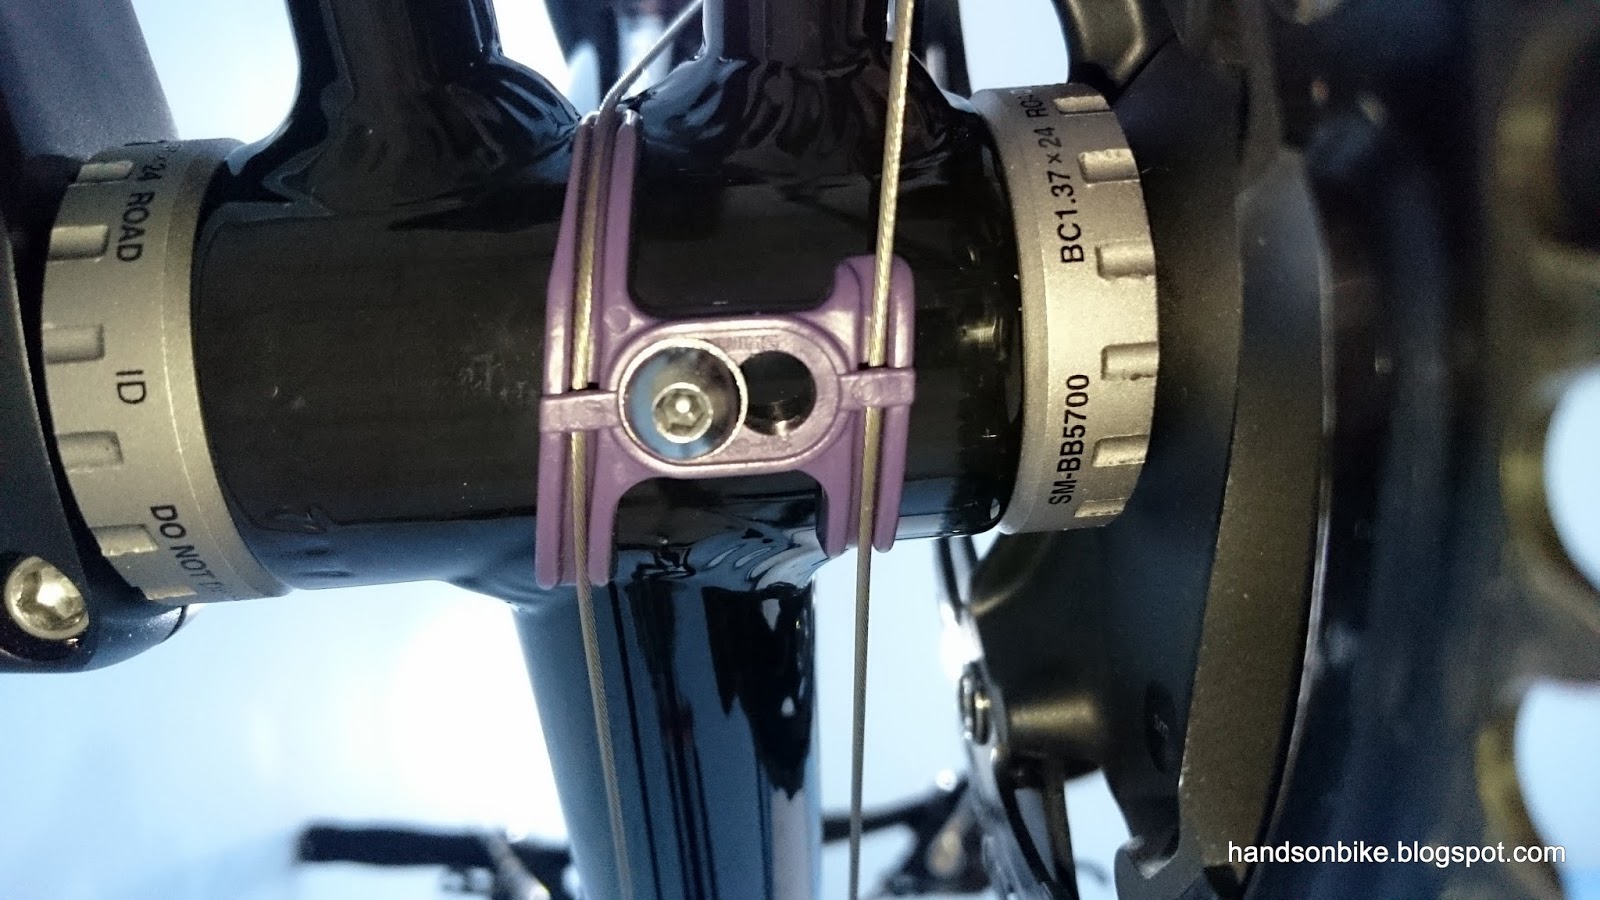
BB guide as shown mounted under the frame. The inner cable on the left leads upwards to the FD, while the inner cable on the right leads to the RD.

Rear shifter outer casing, shown here with a long nose end cap, to better protect the inner cable from wear and tear. Shimano 105 5700 10 Speed Rear Derailleur from the Dahon MuEX is used here.

Shimano 105 5700 Double FD as mounted onto the FD mount provided on the frame

With the full drivetrain mounted! All black to match well with the frame.

Gear range and ratios for this drivetrain setup, with 13 unique gears. 451 wheelset with 53/39T crankset and 12-30T cassette. This gear range should be good for any terrain.

Front brake calipers installed. Small clearance between tire and brake caliper, which means that wider tires (>25mm wide) cannot be used.

Rear brake calipers as installed on the bike. Once again, the small tire clearance limits the maximum tire size that can be used.

The length of the rear brake outer casing needs to be just right. Too short and it would stretch during braking, too long and there would be excessive friction.


Round 3M frame protection stickers have been pasted at strategic locations, to prevent the outer casing from rubbing away the paint on the frame.

With that, the upgrade from 1x9 speed to 2x10 speed is complete! Here is more info regarding the weight of the upgraded bike, and also some added accessories for the bike.

Full specs of the upgraded bike. Good weight of 8.8 kg without pedals! Just a little bit lighter than the original bike weight of 8.9 kg (excluding pedals and kickstand). This is despite adding around 300 grams with the addition of the front shifter, FD and cables.

The D-Light rear light fits perfectly on the seat tube, within the small triangle on the frame.

The D-Light front light also fits nicely on the handlepost, keeping the handlebar clutter-free. Mounted in a similar way to that on the Merida Scultura 5000.

Cateye Strada Wireless cycle computer mounted on the stem, in a very visible location

Side view of the upgraded bike

Looking pretty good!

With a folding handlepost, the handlebar can be folded down to make the bike really flat for storage, as seen here. This makes the bike a semi-folding bike?

When hanging the bike on the Minoura Bike Tower 10, the small frame does not really fit on the hooks properly

The front hook is OK, as it can grip the frame fully

However, the rear hook cannot hold the frame fully, as the frame top tube is too short. It will tend to touch the rear brake cable. Still, it is possible to hang the bike on this bike tower.

Lastly, the geometry of the Wheelsport Fantasy mini velo will be compared to the geometry of the Dahon Boardwalk. This will show the difference in geometry for this bike, as compared to the well established geometry of the Dahon folding bike. To compare the bikes, the BB is used as the datum and reference point. This means aligning the bikes such that the BB of the bikes are aligned beside each other.

The rear chainstay length of the bikes are slightly different. Dahon is 400mm, Wheelsport is 420mm. A longer chainstay contributes to a more stable bike at high speeds, but is also less agile.

Although the handlepost of the Wheelsport tilts much further backwards, unlike the vertical angle on the Dahon, the Wheelsport has a stem that brings the handlebar forward.

As seen here, the handlebar of the Wheelsport is located quite a bit higher and also rearwards. This creates a more upright riding position for the Wheelsport bike, which can be good or bad, depending on rider preference. Great for more leisurely rides, but not ideal for faster rides.

Side view of the bikes for comparison. Overall, the Dahon still has a longer wheelbase of 1020mm, while the Wheelsport mini velo has a wheelbase of 1000mm.

This upgrade is finally completed! I am glad to have had this chance to upgrade the Wheelsport Fantasy 2.0 mini velo, and I learnt quite a bit during the process. The bike has been nicely upgraded to a high performance 2x10 speed drivetrain, using mostly components taken from the Dahon MuEX (which has been upgraded to Ultegra/XTR Di2).

Sunday, May 24, 2015

Using Cateye Strada Digital Wireless with Minoura Bike Trainer

Now that I have installed a new Garmin Edge 510 cycle computer on the Merida Scultura 5000, the previous cycle computer is now available for other uses. I had previously installed the Cateye Strada Digital Wireless cycle computer on the Merida, and now I will move it to the Dahon MuEX.

There are a few reasons for me to install the Cateye Strada Digital Wireless on the Dahon MuEX. The first is because there is currently no cycle computer on the bike, and I have found that I missed the info (speed, distance) from the cycle computer when riding the MuEX. The other reason is that this particular cycle computer has cadence and heart rate info too, which is really useful when training or exercising.

I had previously set up the MuEX on the Minoura Bike Trainer, mainly for indoor cycling and training. To improve the efficiency of the training, it is good to have a target cadence and heart rate to maximise the effectiveness of the training session. Speed and distance will not be accurate as the resistance on the bike trainer is different from riding on the road.

The difference between this Cateye cycle computer and cheaper cycle computers is that while most cycle computers have their sensors on the front fork, this Cateye cycle computer has the sensor mounted on the rear chainstay. This is because there are two parts to the sensor, the cadence sensor and the speed sensor. This combo sensor will detect the cadence from the crankarm in addition to the speed from the rear wheel. As the distance to the handlebar is greater, the sensor also needs to be more powerful in order to transmit the data to the computer unit on the handlebar.

One tricky thing is that not all cadence/speed sensors can be mounted on a small wheeled bike. Garmin also has a similar chainstay mounted cadence/speed sensor (GSC-10), but it will not work on the MuEX (and most small wheeled bikes) because of the sensor design. See below for the explanation.

Comparing the Cateye speed/cadence sensor (top) with the one from Garmin (bottom)

By comparing the distance between the crankarm sensor area and the wheel magnet sensor area, we can see that the distance between the two sensors is shorter on the Garmin sensor than on the Cateye sensor. The problem with a short distance between the sensors is that for most small wheeled bikes, due to the smaller wheel diameter, the rear wheel is further away from the crankarm. The result of this is that the cadence/speed sensor is unable to reach both the crankarm magnet and the rear wheel magnet at the same time.

When the cadence sensor areas are both aligned, the Garmin speed sensor has a reach that is about 20mm shorter than the Cateye sensor.

This 20mm is significant, as the extra 20mm reach of the Cateye sensor means that it can be used on small wheeled bikes! As you can see from the picture below, the Cateye sensor only just manages to reach both the crankarm magnet and the rear wheel magnet. I also had to place the wheel magnet all the way to the spoke nipple, and it only barely manages to reach the sensor.

The Cateye sensor is able to reach both the crankarm magnet and the rear wheel magnet at the same time. Wheel used is Wheelsport Sunny, a 20 inch 406 wheel with a low (~24mm) rim profile.

If a high profile wheelset (such as Wheelsport Smart 1.0, 30mm rim profile) is used, this will not work as the magnet still cannot reach the sensor. On the other hand, if a larger wheel is used, such as 20 inch 451 wheels, it will allow the rear wheel magnet to go closer to the sensor (closer by about 1 inch, or 25mm).

As previously used on the Merida Scultura 5000, I also stuck a strong neodymium magnet (Diameter 12mm) on the pedal axle, instead of cable tying the provided magnet.

Shown as mounted on the bike. The computer unit is able to detect the cadence/speed sensor even when it is mounted far away on the rear chainstay.

The heart rate and cadence shown on the computer screen will help to improve the effectiveness of the workout, by ensuring that I am training in the correct heart rate zone.

Not only is this Cateye cycle computer useful as a training aid, it will also be useful when I take the bike out for a ride as it will just work like a normal cycle computer.

So, if you are considering getting a cycle computer for your small wheeled bike that can also detect your cadence, this Cateye Strada Digital Wireless will work. On the other hand, the standard Garmin GSC-10 cadence/speed sensor will not work on most small wheeled bikes as the sensor cannot reach both the crankarm magnet and rear wheel magnet at the same time.