Thursday, March 29, 2012

Journey of the Boardwalk: Part 23 - Shimano PD-A530 Pedals

It has been a few months since I started using SPD pedals, and I am pleased to say that I have gotten used to it! With sufficient training, clipping in and out becomes natural and intuitive, there is no longer a need to concentrate very hard to remember to clip out when you are stopping.

Recently, at the NTU Bike Rally 2012, I saw Matt's new pedals, the PD-A530. It is based on a similar concept like the pedals I am using, the Shimano PD-M324 pedals. These pedals have MTB SPD on one side, and a platform on the other side. As I have already discussed, this type of pedals are suitable for my style of riding. Matt has tested the pedals for at least 168km during the bike rally, and the review is positive!

I went to get myself a pair too, because they look good and are lighter in weight! These would be a nice upgrade from the current Shimano PD-M324 pedals that I am using. Getting these from CRC is really a lot cheaper than buying from the shops.

Nice packaging! Comes with a set of SH-51 cleats.

Close up of the SPD side.

The platform side. Looks big!

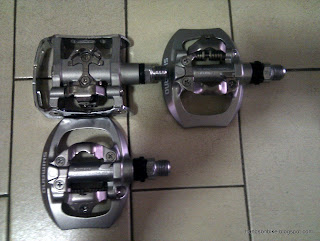
The pair of pedals, looking sleek and good!

The reason I got silver pedals instead of black is because when you are clipping in and out, it is unavoidable that the cleats will scratch the pedals. If the pedals are black, scratches will expose the metal underneath and make the pedals look unsightly. On the other hand, silver pedals will tend to hide the scratches and maintain the look better.

Before replacing the PD-M324 pedals, let us do a comparison!

The squarish PD-M324 pedals in the middle.

The new A530 pedals on top of the M324 pedals. The A530 platform is slightly longer, and has a similar width.

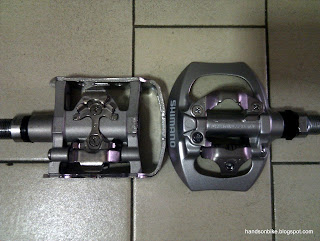
Reverse comparison, M324 pedals on top of the A530 pedals.

End to end size comparison. The A530 pedals has a bigger platform area.

The A530 pedals are about 380 grams per pair, compared to 540 grams for the M324 pedals. Quite a bit lighter and much better looking. The M324 pedals were designed as a city commuting pedals, while the A530 pedals are more for sporty enthusiasts who also commute within the city.

No pedals on the Ultegra cranks!

Platform side

SPD side

Due to the big difference in the curvature of the pedal, it is easy to tell without looking which side of the pedal you are on.

As with all new clipless pedals, it is advisable to set the spring tension to the minimum before you try clipping in! I found it really difficult to clip in initially, as the spring tension is quite high even at the minimum setting. Clipping out is not as easy too. Compared to the M324 pedals, the spring tension is much higher, giving a more solid connection but also makes it harder to clip in and out.

I would not recommend these pedals to beginners, as the spring tension is quite high. For beginners, the M324 pedals would be a much better option. Of course, some people will have no problems with the high spring tension, but it is usually safer and less scary to use a pair of SPD pedals that is easy to clip in and out.

The platform side is awesome, as the area is huge, and you can place your foot anywhere on the pedal and it feels very stable. This is a significant improvement over the platform on the M324 pedals. I think only those large MTB pedals will have a larger and more comfortable platform area.


The design and colour of the pedals fits really well with the Ultegra crankset and the chain!

Full bike shot! Newly installed gold bling and also Shimano PD-A530 pedals.

I'm starting to really like SPD pedals, especially for longer or faster rides, where it is really helpful to keep the shoe on the pedal and helps generate more power when pedaling. The versatility of these type of pedals also means that I can pedal in any shoe, and is also suitable for casual rides where I wear normal running shoes or even slippers. Recommended for those who like to have both SPD and platform pedals, and want a pedal with sleek looks.

Wednesday, March 21, 2012

Journey of the Boardwalk: Part 22 - More Gold Bling for Dahon Boardwalk X20-R

When all your bike components have already been upgraded, the only thing left to do is to add some bling to your bike to customize it! Anyone can buy an Ultegra crankset or get a fast-looking wheelset for their bikes, but colour customization is what makes your bike stand out from the rest.

As you would already know, for my Dahon Boardwalk, the colour scheme is mainly black and gold. Using black coloured components as the base, I add gold coloured bits here and there to make the bike unique. This time, I added gold coloured bits at some less-noticed areas. You can read about how I started sourcing for gold bling for my Dahon Boardwalk here.

One of the rarer coloured bits you can find would be the left crank cap on a Shimano Hollowtech II crankset. This is a black plastic cap that is used to preload the bearings in the Hollowtech II bottom bracket cups. If you want to make your bike unique, this is one of the parts where you can really make a difference!

Default crank cap on the left crank. Size M20 for newer cranksets, M15 for older cranksets.

Ta-da! Gold coloured crank cap! Super bling, I like it!

All the gold bits on the bike. Some parts are a different shade of gold, but no matter, still looks nice!

Another gold part that I got are the barrel adjusters for road caliper brakes. Again, these are uncommon parts to add bling, unlike common bits such as chainring bolts or bottle cage bolts.

Original barrel adjuster on the Tektro R559 Extra Long Reach caliper brakes

New gold barrel adjuster! Good colour contrast with the black caliper brakes

At the same time, I decided to change out the gold coloured brake pad holders which I had been using. These gold coloured brake pad holders were installed a few months earlier. However, due to an issue with the function, I decided to change to special brake pad holders.

Gold brake pad holders. Even with the brake pad holder moved all the way to the bottom of the brake arm, the brake pad comes very close to the tires during braking, with a clearance of only 1mm.

Because of this small clearance, I don't feel at ease with the brake pad so close to the tires. If the brake pad is shifted out of place, it will rub on the tire during braking and rapidly wear out the tires. The brakes work, but I will feel safer with properly aligned brake pads that can afford more clearance. This time, function is more important than appearance.

I found these special brake pad holders that has the brake pads offset from the mounting bolt. Referring to the picture below, the standard gold brake pad holder has the brake pad located at the same height as the mounting bolt. However, the special black brake pad holder has the brake pad located below the mounting bolt. This effectively gives me extra reach with the brake calipers.

Given the same mounting location, the brake pad in the black brake pad holder is located lower by about 1 cm.

Not too clear from this picture, but with this special brake pad holder, I can locate the brake pads slightly lower on the rim, providing more clearance between the brake pad and the tires.

View of the brakes before the changes

View of the brakes after the changes. Removed the gold brake pad holders, but added gold barrel adjusters

These are merely cosmetic upgrades, they don't make the bike faster or lighter. However, they do make the bike unique and strengthens the colour concept of gold on black.

In the next part of the Dahon Boardwalk upgrade series, I will be discussing an upgrade in SPD pedals. Stay tuned!

Saturday, March 17, 2012

Journey of the Boardwalk: Part 21 - Bontrager Evoke RL Saddle

This is the next instalment in the Journey of the Boardwalk, seems like this series will be never-ending! This time, there are no major upgrades, just a change of saddle for the Dahon Boardwalk X20-R.

A few months back, I was using the Rido LT Saddle, and I had written a review on it. At that time, I was still getting used to the saddle, and would give it more time to see if it is really suitable for my riding style. However, even after a couple of months on that saddle, I still could not get used to the hardness of the saddle. It was after one Tuas night ride of 50km that I felt I should be trying another saddle with more cushion.

Actually, the Rido LT saddle was not the saddle that came immediately after I changed from the Biologic Aria saddle. I had bought the Bontrager Evoke RL saddle which looks slimmer than the Biologic Aria saddle but still has quite a bit of cushion.

The Biologic Aria saddle on the left, the Bontrager Evoke RL saddle on the right.

I did not do a review of the Evoke RL saddle as I had used it for less than a month before the Rido LT saddle came out, and I switched over to the Rido LT saddle. However, I found that even with padded shorts, the Rido LT saddle can make the butt sore even after rides of only 40-50km. Maybe it is me, but it is not comfortable enough, even after I gave myself a few months to get used to the Rido LT saddle. Riding with shorts without padding is even worse, as the saddle is too hard.

As I said before, the Rido LT saddle is good if you always cycling with padded cycling shorts, and if you always pedal hard, there is less weight on the saddle. However, that is not my style, I will sometimes do leisure rides where I pedal lightly and don't use padded shorts. I had hoped that the Rido LT saddle would become more comfortable as I used it more, but unfortunately, that was not the case.

Prior to the NTU Bike Rally of 128km, I realised that I would have a really hard time if I used the Rido LT saddle. I remembered the Bontrager Evoke RL saddle and mounted it on another seatpost, so that I can swap between these two saddles easily for comparison. I did some training rides on the Evoke RL saddle, of distances of 70+ km. It felt much more comfortable than the Rido LT saddle, and that was the saddle I decided to use for the NTU Bike Rally 128km. That ride would give me the best opportunity to evaluate the comfort of the saddle.

I am pleased to say that the Bontrager Evoke RL saddle is much more suitable for my riding style, since it has more cushion to suit my more casual riding style. After the 128km cycled during NTU Bike Rally, I was pleasantly surprised to know that I had no butt pain at all. If a saddle can prevent butt pain even after going round island around Singapore, it is a good saddle! Seems that I have found my ideal saddle.

The Bontrager Evoke RL saddle. Looks ordinary, but does its job well! 

The Bontrager Evoke RL saddle is also relatively lightweight, weighing the same as the Rido LT road saddle at 230grams. Good balance between comfort and weight.

Comparison between Bontrager Evoke RL saddle and the Rido LT Road saddle.

The full lineup of saddles I have tried.

The Rido LT road saddle is not a bad saddle, but it is not suitable for my style of riding. It would be great for cyclists who go fast and do not put much weight on the saddle. As for me, I will be using the Bontrager Evoke RL saddle, good for all kinds of riding styles!

Tuesday, March 13, 2012

Topeak RaceRocket Pump + Topeak Mini 9 Pro Review

I would not call this a full review as I have not used these accessories extensively. However, I find that these are small yet useful accessories that will come in very handy when required. Not only do they look good, they are ingeniously designed with interesting features that may appeal to some people. Especially people with an engineering mind (like me) who likes quirky gadgets and innovative features.

These accessories were bought for my Flamingo London NX7, together with some other accessories such as saddle bag, lights and etc. You can see the other accessories at my earlier post.

Let us take a closer look at the Topeak RaceRocket Pump. This is a nifty little pump that looks cool, but is also powerful at the same time. Of course, being gold coloured adds to the bling factor!

Overall view of the pump and the holder. This one can reach a maximum pressure of 120 PSI. More than sufficient for my Flamingo tires which has a recommended tire pressure of 35 to 55 PSI.

The bracket/holder for the pump, for mounting to the bottle cage bosses. Comes with a rubber strap for secure attachment. Not using this since I just put the pump inside my roomy Topeak MondoPack Hydro saddle bag.

Rubber cover on top of the pump to protect the pump head from the elements

The pump head can be extended out from the top of the pump. Flexible hose makes it easy to attach the pump head to the valve during pumping. Screw-on type attachment.

Pump when fully extended. Quite a good extension and grip on the pump.

Here is the ingenious pump head. In its default position, it is for Schrader valves.

To use on a Presta valve, just pull the pump head further out. Such a simple yet effective design!

Although this pump will never be as powerful as the Lezyne Micro Floor Drive that I have, it should be more than sufficient for its intended usage. What I like about this pump is that it has a small profile, yet it has a pull-out hose and a relatively large pump cylinder for quick and easy pumping. Even when not in use, it looks good too!

Another accessory that I want to introduce is the Topeak Mini 9 Pro. These days, multi-tools are available everywhere. From cheap multi-tools found at Changi Village that costs only a few dollars, to exquisite designer multi-tools that incorporate carbon fibre into the tool, you can find it all. Despite the difference in price, the function mostly remains the same. What is different is probably just the design, surface finishing and material used.

I came across this Topeak Mini 9 Pro and I found it to be quite interesting, unlike the usual multi-tool you see elsewhere. Besides having the mandatory Allen wrenches of various sizes, and the Phillips screwdriver head, it also has tire levers!

The tool and its packaging. Comes with a nice pouch to protect the tool and also prevent the tool from scratching other objects in your saddle bag.

Displaying its full array of tools, with a gold coloured body!

This tool has Allen wrenches sized between 2mm to 6mm and a Phillips screw head. Also, there are two tire levers: One metal lever fixed onto the main body, and a second plastic lever that can be removed from the body and unfolded for use.

The plastic tire lever looks pretty flimsy, and probably cannot do the job on tight road bike tires. Might be sufficient for MTB tires that are usually less tight on the rims. A possible way to use this would be to first use the black plastic lever, and hook the end onto the spoke. Then, use the metal lever to leverage out the tire. In any case, I do have a set of dedicated tire levers in my tool kit.

The black tire lever nests snugly within the body of the multi-tool.

I am quite impressed with the recent range of Topeak products. It is quite obvious to me that they have done a lot of improvements in their products, by adding features and making subtle little changes that make their products a little better than their competitiors'.

An example would be their saddle bags. There is usually a loop at the rear of the saddle bag that you can clip your rear light onto. They have included a little wedge behind the loop that helps to tilt your rear light upwards, such that it shines horizontally instead of sagging downwards.

Another example is their adjustable bottle cage. In the updated version, they have added rubber grips to help improve the grip on the bottle, and also simplified some of the construction.

These are the little things that most people will not notice, but for those who do notice them and understand the reasons behind the changes, these improvements are greatly appreciated.

Monday, March 12, 2012

Modifications to Flamingo London NX7: Ezy Wheels

When you run out of things to modify on your primary bike, it is time to get another bike to zhng! And the Flamingo London NX7 is the one. As it is meant to be just a commuting/leisure bike, I don't forsee a need to upgrade the parts on the bike. However, sometimes your hands just get itchy and you want to change something on the bike. This time, I am not calling it an upgrade, as it does not really offer any performance boost or weight loss. Rather, I call it a modification as it is merely an alternative to the current part.

The stock roller wheels that come with the bike is not of very good quality. Although it does not roll very well, what I feel is not acceptable is that the wheels are not round enough. There are small dents and bumps on the circumference of the wheels, which makes pushing the folded bike quite wobbly. I decided to get the Ezy Wheels from Thecyclopedia to give it a try and see if it improves the rolling of the folded bike.

My first reaction when I received the wheels was "Why are the wheels so tiny?!" From the pictures on the website I thought they would be of a similar size to what I currently have on the Flamingo, but I was wrong. The original roller wheels are 65mm in diameter, the Ezy Wheels are 47mm in diameter.

Ezy Wheels with nice bearings

Original roller wheel on left, Ezy wheel on right

In any case, since I already have the wheels, I might as well put them on and give it a try. Because of the small size, this means that I can only put on one pair! I can put on the Ezy wheels on the tail end of the rack, but not at the end where the suspension block is.

Suspension block is close to ground even with the original large roller wheels.

For this end of the rack, I will still use the larger original roller wheels, as the suspension block is already close to the ground. When I tilt the bike upwards to clear obstacles, the block will sometimes touch the ground. Because of this, I cannot change the roller wheels on this end to the smaller Ezy Wheels.

 Height difference between stock roller wheels and Ezy Wheels

As for the other end of the rack, I can change the wheels to the smaller Ezy wheels to give it a try.

Smaller Ezy wheels on the other end of the rack. This particular wheel does not touch the ground as the 4 wheels are of uneven height, even with the original roller wheels.

 2 smaller Ezy wheels and 2 larger stock roller wheels.

With this setup, the bike tilts slightly downwards at the front when folded. This is not necessarily bad as it slightly lowers the folded height of the bike.

What I noticed is that the Ezy wheels do roll better on flat ground, as the wheels are rounder and the bearings are smoother. However, the smaller wheels do not roll over obstacles as well. Examples of obstacles that I come across every time are the metal dots/strips that line the floor of the MRT stations. The bike really judders a lot when I roll the bike across these dots/strips. A larger roller wheel will roll over these obstacles much more easily, just like how a 26" wheel MTB will roll over obstacles better than a 20" wheel bike.

Another issue I noted is that these smaller wheels sometimes get stuck in the groove at the lift doors. Although rolling on flat ground is smoother, I lose the ability to roll over obstacles easily. I find myself needing to tilt the bike upwards more frequently, in order to lift the front end over obstacles.

Depending on further evaluation, I may decide to change the wheels back to the original roller wheels. Or I will have to get better quality roller wheels that are of similar size to what I have currently.

Tuesday, March 6, 2012

Clipless Pedals on the Dahon Boardwalk: A Beginner's Guide

It has been a while since I blogged about my Dahon Boardwalk X20-R! For this couple of months, I have been mostly writing about the new Flamingo folding bike. But that didn't mean that I have not been riding my Dahon. In fact, I have been testing a new upgrade on my Dahon Boardwalk for the past 2 months. The reason it took so long is because it is very new to me, and also because it takes more than just a few rides to evaluate this product. Some eagle-eyed people may have already noticed my new component during these 2 months.

As you would have seen from the blog title, this new product is clipless pedals! The whole set of Shimano SPD includes the SPD shoes, the pedals, and the cleats that link the shoes to the pedals. There are a few differences between SPD for road shoes/pedals and SPD for MTB shoes/pedals. See the picture below for the differences.

Differences between Shimano Road and MTB cleats and pedals
 
Shimano R240 Road Cycling Shoes. Note the triangular 3 point mount on the sole.

A road cycling shoe with the triangular cleats mounted. The larger cleat size supposedly makes it more comfortable for pedaling as it spreads the pedaling force over a larger area on the sole.


Shimano M240 MTB cycling shoe. Although there are 4 holes on the sole, you only need to use 2 of them to mount the cleats. Cleat size is smaller. More pictures can be seen below.


Besides the physical differences in the cleats, cycling shoes and pedals, there are also different characteristics between these cycling shoes. The table below summarizes these differences very well!

A table comparing the differences between Road and MTB SPD systems. 

For me, I chose to use MTB shoes as it allows me to walk properly when off the bike, as the cleats do not protrude from the bottom of the shoe unlike road cleats. Unless you are going for lightweight, the MTB shoes are more suitable for rides that involve some walking instead of pure riding. Nobody says that you have to use Road SPD pedals on a road bike! There are many instances where riders prefer MTB cleats and pedals on a road bike because of the advantage of being able to walk properly using MTB cycling shoes.

My Shimano MTB Cycling Shoes!

With these MTB shoes, I can walk almost normally when off the bike, because the cleat underneath the shoe is recessed and does not contact the ground (usually). The main strap also uses a useful click-tightening system that allows you to fine-adjust the tightness of the strap easily.

Of course, with MTB shoes I will need MTB cleats! For the Shimano SPD system, there are 2 main types of cleats, the normal SH51 single-release cleats and the SH56 multi-release cleats. Apparently the SH51 cleat can only be released by twisting the shoe outwards, while the SH56 cleats will release by twisting either way or even when you pull up hard enough!

As a first timer using cleats, I chose to play safe and use the multi-release cleats. According to reviews online, these cleats will also release when pulled hard enough, such as in an emergency when you suddenly need to release your foot from the pedals.

Multi-release SH56 SPD cleats

I have inspected both the SH51 and the SH56 cleats closely, but can't seem to find any difference. Probably just some small differences in the chamfers or shape of the cleats.

Slots both on the shoe and the cleats for fine-tuning of the cleat position

Cleats mounted on the carbon fiber sole. Also note how the cleat hides under the studs of the shoe, protecting it from damage due to contact with the ground.
The first time you try walking with a hard soled cycling shoe, it will feel very awkward, as the sole is totally rigid and does not bend with your foot, unlike normal shoes. This makes walking somewhat weird as it feels like walking in clogs. As you get used to it, you will be able to walk normally.

The point of using cleats and cycling shoes is to make your foot stick to the pedal when you cycle! MTB shoes are used with MTB pedals, since the cleat system has to be compatible. There are also other types of pedals that are neither pure MTB or Road pedals.

Although I want to try clipless pedals, I don't want to give up the convenience of having a platform (flat) pedals for casual rides. For example, during casual Sunday group rides, I would not want to use cycling shoes as it is more risky and troublesome if you need to clip in and out frequently. Also, I may also want to cycle in slippers when I go to a friend's house nearby or out to buy lunch.

There are a few types of Shimano pedals that can accept MTB cleats:
1) Pure MTB pedals. These pedals are usually very small and lightweight. The pedaling platform is created by the hard-soled shoe and not the pedal itself. The problem with these pedals is that without the proper cycling shoes, it is very difficult to pedal with other types of shoes. Even for those with an external cage, you will still feel a lump on your sole through your shoe, caused by the cleat mechanism on the pedal.

 Shimano PD-M520. Only area on the pedal is the cleat mechanism! Impossible to cycle without using MTB cycling shoes.
Shimano PD-M530 pedals. New and alternate version of the M520 pedals. Comes with an external cage to increase the area available for pedaling when not clipped in.

2) Dual sided MTB pedals with large external cage. These are pedals targeted at more casual riders, who wish to have the convenience of having a dual sided clipless pedals and also a platform pedal. The cage is thicker and is easier to pedal even without MTB cycling shoes. However, the cleat mechanism does not retract fully into the pedal, and the mechanism can still be felt through your shoe.

 Shimano PD-M545 pedals. Dual sided cleat mechanism and also platform pedal


3) SPD mechanism on one side, platform pedal on other side. This is the pedal that I am using, as I find it most suitable for my needs. When I want to clip in, I use the side with the cleat mechanism. For casual rides with non-SPD shoes, I just use the platform side. Although the pedal will be facing the wrong way half the time, with some practice, it is easy to flip the pedal over. I feel that it gives me the best of both worlds, without needing to compromise on comfort unlike the previous 2 types of pedals.

Shimano PD-M324 pedals. Flat on one side, cleat mechanism on the other.

Most clipless pedals these days come with adjustable spring tension on the pedals. For beginners, a low spring tension is recommended, for ease of clipping in and out.

The cleat position on the shoe is also very important. Putting the cleats too far forward or backward will make your pedaling feel strange as the pressure point will not be on the ball of your foot. Shifting the cleat from side to side also allows you to place the shoe more inward or outward on the pedal to compensate for each individual's pedaling technique.

Initially, learning to ride with clipless pedals can be daunting. As you start off, you can clip in easily, yet you worry if you can manage to clip out when you stop! Best way to learn is to cycle in a safe place, preferably with a kerb or wall for you to get some support if you need to.

Also, I had to relearn how to mount the bike and also dismount from the bike. Previously when I was not using clipless pedals, I dismounted with one foot on the ground followed quickly by the other foot. It did not matter which way I leaned as both feet would touch the ground and provide balance.

However, I quickly learnt that this method will not work for clipless pedals! It is important to ensure that you always land first on the foot which you have clipped out. For me, I will unclip my right foot before I stop, and as I dismount, I will lean a bit to the right so that as I come down and straddle the bike, my right foot touches the ground first. Then, I will quickly unclip my left foot and plant it on the ground also. It is not recommended to unclip both feet before stopping, as the bottom of the cycling shoes are hard and slippery, and you will slip off the pedals easily when not clipped in. I learnt that the painful way when I slipped off the pedals and cut my shin on the edge of the pedals.

As for moving off, I will always clip in my right foot and bring it up to the 3 o'clock position, when viewed from the right. To move off, I just push off with my right foot and sit on the saddle. I will then flip/clip in to the left pedal as I pedal off. It is good practice to clip in the starting foot before you move off. This will help you avoid fumbling with the pedals when the lights turn green.

If I am stopping beside a kerb, I will unclip my left foot and rest it on the kerb for support. The right foot will remain clipped in, ready to pedal and move off.
The cleat side of the pedal. These pedals were mounted before I had changed to the Ultegra crankset.

The other side of the pedal, with the wide platform suitable for pedaling with non-cycling shoes.

I did not write a review on these pedals and shoes earlier as I wanted to try it for an extended period to see if it is good. So far, I have done multiple Tuas night rides, the NTU Bike Rally and the OCBC Cycle 39km Challenge while clipped in on these pedals, and many more casual rides while using the platform side.

Using clipless pedals can help you generate more power, as it allows you to pull up as well as push down on the pedals. It also trains you to have a good pedaling technique as you can try to pedal in smooth circles instead of only pushing down on the pedals. When I try pedaling with only one foot, I realise how bad my pedaling motion is, as the pedal does not go in a smooth circle but jerks around.

Note that the benefit of additional power usually only happens when you pedal hard. Pedaling casually is unlikely to involve pulling up on the pedals, unless you consciously pull up on the pedals. There is a lot of potential for using different muscles (hamstring) on the legs for pedaling, but so far I have not maximised that potential.

So far, so good! I am pleased with these MTB SPD pedals and shoes. Also, I am lucky to have no accidents with these pedals. Although there have been a few close shaves where I have unclipped my right foot, only to lean to the left, I have always managed to pull my left foot out, thanks to the low spring tension on the pedals and the multi-release cleats that I am using. What I feel is that most of the time, people fall while clipped in not because they cannot get their foot out, it is because they FORGOT to unclip. The key to smooth and safe operation is practice!

If you are intending to give SPD pedals a try, hesitate no more! It is safe as long as you do not overestimate yourself, and take your time to practice clipping in and out. There are many benefits to using clipless pedals, although you will still get along fine without it.