Showing posts with label Avanti. Show all posts

Tuesday, April 17, 2018

Fizik Saddle Bracket with Cateye Rapid 3 Rear Light

The Canyon Endurace came with a Fizik Aliante R3 saddle, which is the first Fizik saddle that I ever had. What is special about some Fizik saddles is that it has an integrated rear light mount under the saddle. This means that some compatible rear lights can be installed under the saddle neatly.

Fizik saddle, with a plastic cover taking the place of the saddle bracket that is needed to mount a rear light.

With the plastic cover removed, the saddle is now ready to accept the saddle bracket that can be used to mount a rear light.

Depending on which rear light you want to use, you need to get the correct bracket to fix the rear light to the saddle. For me, I will be using a Cateye rear light, and so I got the Cateye saddle bracket.

Cateye saddle bracket that is used to mount a Cateye rear light to a Fizik saddle.

It comes with two different sized brackets as different rear lights and saddle will require different bracket lengths to work.

Short bracket on the left, long bracket on the right.

Cateye Rapid 3 rear light. I would have preferred a USB rechargeable rear light, but I could not find a suitable one.

Battery life of up to 80 hours in flashing mode, which is excellent.

Battery run time for the different lighting modes.

Although the light works well, there are some areas on the light where the build or design quality is poor. It used to be better, until cost cutting measures came in and some quality was sacrificed to achieve lower costs...

Edges of the Cateye badge sticking out, which looks really poor.

This is because there is only one snap fit in the middle, with the edges free to deform.

Uses 1 x AA battery. The rubber seal at the edge of the housing also comes off easily.

Lighting quality is good, with the two smaller LEDs at the side...

...and one big LED in the middle.

Together with the small bracket, the light and bracket weighs 56 grams.

The rear light slides onto the bracket...

...which is then inserted into the saddle mount.

Sticks out quite a bit from the saddle. Still leaves sufficient space for a saddle bag.

View from the rear. Depending on your saddle angle, the light angle will vary.

Advantages:
1) Compact as it does not take up space on the saddle rail.
2) Integrated look.
3) Another light can be mounted on the saddle bag or seatpost.

Disadvantages:
1) When moving your bike, most people will lift the rear saddle. In this case, they will end up pulling the light, causing it to drop out from the bracket.
2) Light angle is linked to the saddle angle.
3) Limited choice of rear lights.

What I feel is that if you already have a Fizik saddle, this is an option for mounting a secondary rear light. However, if you are thinking of getting a Fizik saddle just to mount a rear light on the saddle, you should reconsider as I don't think it is worth it. Good to have but not a strong enough reason to switch saddles.

Wednesday, April 4, 2018

Cycliq Duo Mount - For Garmin + Fly12

When I ordered the Cycliq Fly 6 CE, I received a free Cycliq Duo Mount as I was one of those who made the pre-order. It was a nice surprise as I did not know that when I placed the order. Also, the mount is apparently quite expensive so it was a good offset from the price of the Fly 6 CE.

The funny thing is that this Cycliq Duo Mount was shipped separately from the Fly 6 CE, and it actually arrived before the Fly 6 CE! When I first received it, it looked just like any other ordinary combination mount, which I already have a few.

Almost all combination mounts have an interface on top for a Garmin cycle computer, while the bottom side has a GoPro type of mounting for your camera. This is good enough if you are using a Garmin on top and a GoPro or similar camera. However, what happens if you are using a Cateye cycle computer instead?

I found that there are actually a few different adapters for the top mount, so that you can install different cycle computers on it. Other than the most common Garmin type, it also has those less popular types such as Cateye, Polar, Wahoo, etc.

The only bike where I have a chance to use this mount would be the Avanti Inc 3, but it already has a REC Mount which allows me to install a Cateye cycle computer on top and the Cycliq Fly 12 front camera/light at the bottom.

One problem I had with the REC Mount is that the mount itself prevents me from accessing the Fly 12 charging port easily. Since I already have this new Cycliq Duo Mount, I might as well give it a try to see if it is better.

Packaging for Cycliq Duo Mount, with the other adapters visible. 

As stated, it comes with optional mounting disks (adapters) to make it compatible to a wide range of cycle computers. 

Weighs 43 grams without any adapters installed. It feels strong and rigid as it is designed to withstand the weight of the Fly 12. 

With the Cateye adapter and the fixing bolt at the bottom, the weight comes up to 59 grams. 

Installing the Cateye adapter was an interesting process. The adapter uses two countersunk bolts to attach the adapter to the aluminium mount. However, the Cateye adapter layout is such that the design gets in the way of the second bolt (refer to picture below).

 
First bolt for Cateye adapter installed easily. How do I install the second bolt? Can I do without it?

I tried using the adapter with only one bolt installed. The adapter is not loose, however the Cateye button does not work. For those who have used Cateye cycle computers before, the bottom of the Cateye screen is actually the "button". Pressing that area will cause a bump on the adapter to push the actual button located at the back of the Cateye cycle computer.

However, on this adapter, as the bump which is located on the plastic tab is not supported from below (refer to picture above), the Cateye button cannot be activated. I realised that the only way to make it work was to install the second bolt UNDER the bump on the Cateye adapter. Therefore I had to bend the tab on the adapter by almost 90 degrees so that I can slip the second bolt underneath and tighten it, all the while praying that the tab does not snap off. This is quite a strange design as it can fail easily, but I could not see any other way around it.

After installing the second bolt under the tab with the bump, the Cateye cycle computer can be activated! Luckily the thin plastic did not break off. 

With the Fly 12 also installed underneath the mount. Looks to be a much cleaner and tidier arrangement as compared to using the REC mount. 

The clamp for the mount is located on the left side of the stem, which is good as it does not interfere with the Alfine Di2 Digital Display which is mounted on the right side.

With this Cycliq Duo Mount, the one-armed mount construction no longer obstructs access to the charging port of the Fly 12. Also, everything just looks neater, compared to the utilitarian design of the REC mount. Overall, I am pleased with the Cycliq Duo Mount as it is a better mount. Best of all, it came free of charge!

Saturday, August 12, 2017

Cateye Padrone+ Cycle Computer and REC Mount (Cateye/GoPro)

Most combination mounts available in the market are designed for a Garmin on top and a GoPro type mount below. There are very few mounts that can cater for other cycle computers on top, such as a Cateye.

As I did not want to get another Garmin unit for the Avanti Inc 3, and also did not want to share the Garmin Edge 510 with the Avanti Inc 3, I decided to get a Cateye cycle computer as a standalone cycle computer for the Avanti Inc 3.

Prior to that, I searched on Taobao to find a combination mount with Cateye on top and GoPro type mount below. There were a few, and I bought two of them to try out, since they were not too expensive. However, the quality of the Cateye mounts from Taobao were quite dreadful.

As you may know, most Cateye computers are activated by pressing the bottom of the screen, which tilts the whole unit to depress the small button at the back of the unit. However, after inserting into the first Cateye mount, I could not press down the screen at all. The design is flawed and this makes the Cateye computer useless as I could not interact with it at all.

As for the second mount of a different brand, I could barely depress the button after inserting the Cateye computer. Worse still, upon removing the Cateye, the snap fit arm of the mount broke! This is really poor quality. Either the button does not work, or the mount breaks. Seems that it is not so easy to copy and make the Cateye mount...

I have no choice but to get a mount of a higher quality in order to ensure that it works properly. I found the REC mount which is designed and made in Japan, which should work better since Cateye is also from Japan. It can be found at The Bike Settlement.

In any case, I decided to get a large screen Cateye computer to match with the new REC mount. Last time, when I first saw the Cateye Padrone, I thought it was ridiculous as the screen was so much bigger than the Cateye Strada that I have.

However, I recently realised that it is actually very useful, as it makes it so much easier to read the numbers on the screen. Besides, the Garmin computer also has a large screen.

The Cateye Padrone+, which has backlight compared to the non-plus version of the Padrone

Comes with the standard Cateye sensors which I have already installed so many times

Comparing the size to my hand, it does not look so big...

...but compared with the Cateye Strada, it is huge!

The user manual which is the usual Cateye style. Highly detailed but also utterly confusing.

The backlight function can be set so that it only activates during a preset timing, such as when it is dark. I set it to activate at 6pm and deactivate at 7am.

Small but useful backlight

Weight of entire speedometer setup is only 53 grams

At the same time, I also got the REC mount which has a Cateye mount on top and a GoPro mount below. Having tested it at the shop before buying, the Cateye mount works well like the original. It has to work, since it is actually more expensive than the Cateye Padrone+ cycle computer!

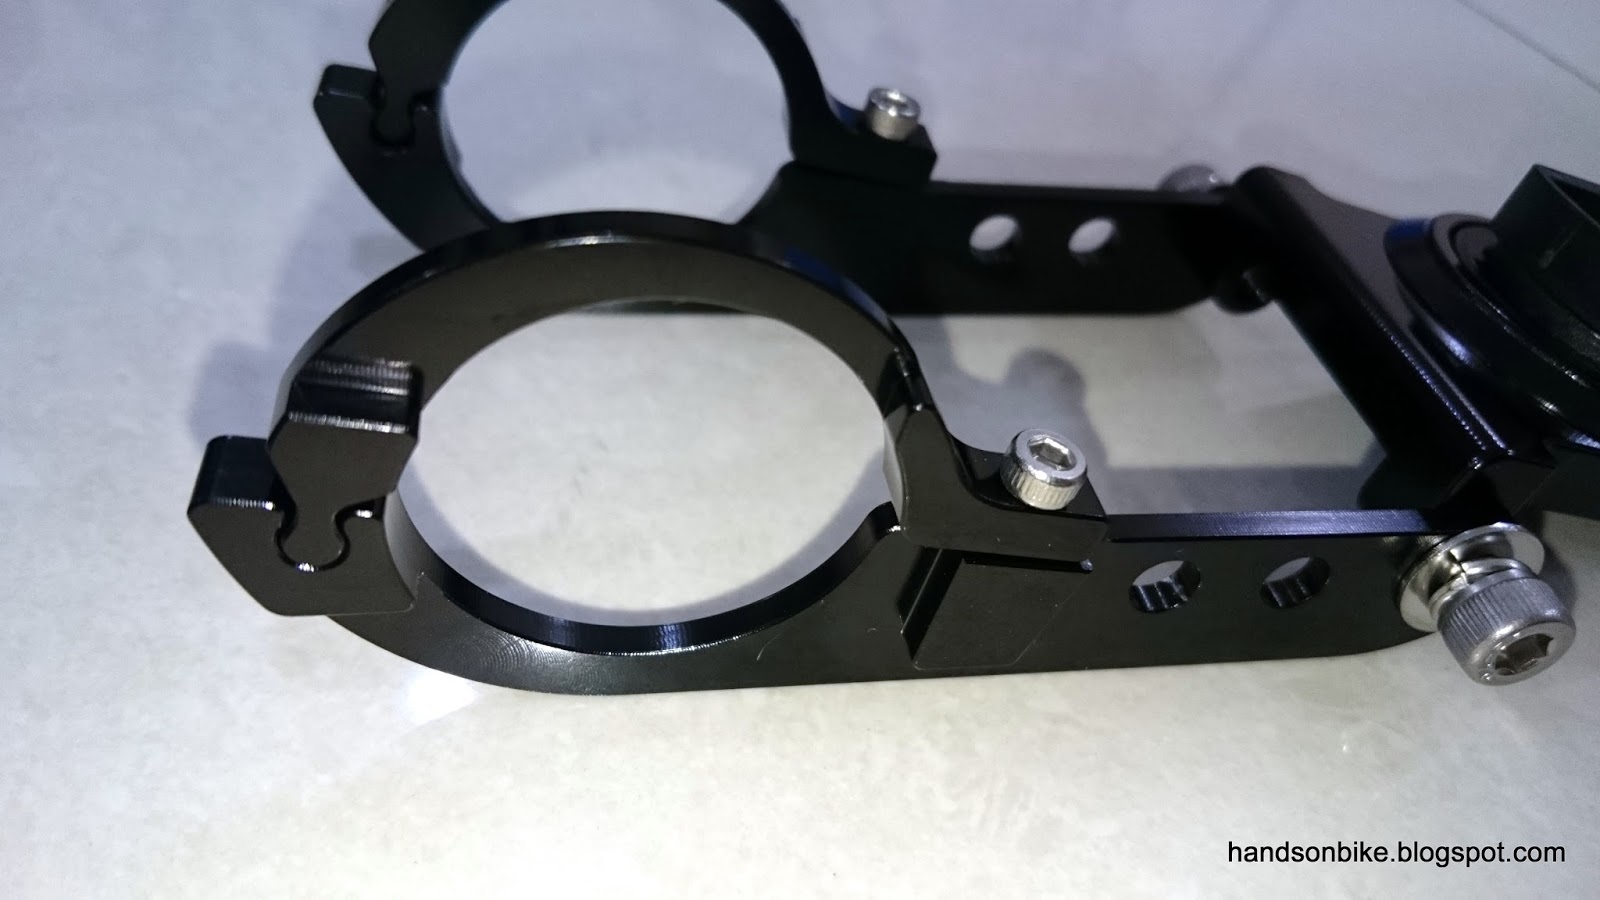
REC mount for Cateye. Garmin mount is also available as an interchangeable piece as seen above.

The dazzlingly array of mount combinations and types available from REC mount

Close up look at the mount. Very minimalist design.

See how thin the clamps are!

You can change the mounting bolts to black ones (supplied) if you prefer

A spare Garmin mount is supplied

The Cateye mount is actually an adapter that allows the Cateye to be fixed onto the standard Garmin mount

Big Cateye Padrone screen on the slim REC mount

Mounting hardware for the GoPro mount at the bottom

Bottom of the REC mount for mounting the GoPro mount or other light mounts (sold separately)

Position adjustment is possible by using alternative mounting holes or by flipping the whole mount upside down

REC mount weighs 77 grams on its own

Cateye on top, Cycliq Fly12 below 

Still looks bulky from the side 

From the top view and rider's point of view, at least it still looks quite neat, with only the Cateye and the Spurcycle bell visible.

With the installation of this REC mount completed, the Cateye and Fly12 can now share the same mount, and take up much less space on the handlebar. Not a commonly used combination, which is why it was difficult to find a suitable mount to fix these items onto the bike.

Thursday, August 3, 2017

Moon Nebula W Front Light

After upgrading the Avanti Inc 3 to Alfine 11 Di2 with drop bars, I have been struggling to find space on the handlebars to mount a proper front light. Since a drop bar is narrower than a flat handlebar, there is just not enough space to mount a front light properly, together with the other accessories.

I always prefer to have two sets of rear and front lights, to act as backup in case the other one suddenly runs out of power. Depending on the route and traffic conditions, I will sometimes run one set on blinking mode, while the other set is on steady mode for enhanced visibility.

Since there is no more space on the handlebar, I have to find other places on the bike to mount a front light. I wanted to run D-Light front lights on the stem spacers like on the Merida Scultura 5000, but the hydraulic hoses will get in the way. Alternative  mounting points would be on the front fork or QR axle (by replacing the QR nut).

While browsing at a bike shop, I came across the Moon lights. I have always like Moon lights as the glow is really nice and the mounting system is so versatile. This time, I spotted the new Moon lights that have a different mount, which mean that it may work on the front fork!

Moon Nebula W front light, very bright with 240 lumens in such a compact package!

Beam angle and brightness

Battery runtime depending on mode chosen. Noted down here for easy reference next time.

The array of features on this light

All the contents of this light package.

This is the innovative mount that I wanted. Instead of having a fixed radius, both ends can swivel to conform to a non circular mounting point, such as an aero seatpost or the front fork legs.

Angle adjustment is also possible with the ratchet to firmly hold the selected angle.

Maximum tilt angle possible

The light itself. Has a full array of Chip-On-Board (COB) LEDs to give that wonderful glow instead of a beam or point lighting

Standard Moon mount which allows for positioning 90 degrees apart

Uses a Lithium-Polymer battery

Charging port has been changed to the more common Micro-USB type, instead of the Mini-USB type used on the first generation of Moon lights

Lovely ring of glowing LEDs

How to switch from steady mode to flashing mode

Weight of light alone

Weight of light plus mount and rubber band

Mounted on the front fork of the Avanti Inc 3! With the innovative mount and the tilt angle, this light is able to shine straight forward.

Slim profile of the light does not protrude out from the fork leg

Moon Nebula W front light mounted on the bike

With the new mount from Moon, I am able to mount a front light on the front fork leg of the Avanti Inc 3 with great results. In fact, it looks quite good and I am quite tempted to buy another one to make it a pair. However, this light is quite expensive and so I will just wait and see.

By the way, the other front light on this bike is from the Cycliq Fly12, which combines the front camera and front light.