Saturday, April 27, 2019

Ninebot by Segway ES2 E-Scooter: Rear Wheel Maintenance

After barely 50 km of riding on the Segway-Ninebot ES2 e-scooter, I found that the rear wheel has developed some looseness. When pushing it from side to side, there is noticeable play. Also, when riding, I can detect some knocking sound coming from the rear wheel due to this looseness.

In order to fix this issue, I went online to find a solution, which shows you how to remove the rear wheel and axle. Here is how it is done!

First, we need to remove the rubber mat on the rear fork, as the screws are located underneath. Use a hairdryer to soften the glue before pulling it off gently.

Once the mat is peeled off, the screws can be seen.

I noticed that the rear cover was already cracked, maybe from overtightening by the factory? Or some impact to the side of the cover.

Do the same for the other side to expose the screws, so that they can be removed.

There is another screw at the side of the cover. Each cover has 3 screws that needs to be loosened before the cover can be removed completely.

Take off the cover gently, as the rear lights are still connected via a thin wire.

What you see here is the rear axle, fixed to the rear fork using 2 black bolts on either side.

Take two size 5 Allen keys and turn the 2 bolts at the same time, opposite to each other. One of it will loosen.

Before removing the rear wheel completely, you need to support the e-scooter. I found that I could clamp the front handlepost using a normal bicycle workstand.

Rear wheel suspended off the ground, for easy maintenance.

Rear axle removed completely. Two black bolts at either end, and two steel bushes to fit to the sealed bearings inside the rear wheel.

Sealed bearing inside the rear wheel, with one set at either side of it. However, there is no support in between the two sets of bearings, which will prove to be crucial later on.

Tire size, which means 8 inches in diameter by 2.125 inches in width.

Axle hole on the aluminium rear fork. Looks like they are reamed to tight tolerances.

Or maybe not. The steel bush fits in loosely, which is where the free play in the rear wheel is coming from. Other than changing the steel bushes, let's see if anything can be done to reduce the looseness.

The looseness of the rear wheel happens despite the rear bolts being tightened, as the bolts bottom out on the rear axle when fully tightened. There is almost no compression force on the bushes or bearings, which means that even when the bolts are fully tightened, the rear wheel can still wiggle from side to side slightly.

This does not seem to be the correct way, as I don't think the bolts are supposed to bottom out on the rear axle. My idea is to adjust the stackup on the rear axle such that the bolts bottom out on the bushes, instead of the rear axle. This way, when the bolts are tightened, the bushes will be under compression force, which will hold the bearings and eliminate the looseness.

I found a weird washer in my toolbox (from IKEA), which effectively lengthens the steel bush without touching the rear axle.

When the bolts are tightened, the bolt head will press on the washer, while the bolt threads will pull the axle. Once the bolts are fully tightened, there will be no looseness between the steel bushes and the rear fork.

Another view of the washer and the rear axle. Without the washer, the bolts will bottom out on the rear axle (centre, with thread).

I found a slightly longer bolt, just to ensure same engagement length with the addition of the washer.

I also prepared loctite, so that the bolts will not self loosen, as there is no anti-loosening mechanism other than applying torque.

Unfortunately, after doing all these, this DIY improvement does not work. What I found is that when the bolts are tightened, and the bushes are compressed, it presses on the inner race of the bearings (as per my intention). Normally, the inner race of the bearings (left and right side) will be supported by a bush in the middle, so that the bush will withstand the compression load from the left and right side.

However, because this rear wheel does not have a bush in between the left and right bearings, the compression load from the bolts will offset the bearings' inner and outer race, causing the rear wheel to experience high rolling resistance. Although there is no more rear wheel looseness, it also cannot spin normally.

Loosening the bolts will reduce the rolling resistance, but the bolts become too loose and will surely self loosen very easily, and it is not safe to do that.

In summary, the steel bushes need to be changed to something that fits better in the rear fork, or the looseness cannot be eliminated. Some other people have claimed that they found a washer that can be added to eliminate the looseness, but I am not sure how it is done. Perhaps, by using a thinner washer, a balance can be achieved between reducing looseness and ensuring sufficient tightening torque on the bolts.

Saturday, April 20, 2019

Ninebot by Segway ES2 E-Scooter: Folding Mechanism, Mobile App, Battery Calculations

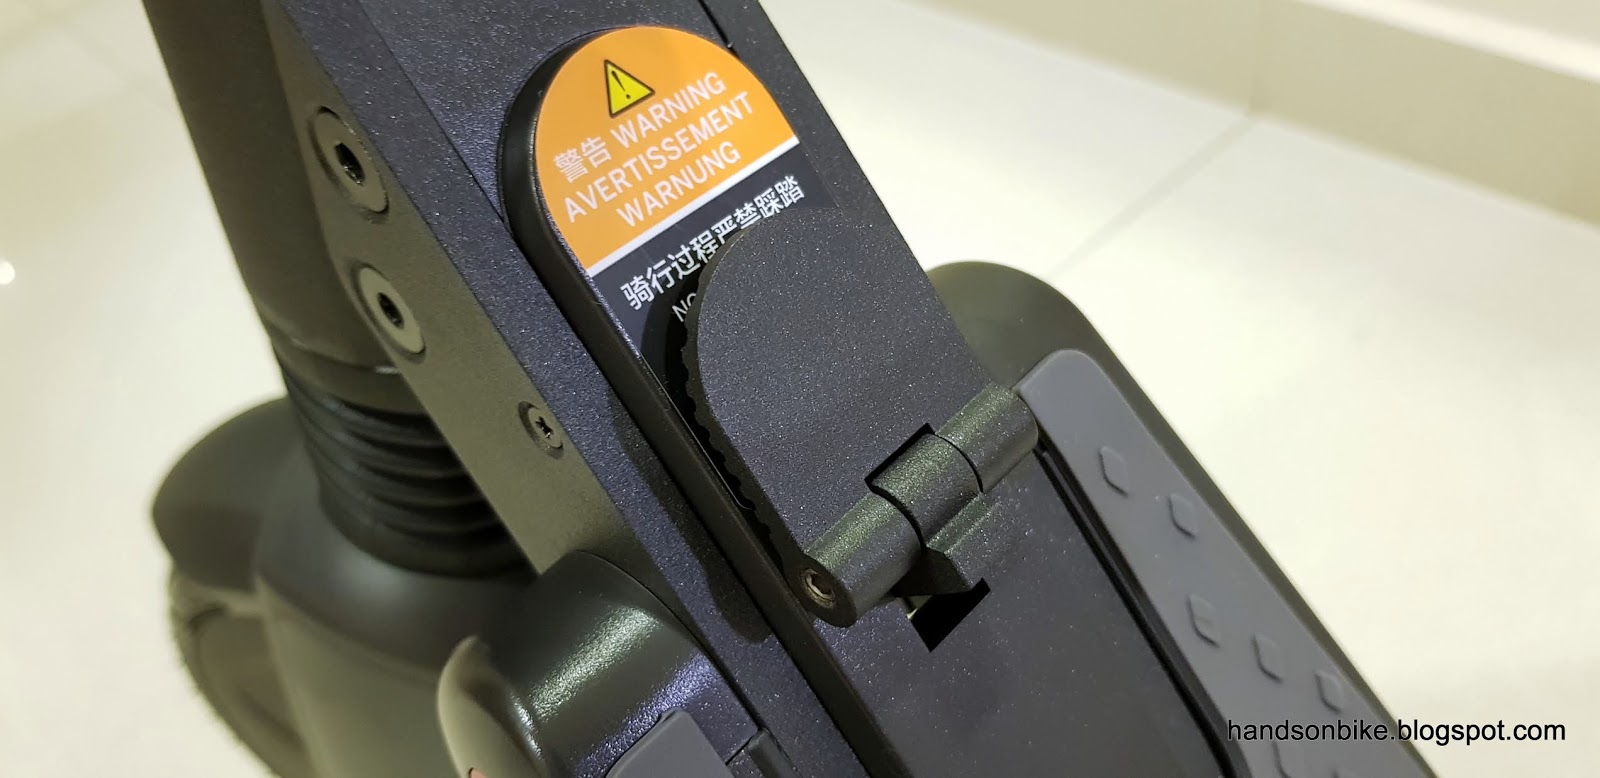
Finally, let's take a close look at the folding mechanism of the ES2 e-scooter. It is difficult to design a folding joint that is strong, durable and also free from looseness. For the last requirement, to be free from looseness, it is only possible if there is some kind of pre-load mechanism, to apply force to press two parts of the frame together.

On the Dahon folding bike, the two folding areas are the main frame clamp, and the handlepost clamp. Both have adjustable clamps to allow adjustment of the clamping force, so that if it loosens or wears out, it can be tightened to make the joint tight again.

It seems that there is no adjustment mechanism on the ES2, which means that there will be joint looseness over time, from wearing out of the contact surfaces and the gradual loosening of the joints.

Metal pin slots into the groove when unfolded, locking the two parts (handlepost and base) of the ES2 together.

The rubber piece (1 on each side) is compressed when unfolded, which reduces the looseness in the folding joint. However, there will still be some looseness as the rubber is not a rigid part.

As seen from the picture above, the rubber piece is the part that applies a pre-load to the joint when it is being compressed. However, since it is not a solid metal-to-metal contact, there will still be some play on the joint. Also take note that this piece can slide out and drop quite easily, so it is best to check that it is in the correct position after every ride. Might be a good idea to add a bit of glue to prevent the rubber piece from dropping off.

When folded, this metal pin is moved away from the slot on the base. This pin is fixed to the frame (handlepost side) by two E-rings. This metal pin withstands most of the load passing through the joint when in use.

How do you store your e-scooter at home? If you have the space, you can just leave it at the corner, unfolded. Or, fold it and store it under a table. However, if you have a vertical bike stand, you can also use it creatively to hold the e-scooter upright, for a minimal storage footprint.

By adjusting the hooks that are normally used to hold the bicycle frame, it can be used to hold the handlebars of the ES2. This is the Minoura Bike Tower 10 bike stand.

Here is how it is done. Make sure that the height is adjusted properly, so that most of the e-scooter weight is resting on the tire that touches the ground. The two hooks are just to prevent the e-scooter from toppling over, by cradling the handlebar.

Input voltage to charge the ES2 battery is 42 volts. Maximum weight for the ES2 is 100 kg, although a lower payload should increase the lifespan of the suspension and other parts.

Make sure you use the authentic charger to minimize any chance of damage to the battery or your property. Based on the power output of this charger (71 W), it should fully charge the battery from flat to 100% in less than 3 hours (187 Wh).

When plugged in for charging, the ES2 will turn on, with the rear lights pulsing. There is no way to turn off the display or the lights.

Once the battery is full (99%), the bottom LED lights will also light up. I think this is designed so that the user knows that it is fully charged, and will unplug the charger from the e-scooter. Not sure if the purpose is also to discharge a bit of power by turning on the LED lights, to prevent overcharging of the battery.

Some people don't like this "feature", as they don't want the e-scooter lighting up when charging is completed. For me it is OK, since it is not recommended to leave the e-scooter charging overnight anyway. The turning on of the bottom LED lights is a useful indicator to let me know that the battery has been fully charged and I should unplug the charger.

The ES2 e-scooter also has an app that can be used to edit the settings and also track other metrics. As shown below, it is useful to use the app for customizing the LED lights and also for other options. The e-scooter connects to the phone by Bluetooth, which is always on and looking for a phone to pair with.

Main screen of the app. You can lock the e-scooter from this screen. It also gives you an estimated range.

Some trip data if you are interested. The total mileage cannot be found on the ES2 display, but you can check it from the app.

Cruise control is to allow the e-scooter to continue moving even when the throttle lever is not pressed. Not useful in my context since there are no long stretches where I can leave the throttle on.

Energy recovery level means the level of regeneration, where the turning of the front wheel recharges the battery, much like how a dynamo works. It slows down the e-scooter, similar in function to the engine brake in a car. I prefer to set it at Weak as the higher levels makes the e-scooter slow down too much, causing jerky movement.

Other areas that are available for customization.

The colour and flashing pattern of the bottom LED lights can be customized in detail, which is really cool to differentiate your ES2 from others. The bottom LED lights also greatly improves the side visibility at night.

Battery information as can be seen from the app. Motor operates on 36 volts.

There are two common ways of indicating battery capacity, either by using Watt-hour (Wh) or milli-Amp-hour (mAh). Both mean the same thing, assuming that the voltage is the same and constant.

For this case, if the battery output is 36 volts, and it has a capacity of 5200 mAh (or 5.2 Ah), it means that it can supply 5.2 amps continuously at 36 volts for 1 hour. Power = Current x Voltage, so if we multiply the current (5.2 A) by voltage (36 V), it gives us 187 watts, which also means that it can supply 187 watts for 1 hour. This is the battery capacity (187 Wh) that is printed on the sticker underneath the ES2 as seen from one of the pictures above.

It is also stated that the nominal power of the ES2 is 300 watts. I am not sure this power draw is applicable at what speed, but I am assuming this is at the maximum speed of 25km/h.

If 300 W is needed to maintain 25km/h, we can use this information to work out the estimated range. The battery (187 Wh) can supply 300 W for a duration of 187/300 = 0.62 hours (about 37 mins).

Moving at 25km/h for 37 mins continuously (assuming that the battery/motor does not overheat) will give you a range of just 15.6 km. This is far less than the estimated range of 25 km. In this case, how do we achieve the claimed range of 25 km?

First, we need to assume that travelling at a lower speed requires much less power, which is true. What we do not know is, how much less? As I do not have any additional information, what I can do is to make an estimation.

The left side of the table below shows the time taken to travel 25km/h, at different speeds. For example, if you travel at 10km/h continuously, it will take you 2.5 hours.

The first scenario (travel at 25km/h for 1 hour) is clearly not possible, as a battery capacity of 300 Wh is needed, assuming that 300 W is needed to achieve 25km/h.

However, if we limit the battery capacity to 187 Wh, and determine the power needed at lower speeds, we can see how it affects the calculations. For example, if you travel at 15km/h, you will need 1.67 hours (100 mins) to cover 25 km. The maximum power consumption allowed for this 1.67 hours is 112.2 watts, if you want to achieve a range of 25 km at a speed of 15km/h.

In other words, if the actual power consumption (green boxes) is lower than the allowable number stated below, you can cover a range of 25 km or more! For example, if the actual power consumption is lower than 112.2 watts at 15km/h, the range will be more than 25 km!

As I do not know the actual power consumption at different speeds, this is purely an academic and theoretical calculation. Also, all these assume 100% efficiency from the battery to the motor.

Table showing the different power consumption allowed at different speeds, if you want to achieve a range of 25 km. Traveling at the top speed of 25km/h will not give you a range of 25 km as the power consumption is too high.

Once again, the full view of the ES2 e-scooter. The features I like most is how sleek and clean the appearance is, plus the integration of the front light, rear lights, and full suspension.

I shall give a rating for some of the features of this e-scooter, based on my own opinion and my limited experience with other e-scooters. You may disagree, which is fine as my rating is based on my own views only.

Rating out of 5 stars (1 is poor, 5 is best-in-class)
Appearance: 5
Price/Cost: 3
Ease of Use (display, throttle, brake): 5
Weight: 4
Battery Life/Range: 3 (5 if you add the optional battery pack)
Acceleration: 4
Stability: 4
Smoothness or Comfort: 4
Ease of Folding: 5
Ease of Customization (Software): 4
Ease of Customization (Hardware): 1
Serviceability: 2
Durability: Unknown

Seems that this ES2 e-scooter ranks pretty high on usage, but is difficult to customize due to many proprietary parts and design. From online forums, it also seems that the durability of this model may not be too good, but so far it is OK for me as I am a light user with low mileage. Overall, I highly recommend this ES2 e-scooter as looks good and works well, there is no point getting a more high powered e-scooter as it cannot be used in Singapore anyway.

Monday, April 8, 2019

Ninebot by Segway ES2 E-Scooter: Lights and Suspension

After taking a look at the handlebar area of the Ninebot by Segway ES2 E-Scooter, let's now take a look at the other parts of the e-scooter. More specifically, the integrated lights and also the suspension design.

Warranty seal located at the bottom of the handlepost. I think there are 2 bolts behind the seal.

Front part of the e-scooter, which links the handlepost to the front fork to the platform.

Electric motor is integrated into the front wheel. Also, there is a simple coil spring located inside the rubber sleeve to act as the front suspension.

Front white light integrated into the top of the handlepost. It is quite powerful, and is angled to shine straight ahead. Does not really illuminate the road, it is more of a to-be-seen light.

Rear red lights located on both sides of the rear wheel. The rear lights will flash when you activate the brake lever.

There are also many LEDs located under the platform, which will glow nicely. You can choose the colours and the illumination pattern from the app! Very cool feature.

2 rows of 8 LEDs located under the platform. Coolness factor is very high!

The rear mudguard also acts as a foot brake if you step on the mudguard. However, I don't use it as the brake lever is more than powerful enough for me.

The underside of the rear mudguard that rubs against the tire for braking action. This will also wear out the rear tire faster. No idea what "Avoid Filling Hollow" on the tire means...

Rear suspension located under the platform. Very simple coil spring with no damping.

If you need to adjust the rear suspension to be harder or softer, you can adjust this bolt to increase or decrease the spring force.

It is nice to see a full suite of features on this ES2 e-scooter, such as the integrated lights and full suspension.

With integrated lights, it is safe to travel even when it is dark, without the need to install any additional lights. It also keeps the appearance of the e-scooter neat and tidy.

The full suspension is also helpful to absorb impacts from small bumps, especially since both the front and rear wheels have solid tires (no puncture concerns). However, since the suspension design is just a simple coil spring for both front and back, there is no rebound control, which is probably not necessary for such a short travel suspension design. Both the front and rear suspension tends to bottom out quite easily with a loud bang, especially if you travel across a step quickly.

I think it would be better to travel over small bumps slowly, despite having suspension, to avoid shock damage to the suspension and other parts of the e-scooter. After all, electronic components can be sensitive to shock and impact, so it is better to ride with care to avoid unnecessary damage.

Kickstand is super useful to keep the e-scooter upright. It would be nice to have a rubber boot covering the kickstand as it tends to retract with a loud bang when it hits the platform.

Textured rubber layer on top of the platform for improved grip. Good design as it is soft and grippy.

This e-scooter can also be folded to save space, for easier storage and transport. As with most e-scooters, folding just means that the handlepost folds downwards onto the platform to make it compact. Handlebar width is maintained.

To fold, just step on the lever located at the front of the platform. This will unlock the catching mechanism and let you fold down the handlepost.

This is the lever which you will step on for folding the e-scooter. When you step on the lever, push the handlepost forward slightly to release the catching mechanism.

To prevent accidental activation, you can also fold up the lever when riding the e-scooter.

Once folded, the handlepost will lock with the rear mudguard, as there is a hook located on the handlepost.

ES2 e-scooter folded! You can lift up the e-scooter by the handlepost.

Folding the ES2 e-scooter is super easy, as it only involves stepping on the lever and putting down the handlepost. Lifting it by the handlepost is quite OK, as that is where most of the weight is (battery is located inside handlepost).

However, if you put in this way into a car, it will tend to tip over if not supported, as the heavy handlepost is on top. When it tips over, the grip will touch the ground (surface of your car boot?) first. This tends to twist the hook which locks the handlepost to the rear mudguard. It seems that the hook or rear mudguard might be damaged if it happens too often.

High stress on the hook that connects the handlepost to the rear mudguard. The rear mudguard might break over time.

I find that it is better to disengage the hook from the rear mudguard, and rotate the handlepost 90 degrees. By doing so, there is no stress on the hook and rear mudguard which can break it over time. The handlepost is also fully supported by the front wheel at one end, and the handlebar at the other end, making the whole e-scooter more stable when folded and placed in a car. You might not have the same problem if you can strap down the e-scooter to prevent it from moving or tilting over.

By not hooking onto the rear mudguard, there is no stress on the hook. The centre of gravity is also lower as the heavy handlepost is closer to the ground.

Although the front mudguard is slightly deformed by the front wheel at this position, it is OK as the material is soft and will regain its original shape once the ES2 is unfolded.