Showing posts with label Seatpost. Show all posts

Sunday, May 5, 2024

Bestrider Pump Pro 20: Frameset, Handlebar, Seatpost, Saddle

It's time to disassemble the Bestrider Pump Pro 20, before starting the modifications! As there are some  stock components that are pretty good, I will be reusing them. As for the other parts which do not meet my requirements, I will swap them out for something better.

Bike frameset with most of the components removed!

Only the aluminium frame left!

Frame weight is 1370 grams, with one headset bearing. It was stuck and I could not remove both to weigh.

Using sealed headset bearings, which is much nicer than loose ball bearings.

Aluminium front fork, with the super tall crown and large width.

Front fork is 507 grams, which is pretty heavy. It can be lighter as proven by the Fnhon front fork.

Stock super short stem weighs 85 grams.

Stock stem length is just 35 mm, which is like a MTB stem.

Lightweight carbon headset spacers weigh 8 grams.

Freshly cleaned and ready for new components to be installed!

As mentioned in the earlier post, the stock riser handlebar is too wide and too high. Therefore, I will be changing to a straight handlebar that is also narrower.

On the previous Bestrider Pump Pro 16, I got a new carbon handlebar in the preferred width, so that I don't need to cut it myself. However, for this new handlebar, I could not find a stock handlebar that comes in the preferred width, so I need to cut it to the correct length myself.

New carbon handlebar with a width of 580 mm

After cutting to the preferred width of 520 mm, the weight of the carbon handlebar is 131 grams. 

I used a very general formula to calculate the ideal handlebar width. Based on this guide, the handlebar width should be about 0.44 of the rider's height. This gives a handlebar width of 520 mm. The weight is pretty OK but there are lighter ones available. The one I used on the Birdy is just 107 grams for 580 mm width. Not sure why this one is significantly heavier, probably because I got a cheaper one.

As mentioned in the first post, the stock seat post and saddle is pretty bad, which is why I have to change them. 
Stock saddle and suspension seat post! Let's see how much they weigh.

Saddle is only 185 grams which is light, but that it because it does not have saddle rails for adjustment.

Stock suspension seat post is heavy at 408 grams, despite the short length.

The saddle and seat post which I got for the Bestrider Pump Pro 16 was good, which is why I decided to get another set for this bike.

Stock carbon seat post of 350 mm length before cutting. Diameter is 27.2 mm.

As the seat post length is too long to insert into the bike frame, I had to cut 60 mm to ensure it can fit at the lowest saddle position. Weight is 203 grams after cutting.

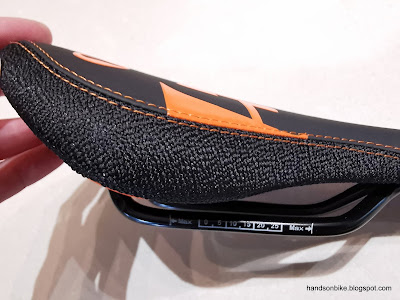
One more SDG Fly Junior saddle for the new bike!

Blue colour was chosen to match the new bike frame

Weight of 260 grams, which is pretty heavy considering the smaller kids size.

The weight of the original saddle + suspension seat post is 185 + 408 = 593 grams. Changing to the new SDG saddle and carbon seat post is 259 + 203 = 462 grams, a savings of about 130 grams.

There are other new components for the Bestrider Pump Pro 20 kids bike, they will be introduced in the next few posts.

Thursday, April 20, 2023

Birdy AXS: Dismantling the Birdy Bike Frame

In order to study the Birdy frameset, all the stock components need to be disassembled. Most of them are not a problem, except for the square taper crankset and bottom bracket. I have a slight phobia of square taper cranksets, due to having stripped the crank arm threads when extracting one a long time ago. Same for the bottom bracket with multiple small splines that are hard to engage properly.

For removing the square taper crankset, I make sure that the square taper extractor tool is well greased on the threads, so as to maximise the thread engagement to avoid damage. As for removing the square taper bottom bracket, I made a simple tool modification to make sure the bottom bracket tool does not slip off during usage.

As shown below, I used an actual crank arm bolt plus a few large washers to keep the tool on the bottom bracket spindle, when applying torque on the tool. This virtually eliminates tool slippage and spline damage. Just take note that as you loosen the bottom bracket cups, you will need to release the crank arm fixing bolt slightly to enable the bottom bracket to back out.

Using a spare crank arm fixing bolt and a few washers to keep the tool in place. The crank arm fixing bolt is screwed into the thread of the bottom bracket spindle.

Thursday, December 15, 2022

Specialized Aethos: Thru Axles, Roval Seatpost and Di2 Battery

On the Specialized Aethos, there are many high end components used, with the main objective being to make the bike as lightweight as possible.

Starting with the super lightweight sub-600 gram frame and sub-300 gram fork, even the fork expander plug is designed to shave off every gram possible. To continue with this lightweight theme, the other parts on the bike are also designed or chosen to be lightweight.

In the previous posts on the frame and fork, I shared that the thru axles are designed to rest inside a countersunk, giving a seamless look on the outside of the frame. To do so, the thru axles need to have a chamfered head to match, as shown below.

Aethos 142x12 mm rear thru axle, only 29 grams.

Aethos 100x12 mm front thru axle, only 22 grams.

Saturday, June 11, 2022

Bestrider Pump Pro 16: Saddle and Seatpost Upgrade

The Bestrider Pump Pro 16 kids bike came with a decent small saddle for kids, but the lack of adjustability is a problem. Only the saddle height can be adjusted via the seatpost height, while the saddle fore/aft and tilt cannot be adjusted at all. This is because the saddle attaches to the seat post via a pipe-fitting interface (refer to pictures below), instead of using the common saddle rail interface.

Another issue was that this pipe-fitting interface had looseness between the saddle and the seat post which could not be eliminated. To be honest, this kind of interface is not good at all, and only used because it is cheap.

Therefore, to optimize the saddle position for proper riding, I decided to get a new kids-specific saddle for this bike. As the stock seat post does not have a clamp for saddle rails, I also had to get a new seat post at the same time.

I found that it was nearly impossible to get a decent kids saddle that is not too big or with overly-thick cushion. There are very few options available.

Finally I found a source which had this SDG Fly Junior saddle that is highly rated for kids. There was practically no second option for a good quality kids saddle.

SDG Fly Junior kids saddle!

Some of the features of this saddle.

It was not available in red to match the bike frame, nor all-black. Therefore I had to settle for orange colour.

Standard saddle construction with normal saddle rails.

Tough side material to prevent scuffing when the bike is rested against the ground or wall.

Comparing it to a standard adult road saddle.

Although it is shorter than the adult saddle, it can actually be even shorter and will still be fine.

Narrower to suit the kids' narrower sit bones. You will be surprised how many kids saddles are too wide.

Comparing the shape of the stock saddle (on the left) with the new saddle. Original saddle is even shorter.

Stock saddle has a large plastic bottom shell which matches with the stock seat post. This is what I meant by pipe-fitting interface.

Stock saddle has a cutout at the rear of the saddle, for an adult to hold the saddle using fingers when guiding the kid on the bike.

Stock saddle is chunkier as well, with a very thick and soft cushion.

As for the seat post, a standard 27.2 mm diameter seat post is needed. Since I already had the carbon handlebars, I might as well get a carbon seat post as well. There are many available online, but I decided to get one from Toseek which is of better quality. I'm not too concerned about the strength of these carbon seat posts, because it will only need to take a kid's weight and not an adult. Also, as long as you don't get the super lightweight type, the strength is usually more than sufficient as they will just use more carbon to ensure sufficient strength. The risk comes when you buy lightweight carbon parts from unknown sources.

New carbon seat post! Definitely needs to be cut to fit the kids bike frame.

Dual bolt top and bottom clamp, pretty standard stuff. However, the resting surface for the saddle rails is rather short as it is limited to the centre portion.

Standard bolt and clamp interface, similar to Litepro seatposts.

There is actually an open slot at one of the clamping areas, which is not such an ideal design. I did not notice this when I ordered the seat post.

Wall thickness is equal around the circumference, and more than thick enough.

Weighs 221 grams, which is decent but not really lightweight for a carbon seat post. That's perfectly fine as I don't need to worry about insufficient strength.

After measuring and cutting off almost 90 mm of seat post...

...the seat post weight is now reduced to 194 grams which is great.

New SDG Fly Junior saddle is 260 grams which is so-so. I expected it to be lighter as it is smaller than the usual adult saddles.

New saddle plus new seat post weighs 454 grams.

Stock seat post and saddle only weighs 254 grams! That is really very lightweight.

A lot of the seat post weight comes from the saddle clamp area, not the aluminium or carbon tube. Also, the steel saddle rails on the saddle accounts for a lot of the saddle weight as well. The stock seat post and saddle design eliminates both of these heavy components, which allowed it to save a lot of weight. However, this sacrifices the option of saddle adjustability. 

New saddle and seat post installed on the upgraded 3 speed kids bike! Unfortunately the orange saddle does not really match the red frame.

Finally we can adjust the saddle tilt angle...

...and also the fore/aft setting to optimize the pedaling ergonomics.

Overall, this seat post and saddle upgrade actually caused a 200 grams increase in weight, which is unusual. The better saddle quality and position adjustment comes at a cost of heavier weight.

Bestrider Pump Pro 16 (Single Speed)
5.6 kg without pedals and kickstand, in stock condition.
About 6 kg with larger Early Rider pedals (266 g) and kickstand (102 g).

Bestrider Pump Pro 16 (3 Speed)
After upgrading to 3 speed drivetrain, new SDG saddle and seat post.
- 6.6 kg without pedals and kickstand.
- 7.0 kg with Early Rider pedals (266 g) and kickstand (102 g).

At 7.0 kg for a 3 speed kids bike, I think it is a very good weight. Probably very difficult to go any lower unless you change to carbon wheels or carbon frame/fork.

Saturday, November 6, 2021

United Trifold: Assembly Begins

In my case, I am basically building a United Trifold from scratch, since I decided to upgrade nearly every part of the bike. From the bare frameset, I added the crankset, wheelset, seat post and handlebar, plus a totally new single speed drivetrain.

By doing so, I learnt a lot about this bike, both good and bad points. And this is just the start of the bike modification, there is lots more to come! It's definitely not the most cost effective way to build a bike, but it is fun. Besides, I bought this bike not because I really need it (I have many other bikes), but because I was curious to find out more about this type of trifold bikes. I used to have a Brompton M6R, but the upgrades were mainly cosmetic and functional, and not a total teardown like this one.

With my dream wheelset and basic drivetrain installed.


Single speed setup, with just one rear sprocket, and a new chain tensioner.


Installing cables on a folding bike is always tricky, as you need to ensure that the cable slack is enough to enable folding and steering, and yet not leave too much slack as it can get in the way during folding. Sometimes it takes a lot of measurements, plus trial and error to make it work optimally.

Measuring the weight of the two brake inner cables before installation. There is no shifter cable for this single speed setup.

After cutting the excess cable off, here is the weight removed. This gives a total inner cable weight of 35 grams that is on the bike.

I added this SM-CB90 Brake Cable Adjuster to the brake outer casings, to release more cable when I need to open up the brake calipers more, during wheel removal.

I love the new 3D forged handlepost, with no welding at the joints. Also check out the new Litepro headset.

Here is how the handlebar looks with the brake cables connected! Super clean with no shifter cables.

It was tricky to find a suitable place for the inline SM-CB90 brake cable adjuster, as it needs to avoid areas with sharp bends, and also avoid being near the frame to avoid knocking sounds during riding or leaving scratches on it.


Here is the original Tektro caliper brakes, conditioned to work smoothly, and with new Ultegra brake pads.

Also using the stock Tektro brake calipers at the rear. Smooth cable routing is one of the factors for good braking performance.

Love the look of the wheelset, with the unique paired spoke pattern. Looks just as good as the Kinetix Pro wheelset on the Dahon MuEX.

Rear drivetrain completed! Drivetrain efficiency is at good as it gets, with a near-perfect chain line and no internal hub drag.

The ideal chain length is when the two pulleys are in line with the hub axle. (or is it the chain tensioner pivot?)

Single speed drivetrain, with one 14T sprocket on the standard freehub body.

The bike is almost ready for a test ride! There is a huge weight saving from the stock setup, it will be revealed in the next post.