Wednesday, August 28, 2019

Bike Friday HaD: Thomson Elite Seatpost, Carbon Saddle, Hope Seat Clamp

As mentioned in previous posts, there are a few quirks of Bike Friday frames that makes it tricky to select the correct components for the bike. What I have found so far are listed here:

1) Handlepost clamp diameter is 25.4 mm, instead of the usual 28.6 mm of a steerer tube. In other words, a standard stem cannot be clamped directly onto the handlepost. Instead, a shim is needed to use a standard stem on the handlepost.
2) Front brake mount is non standard, as a 180 mm brake adapter is needed to use with a 160 mm diameter rotor.
3) Seat post clamp diameter is 28.6 mm, instead of the more common 27.2 mm, 30.8 mm or 31.6/8 mm. This means that the choice of seat posts are severely limited.

To elaborate more on the seat post clamp diameter, I am referring to the size of the seat post that will fit inside the seat mast, which is the part that is inserted into the frame.

Credit to MyBikeShop and Bike Friday, they actually provided a seat post shim, to convert the non-standard 28.6 mm diameter to a common 27.2 mm diameter. The thing was, I did not know this, and I had already got a 28.6 mm diameter seat post. Therefore, I removed the shim and used the 28.6 mm seat post.


Shim is needed to convert the seat mast inner diameter from 28.6 mm to 27.2 mm. That will allow a standard 27.2 mm diameter seat post to be used. 

The only choices of 28.6 mm diameter seat post were the cheap but heavy type from Taobao, or the nicer and lighter ones by Thomson.

Thomson Elite seat post, in 28.6 mm diameter x 330 mm length. I have another Thomson seat post on the Fabike C3 and I like it a lot due to the low weight.

Problem is, this Thomson seat post is not lightweight at all! Although it is shorter and smaller in diameter than the other seat post, it is quite a bit heavier!


Reason is due to the very thick walls used in the tube. Comparing it to the other 31.6 mm diameter seat post, this is very thick and probably over built.

The reason that Bike Friday uses a 28.6 mm diameter for the seat post is so that a standard stem can be clamped onto the seat post, so that a handlebar can be mounted behind as shown. I understand this rationale and can accept this. Ironically, this is also the problem that the handlepost has, where the clamp diameter is not the usual 28.6 mm diameter.

Handlebar mounted behind the seat post, for older children or even adults.

I am not happy with this Thomson seat post, as it is expensive and yet not lightweight at all, unlike the previous one I had. Maybe the thick walls of this 28.6 mm diameter seat post are to allow a stem to be clamped onto it without crushing it.

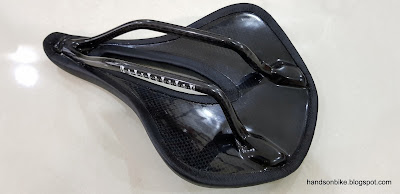
As for the saddle, I got one from Ascent Bikes, at the same time that I got the crankset, wheelset and handlebar from them. I liked the saddle which I tested on the Ascent Bolt mini velo, which is why I wanted to get this saddle for the Bike Friday Haul-A-Day.

Wide and short saddle, with quite a bit of padding.

Side view of the saddle.

What is different from the saddle I tested on the Ascent Bolt mini velo is that this is the carbon version, with a carbon shell and seat rails.

Carbon rails bonded to the carbon shell.

Width of this saddle is 160 mm...

...much wider than the 130 mm of the Selle Italia SLR Titanium Saddle.

Length of the carbon saddle is 240 mm...

...also much shorter than the 275 mm of the Selle Italia SLR Titanium Saddle.

Weight is 183 grams, which is actually quite good! Midway between the weight of the top end SLR Kit Carbonio Flow saddle and the heavier SLS Kit Carbonio Flow saddle.

Lastly, to make it easier to adjust the seat post and seat mast height, I wanted to change the seat post clamps to the quick release type.

The bottom clamp (between seat mast and seat tube) is 34.9 mm diameter, while the top clamp (between seat post and seat mast) is 31.8 mm diameter. I could not find any nice seat post clamps, other than the ones from Hope which uses a brass bushing for better clamping force.

Hope quick release seat post clamps, in 31.8 mm and 34.9 mm diameters.

Bottom seat clamp installed!

The problem is, when the quick release seat clamp is used, I could not secure the seat mast even when the lever is adjusted to be very tight. The seat mast has already been scratched by the seat tube due to the tight clamping force, but it will still rotate when I twist the saddle.

I have no choice but to change the bottom clamp back to the original type that uses an Allen key. The original clamp is able to secure the seat mast tightly.

Original clamp to secure the seat mast onto the seat tube. No slippage when this clamp is used.

Top quick release clamp is able to fix the seat post securely, so there is no issue with this. At least I am able to adjust the seat post height easily, although adjusting the seat mast will require a 5 mm Allen key.

Final set up, with the short and wide saddle, the Thomson seat post, and a Hope seat post clamp.

I am happy with the saddle, as it is wide and short, which is comfortable to use. Not so with the Thomson seat post, as it is expensive but still quite heavy. Finally, I was only able to use 1 out of 2 seat post clamps, as the bottom one does not work well.

Bit by bit, the bike is coming together, and it will be ready to testing soon!

Wednesday, August 21, 2019

Bike Friday HaD: Wheelset and Brake Caliper Installation

Previously, I had prepared the Ascent Bikes custom wheelset, tires, and the Deore XT brake calipers, to be ready for the Bike Friday Haul-A-Day frameset. Once the brake rotors and 11 speed cassette have been installed, the wheelset will be complete!

Let us now install the complete wheelset onto the frameset, hopefully there will not be any major issues.

This was the initial setup, with the 180 mm brake rotors. 

11-40T 11 speed cassette, roughly the same size as the 180 mm brake rotors.

Rear brake mounting is the post mount type, which matches nicely with almost all brake calipers. For a 180 mm brake rotor, an adapter (160 to 180 mm post mount type) is needed (not shown).

The front fork brake mount is the IS type, which means that an adapter to convert it to the post mount type is needed. As the IS mounting tab on the steel front fork is thin, the original bolt length for the adapter is too long. I added a nut as a spacer, so that the bolt does not stick out at the end and hit the rotor.

With the brake adapter mounted on the front fork! This brake adapter is for use with 180 mm brake rotors at the front.

Trying on the other side of the brake adapter, by fixing it to the brake caliper first, instead of the front fork.

However, there is a big problem! The brake rotor will interfere with the brake caliper, when I try to mount it. This is the closest I can put the brake caliper as it is already touching the brake rotor.

After double checking the brake adapter specifications, I am sure that it is correct, as that adapter is for mounting the front brake caliper to use with 180 mm brake rotors. Somehow it just does not fit...

Upon searching online, I found that this issue has been highlighted before. The brake mount of the Bike Friday front fork is actually not of standard design! To mount a 160 mm brake rotor, a 180 mm adapter is actually needed. In other words, if I want to mount a 180 mm brake rotor, I need to upsize to a 203 mm brake adapter!

This is really weird, and is just one of the few designs on the Bike Friday frame that is not of standard specifications. I am not sure what is the rationale behind this, but it means that the components that I have prepared will not fit.

I can either change to a larger adapter (203 mm type), to use with the 180 mm rotor, or downsize the rotor to 160 mm, so that I can use the 180 mm adapter that I already have.

As previously calculated, downsizing from 180 mm to 160 mm brake rotors will mean a 12.5% decrease in brake power. I think it is acceptable, because overall, the brake power is still very good, due to the smaller wheels and also the 4 piston hydraulic disc brakes.

Therefore, I decided to downsize the rotors to 160 mm for both front and rear. This means that I can use the existing 180 mm brake adapter for the front brakes, while there is no need for an adapter for the rear brakes.

Wheelset with 160 mm diameter Ultegra RT800 brake rotors.

Gives a different look compared to the RT99 brake rotors which look more aggressive.

Now it fits! Using a 180 mm adapter, to match the front brake caliper to the IS type mount with a 160 mm brake rotor.

Even so, an additional spacer of about 1.5 mm is needed to push the brake caliper outwards slightly, to avoid touching the brake rotor.

Front brakes installed!

Testing the fitting of the rear brake caliper.

Without spacers, the brake rotor will touch the edge of the brake caliper.

Added about 3 mm of spacers to avoid interference between the brake rotor and the brake caliper.

Rear brake installed! Both front and rear brakes are using 160 mm brake rotors.

Routing of the hydraulic brake hose, following the main frame, to the left chain stay, then to the rear brake caliper.

If you had noticed, you will see that on this frame, the hydraulic brake hose routing is all external. It does not even run through the holders on the frame, but outside the holders.

This is because the brakes were prepared separately, before installing onto the bike fully bled. I took measurements with the brake levers and brake calipers in the actual position, and cut the hose to the correct length.

Then, off the bike, the brake lever and brake caliper were connected, and bled with the hydraulic mineral oil. Once done, it means that the brakes are ready to be installed onto the bike. This also means that I cannot run the hose through the holders on the bike.

Although it does not look as neat, I prefer it this way as I can bleed the brakes properly off the bike, without having to handle the bike with the brake components already mounted on it. In the future, if I ever need to change the brake system, I can remove the entire brake system (brake lever + hose + brake caliper) without disconnecting the hose anywhere.

Once the wheels and brake system have been installed, the bike is almost ready to go on a test ride! The drivetrain goes on without any problems.

Up till now, the trickiest problem was solving the front brake adapter issue, due to the non-standard specifications of the front brake mount.

Saturday, August 10, 2019

Bike Friday HaD: Frameset

Finally the Bike Friday Haul-A-Day frameset has arrived! After a long 4 month wait, the frameset is finally here. Many thanks to MyBikeShop for helping me to place the order and arranging the logistics to ship the parts from USA to Singapore.

As you can see below, I chose the colour Robin's Egg, which is similar to Bianchi Green that is used on Bianchi bikes. Without any further delay, let's take a close look at the frameset!

Front half of the frameset, which consists of the main frame, the fork and the handlepost.

FSA headset is already pre-installed. Mounting bolts for front rack can be seen here.

Front fork has IS brake mount, which is less common than Post Mount type nowadays. An adapter will be needed to mount the Deore XT 4 piston brake calipers.

Bottom view of the fork. The handlepost can pass all the way through to the bottom of the fork for height adjustment.

Top bolt is to adjust the height of the handlepost. Middle bolt clamps the handlepost to the steerer tube. Bottom bolt fixes the pre-load on the headset, do not adjust this bolt!

With the handlepost removed. There are 2 rubber O-rings, for unknown purposes.

Handlepost removed from the fork.


Handlepost with clamp weighs 504 grams.

The handlepost is very simple, just a straight tube with a clamp to join the straight tube to the steerer tube.

Front half of the frame plus the fork and headset weighs a hefty 1500 grams, as they are all made of steel. Just for comparison, my Canyon Endurace carbon frame + fork weighs just 1168 grams.

Here is the rear half of the frame. Accessories already pre-installed by MyBikeShop.

Seat mast comes with a seat post shim to convert the uncommon 28.6 mm diameter size to a common  27.2 mm diameter of a seat post.

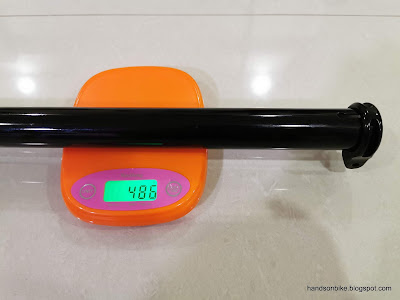
Seat mast weighs 486 grams. The seat mast links the frame seat tube to a conventional seat post, and is used for a wider saddle height adjustment range.

Bike Friday logo displayed prominently on the main frame, via a sticker instead of being painted.

Front derailleur mounting is available, although it does not have the reinforcing plate for the support bolt of Di2 front derailleurs.

Area between the seat tube and the rear wheel. Lots of space here for storage!

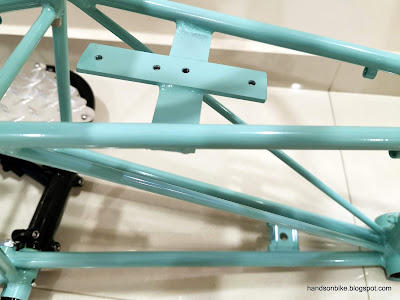
The threaded holes on the plate can be used to fix a bottle cage if desired.

Rear part of the frame is fixed to the middle section via large bolts.

A total of 4 large bolts join the rear part of the frame to the middle section.

Standard threaded bottom bracket, 68 mm wide, English threaded. The Ascent Bikes front single crankset will be installed here.

One of the few bicycles still made in the USA!

This area joins to the front half of the frame, and there are 5 positions to choose from, which determines the top tube length of the bike.

Seat tube can be seen when looking down into the main frame.

This surface will be mated to the front half of the frame.

Once the position is decided, a small bolt is used to fix the position (I chose the middle hole), and 2 more clamp bolts are used to secure the two halves of the frame together.

Front and rear half of the frame joined together. This was the condition when it was at the shop, but I had to dismantle it into two pieces to bring it back home.

Bike will be stored vertically when not in use, to save space.

Prior to receiving the frameset, I had already gathered all the necessary components to build the bike. With the frameset ready, the bike building can begin!