Sunday, September 26, 2021

Park Tool Weighing Scales and Shop Stool

During the setup of my new workshop area, I also got some new tools. To be exact, I got new weighing scales and also a proper rolling shop stool.

I used to have a normal kitchen scale for weighing smaller items. As for weighing whole bikes, I used a luggage weighing scale, which are also inexpensive. Although they work fine, the readings can sometimes be inconsistent.

Park Tool has this professional-looking weighing scale for small items, and also a large weighing scale for whole bikes. I decided to get these weighing scales to see if there is any quality difference with the cheaper, hardware store versions.

Park Tool DS-1 Digital Scale and DS-2 Tabletop Digital Scale

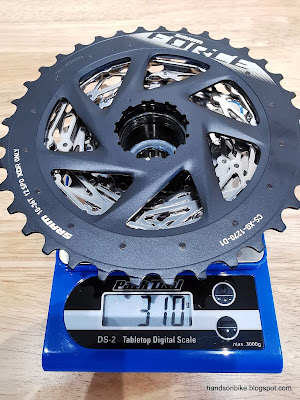
This is the DS-2 tabletop digital scale, which looks good and works well. The readings are consistent and accurate, when compared with another calibrated scale.

Testing it by weighing the new SRAM Force AXS 12 Speed 10-36T cassette.

The DS-1 Digital Scale is huge! It is much bigger than I expected.

The long shaft is for clamping it in a workstand, for weighing whole bikes.

However, there are some issues with this large DS-1 weighing scale. For a start, if I use it by just holding the weighing scale by hand, the readings are very inconsistent. Every time I weigh the bike, it will give a different reading that can differ by more than 0.1 kg, which is quite bad. Once I clamp it in a workstand, the readings become much more consistent.

Another issue is the shape of the blue rubber coated hooks. They are only good for standard tube shapes, but not flexible enough for many folding bike frames. If you are weighing a full sized bike with a normal top tube as shown above, it is fine. However, if you try to use it on a non-standard frame shape, or on the saddle rails, it does not work. In fact, the luggage scale with the strap works better for less-standard shapes.

Park Tool STL-2 Rolling Shop Stool

The next Park Tool item is the rolling shop stool. I tried to find cheaper, but decent quality ones, but they are surprisingly hard to find. I bought a relatively cheap version from Taobao, which took a month to ship over. But the quality was terrible, in terms of the welding and the material. I could not get a refund for it, and I literally disposed of it as the quality was so bad. That is why I still ended up getting a Park Tool rolling shop stool.

There was a broken plastic part at the bottom of the seat, due to shipping damage.

After checking with Park Tool, I was told that this broken plastic piece is just a breather tube to let air escape from the cushion when you sit on it. Even if it is broken, it does not affect the function.

Other than this, the rolling shop stool is of good quality. The metal finishing and welding is good, as well as the very comfortable cushioned seat. The seat rotates and rolls well.

Out of these three Park Tool items, I would recommend getting the DS-2 Tabletop Digital Scale and the STL-2 Rolling Shop Stool, if you need something of better quality.

As for the DS-1 Digital Scale, I just find it too big in size. Also, it does not give consistent readings even when I hold it in my hand steadily, which is how I use it most of the time. The shape of the hooks are also too inflexible for a wide range of tube shapes. I would recommend just getting a good luggage scale instead.

Final work area setup, with the storage cabinet just beside for convenience.

Park Tool stool is stored under the workbench, together with the mobile tool cabinet to save space when not in use.

Friday, September 24, 2021

Bike Tools Cabinet, Storage and Workbench

With more space available in the new house, I can now set up my own bike workshop area, complete with proper tool storage and parts storage, as well as a proper workbench.

Starting with a tool cabinet, I decided to get a mobile one with many drawers, so that I can place all my tools in the cabinet. I plan to park this tool cabinet under my workbench to save space, so I needed one that was short.

Most tool cabinets are rather tall, with a minimum height of 740 mm. This is because they are used as a table on its own. I needed a shorter one that can fit under a workbench.

After much searching, I found the TZ25 model by Tankstorm, which is a shorter tool cabinet with a height of 680 mm. Shipping by the normal way would be very expensive, as it is bulky and heavy. I used ezbuy with Prime membership to ship this, which makes it much cheaper to ship. I only paid a total of $104 including shipping for this tool cabinet, which is a great deal.

Tankstorm TZ25 short tool cabinet, with a height of 680 mm. I think it will tuck underneath the workbench nicely.

After a 1 month wait, the item was delivered to my door step! The wait time was not an issue at all since I had not moved in to the new place yet. In fact, I timed it perfectly, to have the item delivered when the renovations have been completed, but before moving in. This gives me lots of space to assemble the tool cabinet in the house.

Assembly was straightforward, as I only had to mount the 4 wheels and the side handle. The corner of the tool cabinet was slightly dented during shipping, causing the tool cabinet to be a bit out of shape. In the end I added a shim at one corner of the wheels, so that all 4 wheels can rest flat on the ground.

Tool cabinet assembled! An integrated lock is available if you need.

In order to prevent the tools from moving around inside the drawers, a sponge layer can be placed on the drawer to hold them in place. If you want, you can even cut the sponge to fit the shape of the tools.

I ordered the 2 cm thick sponge, and asked for it to be cut into 50 x 28 cm pieces, as that is the interior dimension of the drawers.

After that, the layout of the tools in the tool cabinet is entirely up to individual's preference!

Top drawer is used to store the most frequently accessed tools.

Second drawer has all the wrenches, including the awesome Park Tool PW-4 Professional Pedal Wrench.

Third drawer houses all the measuring equipment, including the Giant torque wrench which I have used since 2013.

Fourth drawer is a bit more random. With tire tools, cable tools, dropout alignment jig, torch lights, etc.

The fifth and bottom drawer houses the heaviest tools. These are the bottom bracket and chain tools.

This tool cabinet rolls and parks nicely under the workbench.

When I am working on the bike, I will pull out the tool cabinet, for easy access to the tools. The top of the tool cabinet also provides extra working space, in addition to the table top.

You may have noticed that I am using an Omnidesk as my workbench, when it is usually used for office work or gaming. I like the electronic height adjustment feature, as it allows me to adjust the table height to best suit the work that I am doing, regardless of whether I am sitting down or standing up.

It happens that I can set the minimum height of the desk too, so that it does not hit the tool cabinet if someone accidentally lowers the table below the height of the tool cabinet. This minimum height is set at 780 mm, which is slightly higher than the standard desk height of around 750 mm.

Other than the new tool cabinet, I also got a new storage cabinet for the bike stuff. Previously, I used to keep bike stuff in the storeroom and all over the house, which makes it hard to find and access the parts when I need. Now, I can have a dedicated storage cabinet which can hopefully keep most of the bike parts neatly in one place.

New tall storage cabinet! I initially wanted glass doors for the top half, but it was not available in this configuration.

3 large shelves on top, plus 4 drawers below. The cabinet is extra tall at 2.1 metres, which maximises the use of space.

After much organizing and reorganizing, I have finally settled on an arrangement which I like. It is a combination of display and storage, with less frequently used items stored high up, and more frequently used items at an easily accessible height.

I have used most of these parts, and now they are either retired or in standby mode.

Top shelf holds the chain rings and disc brake rotors, plus spare chains and bottom bracket. The Dura-Ace 7900 crankset has been retired, and is now on display.

Middle shelf has the shifters, derailleurs and cassettes, all of which have been used before. I would keep them for display, rather than sell them away cheaply.

Lower shelf has the lubricants and cleaning agents at the left. The small drawers hold all the small parts as you can read from the labels.

I had a hard time deciding which component goes where, and whether it was better to keep them in the drawers or on the shelf. In the end, I realized that it will never be perfect, it just has to be good enough.

The drawers hold the parts that are even less frequently used, as you can see below.

Top drawer holds all the brake related parts and tools, including spare parts.

Second drawer is more random, with inner cables and outer casings on the left, pedals in the middle, and shoe parts + helmet parts on the right.

Third drawer houses all the bike bags, portable tools and bike accessories like lights and bottle cages.

Bottom drawer stores all the wheel, tire and inner tube related stuff. There are spare tubes for every bike. I wonder how long spare tubes can be kept before they disintegrate?

Final setup! Check out the Omnidesk workbench, with a bunch of charging cables on top. I had space to put up two (out of 8) posters, brilliantly created by Bike School Asia. 

Update: Added a small bench vise to the tool list!

After a few months of using this setup, I am really pleased with how everything is stored neatly and is easily accessible. I no longer have to look around the house to find the parts that I need, as everything is within reach, as the bikes are nearby as well.

Friday, September 17, 2021

Cervelo Aspero: Front Single Road and Gravel Drivetrain

From the first set up of the Cervelo Aspero, where I first used a 2x11 speed drivetrain for road and gravel riding, I have now changed to a dedicated 1x11 speed gravel drivetrain.

The Aspero is now a dedicated gravel bike, which is why I have changed some of the components to make it more suitable for gravel riding, instead of striking a balance previously between road and gravel usage.

Other than the drivetrain, I have also changed to the GRX Di2 shifters, which has ergonomics that are very well suited for gravel riding. The default wheelset is also the excellent Hunt 650B carbon wheelset, with WTB Venture 47 tires.

That said, if I want to, I can still swap it to a road wheelset, if I ever want to ride fast on the road with this Cervelo Aspero. This is because the Ascent Bikes Zenith Elite wheelset is using the Sunrace RX1 11-36T cassette, which is relatively similar in size to the SLX CS-M7000 11-42T cassette on the Hunt wheelset. Previously I have swapped between the 11-30T cassette and the 11-36T cassette, without adjusting the rear derailleur at all, so I think swapping between the 11-36T and 11-42T cassette is possible.

Default gravel wheelset on the left (Hunt 650B + Venture 47 tires + 11-42T cassette) and the road wheelset on the right (Zenith Elite + GP5000 tires + 11-36T cassette).

From the picture above, you can see that the external wheel diameters are similar. This post shows the size difference in detail. The Zenith Elite carbon wheelset is currently being used on the Focus Paralane, as my all-weather commuting road bike.

Road wheelset with 11-36T cassette installed on the Cervelo Aspero.

Distance between the largest 36T sprocket and the guide pulley is a little further, since the rear derailleur is set for a 42T large sprocket. However, shifting is still OK.

Looks good as a road bike too!

With a carbon road wheelset, this Aspero can be converted into a pretty fast bike as well. It is only limited by the small 38T chain ring, which is good for gravel riding but rather small for road riding.

Full specifications of the Cervelo Aspero in road setup. Weighs about 7.5 kg without pedals.

As for the gravel setup, it will definitely be heavier, due to the heavier wheelset and larger cassette.

Installed the XTR RT-MT900 rotors onto the Hunt wheelset.


Full gravel setup

I think this setup is perfect for gravel riding!

The gravel setup weighs about 8.1 kg without pedals, with the additional 600 grams of weight coming from the wheelset.

Although it is possible for this Aspero to be set up as a road bike as shown above, it is not so likely that I will use it for road riding. I would just take the Focus Paralane instead, as it has more road specific components, such as a slightly larger chain ring and road shifters.

In any case, this Aspero is so versatile that it can be setup as a full road bike or full gravel bike, or anything in between.

Saturday, September 11, 2021

Shimano Dura-Ace R9170 vs Ultegra R8070 Hydraulic Brake Calipers

If you decide to get a new pair of hydraulic disc brake calipers for your disc brake road bike, you may be considering Ultegra or Dura-Ace brake calipers. In this post, let's take a look at the Dura-Ace BR-R9170 vs the Ultegra BR-R8070 brake calipers. What differences or similarities will they have?

New pair of Ultegra disc brake calipers, comes individually boxed. The front and rear boxes are different, but only in the accessories and not the caliper itself.

The front caliper comes with the adapter attached, for quick mounting to the front fork.

Different wording on the adapter of the older Dura-Ace brake caliper versus the newer adapter that came with the Ultegra brake caliper.

The first thing I noticed was how the wording on the adapter looks different from the previous Dura-Ace version that I had. The adapter itself is the same, but the wording is different.

Previously, it was labeled for diameter 140 mm rotor on one side, and for diameter 160 on the other side. This Flat Mount adapter can be flipped to allow the brake caliper to match either a 140 or 160 mm front rotor.

However, this new version of the adapter has an additional "or diameter 160 for 160/180 mount". After some background research, I found what it meant.

Originally, Flat Mount front fork mounts are sized for 140 mm rotors by default. The adapter allows it to be used with 140 mm or 160 mm rotors. However, there have been a move towards larger rotors for more stopping power, especially with gravel bikes.

Therefore, some fork or frame manufacturers started making the default mounting position on the front fork higher, to make it 160 mm by default, when the adapter is at "140 mm" position. If you want to use a larger 180 mm rotor, flip the adapter to the "160 mm" position. So, the adapter effectively allows you to run it at the default size (140 or 160 mm as designed by the fork manufacturer), or upsize it by 20 mm to either 160 mm or 180 mm rotors. Note that the adapter shape itself remains exactly the same.

Here it what it states on the other side of the new adapter.

Overall shape of the Ultegra brake caliper is very similar to the Dura-Ace brake calipers.

On the Ultegra brake caliper, there is an obvious joint line, where the two halves of the brake caliper meet.

If you have a chance to see a Dura-Ace R9170 brake caliper up close, you can see that there is no visible joint line along the perimeter. This is because the Dura-Ace brake caliper is first joined together, before it is machined along the joint line to make it look seamless. That is one reason why it is so expensive.

Next, let's place the brake calipers side by side for a better comparison.

Ultegra uses silver coloured bolts to join the two halves together, whereas Dura-Ace uses black coloured bolts for a more stealthy appearance.

Hose exit angle is the same. The caliper body of the Dura-Ace caliper is more rounded, while the Ultegra version is more angular. Nothing that affects function though.

There are some small differences in profile lines. Also note the different wording on the adapters.

I can't remember what this picture is supposed to show, because it was taken in November 2020 while I am writing this post in September 2021.

Weight of rear brake caliper, with mounting bolts and brake pad is 136 grams for Ultegra.

For Dura-Ace, it is slightly lighter by 10 grams, at 126 grams for the rear brake setup.

The brake pads and mounting bolts are exactly the same, so the weight difference comes entirely from the brake caliper itself. I am not sure where the 10 grams difference is from, it might be from the material of the two large bolts connecting the two halves of the brake caliper together.

In summary, the only detectable difference, other than the visual appearance, is a slightly lower weight on the Dura-Ace brake caliper. I believe the braking performance is the same. The smart money choice is definitely the Ultegra brake caliper, but some people just prefer the gloss black finish and the logo of the Dura-Ace brake caliper.