Saturday, May 30, 2020

SKS Traveller Edge and Explorer Edge Frame Bags

A gravel bike will usually have a bit more luggage capacity than a normal road bike, as it is more suited for adventure and exploration. Therefore, being able to carry more things on the gravel bike is an advantage. Additional weight is usually not an issue as the purpose of a gravel bike is not to go fast or climb well like a road bike. Rather, a gravel bike is used to ride away from nicely paved roads, and it gives you the freedom to explore new routes easily.

For my gravel bike, I want to be able to carry a bit more stuff, such as an extra water bottle, or extra tools, spares and maybe even snacks. There are people who attach big bags onto the bike, in order to carry lots of stuff for bike packing, but that is not my kind of usage.

A frame bag can be useful, as you can make use of the space inside the triangle of the frame to carry stuff. This has less capacity than a bag attached to the seat post or on the handlebar, but it is enough for my usage.

I found two models of SKS frame bags, which comes in a good size that will fit my frame. I could not decide which was better, so I decided to get both to try it out.

SKS Traveller Edge and Explorer Edge frame bags.

The Traveller Edge is a triangular bag, designed for road bikes, while the long and slim Explorer Edge is more for MTB.

Different usage intention as shown here. However, there is nothing stopping you from using it on any bike as long as it fits.

Both have the same volume, but the triangular Traveller Edge is a bit lighter.

The zips have a large rubber surface to allow easy operation, but I wonder how long the rubber encapsulation will last.

Rubberized surface on the velcro straps ensure good grip on the frame to prevent movement and slippage.

The Explorer Edge is slim and long, and can fit relatively long objects. A compact hand pump would probably fit.

A 550 ml water bottle fits nicely inside the bag. Not much room for other things though.

There are netting compartments inside the bag to help organize loose objects.

There is also a protected compartment at the side that you can use to store sharper objects or your phone.

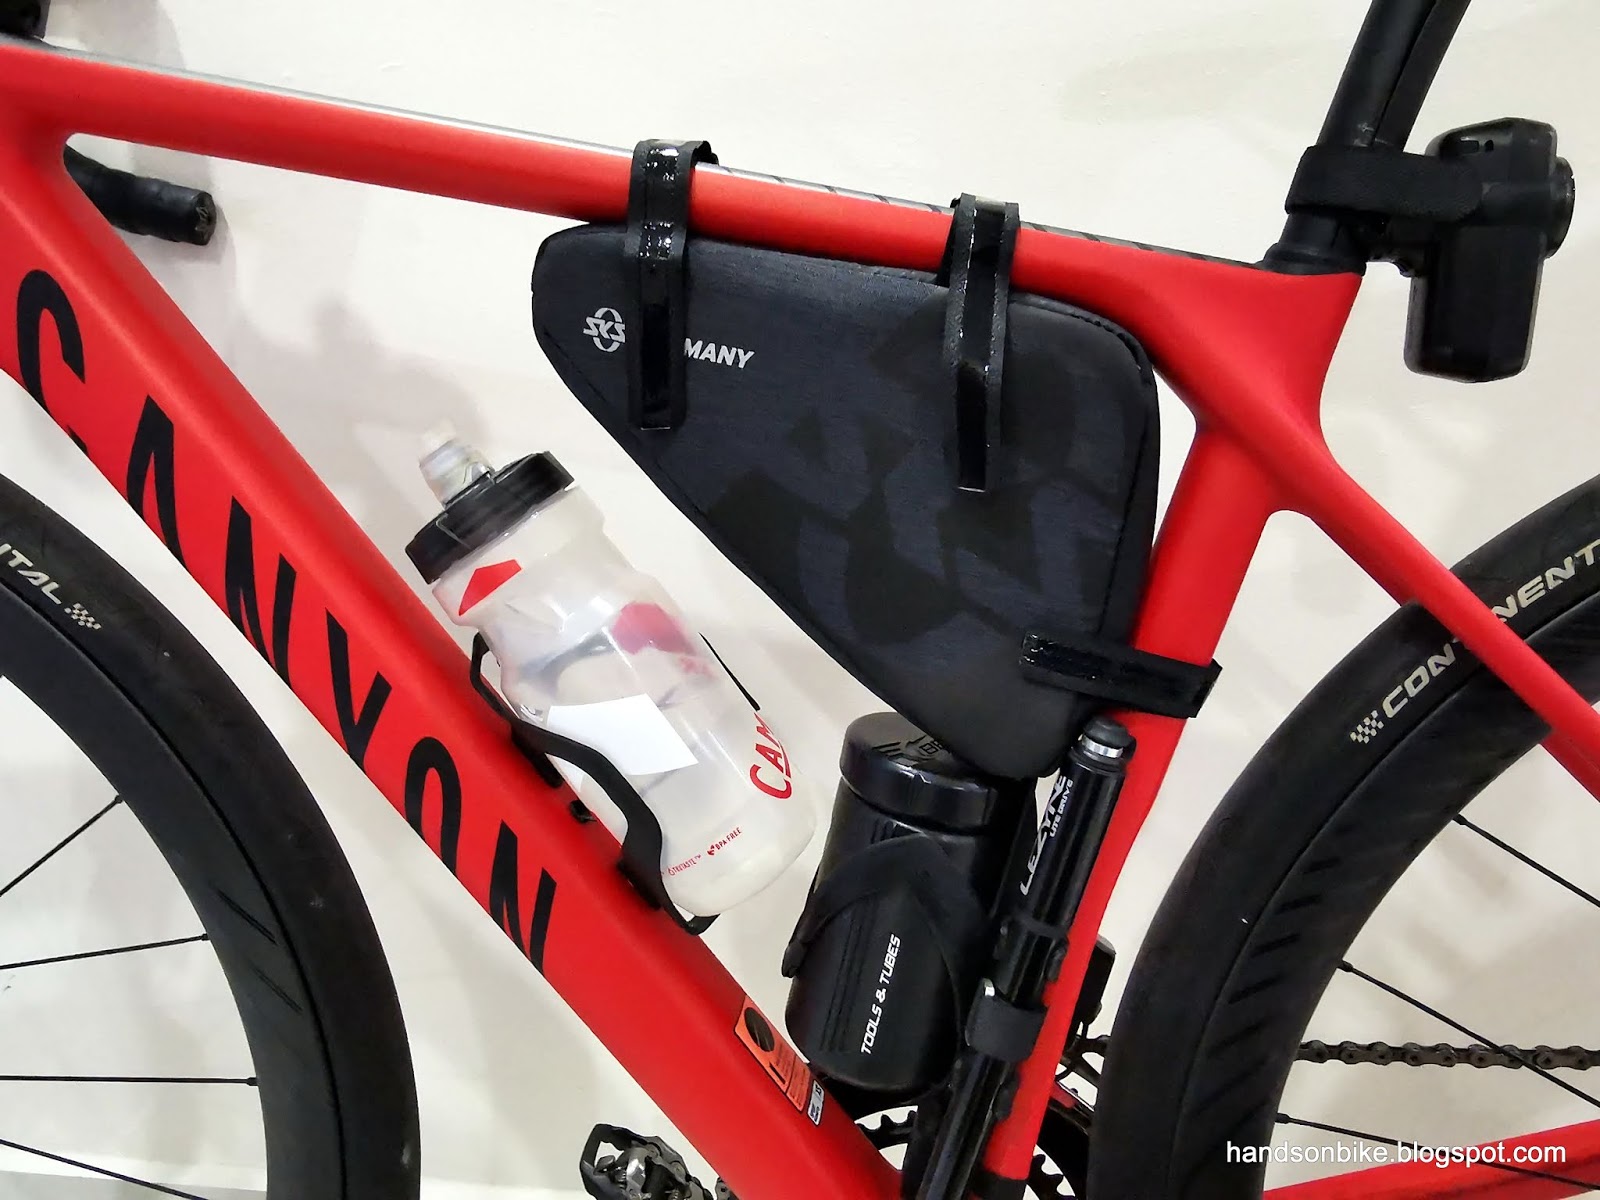
Fits reasonably well on the Canyon Endurace, with sufficient clearance with the tool bottle.

The Explorer Edge touches the water bottle, but it can still be removed quite easily.

The width is OK, and will not interfere with my legs while pedaling.

Comparing the sizes of the Explorer Edge on top, and Traveller Edge below.

The Traveller Edge is triangular shaped, and is more suited to flat and wide objects.

A water bottle does not fit inside the Traveller Edge, as the bag is not long enough.

No netting or inner compartments inside the triangular Traveller Edge frame bag.

The Traveller Edge also fits on the Canyon Endurace, and rests on the tool bottle.

There is much more clearance with the water bottle when using the Traveller Edge.

Main problem with the Traveller Edge is the width! It is too wide and will interfere with my legs during cycling.

Both the frame bags can fit on the Canyon Endurace without any issues. However, the Traveller Edge has a critical problem, where it is too wide. During pedaling, my legs will keep touching the side of the bag, which is really annoying. Therefore, I decided to use the slimmer Explorer Edge frame bag instead.

In the end, the Traveller Edge that was designed for road/gravel bikes does not fit well, while the Explorer Edge that was intended for MTB fits the gravel bike better.

Explorer Edge on the Canyon Endurace


After I changed my bike to the Cervelo Aspero, the SKS Explorer Edge frame bag can still be used. Regardless of whether it is in the road or gravel setup, the frame bag can be useful when you need a bit more luggage capacity.

Explorer Edge frame bag mounted on the Cervelo Aspero. The side velcro strap is exactly at where the seat stays joins to the seat tube, but the strap is long enough to go around the joint.

Looking good! SKS Explorer Edge frame bag installed on the Cervelo Aspero gravel bike.

I am happy that the Explorer Edge frame bag fits well, and is easy to attach or remove from the bike. You can bring along your wallet and spares easily when necessary, without carrying any backpack.

One minor complaint that I have about the frame bag is that I cannot hang my bike on the Minoura Bike Tower, as the bag blocks the hooks from holding the top tube. This is mildly annoying, but the solution is easy as I just need to remove the frame bag.

Sunday, May 24, 2020

PRO Internal Routing Tool

Nowadays, most bike frames come with internal cable routing, which is for better appearance. Functionally there is probably no advantage, other than being a tiny little bit more aerodynamic. However, the main drawback of internal cable routing is troublesome installation of the cables. Many times, after you insert the cable into one end of the frame, it does not come out the other side.

It can be very frustrating and time consuming to route a cable internally through the frame, if you don't have the proper tools. I think Park Tool was the first to come out with a good internal routing tool, followed by many others.

Recently, I decided to get an internal routing tool for myself, as I needed to route new hydraulic hoses and Di2 wires through the new Cervelo Aspero frame and fork. Previously when I assembled the Canyon Endurace, I borrowed the Park Tool internal routing tool kit and it worked pretty well.

PRO Internal Routing Tool. It is made to be like a multi tool, instead of many separate parts. Comes with a storage pouch.

The left side has a big magnet for guiding the other adapters through the frame. Right side has the various adapters to fit different types of hose or outer casing.

There are three adapters, for Di2 wire, brake/shift outer casing, and hydraulic brake hose.

From top to bottom: Di2 wire adapter, brake/shift outer casing adapter, hydraulic hose adapter. Each of these adapters can be removed, to be attached to the other part of the internal routing tool.

Adapter that clips into the Di2 wire

This adapter is joined to a short stretch of cable that has a small magnet on the other end. This will allow the big magnet to guide these parts through the frame.

Alternatively, use the long wire that has a small magnet at the other end. First, guide the long wire through the frame using the big magnet. Then, stick the magnet that is connected to the Di2 wire to this long wire. Finally, pull out the long wire to also route the Di2 wire through the frame.

This tool works pretty well, but you need to know how to use it to maximize its effectiveness. What I like about this PRO tool is the addition of the Di2 adapter that can be used to guide the Di2 wire.

With this tool, I was able to guide the Di2 wires and hydraulic hoses through the Cervelo Aspero frame and fork easily. However, routing the Di2 wires and hydraulic hoses through the PRO Vibe Aero Superlight handlebar was a nightmare, as the internal space was very tight, with sharp bends. Also, the entry/exit holes on the handlebar were quite small which made it difficult to squeeze the magnet and cables through. That is no fault of this tool, just wanted to highlight that if there is insufficient space, even an internal routing tool will have limited use.

Saturday, May 23, 2020

Bike Friday HaD: Upgraded Roller Wheels + Dura-Ace Brake Rotor

My Bike Friday Haul-A-Day cargo bike is already perfect for my purposes, with an excellent Deore XT 4 piston braking setup and also Di2 electronic shifting drivetrain. The only weak point would be the DIY roller wheels that I installed, in order to allow the bike to be wheeled around when vertical.

These DIY roller wheels are quite useful, I would say essential for wheeling the bike vertically into the elevator. However, as already observed previously, these roller wheels are quite flimsy and are not of good quality. These can be seen from the thin side walls and also simple plastic wheels.

Recently, I found that the bike is unable to roll straight when placed vertically. It tends to wobble from side to side, and I realised that this is due to misaligned roller wheels, as shown below.

Steel side walls of the roller wheel bracket are already bent and deformed, as the side walls are quite thin.

The whole roller wheel is already tilted to the side, causing it to be misaligned with the other roller wheel on the other side.

There is no other way to fix this than to get new roller wheels. I tried knocking and bending it back into place but these only made it worse. Getting a new set of the same roller wheels would make the swap easier, but I could not find the same type of roller wheels. It will probably not last very long as well.

The long term solution is to use a better set of roller wheels, but that also means that the bracket dimensions will be different, which will require a new mounting method. I have no idea how it will be mounted, the only way is to get the roller wheels first and figure out a way later.

Bigger and stronger roller wheels shown on the right.

The side walls are much thicker and stronger. However, the hole distances on the metal bracket are different from the previous one.

After a few hours of fiddling, plus lots of trial and error, I managed to create a new way of mounting the new roller wheels. I had to use some new brackets from my spares, without any drilling of new holes on the parts.

New roller wheel on the left, old roller wheel on the right.

Both roller wheels changed to the bigger and stronger version.

Using some creative and desperate methods to hold the roller wheels securely to the frame, to prevent it from moving under load.

Additional brackets at the side to help prevent the roller wheels from shifting when under load.

Mounting these roller wheels is quite challenging due to limited space and non-existent mounting points on the frame.

When vertical and not moving, one of the roller wheels will not touch the ground as the bike tends to rest on the other two points at the end of the wraparound bar.

At least these new roller wheels look stronger than the previous version.

I was glad I was able to make this work, as it is essential to be able to roll the bike when it is vertical. Once again, I wished that there is a standard mounting point on the rear of the Haul-A-Day frame, where standard roller wheels can be mounted easily. This would save me and others a lot of trouble. I would not mind paying extra for a proper mounting point and proper roller wheels, it can be an add-on option when the frame is being made.

Additionally, I changed to a nicer looking brake rotor at the front, because I had an extra Dura-Ace RT900 disc brake rotor available. It is essentially the same as the Ultegra RT800 rotor, just that the cooling fins are black in colour instead of raw aluminium.

Dura-Ace RT900 rotor on the left, Ultegra RT800 rotor on the right. Differs only by appearance. 

New look for the front wheel! Looks better in my opinion.

I did not change the rear rotor, as I only had 1 extra Dura-Ace RT900 rotor. Besides, the rear rotor is hidden behind the side bags and totally cannot be seen, so it doesn't matter what rotor I use at the back.

Saturday, May 16, 2020

Cervelo Aspero: Assembly Completed

Finally the Cervelo Aspero has been completed! It is not easy to build up a bike from scratch, as you need to gather all the parts and components needed, without making any mistakes. After that, it takes quite a bit of work to assemble all the parts correctly. If you had made any mistakes when choosing your components, you will realize it during assembly.

As you already know, this Cervelo Aspero will be used as both a road bike and a gravel bike. It only requires a quick wheelset swap to convert between these two types of bikes.

Let's take a look at the completed bike in both road and gravel configurations. Finally, I will show the Di2 wiring layout for this bike, and also the final component list.


Another look at the PRO Vibe stem. The carbon headset spacer has an outer diameter that is bigger than the stem, which affects the appearance of the bike.

With the new Bracket Cover on the shifters, and the fresh Lizard Skin bar tape.

Aero handlebar with a flat top area, which is claimed to improve aerodynamics. I like it for the comfortable flat holding surface.

Di2 Junction A, EW-RS910 tucked neatly into the right side of the handlebar drops. Di2 wires run internally inside the handlebar.

The hydraulic hoses and Di2 wire exits from the bottom of the handlebar near the stem. Di2 wire that runs to Junction B is routed together with the rear brake hose.

Rear brake hose and Di2 wire enters the top tube. Front brake hose runs into the left side fork leg.


Dura-Ace + GRX drivetrain! Shown here is the GRX RD-RX815 and the 11-34T HG800 cassette.

The gravel setup uses the Panaracer GravelKing SK 650B tires that are 43 mm wide.

Here is how the 650B tires look on the Hunt 650B Adventure Carbon Disc wheelset.

About 7 mm of clearance between the tire and the chain stay. Also enough clearance between the 4iiii Precision power meter and the chain stay.

With the SKS Explorer Edge frame bag installed.

Full view of the gravel bike! The wide gravel tires with brown sidewalls look nice on this bike.

No toe overlap when using these gravel tires, which are smaller than standard road tires.

Here is how the road setup looks like! The Teal coloured frameset stands out well from the black components.

The paint job looks fantastic under sunlight, where the glitter can be seen reflecting through the gloss finish.

Did I say I love the paint job?

Three bottle cage bosses for you to choose the position of the water bottle.

The glitter looks really nice under sunlight. Indoor pictures are not able to show how awesome the paint job is.

Glittery paint with light coloured paint splatters makes this frame unique. Plus it hides most of the dirt, so I don't need to clean it so often.

With these standard road tires, there is a bit of toe overlap. Can be avoided if you position your foot correctly during sharp cornering.

Comparison with the Canyon Endurace. The components have been moved over to the Cervelo Aspero.

Handlebar height on the Cervelo Aspero is slightly taller, but the reach is also slightly further forward.

Di2 wiring layout on the Cervelo Aspero. Wiring around the handlebar area is unconventional, but it hides the wireless unit neatly inside the handlebar.

Full component list, with the numbers in red highlighting the main areas where the weight gain comes from, compared to the Canyon Endurace.

The Aspero frame weighs about 370 grams more than the Endurace, while the fork also weighs 50 grams more. Compared to a full Dura-Ace road setup, the GRX RD weighs about 100 grams more than the Dura-Ace RD, while the special BBright bottom bracket also weighs about 90 grams more than Dura-Ace SM-BB92. With a heavier frameset, it is expected that the Cervelo Aspero will weigh more than the Canyon Endurace.

Cervelo Aspero road setup without pedals: 7.6 kg
Canyon Endurace road setup without pedals: 7.0 kg

Cervelo Aspero road setup with pedals: 8.0 kg
Canyon Endurace road setup with pedals: 7.4 kg

Compared to the Canyon Endurace (full Dura-Ace), the Cervelo Aspero weighs about 600 grams more, even with the road setup. About 400 grams comes from the frame + fork + thru axle lever, while the other 200 grams come from the heavier GRX RD and Wheels Manufacturing BBright bottom bracket.

Gravel setup, with the wheelset, tires, brake rotors and cassette switched.

By isolating the weight of the wheelset, the weight difference for the gravel setup can be determined. The table above shows the weight of the gravel wheelset (inclusive of tires, inner tubes, disc rotors, cassette), and it weighs almost 500 grams more than the road wheelset.

Although the Hunt gravel wheelset is 200g lighter than the Reynolds Assault road wheelset, the heavier gravel tires, inner tubes and cassette adds back the weight and more.

Cervelo Aspero gravel setup without pedals: 8.1 kg
Cervelo Aspero gravel setup with pedals: 8.5 kg

In summary, this Cervelo Aspero weighs 8 kg in the road setup, and 8.5 kg in the gravel setup. Not a lightweight bike, but it cannot be helped due to the relatively heavy frameset weight.