Sunday, March 29, 2020

Polygon Cozmic CX3.0: Sunrace MZ90 11-50T 12 Speed Cassette

Just a couple of months after I changed the rear derailleur and shifter on the Polygon Cozmic CX3.0 MTB to XTR, I decided to change the cassette as well. It is not possible to change to a Shimano 12 speed MTB cassette, as the Microspline freehub is needed. This means that a new rear wheel is needed.

I didn't want to spend money to upgrade the 26" rear wheel to have a Microspline freehub, as 26" wheels are considered obsolete in the MTB world. Although it still rides fine, I would rather spend money on getting a new MTB frame with 29" or 27.5" wheels.

Why would I want to change the S-Ride 12 speed cassette? That is because it has some flaws, which I hoped a better cassette would solve. For example, the shifting performance is not ideal when paired with the XTR 12 speed shifter and rear derailleur, as I think the spacing between the sprockets is not Shimano compatible. It does work OK when paired with the S-Ride 12 speed shifter.

The second reason is because the chain tends to derail from the sprocket during backpedaling. This happens in the lowest (largest) 2 sprockets, when the chain line is quite extreme. I have tried other bikes with a full Shimano 12 speed MTB groupset (XTR or Deore XT or SLX) and they don't have this backpedaling issue.

As Shimano does not make a 11-50T 12 speed cassette, I will have to look to other brands for 12 speed super wide range cassettes. SRAM Eagle 12 speed cassettes are also not compatible with my MTB, as a XD driver is needed on the rear hub. Therefore, I decided to get the Sunrace 12 speed MTB cassette to try out.

The Sunrace MZ90 12 speed cassette has a sprocket size of 11-50T, which is really wide, and it is compatible with standard freehub bodies. Although I don't get the 10T sprocket, I am fine with it as 11-50T range is already very big.

11-50T Sunrace MZ90 12 speed cassette. Looks pretty high end!

Weighs just 525 grams, quite a lot lighter than the S-Ride or the SRAM NX cassettes.

Gear steps: 28-32-36-42-50T. Big step from 42T to 50T. The 42T and 50T are made of aluminium for lower weight.

Gear steps: 11-13-15-17-19-21-24-28 and so on. Pretty standard gear steps.

Largest 4 sprockets are riveted together onto this massive red aluminium spider.

The largest 2 sprockets are cantilevered far out from the spider, enabling 12 sprockets to be squeezed onto the standard freehub body.

Next 3 sprockets (21-24-28T) are riveted onto the second spider.

Nothing special of note here.

All the 12 gear sprockets!

The red spacers are made of aluminium, which are usually only used on higher end cassettes.

There is even a free gift of the RD dropout extender with extra long B-tension bolt, in case you want to use your existing rear derailleur that is not rated to reach the large 50T sprocket.

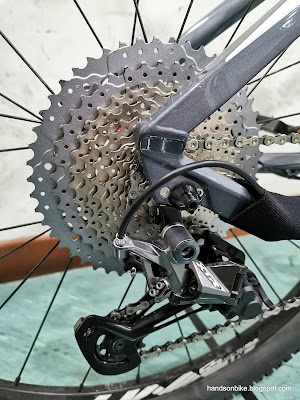
Sunrace MZ90 11-50T 12 speed cassette assembled onto the bike! The red coloured spider is really eye catching.

Still looks enormous no matter how many times I see it.

Silver coloured sprockets match quite nicely with the XTR rear derailleur.

At gear 3, the RD cage is at its lowest point.

At the lowest gear (gear 1), the RD cage is fully stretched as shown.

Latest picture of the bike, with the Sunrace 12 speed cassette being the newest component on this bike.

The Sunrace cassette is a significantly big step up in quality, compared to the S-Ride cassette. First, the shifting performance is improved, as I think the gear spacing is more or less compatible to Shimano.

Also, there is no longer any chain drop from the sprocket, when I backpedal at the lowest 2 gears. This is due to some clever shaping and design of the sprocket teeth which helps to hold the chain onto the sprocket.

This Sunrace MZ90 12 speed cassette is not cheap (around SGD $110 from Taobao), especially for a cassette that is not from Shimano or SRAM. However, it is considered the best of the rest, and it seems to work well with these Shimano components. Overall, I would say it is a good upgrade, especially for older bikes that do not have the Microspline or XD freehub bodies.

Saturday, March 21, 2020

Fnhon DB11: Assembly Completed

The Fnhon DB11 disc brake folding bike is finally completed! This project was started because I didn't want to ride rim brake bikes any more, which is why I decided to change my Dahon MuEX which uses V-brakes.

With a new disc brake compatible frameset, disc brake compatible wheels and a new hydraulic disc brake system, this new folding bike is going to be a nice upgrade over the previous one. Without further delay, let's take a detailed look at all the new components on this Fnhon DB11.

This is Part 2 of the assembly process, to continue from Part 1 where it was started.

Handlebar setup, with new hydraulic brake levers, but the same old Ergon GP1 grips.

Neat cable routing, with only 2 hydraulic hoses visible at the front of the bike.

However, I noticed that the handlepost is tilted to one side. As you can see from the picture below, when the front wheel is vertical, the top of handlepost is offset to the right side due to it not being straight enough. The whole handlebar is thus slightly slanted to the side, with the right side being slightly lower than the left side.

It is quite annoying, but it can only be solved by changing out the whole handlepost. I might do that later on, but it is not urgent. Riding is still OK.

Handlepost is visibly tilted to the right side, causing the handlebar to be tilted and offset towards the right side.

I have another bike with a flat handlebar Di2 setup, and that is the Bike Friday Haul-A-Day cargo bike. It is almost the same as the Dahon MuEX setup, with a Firebolt Di2 shifting switch and Di2 Digital Display. Let's do a comparison between these two handlebar setups.

Bike Friday handlebar in the foreground, and Fnhon DB11 handlebar just behind it. The Fnhon DB11 handlebar is located just a bit higher up.

Both are Di2 systems, but the brake lever, shifting switch and Di2 display are of different models.

Toseek carbon saddle mounted to the Litepro seat post.

Drivetrain mostly transferred over from the Dahon MuEX, except for the Dura-Ace Di2 rear derailleur. Chain ring bolts changed from red to black to match this bike.

Junction B of the Di2 system is located on the seat tube, hidden behind the chain ring.

For me, this 48T Wolf Tooth chain ring is actually over sized, as it was meant to be used with the smaller 406 wheels on the Dahon MuEX. On this new Fnhon DB11 bike with larger 451 wheels, the gearing will increase by roughly 10%.

Gear Range with 11-32T cassette and 48T chain ring:
Dahon MuEX with 406 wheels: 30 - 87 gear inches
Fnhon DB11 with 451 wheels: 33 - 96 gear inches

I don't need such high gearing on this folding bike, as I am unlikely to ride so fast. If I want to revert to the previous gearing, I will need to use a smaller 44T chain ring on this bike with 451 wheels. However, Wolf Tooth chain rings are quite expensive, and so I will just use what I have for now.

Actual chain weight, after being cut to the correct length for this bike. This is a new HG701 11 speed chain.

Lightweight titanium quick release axles are used to save a bit of weight. Note the multiple cable ties needed to route the Di2 wire neatly from the frame to the rear derailleur.


Fnhon DB11 folded. The folding method is neat and relatively compact, with no parts sticking out oddly like on some folding bikes.

Unfortunately, I have now encountered a problem, after folding the bike. The front metal plate and rear magnet are unable to stick to each other as they are not aligned properly.

The front metal plate (adjustable) and rear magnet cannot stick to each other as they are not aligned.

The adjustment range is insufficient to let the magnet stick to the metal plate. Probably a frame design error.

Easiest way is to extend the metal plate, by using a steel bracket that is long enough to reach the magnet. Same idea that I used 10 years ago, to install the Magnetix system on the Dahon Eco 2.

View of the front brake caliper and 160 mm disc rotor, together with the DIY metal plate.

View of the rear brake caliper and 140 mm disc rotor.

The size difference between the rotors can be seen when they are put side by side.

The Magnetix system now works, with the longer metal plate. Problem solved!

Fnhon DB11 folded.

With the handlebar folded in between the wheels, the folded package is smaller.

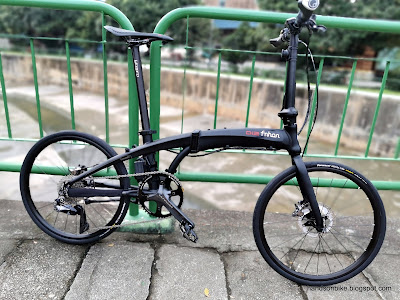
Fnhon DB11 disc brake folding bike completed! Note the various 3M rubber pads stuck on the frame to prevent rubbing between the parts when folded.

Nothing colourful here, with a black-on-black colour scheme.

Here is the full part list with the weight of the individual components. Don't ask me how much it costs as it will vary greatly depending on where you buy them from.

Outdoor picture of the Fnhon DB11

Looks really nice!

I am really pleased with how this project turned out, as the bike looks beautiful. I used some high end and expensive components, such as the XTR brake levers and calipers, and also Dura-Ace Di2 rear derailleur. However, these can easily be substituted for more affordable components, or even a mechanical 1x11 speed drivetrain.

The brakes are powerful, as expected from XTR brake components and small wheels. One finger braking is enough, which makes it really effortless to control the bike. Due to the relatively narrow tires and small wheels, the steering is a bit sensitive, compared to using the wider Kojak tires. It is not an issue as I am used to riding small wheeled bikes with more sensitive steering.

Probably the only downside to this new bike, compared to the Dahon MuEX, is the additional weight, mainly due to the heavier frame and wheels, plus the added weight of the hydraulic disc brake system. The Dahon MuEX weighed 8.4 kg without pedals, while this Fnhon DB11 weighs 8.9 kg without pedals as shown above on the part list. It is an addition of 0.5 kg that is quite a big amount, despite the weight reduction efforts of using a lighter saddle, handlebar, brake components, etc.

If you want to build a lightweight folding bike, a disc brake version will not work. However, if you are willing to add a bit of weight to have a much better braking performance, disc brakes will work really well. It is not necessary, but I really prefer to use hydraulic disc brakes, since almost all my other bikes are already using them, except for the Dahon MuSP.

Saturday, March 14, 2020

Fnhon DB11: Assembly Begins

With all the new components gathered, the assembly of the Fnhon DB11 can begin! Just to recap, here are the main new components.

Frame and fork
Handlepost and handlebar
Hydraulic brake system
451 wheelset and tires

Actually, if you look at it this way, there are many new components. Only the drivetrain and shifting components could be transferred over from the Dahon MuEX.

Previously, when I was building the Crius AEV20 1x11 speed folding bike from scratch, I found that the head tube was not round, which caused some difficulties for pressing in the headset cups. I was worried that this Fnhon frame might have the same issues, as the quality control of these brands (Crius, Fnhon) might not be as good as more established brands such as Tern or Dahon.

As shown previously, the head tube of this Fnhon frame is not too bad, it should not give me any big problems. Therefore, I was able to press in the headset cups quite easily, while the sealed bearings could also be placed into the cups by hand.

Headset sealed bearings placed into the top headset cup.

The tried and tested Litepro headset which I have used for almost all my folding bikes. Standard protrusion length of the steerer tube for Dahon/Fnhon handleposts.

If you want to install a stiffer Tern Physis handlepost, it is possible, but you will need a fork with a longer steerer tube. More details of how I experimented with it on the Dahon Boardwalk here.

As the new Fnhon handlepost has a taller base, the steerer tube appears to be too short.

Which is why the new Fnhon handlepost also comes with a longer compression bolt (bottom) which will enable it to be compatible with standard steerer tubes.

With the fork, handlepost and handlebar installed!

There is a compatibility problem between the new XTR BL-M9120 brake lever and the XTR Di2 SW-M9050 shifting switch. The new brake lever uses the I-Spec EV clamp band, which moves the clamp band position inwards on the handlebar. This causes it to interfere with the XTR Di2 shifting switch, which takes up quite a bit of space on the handlebar.

Compatibility Chart:
Standard BL + Di2 Firebolt Switch = OK
I-Spec EV BL + Di2 Firebolt Switch = Not compatible

In this case, I have to change to another type of Di2 shifting switch, as the XTR Di2 Firebolt cannot be used. Another way is to stick to conventional brake levers with the usual clamp band position (beside the Grip).

Luckily, there are alternative Di2 shifting switches available, such as those from the E-bike series. Those switches are smaller which will be compatible to the I-Spec EV brake lever.

Di2 shifting switch from the E7000 E-bike series. 300 mm refers to the length of the built-in Di2 wire.

The switch weighs just 20 grams! Lighter than the Di2 Firebolt switch which weighs 64 grams each.

Construction is quite simple, with a steel clamp band and a clamp bolt to secure it to the handlebar.

The operation method is straightforward, with just 2 buttons on top and below. The buttons have a slight tilt to the right side for more ergonomic operation.

The side with the printed logo should face upwards.

It comes with 3 high tech rubber bands for neater wire management on the handlebar.

Di2 switch installed beside the Grip for comfortable operation.

With the Di2 wires managed properly, it looks very neat from the top! Note clamp band position of the I-Spec EV brake lever, and also the 2 rubber bands on the handlebar to secure the loose Di2 wires.

Di2 wires hidden under the handlebar and brake lever, to hide the clutter. Di2 wire will run along the rear brake hose to the rear of the bike.

Di2 battery mounted behind the seat tube as done previously on the Dahon MuEX and Dahon MuSP.


Di2 wiring layout of the Fnhon DB11. Note the new Di2 switch and the Dura-Ace Di2 rear derailleur!

Why did I use the Dura-Ace Di2 rear derailleur? The previous Ultegra Di2 rear derailleur from the Dahon MuEX was working perfectly fine. However, ever since I swapped the rear derailleur on the Canyon Endurace to GRX Di2, the Dura-Ace Di2 rear derailleur has been lying around unused. Instead of having such a good component in the storeroom, I might as well put it to good use, and so here it is on the Fnhon DB11! As a bonus there is a weight savings of about 60 grams.

Earlier on, I talked about the usage of 140 mm disc rotor at the rear. I wanted a smaller rotor to reduce the braking power, as small wheels can achieve high braking power even with smaller rotors. On the front, the geometry limits the smallest rotor to 160 mm diameter, but for the rear, 140 mm rotor is possible.

Now, after I installed the new kickstand, I found that a smaller 140 mm rotor at the rear is necessary to prevent interference with the kickstand. A 160 mm rotor would not have been possible. Let me show you why.

With the kickstand installed, the front interferes with the left crankarm, while the rear interferes with the 140 mm diameter rotor.

The kickstand will touch the left crankarm if the kickstand is rotated outwards slightly to clear the rear rotor.

On the other hand, if the kickstand is rotated inwards to clear the left crankarm, the kickstand will touch the rear 140 mm rotor instead.

It seems that there is no way to install the kickstand, without having it interfere with either the left crankarm or the rear 140 mm rotor. However, I had an idea to lower the kickstand slightly, to provide more clearance. I added a spacer under the kickstand mount, so that the entire kickstand is lowered relative to the bike frame.

Spacer added under the frame, to lower the position of the kickstand. This spacer is just a squashed plastic cassette sprocket spacer.

With the addition of this spacer, the kickstand position is lowered slightly, but still constrained by the side walls to prevent kickstand rotation.

Now, the kickstand can be rotated inwards more, and still clear the rear 140 mm rotor and also the rear wheel spokes. It also just manages to clear the left crankarm. Not much clearance though.

With this, I was able to install the kickstand, and still maintain clearance with the left crankarm and also the rear 140 mm rotor. If the rear rotor had been bigger at 160 mm, it would touch the rubber leg of the kickstand.

I tried to put a magnet on the left pedal axle, so that it can be used for the cadence sensor. However, there is not enough clearance between the magnet and the left chain stay.

As you can see, there is actually very little clearance between the left crankarm and the left chain stay. I don't remember having such a small clearance on the Dahon MuEX.

At this point, assembly of the Fnhon DB11 is almost completed. There were less issues compared to what I encountered on the Crius AEV20, which is good news.