Showing posts with label Gates Belt Drive. Show all posts

Sunday, November 18, 2018

Fabike C3: Assembly Part 2 - Road Bike Setup

In the previous post, the main components of the Fabike C3, such as the wheelset and the drivetrain were installed. Once that is done, the cockpit area can be set up properly. Let's now take a closer look at the new handlebar setup and also the full bike!

A completely new cockpit setup, with new handlebar, shifters, Di2 display and bar tape.

PRO PLT aluminium handlebar, mounted on the previous Controltech 80mm stem.

With the new Deore XT Di2 display, SC-MT800. Shows the selected gear and also the battery level.

Internal cable routing, for the Di2 wire and also the rear brake hose. The rubber grommet of the rear brake hose does not fit into the hole on the frame when fitted around the brake hose.

Thomson Elite seatpost after cutting to the correct length. Di2 battery is hidden inside this seatpost.

Using the same Dura-Ace 7900 5 arm crankset with the same 46T Gates chainring.

Belt tension adjusted with the eccentric bottom bracket


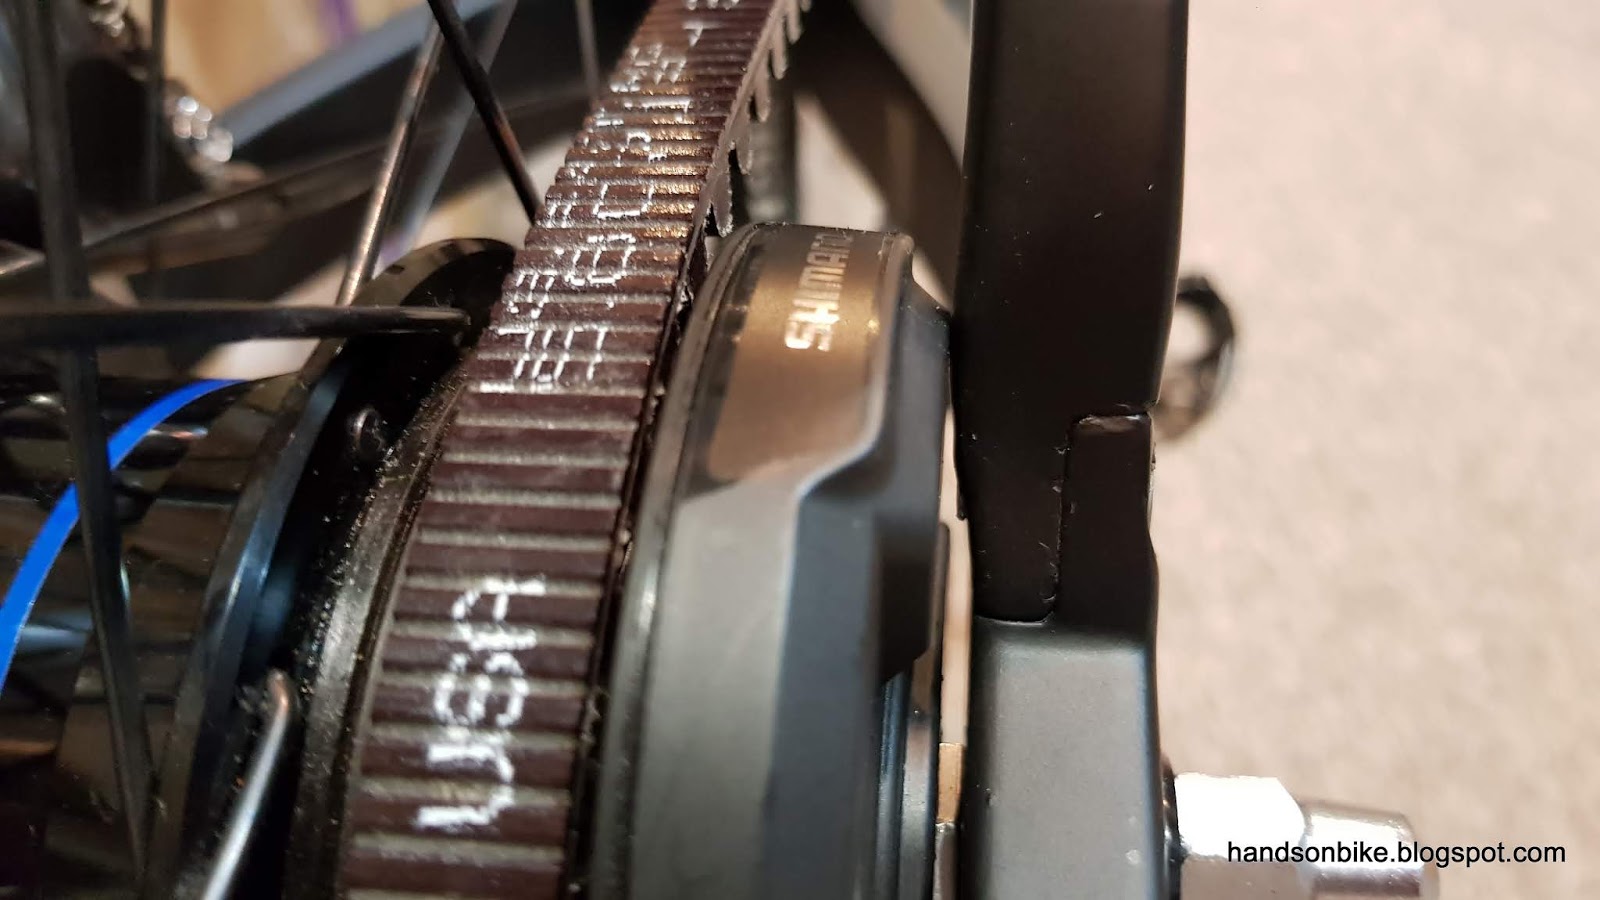
With Alfine Di2 motor unit mounted

Top view of the rear hub area and the Gates CDX carbon drive belt, with a length of 113T.

Maintenance-free drivetrain setup. With belt drive and internal hub, there is no chain or derailleur which will rust when used in wet weather.

Front hub with 12mm E-thru axle. The silver coloured DT Swiss front hub looks a bit out of place here when located next to all the other black components.

View of the DT Swiss ER 1600 Spline DB 32mm front wheel, with the Dura-Ace RT900 disc rotors.

Rear wheel with the same 160mm Dura-Ace RT900 disc rotors and non-series RS805 brake calipers.

View of the full bike! Looks and rides just like a normal road bike, which makes this an all-weather commuting road bike!

Other than the belt drive, the other components look the same as on normal road bikes. Also note the bent seat tube to allow a short chain stay and yet sufficient rear tire clearance.

Using the Canyon Endurace road bike as a reference, I tried to make the setup exactly the same on the Fabike C3, so that these two bikes will feel the same when I ride them. Previously, the Avanti Inc 3 commuting bike was more upright with a different geometry, which made it ride differently from the Canyon Endurace road bike.

The gearing is as shown below, which is the same as on the Avanti Inc 3. With a gear inch of 24 to 99, it is a good range that is more than enough for city commuting.

Gear ratios and range of the Fabike C3.

Using the bottom bracket as a datum for the whole bike, I adjusted the saddle position and handlebar position on the Fabike C3 to follow the Canyon Endurace. Basically, set the same distance from the bottom bracket to the saddle, and likewise to the handlebar.

However, after I set up the Fabike C3, I found that the saddle height and handlebar height is actually higher than the Canyon Endurace. Why is this so, even though I used the bottom bracket as a datum? Both the bikes have a distance of 64.5cm from bottom bracket center to the top of the saddle.

Putting the new Fabike C3 next to the Canyon Endurace, the saddle height is different by about 1 cm.

The shifter position on the Fabike C3 is also higher than the Canyon Endurace, by about 1 cm.

Upon checking again, I found that the bottom bracket height is different on these two bikes. On the Canyon Endurace, the distance from the center of the bottom bracket to the ground is about 27.5cm, while the distance on the Fabike C3 is slightly further at 28.5cm.

In other words, due to the eccentric bottom bracket adjustment, the Fabike C3 has a bottom bracket height that is 1 cm higher. As I used this point as the datum, both the saddle and handlebar position will be 1 cm higher, as what I have measured.

Therefore, these two bikes have the same riding geometry, just the the Fabike C3 is raised by 1 cm overall. This was my intention all along when I got this new Fabike C3 frame, which is to have a commuting bike that has the same geometry and riding feel as the Canyon Endurace road bike.

This bike is not quite all-weather yet, as the SKS mudguards have not yet been installed. That will be shown in the next post where all the accessories will be installed on this bike.

Saturday, November 10, 2018

Fabike C3: Assembly Part 1 - Component Installation

With all the components gathered, this new Fabike C3 commuting bike is now ready to be assembled! As already shown in the previous posts, there are many new components, such as the front wheel, brakes, handlebar, seat post and etc.

Before installing the components, I want to cut the fork steerer tube to the correct length. This will enable me to fix the handlebar position, which will then allow me to fix the shifter positions. Only when that is done, I can connect the Di2 wires, and also set the correct length for the hydraulic brake hoses.

I wanted this Fabike C3 to have the same geometry as my Canyon Endurace road bike, which is why I measured and used the same setup for the handlebar height, using the bottom bracket as the datum. Once this is done, I can cut the steerer tube to the required length, as it is definitely too long.

Cutting the carbon steerer tube at this blue line. After that, a spacer and top cap will be placed on top of the stem.

With the handlebar position fixed, all the Di2 wires can be connected, and the hydraulic brake hoses can be measured and cut to the required lengths. For this setup, the Junction B will be stored internally, within the down tube.

Wrapping the Junction B in sponge to prevent rattling, before stuffing it inside the down tube. The other bundle is actually the wire from the Di2 battery in the seat tube, which has a Di2 wire that is too long.

After running the Di2 wires internally, I can install the eccentric bottom bracket, followed by the crankset. This Dura-Ace 7900 crankset is the exact same one which I removed from the Avanti Inc 3, and I plugged it straight into this new frame.

However, I noticed that the Gates front chainring was rubbing against the frame, on the right side chainstay! There is insufficient clearance on this frame...

No clearance between the chainring and the frame, on the right side chainstay.

On the previous setup, the chainring was located on the INSIDE of the crankset, in order to match the chain line from the Alfine 11 Di2 internal hub at the rear. However, this is not possible on this frame due to interference.

In this case, I have to place the chainring on the OUTSIDE of the crankset, in order to avoid interference with the chainstay. This causes the chain line to be a little bit offset from the rear sprocket, but hopefully it will be OK.

Switching the chainring placement to the OUTSIDE of the crankset. Looks better in this case.

With the chainring located on the outside, there will be about 2mm of clearance with the chainstay, which is good.

Next, the rear wheel will be installed, and it will involve using the special rear dropout design described earlier.

First, the non turn washers will need to be slotted onto the hub axle. Then, the hub axle needs to be rotated so that the flats on the hub axle matches the opening on the frame.

In this orientation, the non turn washers cannot slot into the dropout. Therefore, the frame needs to be widened by a few millimeters, to allow both the hub axle and the non turn washers to be installed. Check out the pictures below.

Orienting the hub axle to slot it into the frame. Frame needs to be spread open slightly to allow the non turn washers to be slotted in at the same time.

After the hub axle is in place, rotate the hub axle, so that the profile of the non turn washers match the profile on the inside of the frame dropouts. Then, slot the non turn washers into the frame, to close up the frame.

Not sure if you are able to understand or follow the steps, but it is a very troublesome method, as many areas need to be aligned at the same time, for both left and right side of the hub axle. Also, note that I did not install the rear brake caliper yet, as spreading the frame will mean that the brake caliper will move to the side, and possibly bend the brake rotor.

Removing the rear wheel will be similarly tricky, as the non turn washers need to be pushed out from its slot on the frame, followed by rotating the hub axle to come out through the opening in the dropout. If I ever get a rear wheel puncture on this bike, I am not sure if I will bother to fix it at the side of the road, or catch a transport home to fix it later.

Anyway, that is probably the most difficult part of setting up this bike. With that settled, all other issues should not pose a big problem.

New Gates Centertrack 113T belt is needed for this frame, as the chainstay is quite short. I could not reuse the other longer 115T or 118T belts that I already had.

Once the belt is installed, it can be tensioned by rotating the eccentric bottom bracket as shown. One of the rare occasions where this tool is actually used!

Adjustment of this eccentric bottom bracket is not as straightforward as it seems. It is important to make sure that both sides of the eccentric bottom bracket are aligned, to prevent the crankset spindle from being tilted. However, since the adjustment is only done at the left side, it is necessary to make the right side follow the adjustment closely.

This synchronized adjustment is only possible if the 3 bolts on the eccentric bottom bracket are tightened, to minimize the play between the left and right side eccentric bottom bracket. However, if the 3 bolts are too tight, it will be clamped onto the frame and cannot be adjusted. This makes adjustment quite tricky. Once done, the 3 bolts are tightened to clamp both the left and right side to the frame, to fix the position.

As mentioned earlier, the change of front chainring position will cause the chainline to be offset slightly to the side. However, based on my testing, it seems to be OK as the belt is still able to roll on and off the chainring without any problems.

There are some other issues which I noticed during the installation of the components, which I will highlight below. These are not critical issues, but something that can definitely be improved upon by the frame maker.

Slight touching between the Di2 motor unit and the inside of the right side seat stay. Can be solved by changing the angle of the non turn washer, or creating more clearance on the right side seat stay.

Once the hub axle angle is fixed by the non turn washer, the angle of the Di2 wire points downwards by 45 degrees, instead of being horizontal. This is not as neat, and can be solved by changing the angle of the non turn washer.

Rubber grommets at the head tube for Di2 wire and hydraulic brake hose do not fit well. The Di2 wire grommet fits too loosely into the hole on the frame, while the grommet for the brake hose becomes too big, and cannot be fitted into the hole on the frame. Can be solved by sizing the hole and rubber grommet properly.

When the wheels are installed, there is quite a small clearance between the tire and the frame. To be fair, these are 28C tires which come up to 32mm wide on these rims. Hopefully the mudguards will fit in this small gap!

Same for the front, there is small clearance between the tire and the fork. Need to fit the mudguard into the small gap without rubbing the tire.

Mounting point for front mudguard is hidden at the back of the fork, which is neat. Slight peeling off of the paint here, but not a big issue.

More to come in the next post!

Wednesday, April 26, 2017

Avanti Inc 3: Installing Eccentric BB + Dura-Ace Crankset

Time to assemble the new components onto the Avanti Inc 3 bike! The new components are the Bushnell eccentric BB, the Dura-Ace 7900 crankset, the 46T Gates front sprocket and 118T Gates belt.

After I had changed to Alfine 11 Di2, the chain line has been moved inwards. Now, since the crankset will be changed, I will need to ensure that the chain line is maintained more or less the same. To make the job easier, I checked the clearance between the right side chain stay and the 42T Gates front sprocket, while still using the Deore crankset. The final clearance should be around this value after changing to road crankset and 46T front sprocket.

2.5mm clearance between 42T front sprocket and right side chain stay

As shown in a previous post, the stock eccentric BB was removed, and replaced by the new Bushnell eccentric BB. A shim was used to reduce the internal diameter of the frame BB shell from 55mm to 54mm, in order to be able to use the Bushnell eccentric BB.

Bushnell eccentric BB installed, with the shim visible around it

A road BB should be used since the width is 68mm and a road crankset is used. Shown here is the SM-BBR60 bottom bracket.

New road BB installed in the eccentric BB

New crankset, front sprocket and belt installed!

Good clearance between the right side chain stay and the 46T front sprocket

This clearance is measured to be about 3.5mm. Chain line is straight.

Black coloured Bushnell eccentric BB blends in well with the black frame

Shiny Dura-Ace 7900 crank arm, with 46T Gates front sprocket and 118T Gates belt

Final picture of the Gates drivetrain

The crankset after some wet weather usage

The modification has been completed, and the Q factor has been reduced from 182mm to 146mm. This means a Q factor reduction of 36mm which makes a big difference in pedaling feeling and comfort.

At the same time, the gear ratio has been adjusted due to the changes in sprocket sizes. With the 46T front sprocket and a 28T rear sprocket, the gear ratios of the latest Alfine 11 setup can be seen below. On the Alfine 11, the lowest gear, Gear 1 has a big 29.2% difference from Gear 2, which some people like while some people don't. I personally don't mind having this big step, as it gives an extra low gear for climbing.

Range of Alfine 11 gear ratios with 46T front and 28T rear

With that, the objective to reduce the Q factor has been achieved. At the same time, the adjusted gear ratios means that most gears will be used most of the time, with a top and bottom gear reserved for slope riding.

Saturday, April 15, 2017

Avanti Inc 3: Dura-Ace 7900 Crankset + Gates Belt and Sprocket

In the previous post, the Bushnell Eccentric BB was used to replace the stock eccentric BB on the Avanti Inc 3. This changed the BB width from 73mm to 68mm, allowing the use of a road crankset.

The road crankset that I can use should have a 5 arm design, and 130mm BCD. I would have preferred to use the new 4 arm road crankset, but Gates does not make their belt drive sprockets in that specification. Therefore, I have to select the crankset to match the available belt drive sprocket from Gates.

The smallest 5 arm, 130mm BCD front sprocket from Gates is 46T. This is smaller than the stock 50T, but still larger than the 42T that I was previously using. Together with the 28T Alfine Di2 rear sprocket, the gear ratio will be changed again.

46T, 5 arm, 130mm BCD Gates front sprocket.

Weighs 81 grams

The road 5 arm cranksets that I can choose from are the Ultegra 6700 (on Dahon MuEX), and Dura-Ace 7900 (removed from Merida Scultura 5000). In order to maintain a full Ultegra 6700/6770 groupset on the Dahon MuEX, I decided to use the Dura-Ace 7900 crankset on the Avanti Inc 3. Only the crankarms will be used, while the chain rings will be removed.

Since the Alfine 11 Di2 hub has a blue accent line running around the hub shell, I was thinking if I should use some blue chain ring bolts to match that.

Blue accent line on the Alfine 11 Di2 hub

Blue chain ring bolts. However, too many colours on the crank arm (blue, black, dark grey, silver) makes it difficult to showcase the beauty of the Dura-Ace crankset. 

Using black chain ring bolts makes the crankset look less busy, giving a more stealthy look

Gates 46T front sprocket mounted on Dura-Ace 7900 crankarm

Front sprocket needs to be mounted behind the tab to maintain straight chain line with rear sprocket

409 grams for right side crankarm plus 46T Gates front sprocket

A comparison picture of the front single sprockets. Crankarm on the left will be installed on the Avanti Inc 3, while the Dura-Ace 9000 crankarm + Wolf Tooth chain ring on the right has already been installed on the Wheelsport Fantasy mini velo.

Next, due to the change in sprocket size, a new longer Gates belt is required. I have no choice but to order a new belt.

Gates carbon drive belts come in a large box to prevent mishandling (twisting, bending) of the belts

118T, which is the next step up in size from the previous 115T belt.

118T Gates belt weighs 90 grams

With all the components gathered, the next step is to install all of them on the Avanti Inc 3. This modification will allow the use of a road crankset, which will have a narrower Q factor for more comfortable pedaling. This is quite a lot of work and modification required just to change the Q factor! To be continued...