Showing posts with label United Trifold. Show all posts

Sunday, June 5, 2022

Bestrider Pump Pro 16: 305 vs 349 Wheel Size Comparison

After completing the upgrade of the Bestrider Pump Pro 16 from the stock single speed drivetrain to the a 3 speed Nexus internal hub setup, I wanted to understand more about the wheel size.

The 16 inch wheel size used on the Pump Pro 16 has a rim diameter of 305 mm, which is less common than the 349 mm version. Most other bikes with 16 inch wheels use the 349 version, such as the Brompton, the Fnhon Gust, and the United Trifold that I have.

The only other bike that I know of that uses a 16 inch 305 wheel size is the Dahon Curve D3, which was one of the folding bikes that impressed me a lot many years ago, but I could not afford it at that time.

Now, I have the United Trifold with the 16 inch 349 wheels, and this new kids bike with 16 inch 305 wheels, so I can do a side by side comparison.

Wheel in wheel picture

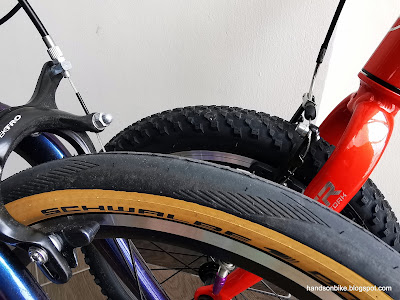
Not exactly a fair comparison, as the tire widths are different, which means a different tire height as well.

The 349 wheelset is larger in diameter, as the rim itself is already larger. 

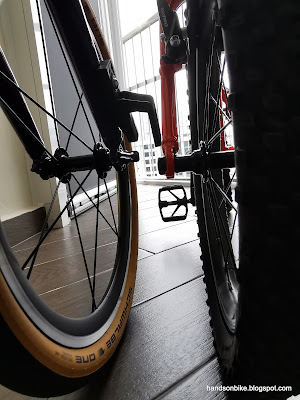
Difference in axle height, due to the difference in wheel diameter, inclusive of the tire diameter. Note that a change in wheel size on the same frame would result in a different bottom bracket height.

Outer diameter of this 349 wheelset is about 425 mm.

Outer diameter of this 305 wheelset is about 400 mm, which means that the 349 wheelset in this case is about 6% larger in diameter.

If the tires used on both the 349 and 305 wheelsets are the same type with the same width, the diameter difference would be larger. Theoretically speaking, the difference in rim diameter is 44 mm (349 - 305 = 44 mm), which means a radius difference of 22 mm.

In any case, 305 wheels have a limited tire choice, as this wheel size is less common.

On the Pump Pro 16, the front V brakes only have a small clearance with the stock tires, although there is still a big clearance with the fork.

About 15 mm of clearance between the tire and the rubber cover.

On the rear, there is very little clearance, at just a few millimeters.

I found that the brake arms of the Tektro brakes are about 96 mm long.

In this case, if I wish to use larger 349 wheels on this Pump Pro 16 bike frame, it is probably possible. Based on the front fork clearance, there is plenty of space up front.

Still lots of space at the rear chain stay area as well.

It seems that the frame itself is not the limiting factor for larger wheels. Rather, it is limited by the clearance between the V brakes and the tires. 

This can be solved easily by using V brakes with longer arms, such as the Shimano LX V brakes that were used on the Crius AEV20 folding bike. Those had an arm length of 107 mm which is longer, but it might still not be enough. If a larger rim diameter is used, the tire needs to be reduced in height as well, by using a slimmer slick tire that is not as tall.

Alternatively, a Litepro V brake with a long slot for brake pad adjustment might be needed, if the rim position is changed a lot. This was used on the Fnhon Gust.

No real reason to change from the existing 305 wheels to larger 349 wheels, as it works perfectly fine now. Just wanted to document these ideas for future reference.

Sunday, February 13, 2022

United Trifold: 11 Speed Drivetrain Completed

Final post on the United Trifold derailleur drivetrain modification! It has been really challenging to do this modification, due to a lot of incompatibility and interference issues.

Finally, I have managed to make it work, albeit with some limitations. Let's take a look at the final setup.

At the second lowest gear of 27T sprocket. Chain is stretched to the maximum here.

There is still some chain tension halfway though the fold, which is good.

When fully folded, the chain will still hang loose. But the additional chain tensioner keeps it in place on the rear derailleur and cassette.

It is recommended to fold this trifold bike with the chain in the larger sprockets, because this is where the chain will have the least slack.

As shown above, due to the small chain tensioner on the rear derailleur cage, it is not sufficient to take up all the chain slack when folded. The chain still hangs slack, but it does not go all the way to the ground, unlike when I used the super short cage Saint rear derailleur.

I think this condition is still acceptable, as it only occurs when folded. The chain does not drop off even when the bike is pushed around in this condition. Also, when the bike is unfolded, the chain still stays on the cassette.

Chain tensioner goes close to the rear tire when folded, but I think it is still OK since the rear wheel does not roll when the bike is folded.

The chain sometimes rests on the rear derailleur body itself, since it becomes slack. Main thing is, it does not derail from the rear derailleur pulleys.

However, there are still other issues, such as chain interference with the frame. This one is also tricky as there is not much I can do.

Cannot use top gear of 11T, as the chain rubs the frame as shown by the marks here.

Also cannot use lowest gear of 30T, as the chain will rub the frame (semi-circle loop for routing the rear brake cable).

If you really want to avoid the chain rubbing, the rear brake cable guide can be sawed off the frame, since it is not required any more.

I had an idea to shift the entire cassette towards the non-drive side, by moving the hub adapter that is currently on the non-drive side of the rear hub. From the start of the single speed conversion, the hub adapter has been installed on the non-drive side of the rear hub, to boost the wheelset OLD from 130 mm to 135 mm in order to match the frame. It was natural to place the adapter on the non-drive side, so as not to affect the freehub body side.

However, I realized that if this hub adapter can be moved to the drive side instead, it will solve a few problems at one go.

By placing the hub adapter on the drive side, instead of the non-drive side, the cassette position is pushed inwards by 5 mm.

With the cassette pushed towards the non-drive side, the chain does not touch the frame in the 11T sprocket nor the 30T sprocket.

This means that the 11T top gear can now be used, giving a good top gear of front 52T and rear 11T on the 16 inch 349 wheelset.

On the other hand, the lowest gear of 30T still cannot be used, despite no more chain interference with the frame. Due to the inward offset of the cassette, the cross chain effect from the chain ring to the 30T sprocket is just too much. During pedaling, it makes quite a bit of noise and also vibrates a lot.

In this case, I decided to use the low limit screw of the rear derailleur to lock out the lowest gear (30T sprocket), limiting the drivetrain to 10 speeds, which is equivalent to a 11-27T casssette.

Another downside of this modification is chain drop when backpedaling in the lowest few gears. Again, this is due to the skewed chain line and short chain stay. It is annoying when pushing the bike backwards, but it can be avoided.

Gear range of this 11 speed setup (limited to 10 speeds) is 30 to 75 gear inches. Quite a nice gear range for folding bikes used for casual riding.

11 speed road shifter for flat handlebars, SL-RS700, with BL-R780 brake levers.

Additional shifter to the handlebar, unlike the previous setup with only brake levers.

The modification is not done yet! During the experimentation, I found that the rear brake cable outer casing kept getting in the way of the chain. From the earlier pictures, you would have seen that I moved the brake outer casing to the outside of the frame. Now I will show the final brake cable routing that is needed for this derailleur drivetrain setup.

Instead of passing through the loop (that was interfering with the chain on the 30T sprocket), the cable needs to run outside the rear triangle.

Also, the outer casing needs to stay close to the chain stay, to avoid crank interference or tire interference.

Here is how the outer casing needs to be routed, to avoid all interference.

Final bike picture with the derailleur drivetrain setup!

When fully folded, the chain becomes slack but this condition is acceptable for me.

Even though the chain is slack, it remains on the crucial areas.

Final setup is 9.8 kg with pedals.

With this, the modification is complete! It is possible to modify the United Trifold to use a derailleur drivetrain, although the process is not straightforward at all.

The end result is not as ideal as I want it to be, due to the unresolved chain management issue. As of now, I don't have a good solution for it, so I will let it be.

As for the ride, the multi-speed drivetrain allows me to use the bike for a wider range of rides, even those with a bit of road riding and also slope climbing.

Finally, the weight of the full bike has increased to 9.8 kg with pedals, up from the 9.3 kg of the single speed setup. This is a weight increase of 500 grams, for the additional derailleur drivetrain. Not as lightweight, but still a good weight reduction of almost 3 kg from the stock setup.

By changing to this derailleur setup, the function and purpose overlaps more with the Fnhon DB12 that I have. In a way, the United Trifold is an inferior version of the Fnhon DB12, being heavier, slower, with smaller gear range, and poorer braking performance. Only advantage the United Trifold has is being slightly shorter when folded compared to the 20 inch Fnhon DB12.

United Trifold: R7000 Short Cage Rear Derailleur + Extra Chain Tensioner

After experimenting with a few different derailleur setups on the United Trifold earlier, I decided to switch back to an 11 speed road setup. This time, I will use a short cage (SS) 105 R7000 rear derailleur, instead of the mid cage version earlier. By doing so, this would solve the ground clearance issue.

Short cage 105 R7000 rear derailleur on the left, mid cage version on the right.

Looks similar from this viewing angle

There is some difference at this area, where the cage is attached to the body of the rear derailleur. This is due to the different large sprocket compatibility between the SS (max 30T) and GS (max 34T) version.

Comparing the mid and short cage derailleurs side by side.

Mid cage length is about 87 mm

Short cage length is about 72 mm

Mid cage weight is 226 grams

Short cage weight is a bit lighter at 220 grams.

Just changing to the short cage R7000 rear derailleur will not solve the slack chain issue, as previously experienced on the mid cage setup. Other chain guides that are used on Bromptons will not fit this United Trifold due to the frame or crankset interference.

Therefore, I got this chain tensioner that was commonly found on older Birdy bikes, before the bottom bracket-based chain guide was invented.

Small extension which will be attached to the rear derailleur cage, to manage the chain when the bike is folded.

This small chain tensioner weighs just 16 grams

At the top gear (smallest sprocket), adjust the chain tensioner so that it just clears the chain.

Adjust the chain tensioner angle so that it avoids the chain.

Plenty of ground clearance, with the cage at its lowest point.

As the chain is shifted inwards to the larger gears, the cage rotates upwards, together with the chain tensioner.

No issue with ground or tire clearance, with the short cage rear derailleur.

Chain at the lowest gear (largest sprocket). Chain length is barely enough, as shown by the super-stretched cage position.

Barely any chain engagement with the top guide pulley. Still able to shift though.

With this additional chain tensioner on the short cage R7000 rear derailleur, I am able to find a balance between good ground/tire clearance, and also sufficient chain management.

In the next post, I will summarize this derailleur drivetrain modification of the United Trifold.

United Trifold: Chain Tensioner from Bottom Bracket (Unsuccessful)

After changing to the 10 speed drivetrain as shown in the previous post, the United Trifold does not have any issue during riding. However, folding becomes a problem due to the short cage of the Saint rear derailleur, which creates a lot of chain slack when folded.

Therefore, I did more research to find out how to maintain tension on the chain when a trifold is folded.

There are additional chain guides that can be added to a trifold, so that it helps to tension the chain when it is folded. As shown below in the example, it wraps the chain around the chain ring, so that the chain takes a longer path from the chain ring to the rear derailleur when folded. This prevents the chain from becoming too slack.

Example showing how the additional chain guide around the chain ring will route and tension the chain when the trifold is folded.

Here is one example of the chain guide, which will be sandwiched between the bottom bracket and the frame.

It is made of a stamped piece of aluminium, and needs special shaping to avoid interference.

Weighs 38 grams

Thickness of the chain guide is around 3.1 mm. In this case it will act as the spacer of the drive side bottom bracket.

Unfortunately, I found that this chain guide interferes with the crank arm.

Apparently the bend on the chain guide is designed to avoid the crank arm shape on square taper cranksets, not the chunky Shimano Hollowtech crank arms.

No way to make it work in this case. I will not sacrifice the crankset for this chain guide.

On to Plan B. There is another chain guide which serves the same purpose, but it is designed differently. Let's see if it works.

Example of the alternate chain guide, shown on another bike. It is designed to avoid the chain stay and crank arms when folded.

Here is how it looks. Angles can be adjusted individually at the pivot points.

This part will be sandwiched underneath the drive side bottom bracket adapter, and also wrap around the bottom bracket shell.

In addition to the bolt, there is an additional pin to prevent rotation of the arm. Seems that angle adjustment is not possible after all.

This chain guide is a bit heavier at 60 grams.

The part that will rest under the bottom bracket adapter is about 2.4 mm thick.

The thickest part of this chain guide is 10 mm for extra stiffness.

Distance from centre of bottom bracket to the roller (which contacts the chain) is about 123 mm. This distance limits the size of the chain ring that you can use.

Internal diameter of the chain guide is 35 mm, which is slightly larger than the thread diameter of the English threaded BC 1.37" x 24 TPI bottom bracket threads.

Unfortunately, another interference problem. This chain guide does not fit the bottom bracket shell on the United Trifold.

This chain guide is designed to wrap around the bottom bracket, but it is too small for the bottom bracket shell on the United Trifold.

From my analysis, this chain guide is designed to fit around trifold with steel frames. The bottom bracket shell on a steel frame has relatively thin walls, as there is no need to make it thick for strength.

However, the United Trifold is an aluminium frame, which means it has an aluminium bottom bracket shell. Thus, the walls on the aluminium bottom bracket shell are thicker, and the outer diameter is too big for this chain guide. Yet another difference on this frame that causes problems with aftermarket modifications. If I try to grind away the interference on the chain guide, I think it will just break off as the material becomes too thin.

Therefore, both the existing solutions for a trifold chain guide does not fit on this bike, due to crankset or frame interference. I need to keep searching for solutions...