Sunday, August 29, 2021

United Trifold: Bare Frameset

It's been a few months since I have completed modifying the United Trifold, but have not had the time to write about the process yet.

When I studied the bike after I received it, I found that there are many features that make it stand out from the other Brompton-style bikes, like Pikes or 3Sixty. Those two brands are basically a direct clone of the Brompton, but this United Trifold is not. The United Trifold is a hybrid of many different folding bikes, which makes it unique, for better or for worse.

Since I was already going to upgrade or change most of the components, I stripped down the bike to the frameset. I was interested to see how heavy the frameset was, as this will dictate how far you can go to achieve a lightweight bike. If the frame is already heavy, it is very difficult and expensive to succeed at building a lightweight bike.

United Trifold with all the components removed.

In the picture shown above, the handlepost is still there only because it holds the fork onto the frame. I will change out the handlepost anyway. The stock seat post is there because it holds the frame together when folded. The rack also remains as it allows the folded frameset to remain standing. Anyway, the rear rack has to be retained to ensure that it can be rolled when folded.

Trifold 7 is the model, as it comes stock with a 7 speed Nexus internal hub. The 2 bottle cage bosses are useful.

Rear rack is mounted to the rear triangle. Made of aluminium, same as the main frame.

I weighed the frame, after removing the fork and rear rack. However, parts that I consider part of the frame is left on the frame, and is included in the frame weight.

In this case, other than the aluminium main frame, the seat post clamp, seat post shim, seat post rubber stopper, and rear triangle hook are included with the frame weight.

The frame weighs 2322 grams, which is an average weight for a frame. In comparison, the Fnhon Tornado frame weighs 2476 grams, which is just a bit more.

Other parts are I did not list above are excluded from the frame weight, as they can be removed and weighed separately. More importantly, those parts are replaceable with good alternatives, which is why I needed to know the stock weight, in case I want to replace them later.


The rear hook is considered part of the frame. The design seems to be an exact copy of the Brompton type, and works well.

Stock rear suspension block weighs 71 grams. It is not compatible with the Brompton design.

I feel that the frame weight is slightly heavy, considering that it is made of aluminium, instead of steel like the Brompton. Still acceptable though, unlike the Java Neo 2 which has a really heavy frame weight.

Moving on, I also weighed the front fork. It is not so easy to find a suitable front fork, as the fork rake angle is rather big. Also, there is a mounting point on the side of the fork for the hook, which aftermarket forks don't have. I will use this stock front fork, else I will be replacing almost the entire bike.

The front fork is so heavy! 664 grams, which shocked me.


I expected this aluminium fork of the United Trifold to be much lighter, maybe at 400+ grams. However, it is over 200 grams heavier than expected. Why?

The main reason is that although the fork legs are aluminium, it has a steel steerer tube! This adds a lot of weight to the fork.

Upon removing the handlepost, I also found that the steel steerer tube has a nut welded at the top, for the compression bolt to tighten into. This is badly rusted as you can see below. Since I don't have a good alternative fork, I have to use this no matter what.

Steel steerer tube with a nut welded inside, instead of being threaded like on Dahon forks. Quite shocking to see this level of rust on a new bike.

This gives a total frameset (frame + fork) weight of 2986 grams, which is almost 3 kg. Most aluminium folding bikes are around this range, so it is not too bad. It could have been about 200 grams lighter if an aluminium steerer tube was used on the fork instead.

Finally, let's see some pictures of the folded frameset, before I start installing new components on it.

Folded frameset, without any components on it.

The 4 wheels roll well. Slightly misaligned but OK, unlike the bad ones on the Flamingo.

When folded, the bottom bracket may rest on the chain stay, depending on your tire size.

With the frameset ready, the next step is to install all the new components on it. I have split up the components into many different posts, because there are just so many pictures and info to write about.

This is not a straightforward upgrade, as I am trying many things for the first time. This makes it challenging and yet also exciting, as there is much to learn and improve. Some ideas will fail, and that is OK.

Saturday, August 28, 2021

Cervelo Aspero: Shifter Replacement from Dura-Ace to GRX

As described in detail in the previous post, where the new GRX ST-RX815 hydraulic Di2 shifters were introduced, I will now install it onto the Cervelo Aspero gravel bike. The bike currently has the Dura-Ace ST-R9170 hydraulic Di2 road shifters, which are good for road riding but not so ideal for gravel riding.

GRX ST-RX815 hydraulic Di2 shifters. Lots of small but measurable differences compared to the road shifters.

My plan is to replace just the shifters, leaving the rest of the hydraulic hose in place. The idea is to cut away the existing insert and olive, and just install a new insert and olive. The hose will be slightly shorter by about 1.5 cm, but there is enough slack in the hose length not to be an issue.

It was a nightmare to thread all the hydraulic hose and Di2 wires through the PRO Vibe Aero Superlight handlebar previously, so I don't want to do it again. Therefore, reusing the hydraulic hose is the smart choice in this case.

Gathered all my tools for hydraulic bleeding. This was before I got the new TL-BT001/002/003 hydraulic bleeding tools which have been improved in many areas.

After removing the bar tape, I need to loosen this connecting bolt on the shifter.

Note that once you loosen the connecting bolt, the hydraulic fluid will be free to flow out. I'm not worried about the hose end, as the brake caliper end is sealed, and the fluid cannot flow out from the cut hose.

However, the shifter side will have fluid leaking out, as there is a reservoir full of fluid in the shifter. If the lever is pressed, the hydraulic fluid will squirt out. My suggestion is to point the shifter downwards, such that the open end is pointing upwards.

My immediate concern would be to fix the new shifter, and settle the removed shifter later on. I will need to drain the fluid out of the old shifter, before I store it. Else all the fluid will leak out during storage, making a mess of the whole shifter.

Anyway, that is for later, as I need to connect the new GRX shifter after I disconnect the old Dura-Ace shifter.

Once the connecting bolt is loosened, the existing hose can be pulled out of the shifter by hand. The old compressed olive can be seen on the hose.

Since the olive can't be pulled off or reused, it will be removed by cutting the hose. Use a proper hose cutter to make sure the end is flat as shown.

During cutting of the hose, a few drops of hydraulic fluid will drip out, so make sure to wrap the area with a cloth to avoid a mess. Also, if you have not already done so, make sure the brake pads and rotors have been removed from the bike, to avoid hydraulic fluid getting on it later during the bleeding process. They need to be off the bike anyway for the yellow bleeding block to be installed.

Press the insert into the hose by hand, and push it in fully using a proper insert tool. Make sure to use the silver coloured insert for BH90 hose.

Once the insert is inserted properly, put on the connecting bolt and a new olive.

The next step is to push the hose into the shifter, taking care to ensure that the hose is fully inserted, and the olive is seated properly and not tilted. Then, tightening the connecting bolt till the appropriate torque, and the whole system is connected! Take care not to over-tighten the connecting bolt or the shifter may crack.

Once the system is connected, it is time to bleed the system. There is fluid in the hose and the brake caliper, but none in the shifter. Therefore, all the air needs to be pushed out of the system, and filled with hydraulic fluid. For Shimano brakes, mineral oil is used. The bleeding cup will be connected to the top of the shifter.

Filling up the syringe with mineral oil, and connecting it to the brake caliper.

I will not go through the whole bleeding procedure, but it is difficult to perform by just one person, unless you are experienced. A handlebar holder helps a lot to prevent the handlebar from turning during the bleeding process.

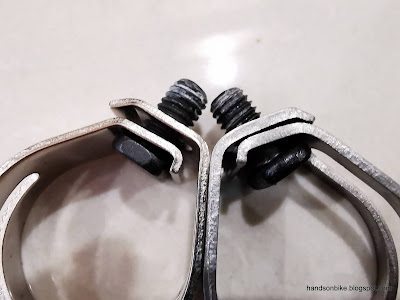
During the shifter swap, I also noticed that the clamp band is different, as shown below.

Regular plated steel clamp band on the left (used in GRX and all road shifters), and the titanium clamp band, used only in Dura-Ace shifters.

The titanium clamp band on the right is slightly thicker, although the cutouts are also larger.

Steel clamp band weighs 12 grams each...

...while the titanium clamp band is only 6 grams each. Half the weight! But it is only 6 grams difference per shifter, not that significant unless you are chasing every gram.

Both sides of the shifters need to be replaced, so it took some time and work to complete. It is actually a lot of work to ensure that the bleeding is done properly, with firm and equal braking performance on both sides. Leave it to the mechanics at the shop if you are not sure!

Good ergonomics for 1-finger braking. The tall hood provides a "wall" to prevent the hand from sliding off the front.

Another angle showing how the tall hood allows the hand stay on the shifter securely. Also note the additional Di2 button at the side of the hood, which will be activated by the inside of the thumb.

Strong ribs enable the hand to remain in place over bumpy terrain, preventing the hand from slipping forward or to the side. Best used with gloves to prevent abrasion on the hands.

Fresh bar tape wrapped on the handlebar, after the shifter positions have been confirmed with an actual riding test.

Still not used to the unusual looking shape of the GRX Di2 shifters. But the ergonomics work really well.

View of the shifter from the inside. I really like the new placement of the additional Di2 button.

Ready to go! Using the 700C gravel wheelset, which has WTB Byway tires on DT Swiss G1800 wheels.

Testing out the new GRX shifter on some proper gravel trails.

I am really pleased with the new GRX Di2 shifters, they feel so much more secure over bumpy gravel trails. Ergonomics are spot on as well, and I like the ability to use 1-finger braking effectively while riding on the hoods. For more details, please check out the previous post where I shared the details of the new GRX Di2 shifters.

With these new GRX Di2 shifters, the Cervelo Aspero is now a proper gravel bike, with most components optimized for proper gravel riding, instead of having some compromises for road riding.

If you haven't tried these new GRX shifters for gravel riding, I highly suggest you give it a go, to see the improvement over the usual road shifters.

GRX Di2 shifters attracting bees!

Saturday, August 21, 2021

Cervelo Aspero: GRX Hydraulic Di2 Shifters

My Cervelo Aspero was initially built as a dual use bike, where I can switch between road or gravel usage, just by swapping the wheelset. As such, the drivetrain was selected to suit both road and gravel riding. I was using a front double drivetrain, with a 50/34T crankset for range, and different cassettes for road and gravel riding.

Up front at the cockpit, I used a road hydraulic shifter, as I usually go for road rides without gloves, so the smaller and smoother Dura-Ace ST-R9170 shifters are more comfortable. Besides, most of the Dura-Ace drivetrain was ported over from the previous Canyon Endurace bike. However, for off-road riding, these road shifters are not as ideal as the hood is small, and thus the hand does not have such a good grip over rough terrain. Many times, if I hold the hoods of the shifter, the hands will tend to bounce off the shifter as it is not secure enough.

Recently, I have converted the Cervelo Aspero to a full-time gravel bike, with a front single drivetrain and more dedicated gravel components. As such, I don't have to make a compromise between road and gravel riding, of which there are different requirements.

Other than the drivetrain, I decided to change the shifters as well. As mentioned earlier, the Dura-Ace ST-R9170 road shifters are good for road riding, but not so ideal for off-road gravel riding. There is a dedicated GRX Di2 shifter, which is designed specifically for gravel riding. That is what I am going to use on this gravel bike, and here is a detailed look at why this GRX shifter is different.

GRX Di2 components!

GRX ST-RX815, which is the Di2 version of the GRX hydraulic shifters.

It comes with the SM-BH90 hose and other small parts which you need to make your braking system complete.

In a separate post, I will compare the GRX shifter side by side with the road shifter. Now I will show the details of this GRX ST-RX815 shifter from every angle.

GRX logo is clearly printed on the lever member. The shaping of the levers are quite different from the road shifters.

Outline is very different, with a very pronounced hood, and a flat surface for the fingers to hold during braking.

Not the most pretty looking shape, I did find it quite weird when I first saw the shape.

There are tall and strong embossed ribs on the rubber cover. The longitudinal ribs on the outside prevent your hand from sliding outwards.

The diagonal ribs on the inside prevent your hand from sliding forward. After riding, I found that the rib design is really effective!

The additional Di2 button is now located at the side of the hood as indicated by the textured surface. It is activated by pressing it with the side of the thumb.

I like the new location of the additional Di2 button, as I can press it without taking my entire thumb off the shifter, unlike on the road shifters, where it is located on top. This means a shorter activation time, and also more secure holding of the shifter when the button is being operated.

There is a clear curvature on the lever, which is designed for your index finger when holding the hoods.

The hoods are tall with a vertical rear surface, which means your hands will remain secure on the hoods even when riding over rough terrain. This is one of the main advantages of this GRX shifter over the road shifters.

The index finger will rest on the curvature of the lever during braking, which makes it easy and ergonomic for one-finger braking.

Previously, on the road shifters, one-finger braking from the hoods are not effective, as it is difficult to get enough leverage to generate sufficient braking power. However, the GRX shifters has changed that, and enabled one-finger braking operation from the hoods! How is this possible?

The pivot location of the GRX brake lever has changed, to be higher than the road shifter. This increases the leverage of the finger on the brake lever, which allows effective one-finger braking.

Simple graphic showing the different brake pivots of the road and GRX shifter, and also the hood shape. 

With the finger further away from the axis on the GRX shifters, it is possible to use one-finger braking. Also, since the pivot is now located higher up, the swing of the lever is different. As such, the lever shape and other dimensions had to be changed, compared to the road shifters. This will be shown in more detail in a separate comparison post. This is another advantage of the GRX shifter over the road shifters, in terms of braking ergonomics from the hoods.

Each of the GRX shifters weigh 190 grams, giving a total weight of 380 grams per pair.

Dura-Ace ST-R9170: 320 grams per pair
Ultegra ST-R8070: 365 grams per pair
GRX ST-RX815: 380 grams per pair

These GRX shifters are Ultegra-grade, with aluminium levers instead of carbon fibre on the Dura-Ace shifters. This is perfectly fine with me, especially for off-road components. The weight is similar to that of the Ultegra shifters, just slightly heavier. The weight of this GRX shifter is no issue to me, given how many benefits it has over road shifters, for gravel riding.

This can be considered the second generation of road hydraulic shifters from Shimano, and has been greatly improved from the first generation in terms of size and weight.

Rubber cover material is TPS, which has been proven to be durable and weather resistant. Not so stretch resistant though, from my experience of loose rubber covers.

Bleeding port is located at the top, in the middle of the shifter, similar to the road shifters.

Di2 ports are located at the side, in a rather compact manner.

Here you can see the high pivot location, and the servo wave cam located below. Also, note the additional Di2 button located at the top, on the side of the hood.

Other side of the shifter, with the rubber cover pulled back.

Here is the servo wave cam, which increases the brake ratio throughout the braking stroke, increasing brake power when the brake pads are contacting the rotors.

The lever reach can be adjusted from the top with a Size 2 Allen Key.

The free stroke can also be adjusted from the side, near the top of the hoods. I always set it to the minimum free stroke, for quicker brake engagement.

From what I see so far, these new GRX shifters will suit the Cervelo Aspero gravel bike really well. With the tall hoods and strong ribs for secure grip, one-finger braking for scrubbing speed while on the hoods, well-shaped levers for ergonomic braking, and servo wave for powerful braking performance, I can't wait to see how it improves my gravel riding experience over the current road shifters!