Showing posts with label Fenders. Show all posts

Thursday, June 18, 2015

Journey of the Boardwalk: Part 40 - From Touring Mode to Race Mode

It has been a few months since I last upgraded the handlepost on my Dahon Boardwalk, from a Fnhon handlepost to a Tern Physis handlepost. In the meantime, I have been modifying my other bikes, especially the Avanti Inc 3 commuting bike. Now, it is time to come back to this Dahon folding bike.

I have noticed that my usage of this Dahon Boardwalk folding bike has evolved over the years, since I first bought it in year 2010. From my one and only leisure bike, to a speedy bullhorn bike, to a overseas touring road bike, and finally as a commuting bike, this bike has served many different purposes over these years. Ever since I got a few other bikes that serves specific purposes, this do-it-all Dahon Boardwalk has had a chance to be repurposed for other uses.

Avanti Inc 3: For daily commuting purposes and also for riding in/after rain.
Merida Scultura 5000: For faster and sportier rides. Occasionally used for commuting too.
Dahon MuEX: Mainly used when compact folding is required, such as when taking the MRT to other places for rides. Currently used on the Minoura bike trainer on normal days.

The Dahon Boardwalk was recently decommissioned as a touring bike, when I removed the rear rack from it to reduce the weight of the bike. I still use the Dahon Boardwalk as a commuting bike, but on regular rotation with the Avanti and the Merida. For commuting, I use the Shimano Unzen cycling bag, and so there is no use for a rear rack. Also, there are other accessories on the Dahon Boardwalk that are no longer required, and so I will be removing them from the bike.

Bike as seen previously, with the Biologic Arclite rear rack removed.

My plan for this bike is to convert it into a more race orientated setup. Another way to look at it would be to use it as a folding road bike, with minimal non-essential accessories. This means removing the Pletscher double kickstand and the SKS fenders from the Dahon Boardwalk.

Weight of the Pletscher double kickstand, 553 grams!

Weight of the set of SKS fenders (excluding mounting bolts), 248 grams!

By removing the double kickstand and the fenders, I have been able to cut 800 grams from the bike! Adding the 700 grams that was already removed previously, this brings the total weight savings to 1.5kg, which is a massive amount. This will make it much easier to carry and move the bike around, regardless of whether it is folded or not.

After removing the front fender

After the rear fender is removed. There is actually a large gap between the tire and the long arm Tektro R559 caliper brakes!

After removing the fenders, the rear wheel of the bike is no longer covered.

Now the bike looks much sportier with no fenders and kickstand on it

Overall view of the bike without rear rack, fenders and kickstand!

After removing all the under-utilized accessories, the Dahon Boardwalk has been converted from touring mode to race mode. Another area that I wanted to clean up was the handlebar area. I had previously rearranged the accessories at the handlebar area to try to tidy them up, but it still looks rather messy.

During that rearrangement, I managed to mount the Shimano Sport Camera sideways on the handlepost itself, as shown below. The Shimano Sport Camera has an angle-free feature that allows it to auto rotate the video to the right way up, when viewed on Quicktime player. However, when viewing in VLC player or DashWare, it will not display properly as those software cannot detect and rotate the MOV video automatically.

I have tried to use software to rotate the video, but they don't work well and will result in loss of video quality. My conclusion is that although the angle-free feature is there, many video software cannot rotate the video properly. After some experimentation, I found that the solution is to position the camera such that it is the right way up, or upside down. Mounting the camera 90 degrees to the side is not advisable.

Previous mount setup for the Shimano Sport Camera. Although it is space saving, the video will not be auto rotated to the right way up properly.

Previous setup with the Lezyne Super Drive XL front light on top, and the Moon Comet front light mounted on the handlepost.

This time, I will rearrange the accessories on the handlebar again. Besides finding a suitable place to mount the Shimano Sport Camera properly, I also need to make space for the Garmin Edge 510 cycle computer. I have already mounted the new Garmin ANT+ speed sensor on the rear hub, and of course I will need to mount the Garmin computer unit on the bike to make use of the speed sensor.

New setup with the Garmin Edge 510 mounted in front, and the Shimano Sport Camera mounted upside down, under the Garmin.

View from the front

View from the side. The arrangement looks similar to the K-Edge Aero Garmin & Camera combo mount that I am using on the Merida Scultura 5000.

Making this change means removing the Lezyne front light, as it is too big to mount anywhere on the handlebar neatly. The only front light will then be the Moon Comet front light. I have always tried to mount at least 2 front lights and 2 rear lights on every bike for redundancy and backup, as I have encountered situations where one of the lights ran out of battery.

In this case, I decided to mount a D-Light USB Rechargeable front light onto the front fork of the Dahon Boardwalk. One thing I like about the D-Light lights is that the mounting is very versatile, helped by the fact that the lights itself are very lightweight and small sized.

Mounting the D-Light front light onto the side of the front fork.

Lastly, I realised that without a kickstand on the bike, it can sometimes get really inconvenient when I need to park the bike somewhere at home. The Minoura Bike Tower 10 is mainly used for the Dahon MuEX and the Merida road bike, while the Feedback Sports RAKK Bike Stand is used for the Avanti Inc 3. Depending on which bikes are at home, the Dahon Boardwalk may not have a space to park, and will need its own kickstand.

For convenience's sake, I decided to add a lightweight kickstand to the Dahon Boardwalk. It is similar to the stock kickstand found on almost all Dahon/Tern bikes with kickstand.

Lightweight kickstand, at only 157 grams.

Seen as mounted on the bike. I had to cut the kickstand by about 1 cm as it was too long for the bike to balance properly.

Finally, I have converted the Dahon Boardwalk from a touring/commuting orientated setup to a race oriented setup that is more lightweight. By removing the fenders and double kickstand, a lot of weight has been removed. In the end I still added a simple kickstand, but it is much lighter than the double kickstand.

The handlebar area has also been tidied up, by removing the Lezyne front light and adding the Garmin Edge 510. A small secondary front light has been added to the front fork, in addition to the main front light on the handlepost.

I do like this new setup as it is more lightweight, and also looks much neater and sportier without the double kickstand and fenders. As the bike's purpose evolves, I will modify it to better suit my usage and preferences.

Saturday, November 2, 2013

Avanti Inc 3: New Tires, Fenders, Rack and Lights

After spending much effort resolving the new crankset issue, I could finally continue with the bike modifications. These bike modifications are not to increase speed or make the bike lighter. Rather, these additions are to make the bike more suitable for commuting.

First up, the tires! The stock Continental SportContact tires are quite OK, but I would like something more puncture resistant and maybe slighter faster. This will help to avoid having to repair punctures and also make the ride slightly smoother. After much research comparing a few Schwalbe tires, I finally decided on the Marathon Supremes.

Folding tires for easier installation and removal from the rims!

One of the tires with a good balance between puncture resistance and rolling resistance.

700x32C size for the Marathon Supreme, versus the wider 700x37C size for the Continental SportContact tires. Just a little bit narrower.

As a true commuting bike, the bike must be able to handle wet weather as well. Fenders are a must to minimise road spray onto the rider and the bike. The stock bike does not come with fenders, but it does have fender mounts. I decided to get a good set of SKS full fenders for maximum protection against wet roads.

 New set of fenders for 700C wheels! Matte black to go with the matte black frame.

I ordered the 45mm wide fenders, after researching on the suitable fender width for the 700x32C tires. It turned out to be a good size! A narrower set would get too close to the tires.

The metal stays and the plastic fenders. They were actually quite a pain to setup, with the over complicated way of fixing the stays to the fenders. The nut and bolt fixing method was very fiddly, and when you manage to fix up one of it, the other side comes out. Very time consuming.

Fixing the front fenders onto the front fork. The bolt provided (M5x45mm) was not long enough to go through the thick front fork, I had to look for a 60mm long bolt to install the fenders.

Front fender fits the wheel nicely! Slightly large gap between the tire and the fenders. If not for the cumbersome method of removing and fixing the fenders, I would have taken out the stays to cut off maybe 10mm, for a better fit. Probably next time.

As for the rear fenders, the fitting was not so good out of the box. But before that, let's take a look at the rear rack. A rear rack is another important part of a commuting bike, as it is very useful for bringing things along.

I selected a matte black rack to go with the matte black frame. Although the bike has disc brakes, the disc brake parts are neatly hidden within the rear triangle, so I can just use a standard rear rack instead of requiring special disc-specific rear racks.

Rear brake caliper mounted on the inside of the rear triangle, instead of on top of the seat stay. This enables the use of a standard rear rack.

Double rails for greater flexibility. I can mount panniers and still fix something onto the top of the rack.

Rear rack and rear fenders shares the same mounting point on the frame.

 
Rack is slightly tilted forward as the seat stay fixing rods were too short. Not a big issue though. 

The rear fender stays have been cut short by 20mm, in order to put the fenders closer to the tires. The initial lengths were too long, and there was a big gap between the fenders and the tires. It was troublesome but necessary to remove the rear fender stays, and to cut them before reinstalling them again.

When I was selecting the new components and accessories for the new Avanti Inc 3, I took care to use similar and compatible components as my Dahon Boardwalk. What I mean by this is that I used the same PD-A530 SPD pedals, and selected a rear rack with a similar tubing diameter (10mm) as the Biologic Arclite Rear Rack, so that I can swap the panniers between the bikes without adjusting anything.

Same Shimano PD-A530 SPD/Platform pedals on both the bikes. This allows me to use the same RT82 Road Touring SPD shoes on both the bikes.

With compatible pedals and racks, I can basically prepare the same shoes and panniers for cycling, and depending on the weather in the morning, I just grab the appropriate bike and go. Dahon Boardwalk for dry weather, and the Avanti for wet weather.

Although the Schwalbe Marathon Supreme tires should greatly lower the chance of getting a puncture, I still feel more prepared if I have the correct equipment to fix a puncture if required. The Alfine 11 rear hub of the Avanti means that I need a size 15 spanner to remove the locknuts on the rear axle, in order to remove the rear wheel if required.

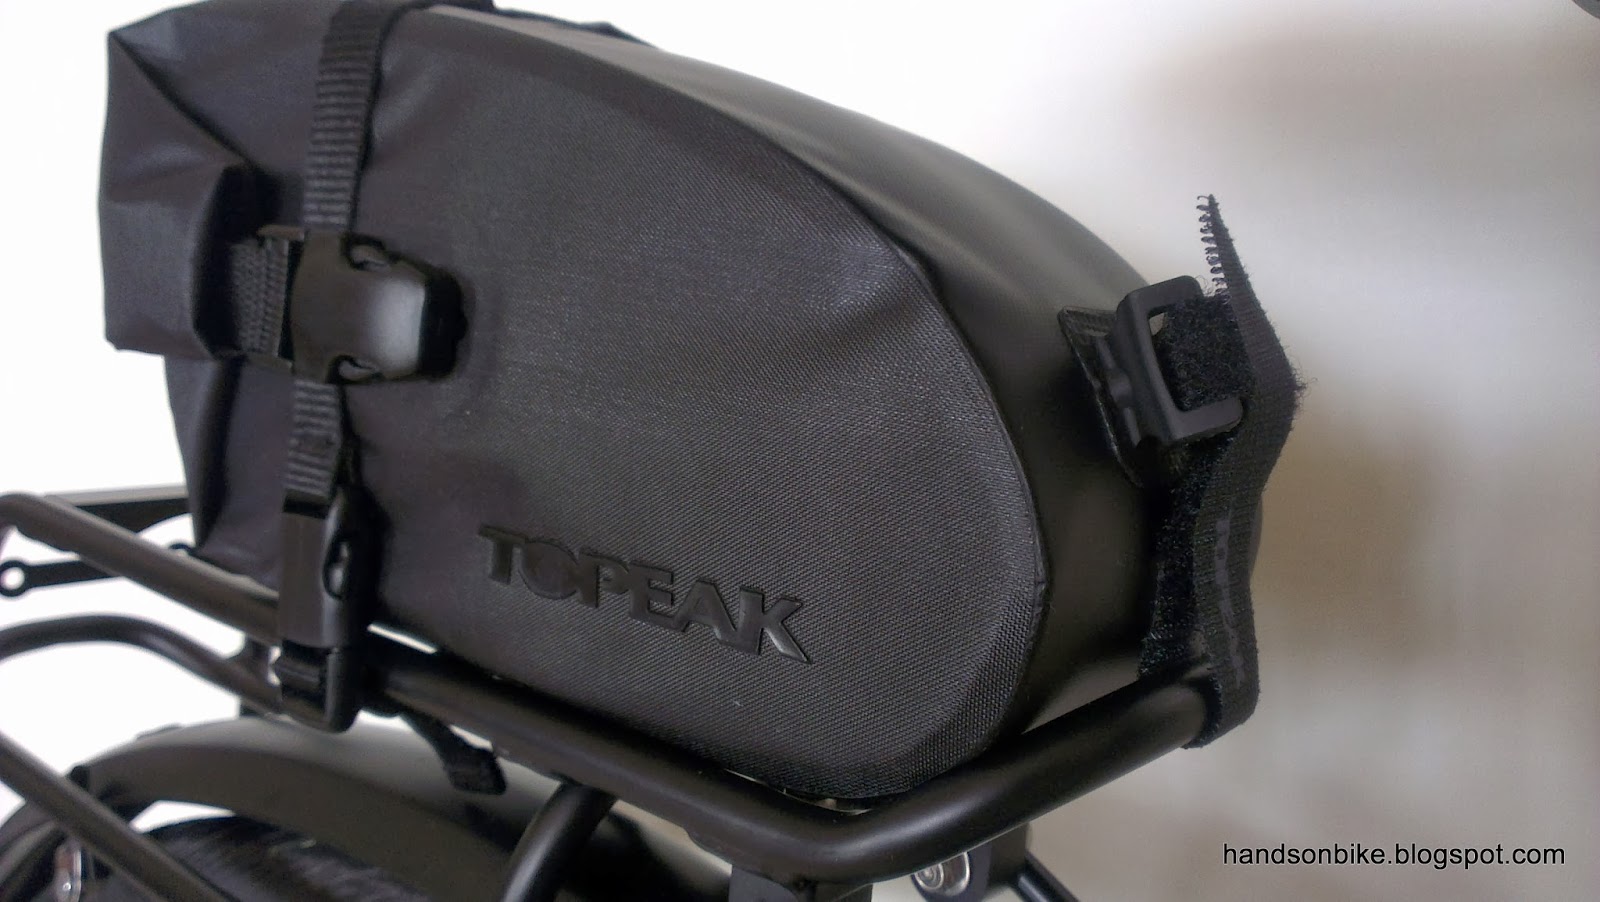
I added a Topeak Wedge DryBag, Large with Strap Mount as a rainproof saddle bag. It will be permanently fixed to the Avanti and will have some basic tools. This is the same saddle bag that I am using on my Polygon Cosmic CX 3.0 MTB.

The Topeak saddle bag with the tools: Topeak Mini 9 Tool, Topeak RaceRocket High Pressure pump, Schwalbe tire levers, a spare tube and a size 15 spanner.

This was the initial position where I mounted the saddle bag. 

Due to the size of the bag and the rack, the saddle cannot be lowered further, although it is at the right height for me. But the problem is that when cycling, the inner thighs will touch the saddle bag, as the saddle bag is rather wide and close to the saddle.

I found an alternative way of mounting the saddle bag, using the rear rack instead of the saddle rails. This avoids the problem of the legs touching the saddle bag when pedaling.

Saddle bag mounted on the rear rack instead.

It is actually a very secure way of mounting the saddle bag! I am quite surprised at the stability.

The only problem is that the rear light tends to tilt downwards when mounted on the saddle bag. I have tried mounting it on the rear rack, but I just can't seem to find a good place to mount it, even with L-shaped brackets and other spare parts.

I have also gotten new lights for the Avanti. The new lights will be introduced soon in separate blog posts, but here is just a sneak preview.

Ultra bright 2 watt Solas rear light by NiteRider!

Goes onto the light clip on the saddle bag.

  Also from NiteRider, the Mako 200 front light.

Mako 200 mounted on the handlebar.

The reason these lights are chosen is because of the relatively long battery life (18hrs for the rear and 42hrs for the front, in the flashing modes), which minimises the need to change batteries often. Matte black casing of the front light also matches the bike, and the ultra bright rear light would really catch attention! Detailed light reviews to posted separately.

Topeak Modula Cage, to fit various water bottle sizes. The one that I have is the older version without the rubber grips on the cage.

LitePro copper bell for a lovely ringing sound!

I had planned to write about the adjustment of the eccentric BB and the belt tension, but this post is getting too long! Shall write about it in the next post instead.

With the accessories such as the fenders and the rear rack added, the bike is now ready for commuting duties! Just rode the bike after rain on wet roads, and the feeling is great!

All ready!


What I love about the Avanti Inc 3:
1) No need to dry, clean and re-lube any bike parts after getting home. There is nothing to rust!
2) Hydraulic disc brakes work well in all weather conditions, and there is no need to clean the rims after riding in the rain.
3) Full fenders blocks most of the road spray, keeping me and my bike mostly dry.
4) Belt drive system is super smooth, quiet and clean. Also does not rust or require lubing like a metal chain.

I could go on about other points which I like, but these are the major ones that really differentiates this bike from other bikes.

Monday, September 9, 2013

Journey of the Boardwalk: Part 32 - Mini Front Fender Modification

After removing my front fender to cater for the new front caliper brakes, I kind of miss having the front fender around. Although it is not as important as the rear fender, it is still good to have. I rode on wet roads without the front fender, and the entire bottom of the bike frame and the BB area ended up being dirty.

Perhaps I could still have part of the front fender, alongside the new front caliper brakes? It is actually quite a simple idea, and it only requires some basic hands-on skills. Here is how I did it.

I first removed the front plastic cap on the front fender. It came out with surprising ease, seems that it was just a snap fit with hardly any glue.

Sawed off the front part of the fender! I discovered that there is a thin layer of metal molded within the polycarbonate shell. So this is why the fender is so light yet strong.

Shape the remaining front end to have a curved shape, similar to the front fender cap.

Apply some super glue and fit on the fender front cap! Looks as good as new with no trace of modification. Now I have a mini front fender!

Oops the mounting bolt is too short to secure the fender. Instead of using a longer bolt, I removed the extra spacer/nut near the bolt head.

Now the mounting bolt is long enough for me to fix on the fender. Secured with a nylon locknut!

Mini front fender modification done! I now have the front fender back on the Boardwalk, to protect me and the bike against road spray. This mini fender can co-exist with the new Elosix front brake adaptor.

A simple modification to the front fender allowed it to be mounted on the Boardwalk again! The only tools required are a simple hand saw to cut the fender, a file to smoothen the rough edges, and some super glue to fix back the fender cap.

Saturday, September 7, 2013

Journey of the Boardwalk: Part 31 - Elosix Front Brake Adaptor

It has been almost 2 years since I last installed the Tektro R559 Extra Long Reach caliper brakes for my Dahon Boardwalk. At that time, my Boardwalk was still a Speed Pro TT setup, with bullhorn bars.

This pair of Tektro brakes have served me well during these 2 years, giving me no problems at all. The wide caliper clearance means that I can still have fenders on the Boardwalk, without the fenders getting in the way of the caliper brakes. In fact there are no other caliper brakes that I know of that allows me to use fenders and caliper brakes at the same time.

Large calipers provide enough clearance for mounting fenders

I have actually been thinking of upgrading the caliper brakes for some time, but as there is no suitable replacement, it has not been possible. However, I recently had a brief discussion with a fellow folding bike rider, and I saw that his bike had only a rear fender and no front fender. His reason was that rear fenders are important to prevent a dirty seatpost and rider, but front fenders are not so important. That gave me an idea for upgrading!

This upgrade is more of an experiment than a solution to a current problem. I just wanted to try it out to see if it is possible, and how effective it is. I realised that if I removed the front fender, it actually opens up possibilities of using alternative caliper brakes!

I had known about the Elosix front brake adaptor for sometime. This is an adaptor that moves the caliper brake mounting point of the front fork downwards, to allow normal reach caliper brakes to reach the wheel rim. However, it had not been feasible or possible as the front fender was there. With the removal of the front fender, this option is now possible.

***Instead of using long reach caliper brakes, or moving the caliper downwards to reach the rim, the alternative way is to move the rim towards the brakes, by using larger 20" 451 wheels, instead of the default 20" 406 wheels. However, that is another story altogether.

Let us take a look at the Elosix front brake adaptor for Dahon/Tern bikes.

The M6 mounting bolt goes through the hole in the front fork

The holes at the bottom are for the caliper brake mounting bolt. One side has a larger hole than the other, allowing the use of recessed brake nuts.

This adaptor is inserted upwards into the hole in the middle of the front fork, and secured with the bolt through the brake hole. The M6 bolt threads through a threaded nut in the middle of the adaptor, to secure it to the walls of the front fork.

It is important to fix this adaptor really securely to the front fork, to prevent it from moving or coming loose. If it does so, the brakes will not work properly, and the adaptor may drop onto your tire and jam the front wheel! Installation not recommended for inexperienced users.

Once the new brake mounting point has been created, a standard reach caliper brake can be installed! For now, I chose a cheaper Tiagra caliper brake to try out the fit and function. Use the front brake as it has a longer mounting bolt than the rear brake.

 The top bolt and nut secures the adaptor to the fork. The bottom nut is the recessed nut from the front caliper brake.

This picture should make it clear. The caliper brake mounting point has been moved downwards with the use of the adaptor.

Fits nicely! Only complaint is that the external circumference of the adaptor is round, which makes it hard for the brake caliper to sit nicely. A flat surface would have been much better.

Small clearance with my 20x1.35" Kojak tires! A 1.5" tire would not fit.
 
Stock Tiagra brake pads. It is actually quite a decent brake pad, with integrated convex washers for perfect brake pad alignment. However, I swapped it out because...

...I could then use my gold coloured brake pad holders, and the excellent Swissstop brake pads! I could not use the gold coloured brake pad holders last time, as I needed the extra reach from the offset Aican brake pad holders.

Looks pretty neat!

No front fenders (for the time being)

I have tested this setup for safety, and it seems to be OK. As long as the adaptor is installed properly, it will not move or drop out. The adaptor walls are pretty thick, so strength wise it should be fine.

The adaptor and brakes were also tested for flex during braking. You can try it out for yourself on your own bike, by pulling the front brake lever hard, and then pushing the bike forward and backward. Any flex in the brakes or adaptor can be seen by looking at the brake pad area. I found that there is a bit of flex, of around 1mm forward and backward. It is similar to that from the extra long reach Tektro R559 brakes, so I think it should not be an issue.

During the test rides (20+ km), it was found that front braking power is actually improved! Just by feeling, the power improvement is probably around 20%. This was not expected, but on hindsight, it is probably due to the improved leverage ratio of the shorter reach caliper brakes, and possibly less flex in the brake arms of the Tiagra brake caliper. A pleasant surprise and improvement!

However, this is not all! As was stated earlier, this was only an experiment. Now that this has been proven to work successfully, there is more to come. Watch out for the second part of this front caliper brake upgrade!