Showing posts with label Bike Stand/Rack. Show all posts

Sunday, June 13, 2021

Vertical Bike Stand

There are many ways of bike storage at home, each with their pros and cons. Some people prefer to hide the bikes from view, such as putting them in the yard, in the storeroom, or under a table in the case of folding bikes.

Others prefer to just place them in plain view, as part of the house decorations, or just out of space limitations. For me, I prefer to place my frequently used bikes near the the main door, so that I can bring it out of the house easily.

For most people, maximizing the storage space is also necessary, especially if you have multiple bikes. One of the best ways is to use a bike rack or bike tower that stacks one bike above another. This makes use of the vertical space available above the bike below. I have been using the Minoura Bike Tower 10 for many years, and it is great at saving space.

However, sometimes the bike tower is not suitable for certain bikes. In my case, it is not suitable for my Cervelo Aspero, when I have the frame bag fitted to the bike. That is because the frame bag blocks the bike cradle from hooking onto the top tube.

It is too troublesome to remove the frame bag every time I want to store it on the bike stand, and reinstall the bag when I want to use it on the ride. Therefore, I decided to get a new bike storage stand that can address this issue.

Frame bag from Bike Bag Dude, custom made to match this bike frame.

I decided to get a vertical bike stand, as this will allow the frame bag to remain attached to the bike. Also, storing the bike vertically makes use of the empty space above the bike.

There are cheap versions of vertical bike stands, but they are flimsy and not stable. I decided to get a more robust version that looks more stable. Although I got it online, I think it is available in the local bike shops as well.

Here is how it will look once assembled.

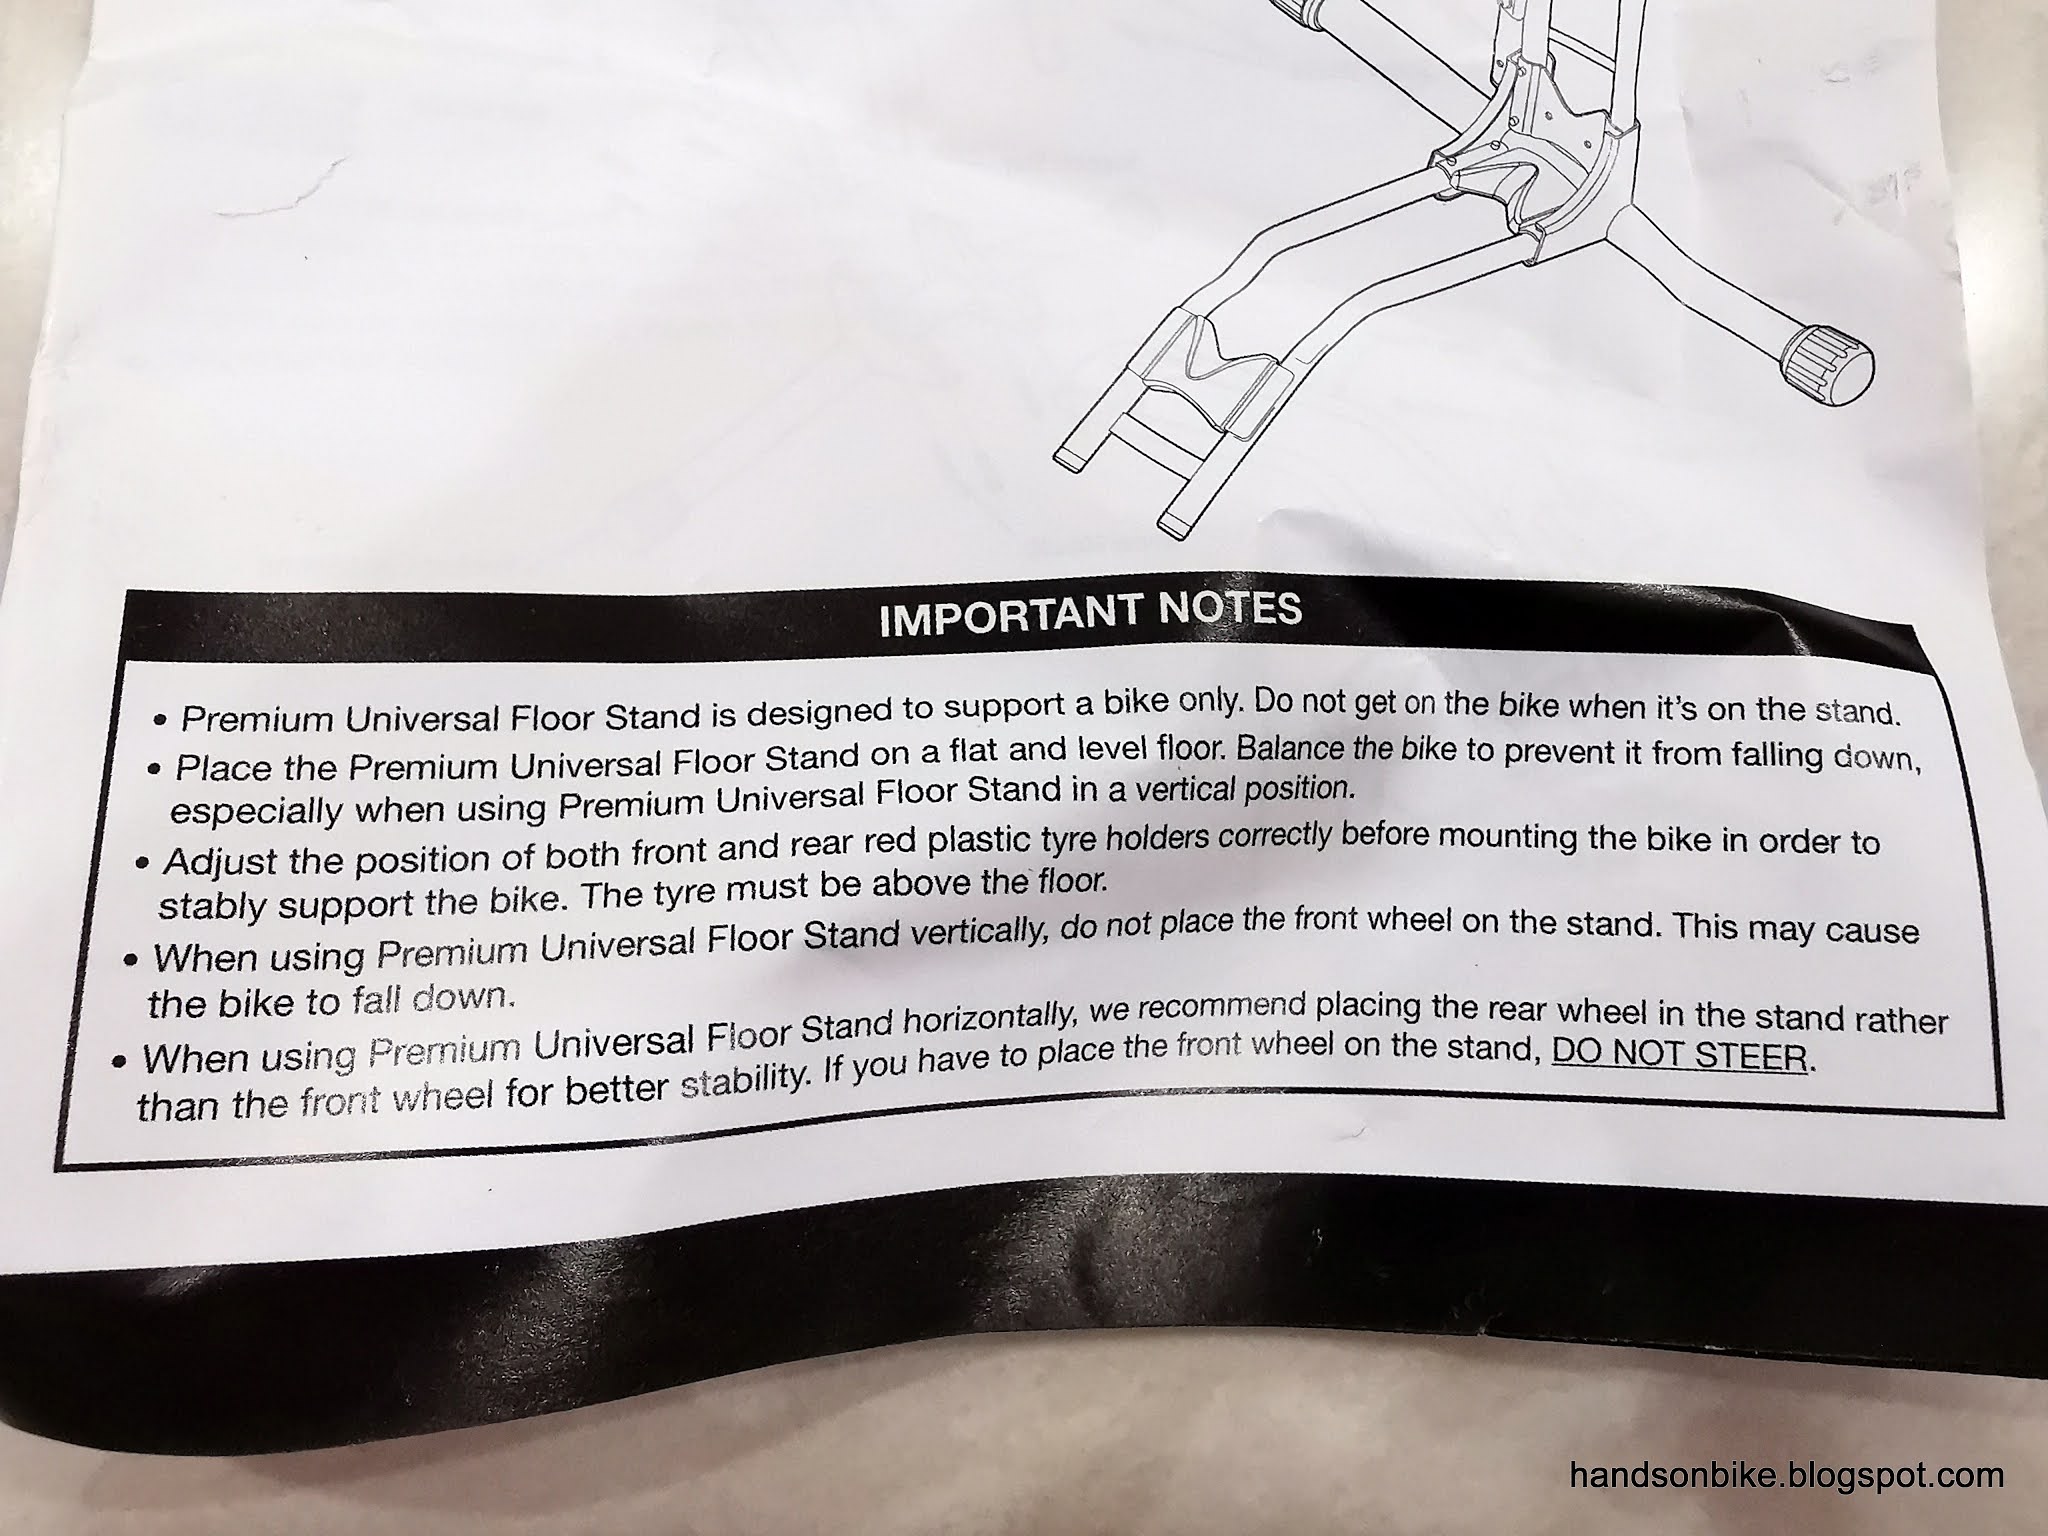
Some points to take note when using this bike stand. Good to know.

Parts of the bike stand, made of steel tubes that are powder coated for durability. Better than cheap flimsy versions that use steel rods instead of tubes.

Lots of bolts and nuts for fixing all the parts together.

Assembly is not so straightforward, luckily the instructions are provided.

I believe these instructions are copied from the original bike stand designer, because the English instructions are quite good.

Adjusting the position of the red holder, to match the wheel size.

Vertical bike stand completed!

If adjusted correctly, the rear tire should touch all 3 red holders at the same time for maximum stability.

Top hook holds the front wheel, and is rubber coated to avoid scratching your carbon rim. Shown here is the Hunt 650B Adventure Carbon Disc wheelset.

Top hook is a bit slanted to the side, but no big issue. It can be bent back to straight if needed.

Both the Cervelo Aspero and the Bike Friday Haul-A-Day stored vertically, side by side to minimize the storage footprint.

I'm quite happy with this vertical bike stand, as it takes up just a small space on the ground. Also, the frame bag can remain on the Aspero all the time.

The downside of this vertical bike stand is that I cannot store a bike that has mudguards on the rear wheel, as the mudguards will be damaged. My Focus Paralane all-weather commuting bike will still be stored on the bike tower as it has mudguards.

This vertical bike stand is pretty stable, as the bike does not fall over even when knocked accidentally. Parking the bike in the bike stand is also easy, as I just need to roll the bike onto the stand using the rear wheel, then hook the front wheel. Removing the bike is just the opposite.

Friday, October 17, 2014

Minoura Bike Tower 10 - Extra Bike Cradle

With the addition of a new road bike, the Merida Scultura 5000, there is not much space left to keep the new bike! Luckily I had already bought the Minoura Bike Tower 10 previously for all the bikes. However, the bike tower came with only 2 bike cradles, and both of them are already in use. The top cradle is used to hold the Dahon MuEX, while the bottom one is actually used to hold the accessories such as the helmets.

The Minoura Bike Tower 10 is actually able to hold up to 4 bikes using 4 bike cradles. Therefore, I decided to buy an extra bike cradle to hold the new Merida Scultura 5000 road bike.

Before I could mount the new bike cradle, I had to move the existing bike cradle from the front to the back. Luckily I had sufficient space on both sides of the bike tower to hold the bikes.

Bike Cradle for Dahon MuEX moved to the back of the bike tower 

New Bike Cradle mounted on the front, ready to accept the additional bike! 

Still a small gap between the end of the handlebar and the wall 

The new road bike mounted on the front! Faces the opposite direction from the Dahon MuEx at the back, to avoid interference between the handlebars. 

5 bikes stored in the space usually only sufficient for 2 full sized bikes. 

Making full use of the Minoura Bike Tower 10

With the additional bike cradle, the bike tower is able to hold an additional bike without taking up any extra space. By making use of the previously unused space at the back of the bike tower, it really maximises the use of space around the bike tower.

It is more difficult to take down the Dahon MuEX at the back, as I will need to first remove the road bike placed at the front. However, since that bike is used less often, it will be acceptable. Overall, I am very pleased with the additional bike cradle, as it is really easy to install and allows me to store one more bike without taking up any additional space at all.

Sunday, August 24, 2014

Minoura Bike Tower 10 Review

Do you have a bike storage problem? Too many bikes and not enough space to store them? This is a very common problem in Singapore, where homes are usually small and don't have much space for full sized bikes. Folding bikes help to alleviate the situation somewhat, but it is only a partial solution as the bikes still take up space when folded. For convenience's sake, many people actually prefer to keep the bikes unfolded.

One good way to maximize the use of space in the house is to store items vertically, using the space above other items. For bicycles, the only way to do this is to use a bike storage stand for hanging bikes. There are many different bike storage stands available, and they serve similar purposes. Most of them use the concept of suspending bikes above each other, saving some space.

There are two main types of storage stands, the type that is freestanding, and the type that is supported by the floor and ceiling. The advantage of the freestanding bike storage stand is that it can be placed almost anywhere in the house, and is super easy to set up. However, there will be the support legs of the stand that will stick out across the floor, which may cause accidents if someone trips over them.

The other type of bike storage stand would be the type that is supported by the floor and ceiling, without the use of support legs across the floor. The advantage of this type is a very clean and minimalist design. However, it cannot be used on soft floors such as carpets. Also, it needs a solid ceiling for the pole to push against. False ceilings cannot use these type of bike storage stands as the false ceiling cannot support the force of the pole pushing against the ceiling. There is also a maximum height limit, depending on the brand and model of bike stand.

For my new place, I had already planned out where to install this bike storage stand. As such, I ensured that there is no false ceiling at the area where I planned to install the bike stand. So which is the bike storage stand that I chose?

I selected the Minoura Bike Tower 10 as Minoura products are usually well designed, very sturdy and durable. The design may not be as attractive as some other brands, but they are very functional.

Minoura Bike Tower 10! Comes in a slim but long package that is about 1.8 metres long.

There are quite a few steps to assemble and install the bike stand, as it is not as straightforward as it looks. Many safety features and fail safe designs can be seen, to minimise the risk to the user.

Some features of the Minoura Bike Tower 10:
1) Can fit up to 4 bikes of 20 kg each (comes with 2 cradles, can buy 2 additional ones if needed)
2) Max height of 3.1 metres, fits almost all HDB flats, even for top floor units.
3) Hooks and arms of the cradles are independently adjustable, ensuring optimal hooking angles for any bike frame.
4) Wide range of mounting heights for the bike cradles, to fit in different types of bikes
5) Very small footprint on the ground, does not have support legs sticking out across the floor.
More details available at this link.

I forgot to take pictures of the bike stand as I was setting it up, as I was too engrossed in making sure that I fixed it up properly. One important thing to take note when setting it up is to ensure that the pole is vertical and not slanted, or the pole may slide to one side and topple.

The bike pole when fully set up! I reinstalled many times before I got it perfectly vertical.

To install the bike stand, we need to first set it to the correct length and fix the length. After that, rest the bottom rubber cup on the floor, and pull down the top section to compress the internal spring. Then, align the pole to a vertical position, and release the top section such that the top rubber cup is pushed hard against the ceiling. This combination of friction and spring force should be sufficient to prevent the pole from moving.

One useful tip for setting the top rubber cup is to place a piece of paper or something between the rubber and the ceiling. This will prevent black marks from being left on the ceiling. For me, I taped the top of the rubber cup with masking tape and cut off the excess at the edges.

Bottom rubber cup seated firmly on the floor tiles.

Top rubber cup resting on the solid ceiling. I designed L-box lights for the ceiling so that the bike pole can rest outside the L-box.

The two included bike cradles can be placed anywhere along the length of the pole. The recommended set up is to have one at the bottom section, and the other cradle at the top section of the pole.

Bike cradle for one bike. The angle of the arms and hooks are independently adjustable.

Cradle hooks are rubber coated to prevent frame damage

The intersection between the top section and the bottom section. The two bolts shown at the right of the picture fixes the height of the entire pole. The chunky clamp of the cradle can be seen also.

Clamp of the lower bike cradle. The many bolts you see allow different arm angles to be fixed and secures the clamp securely to the bike pole.   


The user manual recommends that the front end of the bike should be hung lower than the rear, to prevent the front wheel from swinging around and hitting the bike itself.

Best to ensure that when the bike is placed onto the hooks, the cables are not squashed between the hooks and the frame.

All the bikes located around the bike pole! Dahon Boardwalk at the bottom, the folded Dahon Vitesse at the back, and the Avanti Inc 3 at the side.

I decided not to hang the Dahon Boardwalk using the bottom cradle, as there is not enough space on the frame to hang the bike properly. The cables that run along the bike frame will be squashed between the hook and the frame.

The bottom cradle is not wasted! It can be used to hang other accessories such as helmets or bags.

With the bike pole, it allows four bikes to be compactly stored in a space usually needed to store two full sized bikes.

Although this bike stand did not save as much space as I would have liked, as it only suspended one bike above the others, it still achieved its purpose of helping to store all the bikes neatly in one corner. Also, it displays the great looking MuEX bike in the air as part of the house decoration.

The bike collection! Placed prominently in the living room, near the main door so that bikes can be wheeled in and out of the house easily.

If you have a bike storage problem, this Minoura bike storage stand may just be able to solve your problem!

Saturday, November 9, 2013

Feedback Sports RAKK Bike Stand

With the recent addition of the Avanti Inc 3 to my bike stable, there is a need to get some sort of bicycle stand for it. Due to the tight constraints of the Avanti frame, there is no space to mount a Pletscher double kickstand like the one on my Dahon Boardwalk. Mounting a kickstand on the left side chainstay is possible, but it does not look so good, and there is a high chance that the left foot will brush against the kickstand when pedaling.

Due to these reasons, I decided to go without a kickstand on the bike itself. Although it is not so convenient, the plus side is that the bike will weigh a little bit lighter! However, when the bike is at home, I will still need some sort of bike stand or rack to hold the bike. It is not ideal to lean the bike against the wall as it can be quite unstable, and may leave marks on the white wall.

I used this commonly available bike stand to hold the Avanti upright when at home. Although it works, it can be a little troublesome to have to stretch the bike stand and put it over the rear axle. This is especially difficult with the long rear axle nuts on the Alfine 11 internal hub.

Standard bike stand available at many bike shops, costs less than $20. Works well but not so convenient to put the bike on and off the stand.

In order to make it easier to put the bike on a stand, I decided to get the well-reviewed Feedback Sports RAKK Bike Stand. It is a bike stand that grabs onto the tire of the bike. Not only is this bike stand very easy to use, it also prevents spoke damage, which can happen if those slotted frame bike stands are used.

Slotted frame bike stand. Very simple and easy to use. However, the downside is that the wheel spokes will lean on one side of the bike stand, which may cause damage if the bike is heavy or knocked over.
 
Packaging of the Feedback Sports RAKK Bike Stand. There are other cheaper brands available, but I decided to get the original one. Hopefully it is worth the money!

Packs flat, which is good for storage or transportation.

These are the official part names for the various parts of the bike stand.

Various possible layouts are possible for shop display, by linking multiple units of the bike stand together.

 The pivot clips that are used to join multiple RAKK bike stands together. I removed them as they are not needed.

Button to lock the swing arm in the lowered or raised positions. Just press the button and swivel the swing arm into position. 

The wheel stabilizer that grips onto the tire. Multiple steps cater to all wheel widths, from narrow road tires to fat MTB tires.

RAKK bike stand with the swing arm in the raised position. The height of the wheel stabilizer is fixed, but it has been designed so that it fits wheels of size 18" to 29".

The RAKK bike stand is not suitable to be used on the rear wheel of the Avanti, as I have installed a rear fender. The rear fender is quite long and covers all the way down, and this means that the wheel stabilizer cannot fit onto the tire.

In this case, I will be placing the front wheel into the RAKK bike stand. It is still quite stable and holds the bike nicely.

With this RAKK bike stand, putting the bike away is very simple. Just roll the front wheel into the bike stand and it is done! The spring on the swing arm will apply firm pressure on the tire and secure it nicely. To remove the bike, just push the bike and let it roll off the bike stand.

Although this bike stand is quite expensive, it really works very well. There is no need to set it up or spend time putting the bike onto a stand. The initial cost of the bike stand is easily offset by the time and effort saved. Recommended for bike storage if your bike does not have a kickstand!