Friday, October 30, 2020

Fabike C3: Fulcrum Racing 5 Disc Brake Rear Wheel

When I modified the Fabike C3 commuting bike from an internal hub + belt drive setup to a conventional derailleur + cassette + chain, I needed a rear wheel for that purpose. Previously the Fabike C3 was using a custom-built rear wheel with an Alfine 11 Di2 internal hub, and a DT Swiss ER 1600 Spline DB 32 mm front wheel.

The rear dropout on the Fabike C3 was converted from a nutted axle type to a 12 mm thru axle type. Therefore, I needed an E-thru rear wheel that was disc brake compatible. When I changed the road wheelset on the Cervelo Aspero to the Ascent Bikes Zenith Elite, the previous Reynolds Assault wheelset was available.

However, I had just sold the Reynolds wheelset a few weeks ago, before I had the idea to convert this Fabike C3. That Reynolds wheelset would have been perfect for this Fabike C3, as it was also 12 mm E-thru front and rear with disc brakes. I greatly regretted selling that wheelset so hastily, and fretted over it for quite a while. However, I am unable to undo it, and up till today I still regret it. Moral of the story, don't sell off good components, unless you are absolutely sure that you will not use it on another bike.

In the meantime, I borrowed a spare rear wheel from a friend, so that I can test out the derailleur setup on the Fabike C3. I also needed a narrow rim so that I can install my existing Continental Grand Prix 4 Season tires without having frame-tire clearance issues. These rims are narrow at just 17 mm wide, which is what I needed. Check it out below!

Fulcrum Racing 5 Disc Brake Rear Wheel. Aluminium rims with a modest 26 mm tall rim profile.

Ceramic coated freehub body for durability, and a large flange for a better spoke angle.

Straight pull spokes, and Centerlock disc brake mounting.

Test fitting it into the Fabike C3 frameset. With the non-turn washers removed from the frame, the OLD changes from 135 mm to 142 mm to fit road 12 mm E-thru wheelsets.

The Centerlock rotor fitting is unconventional, as it does not use a normal lock ring. This is due to the different axle and bearing system used by Fulcrum.

Weight of the special steel lock ring and shim weighs 14 grams.

Rear wheel weighs 964 grams, which is rather heavy. Another regret from selling the more lightweight Reynolds Assault wheelset.

Dura-Ace RT900 rotors installed, and fixed using the special lock ring. A Hollowtech BB tool is needed to tighten this external lock ring, instead of the usual tool for internal lock rings.

Using the DT Swiss thru axle that I had bought earlier to fix this wheelset onto the bike.

New drivetrain! Also 1x11 speeds.

Chain drive conversion completed. Looks even more like a road bike with this new drivetrain.

View of the bike from the other side. This is a fast all-weather commuting bike!

Testing it on the slopes of NTU, on a cool night after rain.

The gearing seems perfect, with a 38T front chain ring and a rear 11-32T cassette.

In order to test out the gearing, I went to the NTU slopes to try it out. I had to use the lowest gear (32T) on the steepest parts of the slope, but it was sufficient. As for the highest gear (11T), it was enough to go fast, but it will spin out once you go past 45 km/h. This is also sufficient for me, because I would not want to go too fast anyway.

The best takeaway from the test ride was how useful it is to have a road bike that you can ride in light rain or on wet roads, without having to do maintenance on the bike afterwards. Normally I would not ride my road bike on wet roads, as it means having to clean up the bike afterwards which will be time consuming.

With the Fabike C3, I now have a bike that rides just like a proper road bike, but is weather proof with the new drivetrain and mudguards.

Friday, October 23, 2020

Cervelo Aspero: Custom Frame Bag from Bike Bag Dude

For a gravel bike, sometimes we want to use it to explore more remote areas, where there is no water or supplies for a rather long distance. In this case, it is necessary to bring along some food and drinks, plus spares for the bike, as you need to be pretty much self sufficient. I'm not talking about long multi-day journeys like on touring bikes, but maybe those one day tours where you leave in the morning, and return only in the evening.

It is also useful to have some extra luggage capacity to bring more stuff along, such as more water or more spares. To avoid cluttering up the bike with a rack or large saddle/handlebar bags, a frame bag is useful as it uses the empty space within the frame. I used the SKS frame bags on the previous Canyon Endurace, and it is really useful. However, the problem is that it is rather small, so I can't really bring much. The frame bag, being a generic type, does not maximize the use of the space within the frame triangle. Bigger frame bags can't really fit my Cervelo Aspero, as my frame is a size 51, which is considered rather small.

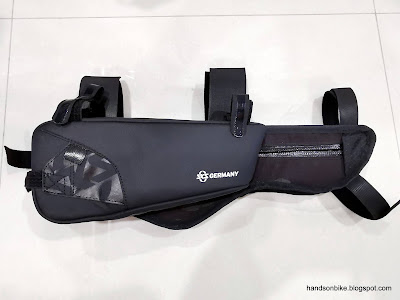
Then, I came across this awesome frame bag as seen in the first picture below. It is a frame bag and fully fills up the space within the frame triangle, following the contours of the water bottles to maximize the bag volume.

I found that it is a custom frame bag, which is specially shaped and sized to fit a particular frame, of that particular size. This maximizes the bag volume, within the limits of the frame.

Custom frame bag, seen on another person's Cervelo Aspero.

I contacted Bike Bag Dude, which is a company based in Australia. They make custom bags for your bikes, where you can choose the material you want to use, and the shape depends on your bike frame. Although they did not have a size template for a size 51 Cervelo Aspero, they can make the bag based on some measurements, as you will see below.

I was also advised to get side load bottle cages, as the shape of the frame bag would make it impossible to pull out the bottles from the top. I needed to take accurate measurements, with the actual bottles and bottle cages, which is why I went to get the side load bottle cages first.

Specialized Zee Cage side load bottle cages. Comes in left and right side types.

The pair of bottle cages weigh 82 grams.

I usually pull out my bottle from the left side of the frame, so using one right and one left cage would enable this.

Putting the actual water bottles into the side load cages, and taking the measurements as shown. Dimensions are in cm.

Taking accurate measurements is necessary, so that the custom bag can be made to your desired dimensions. As shown above, the shape (in green) would fill up the entire empty space inside the frame. In the end, Bike Bag Dude (BBD) was able to secure a template of the size 51 Aspero locally, and also use my measurements as a reference.

The lead time is 3 to 4 weeks, while the cost is also not cheap for a frame bag. AUD 200 for the bag, and add AUD 50 for shipping. Although it is more expensive than an off-the-shelf frame bag, it is actually quite reasonable, considering the custom made, labour and skills required to fabricate the bag. Don't forget that you can also choose the type and colour of the material you want for the bag, other than the dimensions.

The bag has arrived! Only 190 grams when empty, which is good given the large size.

Spare velcro strap, bungee cord (for the zip), and local delicacies are included.

This kind of velcro strap is new to me, as it looks different from the usual loop and hook type of velcro.

Comparing the size with the previous SKS Explorer Edge frame bag.

The new bag is about 1/3 bigger than the SKS Explorer Edge.

SKS Explorer Edge is pretty much filled up when a small bottle is placed inside.

On the new BBD bag, the bottle only takes up the narrow front portion of the bag, leaving lots of space at the back.

The width is also perfect, ensuring no rubbing against the legs during pedaling.

5 velcro straps in total secures the bag to the frame. On the downside, the shape did not fill in the corners below the two "humps" of the bag.

Strap on the downtube also secures the bag to prevent swinging.

I chose the dark camo pattern to fit the gravel theme, while ensuring that it is quite a neutral colour.

Bag fits nicely in the frame, maximizing the bag volume. Note that I used a taller bottle on the downtube, but it still fits.

The front of the bag covers a bit of the cable entrance on the downtube, but it is still OK as the bag material is soft.

The BBD custom frame bag looks pretty good even on the road setup, in case you want to bring more stuff along on your road rides.

It looks best on the gravel setup! All set for a whole day of adventure.

With 2 full water bottles on the frame, the frame bag will be used to carry spares and other supplies as needed.

Without the frame bag, I would have to use 1 bottle cage on the frame for the tool bottle, leaving only 1 full water bottle for the ride.

I am very happy with the Bike Bag Dude frame bag, as the build quality is really good, with lightweight and also water resistant material. The straps are also wide and strong, with a felt-like finish on the inside to prevent scratching the paint on the frame.

With the extra capacity of the frame bag to carry spares, I can carry two full water bottles with me, which is sometimes necessary for longer rides without anywhere to top up water.

Tuesday, October 20, 2020

Xiaomi Portable Air Pump

I recently came across this motorized Xiaomi Portable Air Pump, which can be used to pump up anything from soccer balls to car tires. It is apparently quite popular, as there are some features that are pretty useful.

Since it was not too expensive, I decided to get one to try it out myself, to see what the fuss is all about. Let's take a look!

One of the many advertisements that can be found online

Here is the actual size, when next to a road bike wheel.

Default pump head is shown on the right, for Schrader valves. A Presta valve adapter is included as shown on the left.

Parts of the pump and the purpose. There is a nice digital display, with easy to use controls.

Charging port is located at the bottom, with an indicator light.

Preset modes for setting air pressure, although it can also be adjusted manually as desired.

The air pressure range is between 3 to 150 PSI, which is a huge range! I think the motor would have to work very hard to achieve a pressure of 150 PSI. Otherwise, the pressure range is definitely enough for high pressure road bike tires. As for the rate of pumping, I have to try it out to see how long it takes. The concern is that the air volume of the pump may be small, and take a long time to pump up large volume tires.

Once the hose is plugged out, the unit is turned on automatically. There is a white LED light on top which can be activated, useful for low light conditions.

Testing it out on my gravel wheelset, with 45 PSI. Press the + or - buttons to adjust the preset air pressure, and the right side button to change the measurement unit. The centre button starts the pumping!

Unit weighs 434 grams, which is pretty OK considering how useful it can be. But not so portable to carry as a spare while riding a bike.

Being a digital pump, the desired air pressure can be preset, so that the pump will turn off automatically once the pressure is reached. This is the most useful feature, along with the automatic pumping. There is no need to use arm power to work the floor pump, while also ensuring an accurate tire pressure. Basically just connect the pump head, set the pressure, and press start!

However, once I turned it on, I knew that I would not be using this to pump bicycle tires at home. It is far too loud! Although the unit is quite small, the internal pump makes a lot of noise, which is very loud when used in an enclosed area. It would have been a nice automatic pump, but I find the noise unbearable. I would rather use my quiet old-school manual floor pump for my bicycle tires.

I find that it is much more useful when used to pump up the car tires. Being outdoors at the car park, the noise is more bearable. Previously, I used a 12 volt air pump to pump up the car tires at the car park, but I had to start the car, so that I can run the air pump off the car's electricity. This is not ideal as I am using the large car engine to power the small air pump for the car tires.

This portable Xiaomi pump does the job well, as I don't need to start the car engine in order to pump the car tires. It is able to pump up the large volume car tires, which are relatively low pressure. The battery power is also sufficient to pump up all 4 of the car tires with no issue. After that, I just bring home the portable pump for a quick charge, and leave it in the car for the next time.

In summary, the Xiaomi Portable Air Pump looks good and works well, at a reasonable price too. The deal breaker for me is the loud noise it generates, which makes it unsuitable for use indoors. Works great as a car tire pump though.

Quad Lock Out Front Mount

If you ever wanted to mount your mobile phone on the handlebars, you will find that there are so many different ways to do it. Many years ago I used to have a Topeak DryBag, which protects your phone and makes it rainproof.

However, nowadays most new mobile phones are already waterproof, so it is OK to mount the phone directly on the handlebars without any additional bag or cover for rain protection. Some people mount the phones on the handlebars to use as a speedometer (via GPS in app), others as a map for navigation.

For me, I actually don't use it this way, as I already have other devices (Garmin Edge 530 or Cateye Padrone+) for tracking distance and speed. In rare cases I will use my phone for navigation, if I am cycling in unfamiliar areas. I just want a place to mount the phone securely, so that I can see that it is not missing. If I receive a message or call, I can check easily to see if it is urgent or not.

I first used a Quad Lock mount a few years ago, and was very satisfied with it. I had an additional Quad lock phone casing for my Samsung S8, which I will use when cycling. For this Quad Lock system, you can purchase additional mounts for different bikes, so that you can attach your phone to different bikes easily.

In fact, now I have Quad Lock mounts on all my existing bikes, so that I can change bikes seamlessly. For the folding bikes, I install the Quad Lock mount on the vertical handlepost to avoid interference during folding.


Recently, I have been using the Dahon MuSP as the indoor trainer bike, to use with the Wahoo Kickr Core smart bike trainer. I use the Zwift app which links to the bike trainer, so I need to be able to see the Zwift screen on my mobile phone.

Some people use a dedicated laptop or tablet for Zwift, but I just use my own phone. Sometimes I will mirror the screen to the TV, while at other times I will use place the phone beside the bike trainer, on a table.

All these are not ideal as it is difficult to see and use the Zwift app while cycling. Therefore, I decided to get a dedicated Quad Lock mount, so that the phone can be placed directly in front of me when I am on the bike trainer.

The Quad Lock Out Front Mount Pro is a mount that places the phone in front, so that I can secure my phone in front of me for good visibility and easy usage, while riding on the bike trainer. The Pro indication just means that it is longer, and made of aluminium instead of resin for better strength and rigidity.

Quad Lock Out Front Mount Pro

Fits all the standard handlebar sizes

Comes with two different rubber shims to fit smaller diameter handlebars.

Weighs 66 grams without any shims.

The bracket has serrations to properly secure the top part of the mount. These serrations allow angle settings at 10 degree increments.

Here is the top part of the mount, which will be screwed onto the bracket.

The blue lever is spring loaded, and locks into the back of the phone casing to prevent unintended rotation.

Here is how it looks on the Dahon MuSP. I chose the Pro version because I needed the longer bracket to avoid interference.

I would say it works pretty well as I can fix and remove the phone from the bike easily. The phone is also located at a convenient position for easy usage and good visibility.

Quad Lock parts are rather expensive, but they are really good stuff. Spigen also makes something similar called the Gearlock, at a lower price. It looks just like a copy product of Quad Lock, and even the packaging looks the same. I have not used those so I don't know the quality.

I am committed to Quad Lock as all my bikes are using this mount. The mounts also come in different colours to better match your bikes.