Showing posts with label Controltech. Show all posts

Wednesday, September 12, 2018

Dahon MuSP: Handlebar Setup for Di2

For the Di2 setup on the Dahon MuSP, it will be mostly an internal routing setup. The stock Dahon MuSP rear brake cable and rear derailleur cable are internally routed through the frame, giving a clean appearance.

Using the same concept, the new rear brake cable and also the rear derailleur Di2 wire will be routed internally through the frame. How about the cable routing at the front of the bike?

The usual set up on a road bike is to have a Di2 Junction A situated under the stem, with the shifter Di2 wires connected to this Junction A. This is the stock condition on the Canyon Endurace.

However, this is not a conventional bike, and so the usual Di2 wire routing is not advisable. On the Dahon MuEX, which is also a folding bike, there is a display screen on the handlebar, so the shifter Di2 wires will be connected to the display.

Also, in keeping with the internal routing concept, I would like to keep the Di2 wiring as neat as possible, which means hiding it internally where possible. With that, I considered something that I have never tried before, which is to run the Di2 wire inside the handlebar!

The concept is to hide Junction A inside the bar end for a clean look, and this is made possible by the new type of Junction A as shown below. Other than that, the wireless unit, EW-WU111 will also be hidden inside the handlebar. Finally, I will use a Garmin display to show the selected gear on the Garmin screen! This setup will maintain the neat appearance and yet allow the selected gear to be displayed.

In order to run the Di2 wires inside the handlebar, there will need to be some holes on the handlebar, so that the Di2 wires can be connected between the shifters and Junction A. I thought of buying a PRO handlebar with pre-drilled holes, but they were quite expensive and did not have the size that I needed in stock.

I came across a Youtube video showing how to drill holes in the handlebar for Di2 wiring. This might sound unsafe, but the area where the small holes will be drilled are not under high stress, and so from my point of view it is safe. Obviously this will void your warranty, so do it at your own risk. Lastly, don't do it on a carbon handlebar, as it is more risky.

Using the Youtube video as a guide, I did my own DIY internal routing on the handlebar!

FSA Vero Compact road handlebar, 40cm wide. Weighs 309 grams which is much heavier than a carbon handlebar that is around 200 grams.

Time to drill the holes at the end of the drop bar! For this 1x11 speed Di2 setup, I actually only need to drill one hole on the right side. However, as I want to control the Garmin with the hidden buttons on top of both the left and right shifters, I decided to also connect up the left shifter. This also gives the option of customizing the function of the shifting buttons, such as using the right shifter button for shifting up, and the left shifter button for shifting down, much like the SRAM eTap system.

Clamping the handlebar before drilling a hole. Start with a small drill bit to fix the hole position first, before changing to a larger 6mm drill size.

Drilled hole after removing the burrs

The edges of the holes are also taped up to help prevent the Di2 wire from being damaged by the edge of the hole.

With a similar hole drilled at the other end, this DIY internal routing handlebar is done! It is actually quite easy once you know the technique and have the right tools. By the way, this is the underside of the drop bar, which is normally under compression load and so it is not a danger to have a small hole drilled there.

As the handlepost is a T-shaped type, a stem is needed to link the handlepost to the handlebar. This is the exact same Controltech stem which I used last time on the Dahon Boardwalk.

Weighs 96 grams for this pair of aluminium stem

This stem converts the 25.4mm diameter of the T-shaped handlepost to the 31.8mm diameter of handlebars, while allowing reach and height adjustment at the same time.

The normal Litepro stem requires a 25.4mm diameter handlebar, which is not so common nowadays. Therefore, using this stem allows most road handlebars to be used, which increases your options greatly.

For internal routing through the handlebar, an internal type Di2 Junction A is required. This is quite new, and it is the first time I am using this type of Junction A. The other types of Junction A are the EW67 (used on Dahon Boardwalk and Merida Scultura) and the 3 port EW90 (used on Merida Scultura and Canyon Endurace).

Internal type of Junction A, EW-RS910.

This Junction A can be installed at the bar end of the drop bar, or inside the frame (if the frame is designed for it).

If used at the bar end, the bar tape will be wrapped on top of it. The mode button and the charging port can also be found on the exposed part. If you have an internal Di2 battery, you will need to charge it using this port.

All the parts that are included with this Junction A set, including those for internal frame mounting which I will not need.

Parts required for left and right side. The left side parts is just to make the bar end look similar to the right side, it is not compulsory. There is even a dummy wire (left side of picture) to wrap under the bar tape, to make the grip feel similar to the right side.

Weight of Junction A plus the other small parts weigh 25 grams.

Before installing the Di2 wires into the handlebar, I will first need to connect up the whole system to make sure it is working properly. That will be done in the next post where the bike assembly will start!

Saturday, February 11, 2017

Avanti Inc 3: Alfine 11 Di2 Drop Bar Conversion Part 2

Continuing from Part 1 of this project, which is to convert the Avanti Inc 3 to a drop bar bike with Alfine 11 Di2, here are the rest of the components that are required.

The drivetrain system has been settled, with the new Alfine 11 Di2 hub and rear wheel, new 28T Gates rear sprocket and also the 115T Gates CenterTrack belt.

The other components that are required are the shifters, brakes and motor unit to activate the shifting inside the rear internal hub. As I want to have a drop bar bike with hydraulic disc brakes, the only shifter that is currently compatible with Alfine 11 is the non-series ST-R785 shifter. This is a road Di2 shifter that is integrated with a hydraulic brake lever. For more pictures and details, check out this earlier post where I studied the ST-R785 shifter in more detail.

ST-R785 Di2 road shifter integrated with hydraulic brake lever. Rather heavyweight due to the full aluminium bracket. For comparison, the new Dura-Ace ST-R9170 weighs only 316 grams/pair.

As the entire brake system will be changed, from the current Deore M615 hydraulic brake lever and brake calipers, there is a need to get new brake calipers and set up the whole brake system from scratch. This means installing the brake hose and bleeding the whole brake system.

This BR-RS785 brake caliper is the recommended brake caliper to go with the ST-R785 shifters

Low profile road hydraulic disc brake caliper, using the traditional Post Mount system, not the new Flat Mount standard

No banjo fitting for this brake caliper for a low profile look.

With the brake system components settled, next is the electronic components. As I am converting the bike from mechanical shifting to electronic shifting, I will need to get some electronic components. I have set up a few Di2 bikes previously, so this is quite straightforward for me.
Dahon Boardwalk Ultegra Di2
Dahon MuEX Ultegra/XTR Di2
Wheelsport Fantasy Ultegra Di2
Merida Scultura 5000 Ultegra Di2

New battery mount is required. A long battery mount is used and will be fixed to the bike using the water bottle cage mounts.

MU-S705 Motor Unit, will be fixed to the Alfine 11 Di2 hub to activate the shifting inside the hub. The yellow ring is the seal.

The splines that will engage with the Drive Plate on the hub. This unit has been pre-programmed to work with 11 speed Alfine Di2.

After installing the yellow ring to create a watertight seal around the Drive Plate area

Weighs 140 grams for this Motor Unit. Di2 wire will plug into the hole as shown at the bottom.

Wiring up all the Di2 components to test out, before installing onto the bike. The digital display, SC-S705 is from the Dahon Boardwalk a few years ago.

Wiring diagram for this Alfine 11 Di2 setup. Quite simple as there are fewer components than the road Di2 setup.

Everything worked fine even before any firmware updates. The plan is to share 2 external Di2 batteries across the 3 Di2 bikes that I currently have. The Merida Scultura 5000, Dahon MuEX, and this Avanti Inc 3.

The system is then connected to the Di2 SM-PCE1 box to update the firmware and also customize the settings.

Updating the firmware for all the Di2 components

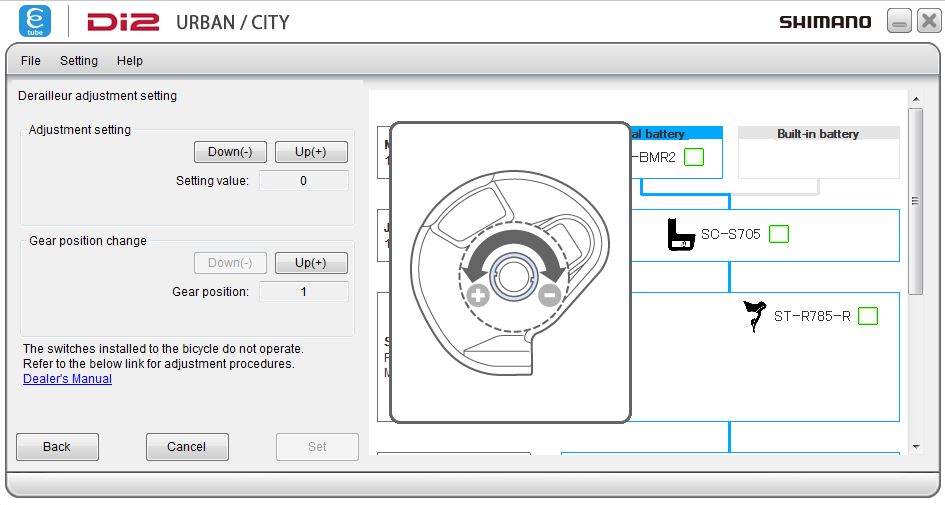
It is possible to re-program the Motor Unit to work with either the 8 speed or 11 speed Alfine Di2 system

There is a fine-tuning function for adjusting the Motor Unit, in case there is some problem with the shifting. Otherwise, the factory setting will be fine.

A new drop bar is required to convert this bike from flat handlebar to drop bar. As weight is not the main concern, while durability and all-weather ability is more important, I opted for an economical FSA aluminium drop bar, in my preferred compact shape.

FSA drop bar (42cm width) that is wider than usual (40cm), in order for better control during wet weather. Same concept as on cyclocross bikes.

Flat top that may be more comfortable for holding

Over 300 grams for this handlebar, which is 50% heavier than the lightweight FSA K-Force carbon drop bar that I am using on the Merida Scultura 5000 and Wheelsport Fantasy Mini Velo.

One downside to using this Avanti Inc 3 frame and modifying it to a road bike style is that the top tube length of the Avanti Inc 3 bike is quite long. In fact, it is about 25mm longer than the Merida Scultura 5000.

Therefore, I decided to compensate for the longer top tube by using a shorter stem.

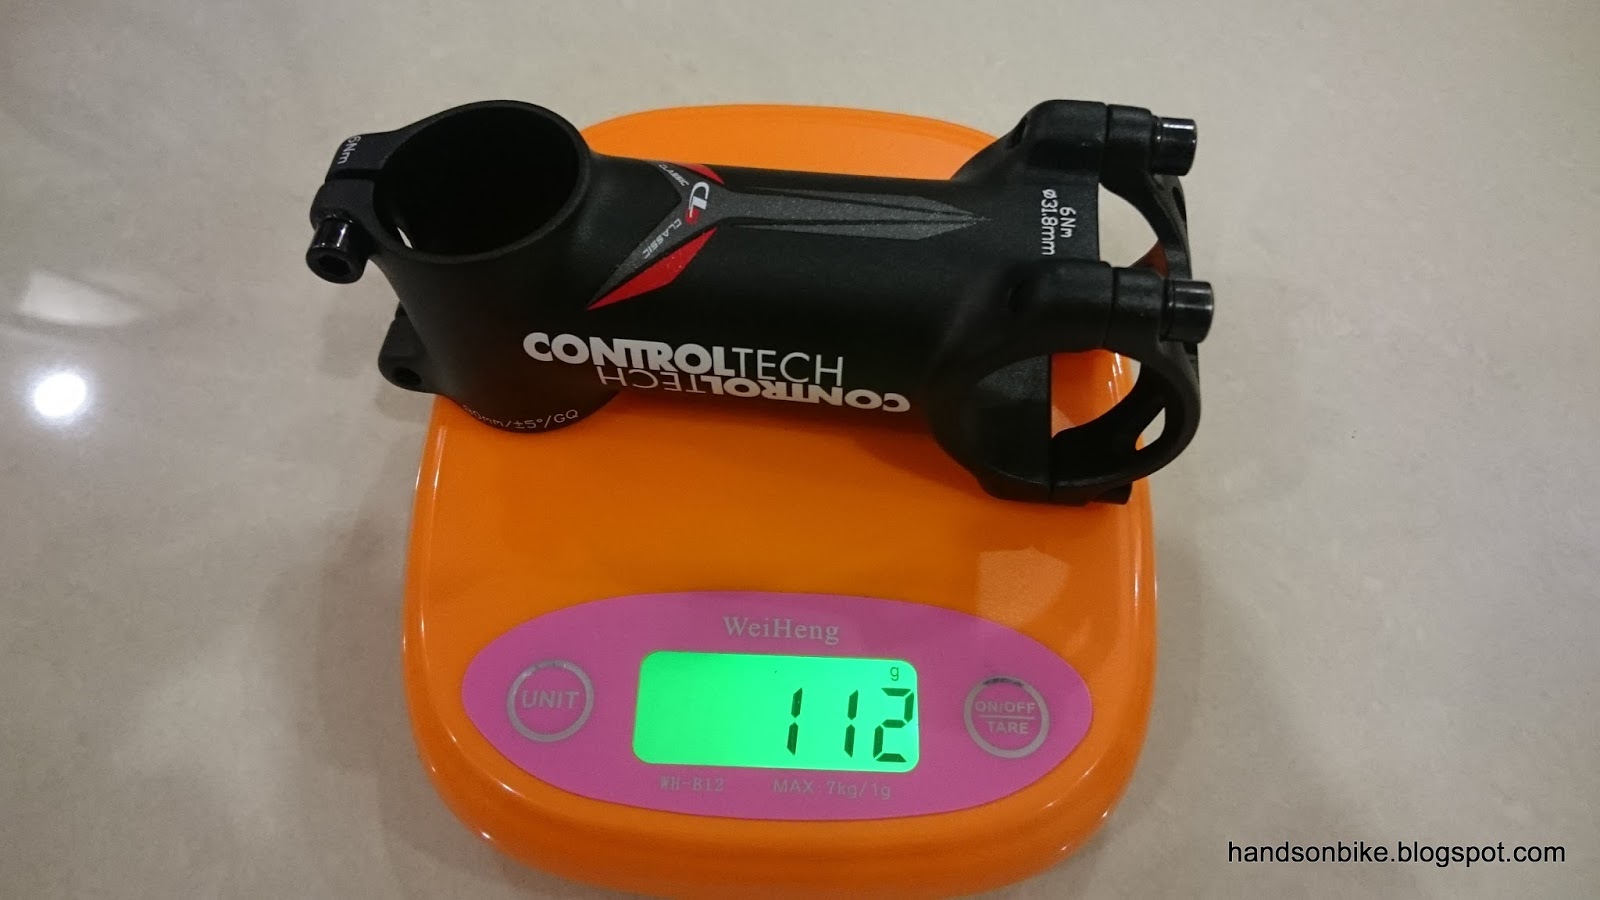
80mm Controltech stem

Looks very similar to the stock stem on the Merida Scultura 5000

Lightweight at only 112 grams

As a preview for Part 3, where the installation of all the new components will take place, here is a wheel weight comparison.

Weight of stock Alfine 11 (mechanical) rear wheel, without sprocket or disc rotor

Weight of new Alfine 11 Di2 rear wheel. Lighter by about 250 grams, mainly from the rim and spokes.

In the third part of this project, all the components will be installed onto the bike. Stay tuned for the updates and the pictures!

Part 3 here

Wednesday, March 25, 2015

Can I Install Tern Handlepost/Fork on Dahon Frame? Part 5: Adjustments and Accessories

This is the 5th and last part of the project, "Can I Install Tern Handlepost/Fork on Dahon Frame?". Continuing from the previous part of the project, where I completed the installation of the Tern handlepost and fork onto the Dahon Boardwalk, this final post will wrap up the whole project.

As stated at the end of the previous post, I encountered a steering problem when I test rode the bike after installing the Tern handlepost and fork. It is kind of difficult to describe the problem clearly in words, but I will try.

Normally, a small wheeled bike such as my Dahon Boardwalk will have a more nimble steering feel as compared to bikes with standard wheel sizes. However, test riding the newly upgraded Dahon Boardwalk felt really strange. I found it difficult to keep the bike travelling straight even on a straight and smooth road. The bike tends to auto-steer to the sides, and it was taking a lot of effort to keep the front wheel pointing straight.

Having rode a folding bike regularly since 2008, I have a few years of experience riding small wheeled bikes, and I am familiar with the steering feeling. Although some bikes are naturally more twitchy, this felt different and wrong.

It got so bad that after a while, I could not steer properly while riding! Upon steering to the side, the handlebar stayed to the side and did not want to return to the centre. Luckily, I was going slow and only test riding around the estate, so there was no great danger. At that point I knew that something was seriously wrong with the steering.

My first suspicion was that the headset may have been tightened too much, causing the headset bearings to seize and stop rolling properly. However, even after I loosened the top cap inside the handlepost, the steering still felt stuck.

The next step to troubleshoot this problem is to remove the handlepost, and see if I can spot any anomalies. Upon removing the handlepost, I noticed some wear on the gold coloured headset bearing cup.

Signs of wear at the front of the gold headset bearing cup

Metal shavings can be seen between the headset bearing cup and the base of the handlepost

Abrasion marks and metal shavings found along the inside edge of the handlepost base

From the signs of wear that I spotted, I found that the edge of the handlepost base was rubbing against the headset bearing cup. This meant that the clearance between the handlepost base and the headset bearing cup is not sufficient to allow for smooth rotation. When there is no load on the handlepost (Eg. in the workstand), the handlepost can rotate smoothly. However, during riding, the load from my weight on the handlebars will close up the tiny gap, causing intermittent rubbing. This excessive friction eventually caused the handlepost to jam up and stop rotating properly.

One way to solve this would be to grind away the bottom edge of the handlepost base, to create more clearance. However, since the handlepost is already assembled with the rest of the handlebar, it is too troublesome to remove the handlepost for grinding at the workshop.

The other way is to add a spacer above the headset compression ring, so that the handlepost rests slightly higher. This will create more clearance between the base of the handlepost and the headset bearing cup. This spacer diameter is the same as a standard headset spacer, but they usually come in 5mm or 10mm thicknesses, which is far too thick. Therefore I sourced for thin headset spacers from Taobao.

Set of thin headset spacers

3 x 0.3mm spacers, 1 x 1mm spacer, 1 x 2mm spacer, 1 x 3mm spacer

From what I see, adding just one 0.3mm spacer will create sufficient clearance to avoid rubbing. However, I took the chance to add back the rubber seal that was on the base of the Tern handlepost. Therefore, I chose the 1mm thick spacer and placed it on top of the headset compression ring.

1mm headset spacer on top of the headset compression ring. This will reduce the clamping length by 1mm.

Rubber seal that comes with the Tern handlepost. It was previously removed due to insufficient clearance.

Rubber seal re-installed to the base of the Tern handlepost

After putting the Tern handlepost back onto the steerer tube. Slightly shorter clamping length, but it will have to do as there is nothing else I can do to increase the clamping length.

Rubber seal can be seen between the base of the Tern handlepost and the gold headset bearing cup. This minimises the amount of rain and dust that enters the headset bearings.

After making these adjustments, the steering feel of the Dahon Boardwalk is back to normal! The front wheel is now able to auto centre itself as designed, making steering much easier and natural, instead of me having to try so hard to keep the front wheel straight.

Now that the Tern handlepost and fork has been mounted successfully on the Dahon Boardwalk with no issues, I can now add on more accessories to the handlepost and handlebar. One accessory that I want to add to the Dahon Boardwalk is the Shimano Sport Camera.

The camera has previously been installed on the Merida Scultura 5000 road bike, using the K-Edge Go Big GoPro handlebar mount. If I want to mount the camera on other bikes, I would need to get additional mounts to allow quick and easy transfer of the camera from bike to bike.

However, the biggest problem here is that the K-Edge mount is really expensive! From Taobao, I found similar GoPro mounts at a fraction of the cost. They may not look as nice as the original K-Edge mount, but they have the same function and are much cheaper.

GoPro handlebar mount from Taobao. Looks almost the same as the K-Edge version.

Same as on the K-Edge mount, I moved the mounting piece to the top of the mount.

As there is no more space on the top of the handlebar for mounting this GoPro mount, I mounted it sideways on the Tern handlepost. Although the camera will be tilted to the side, the camera is able to auto rotate the video to the correct orientation.

As seen from the front. Loads of accessories!

The Controltech Stem is tilted slightly forward to put the handlebar at the correct reach. This is because the vertical part of the handlepost is further back as compared to Dahon/Fnhon handleposts, due to the taller handlepost base.

Tern handlepost locking lever with the green protective sticker removed. Looks very glossy and elegantly designed!

Final view of the upgraded Dahon Boardwalk with the Tern handlepost.

Yet another project completed successfully!

Through this project, I have learnt much about the design, construction and installation of the Tern handlepost. As for the ride quality, I have not detected any large improvement in handlepost stiffness, as the previous Fnhon 27cm 4 bolt handlepost is already very stiff. In fact, when I pull hard on the handlebar, I can feel some flex coming from other parts of the bike, such as the long seatpost and the main folding joint on the frame. The stiffness of the bike frame and handlepost is probably as good as it gets with this Dahon Boardwalk frame.