Tuesday, September 25, 2018

Shimano Dura-Ace R9100 vs Ultegra R8000 vs 105 R7000: 11-30T Cassette

The 11 speed 11-30T cassette is a very versatile cassette, given its relatively wide range (for a road bike) and still has sufficiently close ratios due to the 11 gears. Previously, when a cassette was just 9 or 10 speeds, it is not ideal to have a low gear of more than 28 teeth, as the gaps between the gears will get uncomfortably big. Now, with 11 gears, it is possible to have a low gear of 30 teeth or even 32 teeth without sacrificing the gear steps.

This 11-30T cassette can be found on the 11 speed road groupsets, which are the Dura-Ace, Ultegra and 105 series. The gear ratios are exactly the same (11,12,13,14,15,17,19,21,24,27,30), as first seen on the Canyon Endurace. Differences are the material used, the construction, the weight, the surface treatment and of course the price.

Let's compare the Dura-Ace R9100 cassette with the Ultegra R8000 cassette, both of which are the 11-30T variety. Why does the Dura-Ace cassette cost twice as much as Ultegra cassette? Is it purely due to the use of the titanium sprockets in the Dura-Ace cassette?

Nomenclature:
R9100 - Dura-Ace R9100 cassette
R8000 - Ultegra R8000 cassette
R7000 - 105 R7000 cassette

R9100 has the largest two titanium sprockets (27T and 30T) mounted together on an aluminium spider

Weighs only 64 grams for these two sprockets, due to the use of the lightweight aluminium spider and the titanium sprockets.

Next 3 sprockets in the R9100 (19T, 21T, 24T) are also made of titanium, and are riveted to a carbon fibre spider.

Very lightweight due to the 3 titanium sprockets and the carbon fibre spider used in R9100.

As you can see, the Dura-Ace R9100 cassette has spared no expense to make sure it is as lightweight as possible, through the use of titanium for its 5 largest sprockets and the use of aluminium and carbon fibre spiders. Using titanium in the smaller sprockets (17T and below) will probably result in minimal weight savings at a much higher cost.

On the other hand, as the Ultegra R8000 is more cost sensitive, it will have to use a different construction and material to achieve a lower cost.

R8000 has the 3 largest sprockets (24T, 27T, 30T) mounted together on an aluminium spider

Weighs 135 grams for these three steel sprockets plus spider. Cannot compare directly to the Dura-Ace cassette as the number of sprockets mounted on the last spider is different.

R8000 has the 19T and 21T steel sprockets mounted together, on a carbon fibre spider

Weighs 49 grams for these two steel sprockets on the carbon fibre spider

At this point, we can compare the sub units of the R9100 vs the R8000, just for the last 5 sprockets.

R9100:
(27T & 30T) + (19T & 21T & 24T) = 64g + 59g = 123 grams
R8000:
(24T & 27T & 30T) + (19T + 21T) = 135g + 49g = 184 grams

For the last 5 sprockets alone, the weight difference is already 61 grams. The remaining 6 sprockets are mounted individually and are made of steel, so the weight should be similar regardless of Dura-Ace or Ultegra.

Weight of whole R9100 11-30T cassette is only 206 grams

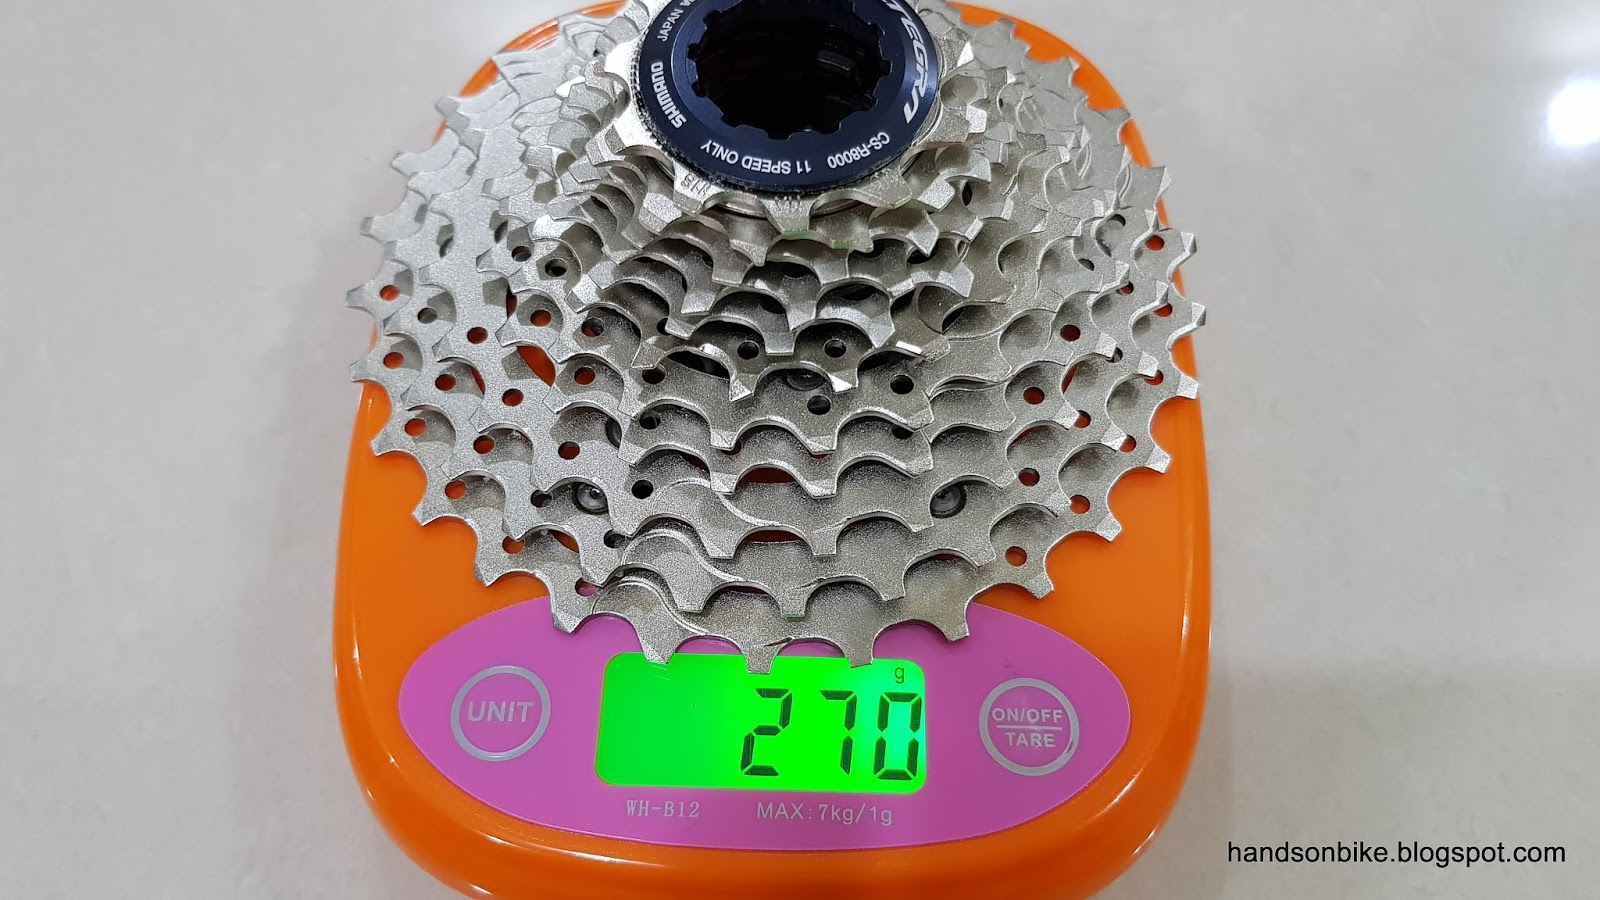
Weight of whole R8000 11-30T cassette is 270 grams

Update: R7000 11-30T cassette weighs 295 grams.

If you compare the weight difference for the whole cassette, the Dura-Ace cassette is lighter than the Ultegra cassette by 64 grams, out of which 61 grams comes from the last 5 sprockets.

In other words, almost all of the weight difference between the R9100 and the R8000 11-30T cassettes come from the last 5 titanium sprockets!

If you are a weight weenie, you can save 64 grams from the cassette by choosing a Dura-Ace R9100 vs Ultegra R8000. However, if this weight difference does not matter to you, you can save quite a bit of money by using the Ultegra cassette which shifts just as well.

Update: The R7000 cassette uses one less aluminium spider in the construction compared to Ultegra, meaning there are more full spline steel sprockets being used, thus adding to the weight.

11 Speed 11-30T Cassette Weight Comparison
Dura-Ace R9100: 206 grams
Ultegra R8000: 270 grams (+64 grams & +31%)
105 R7000: 295 grams (+89 grams & +43%)

Friday, September 21, 2018

Dahon MuSP: Final Assembly

Finally, after much effort, plus trial and error, the Dahon MuSP has been completed! This is a folding bike with 451 wheels, drop bar and caliper brake setup, 1x11 speed drivetrain with Di2 shifting, and internal cable routing. Let's take a look at the final product!

Drop bar setup, with Ultegra Di2 shifters

Bar end type Di2 Junction A for a neat appearance

Controltech stem used to mount the FSA Vero compact drop bar on the Fnhon T-shaped handlepost

During folding, the rear brake outer casing will be scratched by the hole edges of the frame. This is quite a serious problem as the metal coil can be seen...

Di2 battery located behind the seat tube. The Di2 wire runs from the battery mount to Junction B (hidden inside frame), together with the rear brake cable through the same hole in the frame.

Top view of the battery location, which is hidden between the seat stays.

Di2 wire to the rear derailleur exits from the right side seat stay.

Blue Wheelsport Smart 1.0 451 wheelset, with Panaracer Minits Lite tires

Ultegra R8000 road caliper brakes, which fits on this bike without any modification or adapter required!

Ultegra 1x11 speed drivetrain

Wolf Tooth 46T chainring, mounted on the Ultegra R8000 crankset

Left crankarm of the Ultegra R8000 crankset

Blue Wheelsport hubs, which have a different shade of blue from the rims. Lightweight titanium quick release axles.

Another view of the Ultegra Di2 R8050 rear derailleur, and the 11-30T cassette


Stock lightweight kickstand from the Dahon MuSP, which only weighs 158 grams. Optional but very useful to have!

View of the completed bike from the non-drive side

View of the bike from the drive side. Blue accents on the frame makes it more special!

Full specifications of this Dahon MuSP. Weight without pedals and kickstand (usual standard for comparing weight with other bikes) is about 9.1kg.

Comparing the weight of this bike to a few other bikes which I have weighed, let's see where it stands. Flat handlebar and drop bar bikes cannot be compared directly, as the handlebar setup is different which makes a drop bar bike heavier than a flat handlebar bike. All weight comparisons are done without pedals, kickstand or any other accessories.

Flat Handlebar:
Dahon MuEX (1x11 speed Di2): 8.4kg
Crius AEV20 (1x11 speed): 9.1kg
Dahon Vitesse (2x10 speed): 10.5kg
Brompton M6R (2x3 speed): 11.9kg
Tyrell IVE (1x9 speed): 11.5kg

Drop Bar:
Dahon MuSP (1x11 speed Di2): 9.1kg
Dahon Boardwalk (2x11 speed Di2): 10.7kg (estimated)
Wheelsport Fantasy (2x11 speed Di2): 7.3kg
Java Freccia (1x11 speed): 6.4kg
Canyon Endurace (2x11 speed Di2): 7kg
Merida Scultura 5000 (2x11 speed Di2): 7.4kg
Merida Reacto 4000 (2x11 speed): 9kg
Avanti Inc 3 (1x11 speed Di2): 10.9kg

From this comparison, the 9.1kg weight of this Dahon MuSP is not too bad, as it is actually the second lightest folding bike, after the flat handlebar Dahon MuEX which is just 8.4kg. Non-folding bikes normally have a weight advantage as they don't need to strengthen the joints or have the folding mechanisms.

The handlepost used for this Dahon MuSP is still quite tall, despite getting one that is shorter (27cm) than the stock handlepost (31.5cm). There are handleposts that are even shorter (about 25cm), but they don't fit the requirement of a T-shaped, inward folding type.

As a result, the handlebar is still positioned relatively high, when compared to a road bike.

Dahon MuSP with the Controltech stem angled 45 degree upward/forward, which is the angle that I used when tesing this bike. Still a lot higher than the handlebar of the Canyon Endurace in the foreground.

As mentioned earlier, the main purpose of having the Controltech stem is to allow the handlebar to be placed BEHIND the handlepost, as it will be used for a smaller rider with a shorter reach. Therefore, let's see how it looks like when we actually rotate the stem to be behind the handlepost.

With the stem rotated to place the handlebar behind the handlepost, the handlebar is now lower as there is no vertical extension provided by the stem.

In this setup, the handlebar position looks to be just right for a shorter rider, as it is lower and further back.

This Dahon MuSP has finally been completed! I am happy with being able to install standard reach road caliper brakes on a folding bike, as it ensures good braking performance when paired with a road shifter. The internal cable routing is good because it makes the appearance much neater, especially with the bar end Di2 Junction A.

On the other hand, during folding and unfolding, the rear brake cable will slide through the hole on the frame, which causes it to be damaged by the sharp hole edge. This is a problem as the plastic layer on the outer casing will get scraped off easily, exposing the metal coil of the outer casing.

The solution is to minimize the folding of the bike, and also to carefully guide the outer casing through the hole during folding and unfolding. Not ideal, but it is the only way to deal with this issue. External cable routing would eliminate this issue, at the expense of a less tidy cable routing.

After testing this bike for an extended distance of 60+km, it is all ready to go. It is not for my own use, but I build every bike as if it is my own, ensuring that it is adjusted correctly and optimally. Yet another bike project has been completed!

Sunday, September 16, 2018

Dahon MuSP: Assembly Begins

In the first post about this Dahon MuSP folding bike, one of the requirements was for a blue wheelset. The overall colour scheme for the bike is thus black with blue accents. Other than the blue Wheelsport Smart 1.0 wheelset, it will look nicer if I can find some blue bits to add some colour to the bike.

However, blue parts are hard to find! Most of the custom colours are red, silver, black or silver. Very few blue parts are available. I managed to find some blue Litepro chainring bolts, to use on the front single crankset.

For this bike, other than the blue wheelset and the blue chainring bolts, I wanted to change the seatpost clamp and the headset to blue colour. This would be similar in idea to how I wanted to add red colour to the Dahon MuEX last time.

There are only a few sources with blue parts on Taobao, and you will not know if they really have it in stock, until you actually order it. Therefore I just have to try my luck and place the order...

Blue seat post clamp is available! Looks very much like the Dahon design which is good.


Looks good on the black frame. Although it will look better if the logo is removed...

Blue headset shown in the top row, with the Litepro headset shown at the bottom row.

The blue headset is from some generic brand with no logo. The construction is of an older design, which has more parts as compared to the Litepro headset which is much simplified. The part that can actually be seen is only the blue headset cover, therefore I mixed and matched the two headset to get the best combination that matches both the frame and the fork.

With the blue headset cover installed! Good contrast with the black frame and handlepost.

Frame, fork and handlepost installed, along with the blue headset cover and seat post clamp.

At this point in time, I was actually still waiting for the blue Wheelsport wheelset to be available as it was out of stock, which is why I could not start some parts of the assembly yet. However, I could install some other parts that are not directly dependent on the wheelset.

Ultegra R8000 brake calipers installed at the rear of the frame, using the dedicated caliper brake mount.

The brake calipers are also installed on the front fork, also using the dedicated caliper brake mount.

Before installing all the components, it is a good idea to connect up the Di2 components to make sure they are working properly. This is especially important since the internal routing will make it more difficult to troubleshoot if something does not work.

Di2 wiring layout on the Dahon MuSP. Note that the wireless unit and Junction A are actually placed in between the left and right shifters, which is unconventional.

In this layout, the 1000mm, 150mm, 300mm, 700mm Di2 wires are fully internal routed, while the 1400mm Di2 wire is partially internal routed through the main frame. As shown below, the 1000mm Di2 wire, wireless unit and 150mm Di2 wire are fully hidden within the handlebar.

Full Di2 layout tested on actual components to check if they are working properly. No problem!

Shown here is the right side bar end. The 1000mm Di2 wire (peeping out from the handlebar) comes from the left side shifter, through the handlebar, and is connected to the wireless unit. The short 150mm Di2 wire will be connected to Junction A.

Before pushing the wireless unit into the handlebar, it is first wrapped in sponge to prevent rattling inside the handlebar. Might be difficult to get it out next time...

The 150mm Di2 wire is then connected to Junction A. The other 300mm Di2 wire will pass through the hole at the handlebar, and run along the outside of the handlebar, up to the right shifter.

Once again, connecting everything to make sure it is working properly. Remember to install the Controltech stem before you install the shifters!

At the same time, I also connected the Garmin Edge 510 to the Di2 system, to display the selected gear. It works fine!

Now I know that the handlebar area of the bike is working fine, the next step is to wire up the rest of the bike. More specifically, connecting the Di2 rear derailleur, battery and Junction B together, before linking up with the handlebar.

This part is quite challenging, as it also requires the internal routing kit to help pull the cables and wires through the frame. I started with the 700mm Di2 wire, which is the one that links the Di2 rear derailleur with Junction B, and is routed internally through the right side seat stay.

Routing this Di2 wire from the seat stay side should be easier, as the hole at the seat stay side is small, while the frame hole near the joint area is bigger. It is always easier if the cable/wire exits from a larger hole.

View from the frame joint, looking back towards the seat tube and seat stays. It seems that the seat stay and main frame is not connected internally, but it actually is, through a small hole as seen on both sides of the seat tube.

Routing the Di2 wire through the small hole between the seat stay and the main frame is quite tricky, luckily I had an internal routing kit which uses a strong magnet to help guide the wire along the correct path.

The 500mm Di2 wire links the external Di2 battery to Junction B, which will be located internally inside the main frame. This wire will enter the frame through the hole for the rear brake cable.

At the other end, the long 1400mm Di2 wire will enter the main frame near the head tube area, and exit at the frame joint. Same path is taken for the rear brake cable.

After much work, the Di2 wires can be connected at the frame joint area! The two wires from the left comes from the battery and the rear derailleur, while the one from the right is connected to the handlebar area.

Once again, the components are tested to make sure they are working at this stage. Once done, the Junction B needs to be stored inside the frame, at the rear part of the main frame (near the seat tube).

In order to prevent rattling sounds, I will need to prevent Junction B from hitting the inside of the frame. I wanted to wrap Junction B in sponge, but I found that it does not fit into the hole after wrapping it in sponge. The other way is to stuff sponge inside the frame, to act as padding along the internal walls of the frame.

Junction B inserted into the frame, in between the sponge. The brake cable will also run through this hole, beside the sponge and Junction B.

All these internal routing takes a lot of time and effort, especially since this frame is not designed for internal Di2 wiring. I would prefer not to do it again, as it is quite a lot of trouble.

More assembly to be done! To be continued in the next post.

Wednesday, September 12, 2018

Dahon MuSP: Handlebar Setup for Di2

For the Di2 setup on the Dahon MuSP, it will be mostly an internal routing setup. The stock Dahon MuSP rear brake cable and rear derailleur cable are internally routed through the frame, giving a clean appearance.

Using the same concept, the new rear brake cable and also the rear derailleur Di2 wire will be routed internally through the frame. How about the cable routing at the front of the bike?

The usual set up on a road bike is to have a Di2 Junction A situated under the stem, with the shifter Di2 wires connected to this Junction A. This is the stock condition on the Canyon Endurace.

However, this is not a conventional bike, and so the usual Di2 wire routing is not advisable. On the Dahon MuEX, which is also a folding bike, there is a display screen on the handlebar, so the shifter Di2 wires will be connected to the display.

Also, in keeping with the internal routing concept, I would like to keep the Di2 wiring as neat as possible, which means hiding it internally where possible. With that, I considered something that I have never tried before, which is to run the Di2 wire inside the handlebar!

The concept is to hide Junction A inside the bar end for a clean look, and this is made possible by the new type of Junction A as shown below. Other than that, the wireless unit, EW-WU111 will also be hidden inside the handlebar. Finally, I will use a Garmin display to show the selected gear on the Garmin screen! This setup will maintain the neat appearance and yet allow the selected gear to be displayed.

In order to run the Di2 wires inside the handlebar, there will need to be some holes on the handlebar, so that the Di2 wires can be connected between the shifters and Junction A. I thought of buying a PRO handlebar with pre-drilled holes, but they were quite expensive and did not have the size that I needed in stock.

I came across a Youtube video showing how to drill holes in the handlebar for Di2 wiring. This might sound unsafe, but the area where the small holes will be drilled are not under high stress, and so from my point of view it is safe. Obviously this will void your warranty, so do it at your own risk. Lastly, don't do it on a carbon handlebar, as it is more risky.

Using the Youtube video as a guide, I did my own DIY internal routing on the handlebar!

FSA Vero Compact road handlebar, 40cm wide. Weighs 309 grams which is much heavier than a carbon handlebar that is around 200 grams.

Time to drill the holes at the end of the drop bar! For this 1x11 speed Di2 setup, I actually only need to drill one hole on the right side. However, as I want to control the Garmin with the hidden buttons on top of both the left and right shifters, I decided to also connect up the left shifter. This also gives the option of customizing the function of the shifting buttons, such as using the right shifter button for shifting up, and the left shifter button for shifting down, much like the SRAM eTap system.

Clamping the handlebar before drilling a hole. Start with a small drill bit to fix the hole position first, before changing to a larger 6mm drill size.

Drilled hole after removing the burrs

The edges of the holes are also taped up to help prevent the Di2 wire from being damaged by the edge of the hole.

With a similar hole drilled at the other end, this DIY internal routing handlebar is done! It is actually quite easy once you know the technique and have the right tools. By the way, this is the underside of the drop bar, which is normally under compression load and so it is not a danger to have a small hole drilled there.

As the handlepost is a T-shaped type, a stem is needed to link the handlepost to the handlebar. This is the exact same Controltech stem which I used last time on the Dahon Boardwalk.

Weighs 96 grams for this pair of aluminium stem

This stem converts the 25.4mm diameter of the T-shaped handlepost to the 31.8mm diameter of handlebars, while allowing reach and height adjustment at the same time.

The normal Litepro stem requires a 25.4mm diameter handlebar, which is not so common nowadays. Therefore, using this stem allows most road handlebars to be used, which increases your options greatly.

For internal routing through the handlebar, an internal type Di2 Junction A is required. This is quite new, and it is the first time I am using this type of Junction A. The other types of Junction A are the EW67 (used on Dahon Boardwalk and Merida Scultura) and the 3 port EW90 (used on Merida Scultura and Canyon Endurace).

Internal type of Junction A, EW-RS910.

This Junction A can be installed at the bar end of the drop bar, or inside the frame (if the frame is designed for it).

If used at the bar end, the bar tape will be wrapped on top of it. The mode button and the charging port can also be found on the exposed part. If you have an internal Di2 battery, you will need to charge it using this port.

All the parts that are included with this Junction A set, including those for internal frame mounting which I will not need.

Parts required for left and right side. The left side parts is just to make the bar end look similar to the right side, it is not compulsory. There is even a dummy wire (left side of picture) to wrap under the bar tape, to make the grip feel similar to the right side.

Weight of Junction A plus the other small parts weigh 25 grams.

Before installing the Di2 wires into the handlebar, I will first need to connect up the whole system to make sure it is working properly. That will be done in the next post where the bike assembly will start!