Saturday, July 26, 2025

Brompton P Line: Stock Wheel Weights and Chain Ring Bolts

Although the Brompton P Line uses a titanium front fork and rear triangle to save weight over the regular C Line (similar to old M6R that I had), those are probably not the only areas where weight reduction can be found.

From my experience, there can be quite a lot of weight savings to be found from the wheelset and also the tires mounted on it. At the same time, I was curious about the 4 speed components used on the P Line, and wanted to take a closer look at them.

Most importantly, I didn't like the Schrader inner tube valves that came with the bike. All my other bikes use Presta valves, while my Lezyne Sport Gravel Floor Drive only has Presta pump head. Therefore it makes sense to have all my bikes use the same type of valves to avoid having to switch pump heads or use adapters. This means I need to change the inner tubes on the P Line to the Presta valve type, which will involve disassembling both wheels from the bike.

After removing the front quick release axle, a steel plate can be seen holding onto the hub axle. This is a secondary feature which prevents the wheel from falling out of the dropout if the quick release axle comes loose.

This axle retaining plate is not commonly seen on other front forks of other bikes, as the more common design is to have a raised lip to perform the same function.

The reason Brompton uses this design with an additional part is to balance the other side of the front fork, where there is a steel bracket to support the front hook.

Steel bracket with dual function: Prevent hub axle from falling out, and also to hold the bent steel wire bracket of the front hook.

Next, I removed the tires from the wheelset, as I wanted to check some specifications of the rims. The lightest 16" wheelset that I have used was on the United Trifold, where I upgraded the stock internal hub wheelset to the super lightweight Elosix wheelset which weighs only 951 grams!

Brompton P Line rim internal width is about 17.6 mm, which is a decent width and not too narrow.

For some reason I forgot to measure the external rim width and rim height, but I guess those can be measured easily without dismantling anything.

Tire weight is 220 grams which is decent as well, although not as light as the Schwalbe One which is just 174 grams each.

Stock butyl inner tube weighs 87 grams. I could save at least 50 grams per wheel by using lightweight TPU inner tubes, but the frequent tire pressure top up is not worth the hassle in this case.

New Schwalbe butyl inner tubes, which is slightly lighter at 82 grams each. They are of the Presta valve type which is my whole objective of changing out the inner tubes.

With the front wheel done, I moved on to disassemble the rear wheel. This is where it gets more interesting, with the 4 speed external drivetrain to be studied in more detail.

Rear derailleur hanger is made of aluminium, and looks well designed and made.

Removing the rear wheel is tricky, as it involves sliding the rear hub axle rearwards, where it is being blocked by the rear mudguards.

4 steel sprockets of sizes 11-13-15-18T, and secured by a Sunrace lockring.

The 4 sprockets with spacers plus lockring weighs 81 grams.

There is a plastic spoke guard at the back of the largest sprocket, to prevent the chain from going into the spokes if the rear derailleur low limit is not set correctly.

There is a 2 mm cassette spacer behind the largest sprocket as well. Different from the usual 1.85 mm spacer found on some Shimano cassettes.

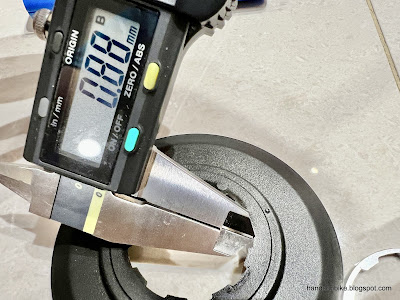
The plastic spoke guard itself has a thickness of about 0.9 mm. This means there is additional 2.9 mm of space behind the largest sprocket in stock condition.

Stock rear quick release axle weighs 35 grams. It is basically an extra long bolt with a nut at the end, so technically not quick release as an Allen Key is required.

Front wheel weighs 447 grams, about 50 grams more than the super lightweight Elosix front wheel.

Rear wheel with the short freehub body weighs 628 grams, about 70 grams more than the Elosix version with full length 11 speed freehub body.

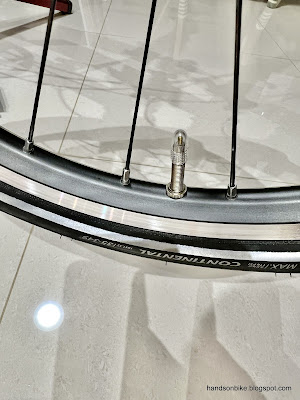
Finally, Presta valves on the Brompton P Line!

In conclusion, my verdict for the stock Brompton P Line wheelset is excellent. It is lightweight at 1075 grams for the front and rear wheels, and it is hard to go much lower than that. No point swapping out this wheelset unless you are looking for something different, like a flashy carbon wheelset (like what I did for the Birdy AXS).

I'm pretty sure the lower cost C Line uses a cheaper but heavier wheelset, but I can't be sure. Drop me a comment if you have more information on this!

Another small modification I did for the Brompton P Line was to change the chain ring bolts. As you may already know, for nearly all my other bikes (such as Birdy AXS 12 speed, Fnhon Ultegra Di2 12 speed, kids bike Bestrider Pump Pro 20), I used multi coloured chain ring bolts on the 4 or 5 arm cranksets, inspired by the Marvel Infinity Stones which come in 6 colours.

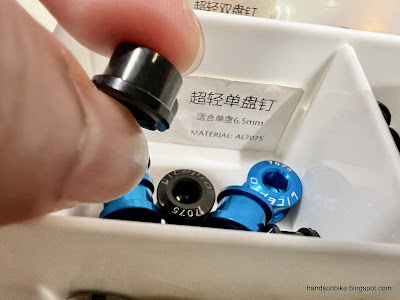
Stock steel chain ring bolt on the left is shorter than the usual 8.5 mm chain ring bolt (right) I use on my other bikes.

This means I need to use the shorter 6.5 mm chain ring bolts, but I don't have them in multiple colours.

Stock steel chain ring bolts (4x) weighs 18 grams. There is one hidden chain ring bolt at the back of the 5 arm crankset which I will not be swapping.

Due to the lack of shorter coloured 6.5 mm chain ring bolts, I used the longer 8.5mm coloured "bolt" for the front, and the shorter 6.5 mm "nut" for the back. Weighs 7 grams for a set of 4.

New coloured chain ring bolts installed! Only the 4 visible ones are changed, the hidden one behind the crank arm remains the same.

Picture of the Brompton P Line with the coloured chain ring bolts! Not obvious at first sight, unless you take a closer look.

Saturday, July 19, 2025

Brompton P Line: Hinge Springs and Protective Plates

Back to the annoying problem of the Brompton hinge clamps. On my previous Brompton M6R, the hinge clamps were upgraded to the Imperium Cycle type, where it works much better than the stock design. With the better design, the hinge clamps will always be aligned with the hinge even when you loosen it, avoiding the need to realign the clamps when tightening.

On the Brompton P Line, the hinge clamps have aluminium levers which are already nice. However, the hinge clamps still have the same problem of misalignment after loosening. This is unlike other folding bikes such as the Dahon, where the hinge clamps on the frame or handlepost are always aligned.

When the stock hinge clamps are loosened, they will not be aligned with the hinges any more. This requires realignment when tightening the clamps which is a bit more troublesome.

I have seen a very simple solution to this problem, which involves adding a little part to maintain the clamp's alignment even when loosened. I decided to give this a try since it is not expensive and also easy to install.

3D printed hinge springs! Made using a flexible material to provide a spring effect and also prevent cracking when compressed.

Super lightweight at just 2 grams.

Nice little innovation and note from the designers.

This hinge spring goes over the original bolt of the hinge clamps. The two "wings" keep the hinge clamp in the correct alignment even when they are no longer contacting the frame.

When the hinge clamps are tightened, the "wings" will bend and tuck itself away without causing any interference.

You can see the slim "wing" of the hinge springs hiding in the empty space under the hinge clamps. It does not take up additional space, nor affect the normal clamping function or force.

The squarish profile of the hinge springs ensure that it does not rotate when the hinge lever and bolt rotates.

I also came across a few small items to protect common contact points on the Brompton frame, and decided to try them out.

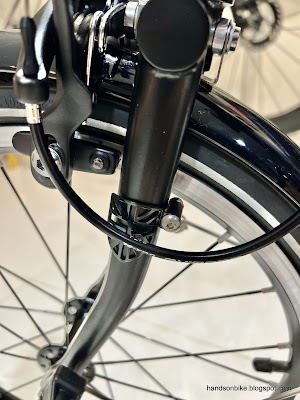
This little plate attaches to the left side of the front fork, preventing the front brake cable from rubbing against the paint.

Weighs 6 grams.

Another protective plate attaches to the underside of the bottom bracket, preventing the rear tire from rubbing against the frame when folded.

This plate is pasted onto the Brompton frame with double sided tape.

I like the ingenious design of the 3D printed hinge springs, which are so simple and yet so effective. Completely solves the hinge clamp misalignment issue without any compromises at all.

Brompton P Line: Monkii Bottle Cage and Quad Lock Mount

Some accessories to be added to the Brompton P Line! After showing the stock condition, and also the special features of the P Line, now it is time to add some accessories and bring the bike out for a ride.

I decided to keep the accessories to a minimum, which is why the dedicated accessories for the Brompton P Line is only the phone mount and the bottle cage.

The bottle cage is usually mounted on the vertical handlepost of the Brompton, for easy access while riding. However, a permanent bottle cage that is mounted here would affect the folded size. Therefore, I got the Monkii Cage bottle cage, which I first used a long time ago on the Dahon Boardwalk.

What's unique about the Monkii Cage system is that the bottle cage itself can be easily separated from the base, so as not to affect the folding.

Depending on the diameter of the handlepost, and whether it is straight or tapered, use the different spacers accordingly.

After a bit of trial and error, I found that the Brompton handlepost does not require the use of spacers. However, I also did not want to scratch the handlepost by clamping the Monkii Cage directly onto the painted surface. Therefore, I found some thin rubber shims to protect the handlepost.

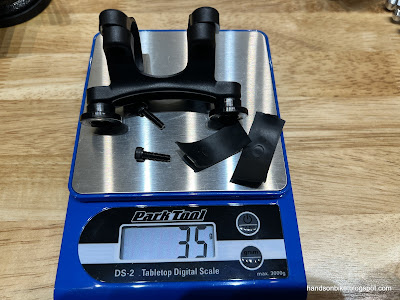
Weight of Monkii Cage mount, with thin rubber shims, is 35 grams. That is more than the weight of most bottle cages already...

This is the new version of the Monkii Cage, which is called Type V. The way it fits onto the mount is more secure than the original.

New cage design on the right, my old Monkii Cage on the left. From the front you can't really tell the difference.

Old cage on the left just slides straight into the mount. However, it can sometimes jump off on bumpy roads. The new Type V on the right requires some clever movement to prevent self-ejection.

New cage requires the cage to be slid into the top screw boss from the side first, before rotating and then sliding downwards onto the bottom screw boss. This ensure it will never slide off on its own.

Mounted onto the handlepost of the Brompton P Line! When folding the bike, I just slide the bottle cage off, and leave the mount on.

Other than mounting a bottle cage, I also needed to mount my phone onto the bike. As what I have done on all my other bikes, a Quad Lock mount will be used to attach the phone to the bike. I have used Quad Lock for many years since Samsung Galaxy S8, on the Java Freccia carbon mini velo. The Quad Lock design has never failed me and is 100% reliable.

The Brompton Quad Lock mount is a bit special, because it is not sold directly by Quad Lock. Rather, it can only be bought through Brompton retailers.

Collaboration between Brompton and Quad Lock to create this mount that is specifically designed for Brompton handlebars.

Made in UK, with Brompton logo. No surprise that it commands a Brompton premium as well.

Official Quad Lock mount for Brompton!

It's designed to make use of the dead space in between the M or H type handlebars.

Instructions are written in a recognizable Brompton style, if you have seen the Brompton manual before. Adjust the angle to avoid the Quad Lock mount sticking out when bike is folded.

Brompton Quad Lock mount weighs 55 grams.

Quad Lock mount installed! Very stable with two clamps on the handlebar.

Monkii Cage mounted on the handlepost, and Quad Lock mount on top.

When folded, it does not cause interference or take up additional space.

I'm happy with these two accessories, as they fit well and work well. These are pretty costly, but I think its worth the quality that I get.