Tuesday, March 24, 2015

Can I Install Tern Handlepost/Fork on Dahon Frame? Part 4: Installation

In the previous part of this project, I have completed the measurements and considerations for fitting a Tern handlepost and fork to my Dahon Boardwalk frame. The conclusion is that I will need to cut the steerer tube as it is too long for my Dahon Boardwalk frame.

Before cutting the steerer tube, it is important to calculate and measure how much to cut. The ideal length is when the steerer tube rests just below the top edge of the handlepost base. This will maximise the clamping length for best stiffness and strength.

The tricky thing about this modification is that the starnut is already in the steerer tube. As the starnut cannot be removed without damaging it, the only way to continue using the starnut is to push it further down into the steerer tube, before cutting the steerer tube to the required length.

Starnut comes pre-set in the steerer tube of the fork. Standard depth is about 10-15mm.

My plan is to cut about 12mm off the steerer tube, as shown by the marking here.

Marking on the inside to show the initial position of the starnut.

Special starnut setting tool by Park Tool. Used to set starnuts to a depth of 15mm.

As I needed to set the starnut even deeper than 15mm, I swapped out the pin at the end of the tool for a longer pin. This pin will not thread into the starnut, but will be inserted through the hole to help centre the tool on the starnut. Washers are also added to control the depth of the starnut during the hammering of the tool.

Washers are used to control the depth of the starnut, and also to ensure that the thread of the starnut is not damaged.

The gap between the tool and the steerer tube before pushing the starnut further in. Upon proper setting of the starnut, the tool will rest fully on the edge of the steerer tube.

Before hammering the tool, the fork is set on a sturdy workstand for proper support. This method prevents damage to the fork ends.

After pushing in the starnut. It has been pushed deeper by about 10mm.

Now that the starnut has been pushed down, away from the area that will be cut, it is now time to shorten the steerer tube. My preferred way of cutting a tube is to use a proper tube cutter as shown. This is the same tube cutter I used when I shortened the handlebar of my Avanti Inc 3.

To cut the steerer tube, tighten the cutting blade onto the marking (12mm) made earlier.

Turn the tool around the cutting line, and tighten the tool after every 1-2 turns. Eventually the cutting blade will cut through the thickness of the steerer tube.

After cutting, the steerer tube is now 12mm shorter than the original length of 140mm.

New crown race from the LitePro headset for the new Tern fork.

Installed the crown race onto the Tern fork. For more info on installing headset for Dahon/Tern bikes, click here.

Now that the Tern fork has been modified, it is ready to be installed onto the Dahon Boardwalk! Before that, I double checked the instruction manual that came with the Tern handlepost to make sure that I am installing the Tern handlepost and fork correctly.

Instruction manual for installing the Tern handlepost

Before installing the new Tern handlepost and fork, the old handlepost and fork first needs to be removed from the Dahon Boardwalk.

Amount of steerer tube that protrudes from the top of the headset.

From my measurement, the length of steerer tube that protrudes above the headset is about 36mm. This is 3 times more than the 12mm of steerer tube with a Dahon handlepost and fork! With this large increase in clamping length, the interface between the handlepost and the fork will be a lot stronger and stiffer.

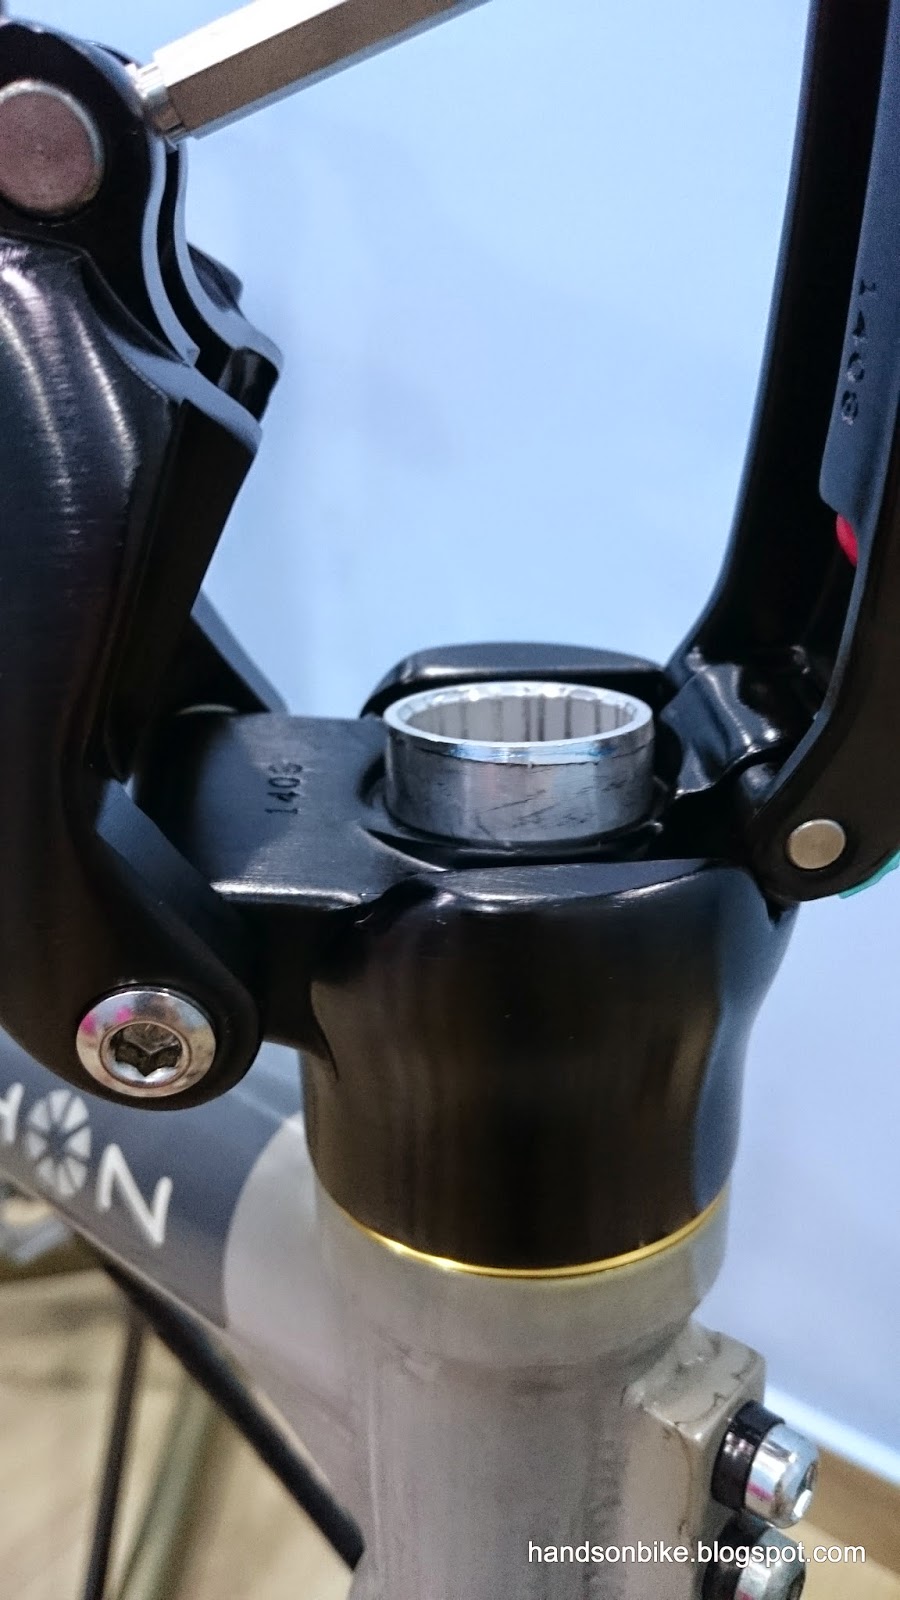
After installing the Tern handlepost on the Tern fork, this is how it looks. The steerer tube could have been about 1-2mm longer, but it does not matter too much.

Using the top cap to pre-load the headset bearings. The bolt of the top cap threads into the centre of the starnut in the steerer tube.

Two clamp bolts at the base of the handlepost tightens the handlepost securely to the steerer tube.

Tern handlepost and Tern fork installed onto the Dahon Boardwalk

In order to install the Controltech Stem, it needs to be slid on from one side of the drop bar. This means removing the bar tape, shifter and accessories from one side of the drop bar.

Installing the Controltech Stem onto the drop bar

As the stem and handlepost design is different from the previous Fnhon handlepost, the Di2 wires will need to be adjusted to account for the different length and location.

Controltech Stem installed onto the T-bar of the Tern handlepost. Note that the gap between the handlebar and the handlepost is very small!


Found a new place for the Di2 Digital Gear display! Also, the stem area is much neater with only 5 visible bolts, as compared to 10 previously.

With all the accessories mounted on the handlebar again

Finally, the Tern handlepost and fork have been installed successfully onto the Dahon Boardwalk. However, this project is not over yet. As I found out later on during test riding, there is some problem with the steering, which makes the bike quite difficult to ride.

In the final part (Part 5) of this project, I will reveal more details about the steering problem and describe how I finally managed to solve it. Also, I managed to find space to install a mount for the Shimano Sport Camera!

Part 5 is now up! Click here to continue reading.

Friday, March 20, 2015

Can I Install Tern Handlepost/Fork on Dahon Frame? Part 3: Considerations

Continuing on from Part 2 of the series, "Can I Install Tern Handlepost/Fork on Dahon Frame?", this is the third part of the series. In this post, I will be checking for the compatibility of the new Tern handlepost and fork with the Dahon Boardwalk frame.

In Part 2, I compared the Tern and Dahon/Fnhon handleposts side by side, and the differences have already been highlighted. The same comparison was also done for the Dahon fork and new Tern fork.

In summary, the critical differences between these components are:
1) Tern fork has a longer steerer tube than the Dahon fork, as the Tern handlepost requires a longer steerer tube to clamp onto.
2) Tern fork uses a starnut for pre-loading the headset bearings, different from the threaded compression bolt used on the Dahon fork.
3) Tern handlepost has an integrated headset Upper Cover shape at the bottom of the handlepost, which eliminates the need for the headset Upper Cover.

Based on these observations, the items which I needed to check and confirm in response to these findings were:
1) Is the Tern fork steerer tube long enough for the Tern handlepost, or is it too short?
2) With a starnut system, is the installation method different or still the same?
3) How will the whole headset and handlepost assembly look like without the use of the headset Upper Cover? Will the base of the Tern handlepost be compatible with my current headset and Dahon Boardwalk frame?

I started by studying the assembly of the headset and the Upper Cover. This was done using a spare LitePro headset that I had.

From left to right: Upper Cover, compression ring, headset bearing inside the bearing cup. The lower headset assembly is not shown.

If assembled without the Upper Cover, the headset assembly would look like the stack on the right.

When the Upper Cover is placed on the compression ring, it provides a flat platform for the base of the handlepost to rest on. There would be a small gap between the bottom edge of the Upper Cover and the bearing cup to allow for movement during steering.

If the Tern handlepost is to be installed, the Upper Cover will no longer be needed. This is because the base of the Tern handlepost will also fulfill the role of the Upper Cap, which is to press onto the compression ring. In other words, the Tern handlepost will rest directly on the headset compression ring.

Comparing the bottom profile of the headset Upper Cover with the base of the Tern handlepost. They look quite similar! 

When the base of the handlepost is placed on the compression ring, there should be a small gap between the handlepost and the bearing cup. There is a very small gap here, not sure if it is sufficient for smooth rotation.

It seems that the Tern handlepost can be installed onto the LitePro headset, although it can only be confirmed upon actual installation. Note that I had to remove the rubber seal at the bottom of the handlepost as it was rubbing against the headset bearing cup.

Next, I checked the height of the headtube for the Dahon frames, as the headtube height directly affects the length of the steerer tube that protrudes above the headset. If the headtube is tall, there would be less steerer tube sticking out from the top of the headset.

Dahon Boardwalk frame with a headtube height of 89mm.

Dahon Vitesse frame with a headtube height of 89mm. Similar frame design as the Boardwalk and Speed frames.

Dahon MuEX frame with a headtube length of 101mm. This is 12mm taller than the Boardwalk/Speed/Vitesse frames.

After measurement, I found that the Mu frame has a taller headtube than the Boardwalk/Speed/Vitesse frames. This extra height is 12mm, which corresponds to the different steerer tube lengths. As stated earlier, the Mu fork has a steerer tube that is 123mm long, while the Boardwalk/Speed/Vitesse fork has a steerer tube length of 111mm. This difference in steerer tube length is solely due to the difference in headtube height.

Other than the headtube height, the clamping height of the handlepost base is also important. This is directly related to the length that the handlepost wraps around the steerer tube. By logic, a taller clamping length should give a stiffer and stronger interface between the fork and handlepost.

Dahon/Fnhon handleposts have a base thickness of around 26mm. This is not exact as the base is sloped.

However, upon actual measurement, the clamping height of the Dahon/Fnhon handlepost is only 12mm.

The Tern Physis handlepost has a base thickness of 53mm, twice as much as the Dahon/Fnhon handlepost. This means that the clamping height of the Tern handlepost is likely to be twice as much as a Dahon/Fnhon handlepost.

As you can see from the base thickness, the Tern Physis handlepost has a much thicker base, which requires a longer steerer tube to clamp onto. This is one of the factors that will give greater stiffness over the Dahon/Fnhon handlepost and fork design.

Next step is to find out the length of the headtube that is normally required to install the Tern handlepost and Tern fork. This is done by inserting the handlepost onto the fork, and aligning them such that the handlepost base is at the optimal clamping height.

When the Tern handlepost is at the optimal clamping height on the steerer tube, the headtube length required is 101mm. This is 12mm too long, as the Dahon Boardwalk headtube length is only 89mm.

This is how it should look like if the headtube length is 101mm long. The end of the steerer tube should rest just below the circular surface for the top cap.

From this, we can conclude that the steerer tube for the Tern fork is too long for my Dahon Boardwalk headtube. Before we go any further, let us just try out the Tern fork and Tern handlepost in the Dahon Boardwalk frame.

Tern fork in the Dahon Boardwalk frame, without the headset Upper Cap. The Upper Cap is not installed as the Tern handlepost does not need the Upper Cap.

The exposed steerer tube length is far too long at 49mm! I will need to cut away the steerer tube to shorten it for this frame.

With the Tern handlepost installed onto the Tern fork. As you can see, the steerer tube is too long as it protrudes quite a bit above the base of the handlepost.

The extra length of the steerer tube is measured to be about 9mm. To be safe, I will cut away about 12mm of the steerer tube, so that the steerer tube is just below the top edge of the handlepost base.

By now, it is quite clear that the Tern fork steerer tube is too long for my Dahon Boardwalk frame. It will be necessary to cut short the steerer tube to ensure that it is compatible with the Tern handlepost. From the calculations and measurements shown above, cutting away 12mm seems to be about the right amount.

***
As a side note, you may have noticed that from the measurements above, the ideal headtube height to suit the Tern fork and Tern handlepost is 101mm. This is exactly the headtube height on the Dahon MuEX frame!

In other words, if I wanted to install a Tern fork and Tern handlepost on a Dahon Mu frame, it would go on perfectly without needing to cut the steerer tube! This is something worth considering for those who has a Dahon Mu frame, and want to install a Tern handlepost.
***

Now that all the considerations and measurements have been done, the next step would be to do the actual modifications required. The main task would be to cut the steerer tube, but it is not so straightforward as the starnut is still in the way.

In the next part of this series, I will show how I did the modifications and installation of the Tern handlepost and Tern fork onto the Dahon Boardwalk.

Part 4 is now up! Click here to continue reading.

Saturday, March 14, 2015

Can I Install Tern Handlepost/Fork on Dahon Frame? Part 2: Comparison

In the first part of this series, I introduced the Tern handlepost and fork, and I plan to install them on my Dahon Boardwalk. However, some of the dimensions and designs are different, and so fitting the Tern parts on the Dahon bike is unlikely to be so straightforward.

Before we proceed further to installation, it is important to compare the Dahon/Fnhon and Tern parts, so that we can determine the feasibility and possibility of this upgrade. The best way would be to do a one to one comparison, and take note of the differences. Once the differences are known, it would be much easier to figure out how to make the parts fit each other.

Let's start with the fork. As introduced in the previous post, the general construction of the fork is the same, however there are some key differences which affects the function and compatibility.

Weight:
To make an accurate weight comparison, we will need to include the weight of the compression bolt (Dahon) or the weight of the top cap (Tern), as it is an integral part of the fork.

Weight of Tern fork plus top cap is 454 grams.

The weight of the Dahon fork plus compression bolt is about 488 grams, as referenced from the fork used during the building of the Mu Ex bike. The weight of the compression bolt alone is 48 grams.

However, do note that the fork for the Mu Ex bike has a steerer tube length of 123mm, as compared to the 111mm for the Dahon Boardwalk. This means that the actual weight of the Dahon fork on the Dahon Boardwalk will be a bit less than 488 grams.


Compression Design:
This is where there is a big difference between the Tern and Dahon fork, although the function is the same. The purpose of this compression function is to preload the headset bearings and to remove any play between the headset parts.

The Dahon fork uses a threaded compression bolt, which screws into the steerer tube that is threaded internally. This means a special compression bolt is required, while the steerer tube also needs to be threaded. Although it works well, it probably means a higher production cost and heavier weight.

Dahon fork's steerer tube is threaded internally, for the compression bolt to tighten into

As for the Tern fork, it uses a more traditional starnut design plus top cap for preloading the headset bearings. This starnut is inserted into the steerer tube, and it is a one way fit which means that it will not come out the same way. This is a lighter weight design, and also means that there is no need for a special compression bolt and a threaded steerer tube. Lower production cost and lower weight, but not sure what is the downside.

Tern fork steerer tube with a pre-inserted starnut

Any standard top cap with bolt can be used to preload the headset bearings


Steerer Tube Length:
This is the most important difference, which is the reason why I needed the Tern fork in the first place. The Tern handlepost requires a longer steerer tube to clamp onto, which is why the Dahon fork is not compatible with the Tern handlepost.

Dahon forks comes with 2 different steerer tube lengths. The 111mm version is for Boardwalk/Speed/Vitesse frames, while the 123mm version is for Mu frames. This is due to the taller head tube on Mu frames.

Dahon fork steerer tube length on the Dahon Boardwalk. 109.5mm, slightly short of the nominal 111mm.

Tern fork steerer tube length of 140mm, much longer than the Dahon fork.

Comparing the steerer tube lengths side by side


Position of Brake Mounts and Magnetix Mount:
Lastly, there are some differences in brake mountings and Magnetix mountings between the Dahon and Tern fork. Due to the different folding method used, the V brake mountings and Magnetix mountings are the total opposite between the Dahon and Tern fork.

Dahon fork has the V brake mountings facing the front, while the Tern fork has the V brake mountings facing the rear.

The Dahon fork has the Magnetix mount on the left side of the fork, while the Tern fork has the mount on the right side. This will affect the folding of the bike.

Now, let us compare the Dahon handlepost with the Tern handlepost. There are many differences here, and some of them contribute to the added strength and stiffness of the Tern handlepost. Let's find out what they are!

Weight:
The Tern handlepost is quite a lot heavier than the Fnhon handlepost. This is mainly due to the more chunky construction at the joint area and the T-bar at the top. Hopefully the added stiffness is worth the additional weight!

Fnhon 4 bolt handlepost, weighing only 511 grams.

Tern Physis handlepost, 12 degrees tilt angle and 290mm long. Weighs 200 grams more than the Fnhon handlepost, at 710 grams.


Manufacturing Process:
The Fnhon handlepost is made up of a few pieces welded together, which means that weld lines can be seen at the joints. This does not affect the function, although it may not look so nice.

The Tern handlepost is 3D forged into one piece and thus there are no weld lines to be seen. This makes the handlepost look better and is also stronger.

Fnhon handlepost with welding joints at the top and bottom of the handlepost

Tern handlepost with no weld lines to be seen. Nice smooth shapes along the handlepost.


Bottom Design and Clamp Design:
The bottom of the handlepost is quite different between Tern and Dahon/Fnhon. For Dahon/Fnhon handleposts, the bottom of the handlepost is flat, and it rests on the Upper Cover of the headset.

On the other hand, the bottom of the Tern handlepost is specially designed, such that it mimics the shape of the headset Upper Cover. This means that the headset Upper Cover is integrated with the base of the Tern handlepost, eliminating the need for a separate part.

Another difference is the side clamp bolts at the base of the handlepost. Dahon/Fnhon handleposts have one clamp bolt to secure the handlepost to the steerer tube, while the Tern handlepost has two. Two clamp bolts should be more secure and stiffer than one. Also, the two clamp bolt design is more similar to traditional stem designs with two side clamp bolts.

Flat bottom of the Dahon/Fnhon handlepost

Standard design of Dahon/Fnhon handlepost. Compression bolt, single clamp bolt and headset Upper Cover (shown in gold colour).

Tern handlepost with a specially shaped bottom. A rubber seal is also included. Two side clamp bolts to tighten the handlepost to the steerer tube.


Locking Lever Design:
The Dahon locking lever design is really well designed and looks very integrated with the handlepost. With an internal clamping design, the locking mechanism is the most low profile and compact that I have seen across all folding bikes.

Fnhon locking lever design which follows the Dahon design. However, it uses the old type of black sliding clip as an additional safety catch.

Internal clamp mechanism of the Fnhon handlepost. Simple and works well. Best of all, it is hidden inside the handlepost.

The Tern handlepost actually uses an older Dahon locking lever design, with an external over-centre locking type of design. It is more bulky, but it can be easier to adjust and can potentially be stronger if designed well.

Old locking lever design on the Dahon Eco 2 handlepost. Same concept as the Tern locking lever design.

Tern handlepost locking lever with the mechanism all on the outside of the handlepost.


Length of Handlepost:
The length of the handlepost is important as it determines the riding position. One of the main reason I wanted to get the Tern handlepost is because it is short enough for my requirement. However, in order to get an accurate handlebar height, it is necessary to include the stem in the height measurement, as the type and length of stem will affect the overall length/height.

I also realised that for the Fnhon handlepost, I also needed to add the thickness of the headset Upper Cap as it adds to the overall height. This Upper Cap is already integrated with the Tern handlepost.

The Fnhon handlepost uses a 31.8mm stem on top, which adds to the overall height. Same for the Tern handlepost with the new Controltech Stem.

Fnhon handlepost plus 31.8mm stem, with a total height of about 340mm. Note that I included the gold Upper Cap at the bottom as it is part of the total height too.

Tern handlepost with the Controtech Stem, with a total height of about 330mm.

Comparing the two setups side by side. The base of the Tern handlepost can be seen to be much chunkier.

As measured earlier, the overall height of the Tern setup will put the handlebar about 10mm lower than the current Fnhon setup.


Width of Stem:
Lastly, the different stems used on the handleposts will affect the space available on the handlebar. This is due to the different clamp widths of the different stems.

Fnhon handlepost with the old stem has an internal width of about 41mm.

Fnhon handlepost with the old stem has an outside width of about 63mm. Clamp width is about 10mm each.

Tern handlepost with Controltech Stem has an internal width of about 55mm. More clearance between the stem clamps.

Tern handlepost with Controltech Stem has an outside width of about 88mm. This is much wider than the previous setup, which means less space at the sides for other accessories. Clamp width is about 16mm each.

With that, the comparison is complete! We now have a clear picture of the differences between the Fnhon and Tern parts. With this information, we can start to consider the effects and modifications required to fit the Tern handlepost to the Dahon Boardwalk frame. This is the ultimate target which I want to achieve.

In the next part of this series (Part 3), I will write about the considerations required for this project to continue.

Part 3 is  now up! Click here to continue reading.