Tuesday, February 21, 2012

Accessories for the Flamingo London NX7

 The Flamingo London NX7 with the saddle bag from my Dahon Boardwalk

One way of categorizing cyclists is by the number of accessories they put on their bike. Some are the minimalistic type, where they try not to put anything on their bikes. At the very most, they will put a teeny-weeny front blinker and a rear blinker. Maybe a bottle cage, but that is all.

On the other hand, there are some people who load their bikes with all sorts of accessories! I call this bringing out the full battle gear. Powerful front lights X 2, rear lights X 2, bottle cages + bottles x 2, saddle bag, fenders, kickstand, rack, panniers, bell, portable speaker, handlebar bag, pump, etc. These cyclists like to have everything with them, so that they are prepared for all conditions! Some people come to mind immediately, such as Vince and Eddie? Haha...

My Dahon Boardwalk in full battle gear!

The same bike with much lesser accessories

As for me, I am more of the full battle gear type for my Dahon Boardwalk X20-R! Although this is a fast bike, I like to have accessories that allow me to do some light touring and also bring stuff along while commuting. Which is why I have a rack and panniers, fenders to protect myself from wet ground, multiple front and rear lights for safety, and multiple bottle cages. I try to make all these accessories easily detachable, so that I can remove them when I am not using them to save some weight and space. Except for the fenders and rack, practically all other accessories can be removed easily without tools!

Finally I'm getting to the main point of this blog post. I was thinking of how I will go about outfitting my new Flamingo London NX7 with accessories. Should I go minimalistic or full battle gear? After some thinking, I realised that I will not need full battle gear for the Flamingo as I do not intend to do long rides with it. On the other hand, going minimalistic will leave it vulnerable to mechanical malfunctions such as flat tires, and I will not be able to carry along my valuables with me on the bike.

Therefore, I settled for something in between, with the bare minimum accessories required to be self sufficient. Even if you have a folding bike, if you suffer a flat tire in the middle of Changi Coastal Road, you will find yourself stranded for a long time.

Front light with a small profile. Will wrap this around the handlepost, does not affect folding.

4 bright white LEDs, powered by 2xAAA batteries. Which is good, because I can use rechargeable batteries.

 Very bright 0.5W SMART rear light, also uses 2xAAA batteries.

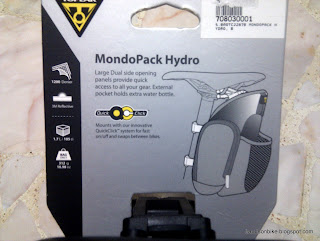
The key accessory: Topeak MondoPack Hydro saddle bag that can carry all my necessities!

 Big and spacious, and perfect for a folding bike such as the Brompton or the Flamingo
Initially I thought of sharing the saddle bag with my Dahon Boardwalk, but I soon found it to be impractical as one bike might be at my workplace, while I want to ride the bike when I'm home. It is difficult to track and remember to bring the saddle bag along with me, which I why I ended up getting a saddle bag and separate  set of accessories for each bike.

There are many reasons why I got this saddle bag. First, it makes use of the tall space underneath the tall seatposts. Only bikes with a tall section of exposed seatpost can use this saddle bag. Also, it has a mesh pocket that allows me to put a bottle. Much better than trying to fix a bottle cage elsewhere on the Flamingo. Lastly, it has 2 loops of velcro that goes around the seatpost when you ride. When you want to fold the bike fully, just open up the 2 velcro loops and you can slide the seatpost all the way down! It's practically made for this type of folding bikes.

 The large saddle bag fits at the space underneath the saddle when folded. Does not stick out too much

Topeak RaceRocket hand pump, small but powerful with a hidden hose. Comes in gold too! 

Topeak Mini 9 Pro multi-tool. Yes it also comes in gold colour...

A detailed review and closeup pictures of the Topeak RaceRocket pump and the Topeak Mini 9 Pro tool will be up once I have time to do the writeup.

All these accessories to go along with the Flamingo! 

All the accessories fit nicely inside the huge Topeak MondoPack Hydro. 

The spare tube tucks into the space at the top of the compartment, the rest of the tools can fit inside the large compartment. Rear light and bottle can also be put on! Plenty of space left for my wallet and mobile phone.

Gold coloured copper bell, gives a very nice ring, sounds a bit like my microwave!

My Flamingo London NX7 with the accessories! Does not affect the folding at all.

Sunday, February 19, 2012

Preparation for NTU Bike Rally 2012

The 2012 edition of the NTU Bike Rally is taking place soon, in less than 1 week's time! If you have not trained, I'm afraid its too late, haha. For me, I will be taking a break from cycling this week, to ensure that I will be at 100% condition for the bike rally on 26 Feb 2012.

Besides being ready physically, preparing your bike and supplies for the ride is also very important. Although there will be rest stops along the way with water, bananas, bread and other foodstuffs, it may not be sufficient to keep you going all the way. If you arrive late at the rest points, there may be a shortage of supplies! You must bring some supplies yourself and not be too reliant on the rest points for sustenance.

Before the bike rally, do give your bike a thorough checkup to ensure that it will be working well during the ride. Other than the usual bike maintenance like lubing the chain, tuning the gears and pumping the tires, there are some other aspects which you may want to consider for a long ride.

Non-routine Bike Maintenance Tips:
  • Tighten all bolts and screws. You don't want your fenders or rack dropping off if a screw is loose.
  • Check your frame latches (handlepost, frame, etc) if you are riding a folding bike.
  • Check your cables and change them if they are fraying.
  • Charge/Replace your lights' batteries.
  • Replace your speedometer batteries. You want to know how far you have cycled, don't you?
  • Check your brake pads and make sure there is still plenty of brake pad left
  • Ensure that your cranks are tightened (yes we have had cranks drop off before!)
  • Inspect the entire chain to make sure there are no loose links
 
Tools and Spares:
  • Spare tubes
  • Pump
  • Tire levers
  • Chain Tool
  • Multi-tool
  • Adjustable wrench
  • Spare bolts/screws for water bottle cage/fenders/rack
  • SRAM Powerlink/KMC Missing Link for 9/10 speed chains
  • Cable ties
  • Tape
Some of the tools and spares that I will be bringing!

Accessories:
  • Additional bottle cage on handlepost. Can drink while cycling.
  • Colourful rear lights for easy identification by other riders
  • Arm sleeves
  • Leg sleeves
  • Bike Peddler Take-A-Look Mirror
  • Deep Heat muscle rub. Very important!
  • Sun block to prevent getting BBQ-ed
  • Clip-on sunglasses to provide some shade from the sun
  • Wet tissues for a refreshing wipe
  • Money for lunch or drinks along the way
 Additional bottle cage, for drinking while cycling

Some protection from the sun and other neccesities


Food and Drinks (2 person's worth):
  • H-Two-O isotonic drinks x 3 bottles
  • Pocari Sweat powder satchets
  • Berry Bliss gummy sweets
  • Raisins for extra energy
  • Shotz energy gels x ???
 Some of the food and drinks for the bike rally

For food, you can bring anything you like. If you like chocolate, some KitKat will do, although it may melt in the sun. I tried some muesli bar last year, but it wasn't very palatable as it was too dry and this made it hard to eat properly. If you are not in a hurry, you can stop for lunch at suitable places along the way.

The Pocari Sweat powder packets will be very useful as you will not need to carry around bottles of drinks. At the rest points, just get a bottle of mineral water from the drinks station. Pour both the mineral water and the powder into your bottle and you are ready to go! I will not be taking any carbonated drinks this time, after suffering leg cramps as early as 40 km last year, from drinking the 37 Degrees carbonated isotonic drinks.

Remember to carbo load 1 to 2 days before the bike rally, you will need all the energy you can get! For the veteran cyclists, no need to worry. However, for those who are going for the bike rally for the first time, or if you are attempting this distance for the first time, you will need all the support and preparation you can get! Do prepare your supplies early and get lots of rest this coming week.

See you at the NTU Bike Rally 2012!

Wednesday, February 15, 2012

Bike Peddler Take-A-Look Mirror Review

Just a short review on the Bike Peddler Take-A-Look Mirror. I have used it for about 3 weeks, and I have found it very useful!

Nice retro style of packaging

Mirror with 3 attachment points (shown in black) for a very secure fit

The mirror can attach to your spectacles or to your helmet, depending on your preference. Most likely, you will need to have a helmet visor for you to fit the mirror onto your helmet. For me, I prefer to fit it on my spectacles frame.

I was surprised by the lightweight mirror, made of good quality metal parts. The 3 black rubber pieces grab onto your spectacles tightly, very unlikely to ever come off on its own.

Mirror on my spectacles

The mirror is highly adjustable, with 3 axes of rotation possible. This means that you can set the angle of the mirror to precisely what you want. Just clip it on the spectacles frame and adjust the angle on the go.

Close up view of the attachment

Even though the mirror may seem small, it is actually good enough because it is quite near to your eyes. The image it gives is very sharp and clear.

From my point of view! Seen in the mirror is my mobile bike tools cabinet. Very sharp and bright image.

Adjusting the mirror is easy, it is just like adjusting your side mirror on your car! A small difference in angle can make a big difference in the view.

I find the mirror very useful when you cycle on the roads.It is like giving you a third eye that looks backwards and tells you the situation behind you. At first, you will not be used to the mirror, it is like something distracting you at the corner of your sight. However, I found a way to use it easily.

For me, I will close my left eye, and my right eye automatically focuses on the mirror, giving a very clear picture of what is going on behind you. Of course, you should not look in the mirror for too long, perhaps 2-3 secs at max. In any case, this is much easier and safer than turning your head around to look behind.

Normally, your body will block your view of what is directly behind you. To work around this, just turn your head slightly to your right and you will be able to see directly behind you.

Here are some examples of situations where I feel that the mirror came in very useful:

1) You are cycling on the left lane, when you hear a large truck/trailer/bus coming up behind you.
It is likely that you will feel nervous as you are not sure if the vehicle is going to zoom past very close to you or not. With the mirror, you can take a quick glance and see if the vehicle is directly behind you or actually on the next lane.

2) When making a right turn, you need to turn your head frequently to check that the lanes are clear before filtering over to the right lane.
With the mirror, just keep cycling on the left lane, and glance back often to check that the lanes are clear. This is much easier than turning your head back. When the coast is clear, double check by turning your head to see, then filter across.

3) When leading a group, you find yourself looking back often to ensure that everyone is still in the group.
Just use the mirror to glance back, you can even see who is directly behind you without turning your head to look back. Very useful!

4) Sometimes, you want to cycle side by side with your friends, but it is not safe to do so if there is traffic.
Use the mirror to check behind you. It is usually fine to cycle side by side as long as there is no vehicle in sight behind you. An example would be International Road or Tuas roads at night. Even if there is, you can spot them very early as you have your mirror to help you.

For me, the only downside to the mirror is that it sometimes causes the spectacles to tilt down on the side where the mirror is attached. Even though it is lightweight, it is still heavier compared to the other side of the spectacles which has no mirror. Can be solved by putting a small counterweight on the other side of the spectacles frame.

This product is highly recommended, especially for cyclists who do not have an existing mirror on the bike. Once you have this mirror, you will understand how useful it is!

Sunday, February 12, 2012

Converting a Vitesse P9 to a Vitesse P18-TT

In today's blog post, I will show you how to do some serious upgrades to your Dahon! Sometimes, you just cannot find your ideal bike off the shelf. Which is why there are custom bike services, and the first that comes to my mind is a be-spoked Brompton. You get to choose exactly what accessories go onto your bike, what frame material, what colour and etc. It is good because you get everything you want and nothing you don't want. However, the component selection for a custom bike is usually pretty limited, you can't really choose exactly what components you want, unless you pay more or change it afterwards. Which is why people upgrade their bikes and change components, because they can choose exactly what they want.

As previously discussed, bullhorn bars are known for their comfortable grip positions. However, there are not many folding bikes out there with a bullhorn bar. How many can you think of? Other than the Dahon Speed Pro TT/ Vector X27 or the Tern Verge X30, the other one I can think of is the KHS F20-R. There are probably only a few others out there. Today's highlight will be converting a Vitesse P9 to a Vitesse P18-TT!

The Vitesse P9, previously upgraded from a stock Vitesse D7. About to undergo another transformation to a Vitesse P18-TT

Before upgrading the components, the bike was disassembled and fully cleaned

Bike frame after waxing with Hi Glaze 88. Clean and shiny!

First new component to go on. Ultegra 6700 Hollowtech II BB

Same 9 speed 12-28T custom SRAM cassette. After cleaning it looks brand new! Installed on the excellent PZ Racing wheelset.

New rear derailleur! Shimano 105 5600 RD, which was previously on my Boardwalk.

Shimano 105 5600 crankset, also from my Boardwalk. Major improvement from the stock D7 crankset!

One major issue I encountered with the new drivetrain was that the chainline was not ideal. Also, I was using a 9 speed chain on the 10 speed crankset. Because of this, it meant that in the small chainring and small sprocket combination, the chain will rub on the inside of the large chainring, where the ramps and spikes will catch the chain and make it shift onto the large chainring. It was not just a little chain rubbing, it was more serious as it tends to cause the front gear to shift on its own.

Although this cross-chain gear combination is not recommended, it will be prudent to make sure that even if this condition happens, it will not cause a big problem for the cyclist. To solve this, I added some spacers under the right-hand BB cup, in order to move the crankset further out. This is unusual as road cranksets usually do not need spacers. These spacers increased the chainline by about 1.5mm, which is the maximum that is possible. Any thicker and it will cause the axle protrusion on the left side to be too short to fasten on the left side crank.

The right side BB cup with a few spacers to increase the chainline

After doing this modification, the chain rubbing problem still cannot be completely solved, but at least it is not so bad. To avoid this problem, when the small chainring is being used, the 2 smallest sprockets at the rear must be avoided.

Another major modification is the addition of a front derailleur! A LitePro FD adaptor is first used to provide a mount for the FD.

Shimano Tiagra 4500 Front Derailleur for double cranksets

The drivetrain installed on the Vitesse


Bar end extensions for the bullhorn. Extends the "horn" by 20mm. Provides a firmer grip when holding the ends of the bullhorn bar!

 
Close up shot. Fits nicely into any handlebar.

Road shifters fitted onto the bullhorn. Also from my previous Boardwalk TT

Still can plug in your bar ends as the extension is hollow


 Some clear polyurethane patches to protect the frame from cable rub. Very thin but tough.

Inline barrel adjusters for adjusting the cable tension. Not so important for the rear shifter, but essential for the front shifter.

 Interrupter brake levers

Bullhorn bars mounted on the bike, cables all done up. Got to make sure there is enough slack for steering and folding the bike.

Top down view of the handlebars
 

Innovative front cable routing for the front brakes. 

Instead of putting the Travel Agent on the brake calipers itself, I used a flexible brake noodle so that I can put the Travel Agent elsewhere. This allows the front brake cable to be routed under the frame and behind the fork, just like the stock front brake cable routing. The main reason for this arrangement is so that the handlebar can be steered to the left without the Travel Agent hitting the bottle cage in front! Another reason is to avoid stretching the front cable when folding down the handlebar.

Neat cable arrangement for the front brakes

Travel Agent mounted the usual way on the rear brakes

Clear patches placed at strategic locations to protect the paint!

 Cable routing for the rear brakes
 
Front system all done up

Rear system all done up!

Mounting the bottle cage on the front, using the holes on the front of the frame

Not a routine fix! Some extra metal plates (from Daiso) and bolts required

Water bottle mount from a Minoura bottle cage required for this mod

Silicone strap to keep the bottle in place on bumpy terrain. Adjustable bottle cage to fit bottles of any diameter

Taking the Vitesse P18-TT out for a test ride! Feels super shiok especially when sprinting with the bullhorn bars

After wrapping the bar tape!

 Ready to chiong!

 
View from the left

View from the right!

The Vitesse P18-TT is ready to roll! With 18 speeds and a comfortable bullhorn bar, this bike can do more than just leisure rides! It was not an easy upgrade as there were a few issues with the chainline and the cable routing. Luckily I had the experience gained from the previous upgrade to my Boardwalk TT to help me, which enabled me to foresee certain problems and solve them, and improve on certain aspects such as the front brake cable routing.