Wednesday, October 19, 2011

Journey of the Boardwalk: Part 14 - Caliper Brakes for Boardwalk TT

There are many Dahon bikes, but how many Dahon bikes come with road shifters/brake levers and caliper brakes? Other than the Speed Pro TT and the new 2011 Dash X20, no other Dahon folding bike comes equipped with these road components.

Because of this, the Speed Pro TT can be truly called a road bike, since it has Shimano Tiagra ST-4500 road shifters and bullhorn handlebars. As for the brakes, it has been changed every year since 2008.

In 2008, the Speed Pro TT came with long reach caliper brakes. For 2009, it came with V brakes and NO Travel Agent, which caused the braking performance to be really poor. As for the 2010 version, it was V brakes but at least it came with the Travel Agent, which allows compatibility between the road shifter/brake levers and the V brakes. Currently, the 2011 version is called the Vector X27, which has V brakes with the Travel Agents.
 
2008 Speed Pro TT, comes with long reach caliper brakes. Chromoly Steel frame.


2009 Speed Pro TT, comes with V brakes and NO Travel Agent. Aluminium Frame.

2010 Speed Pro TT, comes with V brakes and Travel Agents. Aluminium Frame.


2011 Vector X27, comes with V brakes and Travel Agents. Hydroformed Aluminium Frame.

At this point, if you are wondering what are Travel Agents, you can check out my previous post showing the transformation of my Boardwalk to the Boardwalk TT.

Travel Agent as seen on the 2010 Speed Pro TT.

However, these Travel Agents are not ideal for braking performance, as it introduces a lot of friction and thus efficiency losses into the brake system. The are many points of contact between the moving brake cable and the Travel Agent, and the rubbing can be easily felt through the brake levers. Also, because the brake cable is bent around such a small radius, it tends to want to unravel itself and again causes a lot of resistance when applying the brakes. Lastly, the geometry of the bullhorn bars, together with the long frame of the folding bike plus the wrapping of the brake cable around the Travel Agent means that even with the full length of the brake cable, it is only barely long enough to reach the rear brakes.

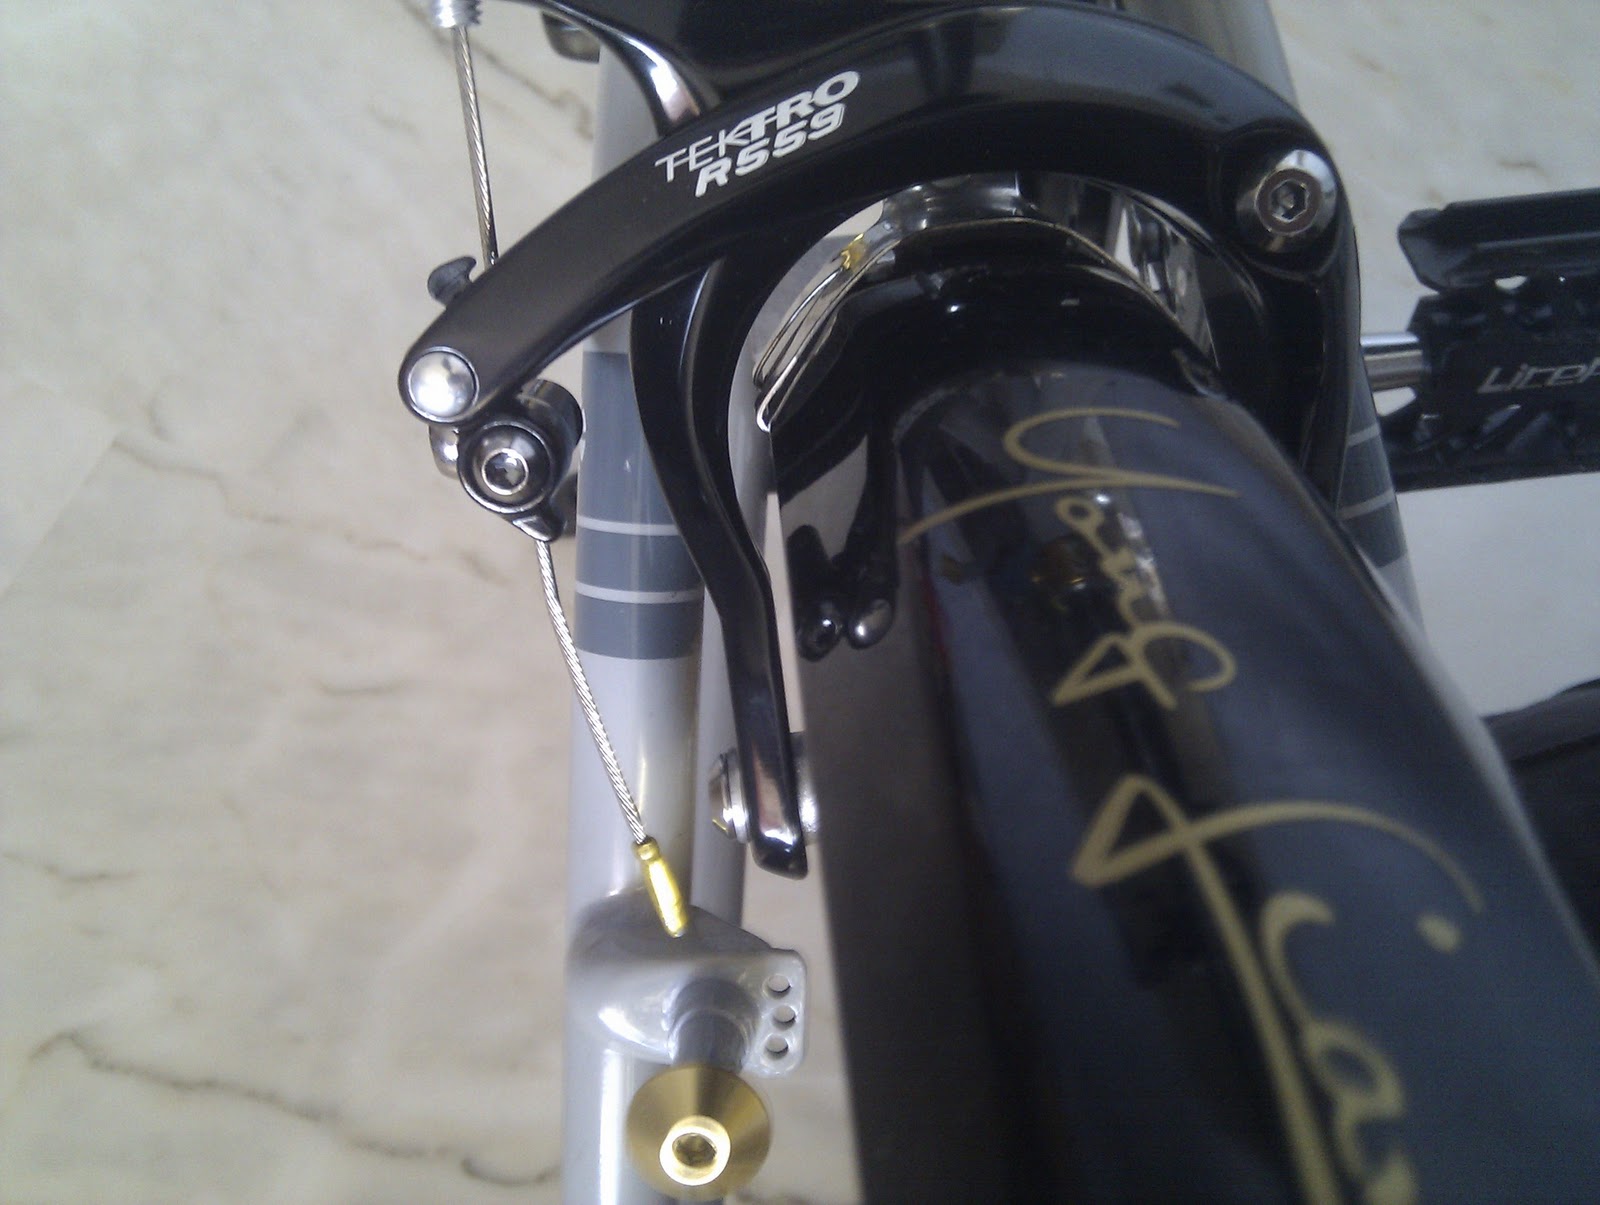
Due to all these issues, I decided to try to find long reach caliper brakes, which can be mounted on the holes for the fender bolts and reach all the way down to the rim. After some searching, I came across some caliper brakes that are actually meant for trekking/comfort bikes, which means large and fat tires with fenders installed. These caliper brakes are able to reach up to 74mm (measured from mounting bolt to rim), compared to the normal reach of about 50mm.

Extra Long Reach Tektro R559 brake calipers. Comes in black or silver.

Compare the distance and the arch width between the Long Reach Tektro brakes (Nutted)
and the normal reach Ultegra brakes (Recessed).


Also, it is necessary to get the nutted version, which has a bolt and an external nut to fix the caliper brake onto the frame. The recessed version can only be used on certain frames, not Dahon frames. To learn more about these two different mounting methods, read the Sheldon Brown website here.

Installing the brakes was rather straightforward. For me, it was the first time I was installing caliper brakes, thus it was quite tricky to get the alignment correct. By the way, I changed to Kool Stop All-Weather brake pads, not even bothering to try the stock brake pads!

 
 Good clearance between brakes and fender! Clearance is maintained even when brakes are applied.

At the maximum reach, it is just long enough to reach the rims.
 
 Black caliper brakes to go with my black fork!


 Rear caliper brakes fit well too!

Once I had changed the brakes, the braking improved tremendously, as the cable pull of the road shifters match the required cable pull of the brake calipers perfectly. Also, there is much lesser friction acting on the brake cable, which means that the braking action is much smoother. No more squishy brakes!

This upgrade should be possible for most Dahon bikes, as the frame structure is similar and the reach required should be achievable by these Tektro R559 long reach caliper brakes. Of course, these should be paired with road shifters/brake levers for optimal performance.

Monday, October 10, 2011

Rolling the Dahon Boardwalk TT around with ease!

I recently changed my kickstand to the Pletscher double kickstand, and I am very pleased with it so far! Read about the upgrade HERE.

Although it is rather heavy compared to my previous kickstand, it is extremely stable, which makes it excellent when I load my bike up with more stuff, because the bike will not topple. Previously it can be difficult to balance the loaded bike on the single-legged kickstand.

But stability when carrying heavy loads is not the main reason for changing the kickstand! The main reason I changed the kickstand is so that I can roll my Dahon Boardwalk TT around with ease, instead of carrying it around. This is particularly useful especially in MRT stations.

Before I had this Pletscher kickstand, when I take the MRT with my bike, I will have to fold it up at least partially, by putting the seatpost down to stabilise the bike. At this point it is still possible to pull the bike around on its wheels, but it is hard to balance and the base of the seatpost will scrape on the ground whenever you rest the bike.

I know that some people are able to roll their Dahons around even when folded, but it can be tricky especially if the wheels are not parallel to each other. This causes the bike to come apart frequently as the magnet is not strong enough to hold the two halves together. Which I why before I had the Pletscher kickstand, I ended up carrying the bike around as it was faster than attempting to roll it around.


Bike in the unfolded state
To fold the bike so that it can be rolled around, I only need ONE step! Yes only one step, very easy. Just loosen the frame clamp and fold it in half, that's all!

 Tall but narrow, doesn't take up more space than a person!

From this folded state, just lift the bike up slightly by the nose of the saddle, and drag the bike along with you! It is very comfortable because the saddle is at a good height to hold, and you can put down the bike anytime on the rubber shoes of the kickstand and not damage the base of the seatpost.
Also, when pulling the bike along this way, the bike rolls along on the front wheel only, the rear wheel does not touch the ground. This allows the bike to be rolled forward or backwards with no problem.

 If desired, you can lower the height by folding down the handlepost. 
Still can drag around easily by holding the saddle.

Points of contact with the ground: Rear wheel, front wheel and one side of the kickstand.

 Can lower the height even more if you put down the seatpost!

 However, this makes the folded package very wide with my bullhorn bars. 
No problem with flat handlebars though.

Not sure how I folded the bike with the handlebars outside? Check it out HERE.
The best part about using the kickstand as one of the points of contact with the ground is that I don't need to adjust my handlepost or seatpost! Forget about fiddling with the height of the seatpost or handlepost after unfolding. Just tighten the frame clamp and you are good to go!
  
From this...

to this in 3 seconds flat!

Saturday, October 8, 2011

Pletscher Kickstand Review!

Just installed my new Pletcher kickstand today! For those who do not know what it is, it is a highly acclaimed kickstand with double legs, that folds up to one side. According to many people, this double leg kickstand makes it very stable and able to withstand heavy loads, especially for touring bikes!

Kickstand with rubber shoes (sold separately)
Double legged kickstand!

The whole kickstand is rather solidly built, such that initially I thought it was steel! But the whole kickstand is actually aluminium, but still rather heavy.

However, installation was not as straightfoward as I thought. Initially I thought I could just swap out the kickstand, but it was not possible! From the first picture above, you can see that the bolt is quite long. In fact it bottoms out in the kickstand long before I have even clamped the kickstand on!

What is worst is that the bolt is not of metric size, which means that I cannot just change to a shorter bolt that I have. It is probably something like 3/8 inch in diameter or something. In the end I managed to work out something, although it is not neat at all. I had to use larger nuts as spacers in order to take up the extra length of the bolt.


 Extra 2 nuts (M10/M12 size?) + Spring washer


A word of advice here, if you plan to fix on this Pletscher kickstand using your existing kickstand mount, be prepared to do some fudging to make it work! 

 
Uncut legs, puts my rear wheel 12 cm off the ground!

Without cutting the legs of the kickstand, the long legs ended up lifting my rear wheel by 12 cm off the ground, which is far too much for me. Had to cut the legs so that my rear wheel is not lifted so far off the ground. I would prefer that the rear wheel be lifted by maybe 3cm off the ground. However, do not cut 12-3=9cm off your kickstand leg! Because the distance measured is at a different place, cutting 9 cm off your kickstand is likely to make it shorter than the wheel, and your kickstand would be useless.

Original length as embossed on the leg is 320mm, decided to play safe and cut at the 270mm mark, which means sawing 5cm off. To do this, of course you need a saw and some arm power! Luckily it is aluminium and not steel, so it is not too tough.

After putting on the rubber shoes, here it is!
 
  
Rear wheel is about 4cm off the ground!

After putting on the rubber shoes, the rear wheel is found to be lifted off the ground by 4cm. More than what I was looking for, but no problem at all. Too lazy to cut the kickstand legs again haha. I would rather leave it longer, and trim later on if needed, than have it too short.

Unfortunately, the left crank will still hit the kickstand leg. I remember seeing on another bike where the crank will clear the kickstand leg, but the geometry is probably different on that bike. This means that roadside tuning of the bike that requires spinning the cranks is still not possible. However, changing tubes is made easier, since the bike can be see-sawed so that either the front of rear wheel can clear the ground.

Left crank will still hit the kickstand leg

Very stable platform, especially if you have panniers! Perfect companion with Ortlieb panniers haha...

One thing to take note is that this stand is definitely not for the weight weenies. The stock Dahon kickstand is only 160 grams, but this Pletscher kickstand + all the bolt and spacers weighs in at around 630 grams! More than 400 grams added, whatever weight savings that you have saved by using carbon fibre/ titanium parts will all be gone...


Then some of you may ask: Why change to this kickstand in the first place and suffer the weight penalty? This is not because I want to add panniers or something, but because I want to enable my Dahon Boardwalk to be folded and rolled along easily! Wondering how I can do that with the Pletscher kickstand? Watch out for my next blog post!

Updates below!

Earlier in the post, I was saying that the bolt was not metric, which means I cannot just substitute another shorter bolt for the kickstand. In fact I wrote an email to Thorusa regarding this matter. They were very nice to actually send me a collection of bolts of different lengths, in order to solve my issue with the bolt that was too long.

I just received the bolts a few days ago, and I used the short bolt to mount the kickstand directly to the frame as shown below. Apologies for the poor picture quality.


With this shorter bolt, it now looks very similar in mounting to the original Dahon kickstand! And since the extra nuts and spacers have been removed, and a shorter bolt is now used, the total kickstand weight has dropped to 550g. Still not lightweight, but definitely an improvement!

Most importantly, it now looks much sleeker, without the stack of spacers as previously used! Thanks Thorusa for the wonderful customer service and advice. Wish there were more online bikeshops with your level of service and expertise!

Wednesday, September 28, 2011

Introducing the Finish Line Fiber Grip for my Boardwalk TT!

Since I recently upgraded to bullhorns, the handlepost top clamp has been working overtime keeping my bullhorn in place! You can read about the upgrade here.

More pictures of the bullhorn handlebars below!


As you can see, the quick release clamp in the middle needs to be closed really tight to prevent the bullhorn from rotating downwards. However, I realised that even when it is super tight, (any tighter and I cannot close it!) the bullhorn will still creep downwards overtime, as I rest my weight on the barends.

This realisation came during the recent Tuas night ride, where the road can be rather bumpy along some stretches. With the bumps and the weight at the barends, there is a torque that will cause the bullhorn to rotate downwards.

To solve this problem, I went to get some Finish Line Fiber Grip. This gel is actually meant for carbon fibre parts, which cannot be clamped too tightly to prevent crushing the tube. Examples would be carbon fibre seatposts, handlebars, stems etc. How this gel works is that there are tiny plastic balls within the gel, that will deform and fill in the gaps between the surfaces when you clamp it. When you spread the gel, you can feel the gritty texture. This rough texture will help to increase the friction between surfaces, allowing the components to grip tightly even with lesser tightening torque.

Even though it is designed for carbon fibre parts, it can also be used for other materials, since the working principle can be applied to any surface.

Have not tested its effectiveness so far, but it seems to be pretty effective according to reviews! Hope it works and solves the issue!

One other curious thing to note is the rust on my 9 speed SRAM chain. There is 1 inner link that is totally rusted, and only realised it when the pedaling sound seemed different. The links in that area was stuck, and could not go around the rear derailleur pulleys properly, giving an unusual clicking sound.

Upon closer inspection, it was found that other links have some little signs of rust too. Quite surprised as I do regular maintenance and will keep the chain nicely lubed for smooth operation. I only put chain lube at the pins as that is where the friction is. This leaves the chain links uncovered, which may be why they are rusted.

The only link that is totally rusted!

Chain links that are supposed to rotate becomes stuck, while the handlebar that is supposed to be stuck ends up rotating! Need to ensure that only the proper parts rotate!

Monday, September 26, 2011

Highlights from Interbike 2011 at Las Vegas

 Chris King headsets going cheap!

"Holey" SRAM XX Cassette! 

 Your carbon crank is not hollow after all...

 Dura-Ace Di2, with MTB long cage!

Tern Eclipse P9, very sweet with disc brakes!


Tern Verge S11i with Alfine 11 hub!

Any colour to match any bike!

How many "wheels" are there on this bike?

Surly rims for your surly tires!

Thursday, September 22, 2011

Boardwalk TT Review: Taking comfort to the next level

It has been around one week since my Boardwalk TT was officially completed! Since then I have done a few short rides nearby and also longer rides to work. I'm pleased to report that there has been no major issues with the upgrade! The most significant change to the ride is the increase in comfort, due to the better hand positions possible with the bullhorns.


With the bullhorns, I have a lot more hand positions for greater comfort! Previously on the flat handlebars, I only had the usual grip position and the bar ends. This is fine for short rides, but for extended or faster rides, this is not really sufficient. It is common to get some numbness with the limited hand positions.

These bullhorns offer up to 5 hand positions, for very different purposes and riding style! There are hand  positions for leisure and also other hand positions for speed.

1) On the top of the handlebar 


In this position, the grip height is relatively high, which puts me in the most upright position. Very relaxing position, most suited for leisurely rides, such as LCSG Sunday rides! Allows me to see far and enjoy the scenery around me. I also installed cyclocross brake levers on top, so that I can brake from this position! Although I cannot shift gears from this position, I can select the gear I want before that, before settling into this comfortable riding position.

2)  At the corner of the handlebar


This is a position that is rather uncommon. I find this actually quite interesting, as it feels like I'm holding a steering wheel! Gives me good control over the handlebar, as it is a wider grip position than the 1st hand position. Still allows me to stay upright and comfortable. No brakes or shifting from this hand position.

3) Traditional bullhorn grip


This is the most basic and common hand position for these bullhorn bars! In fact, it is the most ergonomic position, better than the grip position on a flat handlebar.

Try a little experiment. Hold your hands out in front of you. Try rotating your palms to face up, face each other, and face down. You will find that the most comfortable position is when your palms are facing each other. This is due to the structure of the arms and shoulder, which puts your hands in this position.


Translating this hand position to the bicycle, you will see that gripping the bullhorns this way is the most comfortable hand position for riding. This is also one of the main reasons why I changed to bullhorns! Braking is easy, just pull on the brake lever with the fingers. Shifting is also easy, just push the levers inwards with the fingers. At all times my palm is resting on the grip, so I am always in control.

In this position, I can also ring the bell easily, by reaching up with my left hand and turning the ring surrounding the bell. More reach is achieved in this hand position,as it allows me to bend over more. Less upright riding position, but still very comfortable. 80% of most rides would be spent in this hand position.

4) On the hoods


Gripping the bullhorn in this position is very similar to riding on the hoods with a drop bar. The difference is that in this case, instead of gripping the rubber hoods of the Dual Control Levers, I am gripping the upward-tilting corner of the bullhorns. Very good position if I want to go for speed, as it extends the grip even further, putting me in a low aerodynamic position. Control is good too due to the self-centering effect and the wide grip.

Shifting is possible in this hand position, by pushing the levers inwards with the fourth and little fingers. However braking is not possible as the fingers cannot pull on the brake levers in this position.

5) Time Trial (TT) position


This is the hand position that gives the longest reach! Grip the ends of the bullhorns and rest your forearm on the handlebar.By doing so, the elbows will be at almost 90 degrees, which puts me really low and aerodynamic! Although this is not as aerodynamic as proper TT bars which puts the arms closer together, this is much better that having none at all. Perfect for windy stretches of clear straight road, such as at Pengerang ,Tuas South or Changi Coastal road.

One disadvantage of this hand position is that my arms will become tired more quickly than usual, because the arms are now supporting more of my weight. Still need more practice in this position, to find the ideal angle and location for gripping and resting the forearms. My neck also becomes more tired as I will have to make an effort to look up to see ahead. Not safe to just look down and pedal on!

Ringing the bell is easy, I just need to twist my hand as I am already gripping part of the bell!

Tuesday, September 20, 2011

Shimano Alfine 11 Internal Hub Review

Update: I now have my own Alfine 11 bike! The Avanti Inc 3 with Gates Belt Drive and Alfine 11 Internal Hub.

So this is the Alfine 11 internal hub that many people have been talking about, and how they would like to use it on their bikes. I had the chance to try out a bike equipped with the Alfine 11 gear set over the weekend.

This bike is actually a Montague bike, which is a full sized mountain bike that can be folded. When paired with an internal hub, it creates a wonderful bike that is able to tackle rough terrain, is low maintenance and still folds! Quite an unique and amazing mix of features.

The Alfine 11 is a new internal hub released by Shimano late last year, and has a completely revamped construction from the previous Nexus and Alfine 8 hubs. This actually makes it slightly lighter than the Alfine 8, even though it has 3 more gears!

Good for off road too! No more chain drops or bouncing/broken rear derailleurs. Works perfectly even without much cleaning!

The Alfine series of internal hubs is able to accept disc brakes, unlike the Nexus series which only accepts roller brakes instead. To me, this is a great feature, as disc brakes with internal hubs makes the bike highly weather resistant, looks really good and works really well!

Chain tensioner is required for frames without horizontal dropouts. The chain seems to be longer than required, but is not an issue with the chain tensioner.

Another highlight of the Alfine 11 is of course the 11 speeds available! Other than the 11 speed drivetrain by Campagnolo, the Alfine 11 is the only drivetrain with 11 speeds on one shifter.

The 11 speeds available gives a really wide range of gearing, and can handle uphills or downhills with the spread of gears available. If there is a need to shift the whole gear range up or down, the size of the rear sprocket can be selected to give your desired gear range.

11 speeds! Without the indicator, it is easy to lose track of which gear you are in, because there are so many!

Other than the excellent internal hub, the Alfine 11 shifter also works brilliantly, just as a high end shifter should. The new construction means that the main lever downshifts, while the release lever upshifts, just like all high end Shimano MTB shifters. The previous Alfine drivetrains had the functions of the levers reversed, due to a different hub construction.

As with high end Shimano MTB shifters, it has 2-Way release, Instant Release and Multi Release features built in. This allows you to easily shift multiple gears both ways. The Alfine 11 is also perfect for commuting, as it allows gear shifting when the bike is not moving. Downshifting while stationary at the red light is now possible.

Had the bike over the weekend, and brought it out to the LCSG ride! Quite a few people were interested in it and had a go on the bike. Everyone who had tried the bike said that the shifting is very smooth and quick! In fact, some of them commented that compared to the other internal hubs, this Alfine 11 is way better. Also, it is hard to actually find and test ride an Alfine bike in Singapore as the LBS don't bring in these bikes due to low demand.

The smoothness of the gear shifting is largely due to the oil lubrication of the internals, the helical gears used and better designs. All these results in lightning quick shifts, where there is no need to wait for the chain to climb or drop onto the next gear. As soon as the lever clicks, the gear change is done, no delay.

The good stuff!

Of course, the shifting is not perfect everytime. When pushing hard on the pedals, sometimes the gear does not shift. This is very different from a bike with a derailleur, where you have to continue pedalling in order to complete the shift. For an internal hub, it helps to pedal lightly when you shift in order for the shift to be successfully executed.

The main downside to this internal hub is probably the weight. At around 2kg for the whole system (hub, chain tensioner, shifter), this is quite hefty compared to a conventional rear derailleur (rear hub, cassette, RD, shifter, around 0.9kg in total). It certainly does not come cheap too, due to the complex internal construction and precise tolerances required to manufacture the hub.

Most bikes should be able to use this hub, with its hub width of 135mm. Even bikes with a rear width of 130mm might be able to use it, although it will be a tight fit.

Overall, it can be said that this is a really good alternative for people who wants to have a low maintenance drivetrain, yet have multiple gears to use. The ease of shifting when stationary is definitely a plus, although the weight penalty is something that has to be overcome.

Great bike, great hub system!