Monday, August 27, 2012

Dahon Vitesse X20-TT

It has been quite some time since I last upgraded a folding bike! On my Dahon Boardwalk X20-R, there is practically nothing left for me to upgrade. It is already a 20 speed folding bike with a mix of Shimano Ultegra and 105 components, with fast rolling wheels and tires. Even if I change out the components to even higher end stuff, it may only be marginally lighter and faster, probably not worth the cost involved. In any case, it is already a great bike, and I can find no fault with it.

But my hands are itchy after not upgrading a bike for some time, and the solution is to find another bike to upgrade! I technically have 4 bikes under my stable, with my own Dahon Boardwalk X20-R and Flamingo London S7R, and Bernice's Dahon Vitesse P18-TT and Pacific Cycles Carry Me.

Coincidentally, the Vitesse has been found to be lacking in proper gear ratios at the low end of the gear range. This is due to the custom 9 speed cassette that I previously assembled. You can check out this link for more info on the custom cassette.

12-28T 9 speed cassette, as previously seen on the Boardwalk

This 9 speed cassette has sprockets sizes of 12-13-14-15-16-17-19-23-28. The advantage of this combination is that it has a close spread of high gear ratios (12-17T) for comfortable cruising on flat roads, but also has a low 28T sprocket for those "friendly" slopes.

However, the disadvantage is that the jumps between the lower gears are quite large, as the sprocket size changes quite a lot from 19-23T and 23-28T. This can be a problem when climbing slopes, as the 23T sprocket is too hard, but when changing down to 28T, the difference is too great, and the pedaling momentum is lost.

To solve this issue, the best way is to have one more speed between the 23T and 28T sprocket. But I cannot do that on a 9 speed cassette without sacrificing a sprocket from the higher gear range (12-17T). The solution is to upgrade to 10 speeds!

A lot of people ask why do we want so many speeds? My answer is, it gives you more gear ratios which makes your pedaling more efficient and comfortable. It may not necessarily make you go faster, but you will have more gears to choose from and you will be more likely to find a gear that you can pedal on at a comfortable cadence.

Working from the previous iteration of the Dahon Vitesse P18-TT, the "ingredients" that I need to convert the bike into a 2X10 speed bike are listed as below:

Components needed to upgrade the Vitesse from 18 speeds to 20 speeds:
1) 10 speed road cassette
2) 2x10 speed road shifter
3) 10 speed road front derailleur (FD), double
4) 10 speed road chain

Optional:
1) KMC MissingLink for 10 speed chains

Shimano Tiagra 4600 12-30T 10 speed cassette.

Why choose this? Wide ratio 12-13-14-15-17-19-21-24-27-30 cassette gives you many climbing gears. The 16T sprocket is sacrificed, but hopefully it is not a problem.

Shimano Tiagra 4600 2x10 speed road shifters

Why choose this? Instead of the higher end road shifters with internal shifter cable routing, I chose these shifters because of the external shifter cable routing. This is better for bullhorn bars to avoid excessive friction in the shifter cables.

Shimano 105 5700 double front derailleur

Why choose this? Because it matches the rear derailleur and crankset!

Shimano 10 speed chain

 KMC Reusable MissingLink for Shimano 10 speed chains

Note that these are not the only components that are needed to upgrade a bike from 9 to 10 speeds! You will also need a 10 speed rear derailleur and a 10 speed crankset. I did not need these for the Vitesse as it already has a Shimano 105 5600 Double Crankset and 105 5600 Rear Derailleur on it, which are both 10 speed components.

Sidetrack: During the upgrading of the cassette, I decided to take the chance to dismantle the rear hub and grease the internal pawl and ratchet mechanism

Rear hub with dirty grease. Still not too bad as it was last serviced at the beginning of this year.

Pawls on the freehub body

A clean ratchet! I just took some toilet paper and wiped away the old grease.

Similarly, the pawls and other parts are also cleaned.

As it says on the cover, you need special freehub grease. It is much lighter than normal grease, but more viscous than oil.

 
Generously coating the ratchet and pawls with freehub grease

After greasing the internals of the freehub mechanism, the freehub runs smoother and much more quietly. The freehub clicking sound will slowly return to its normal levels as the grease is displaced during normal usage.

Back to the Vitesse upgrade!

Sparkling new 10 speed cassette!
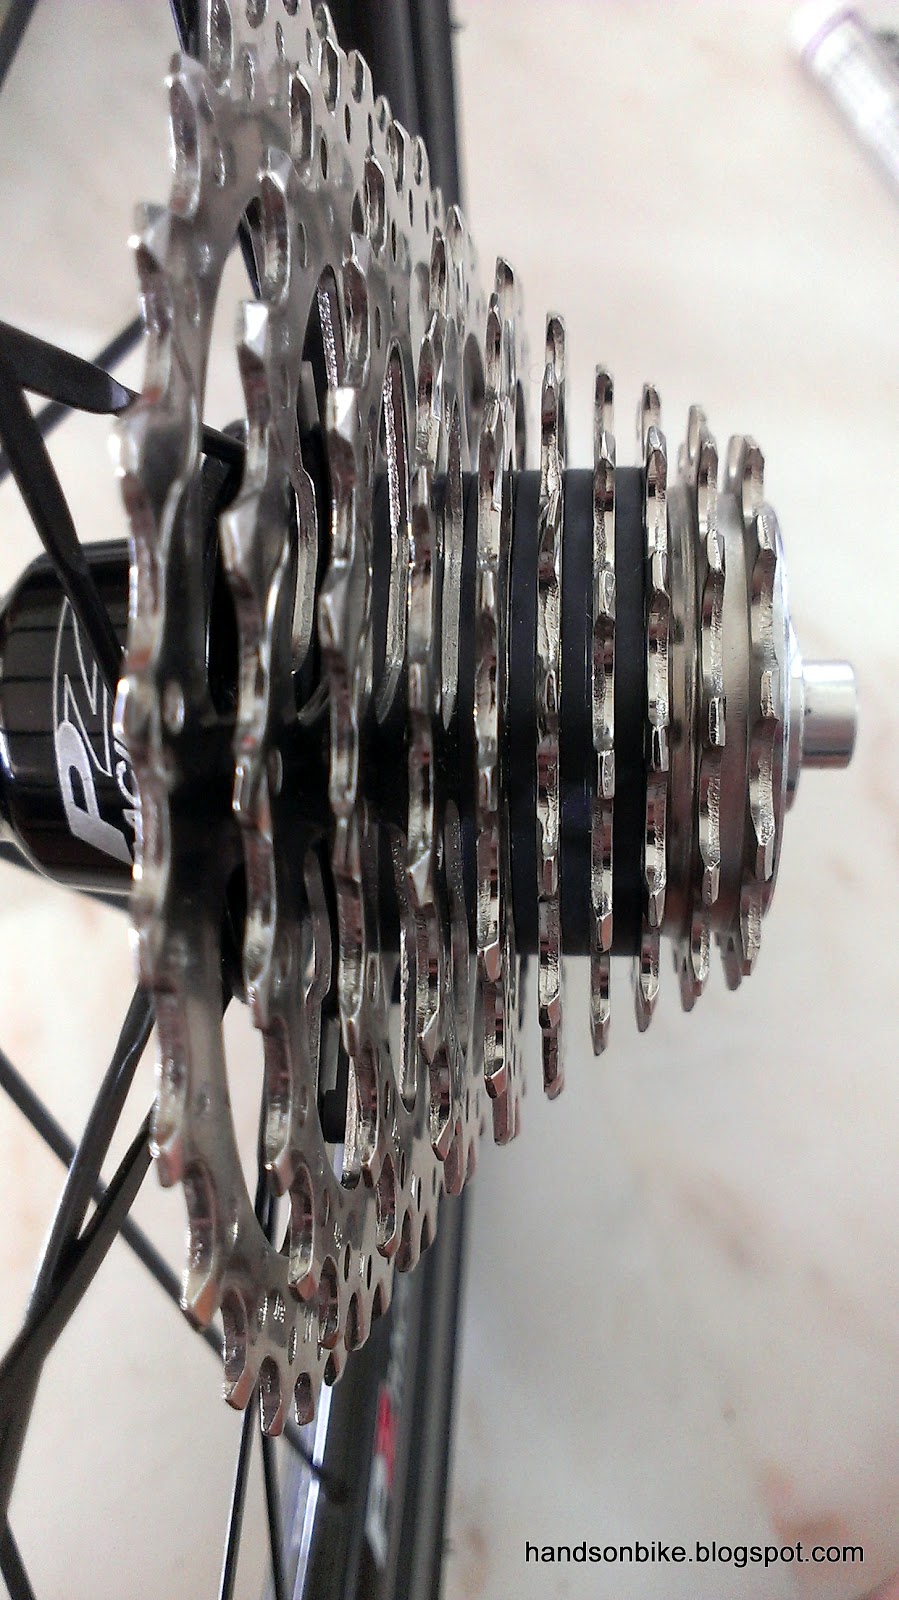
Go on, count it. You know you want to.

Tiagra 10 speed road shifters. Great shifters at an affordable price.

New Shimano 105 5700 FD with the older series Shimano 105 5600 53/39T crankset

Shimano 105 5600 series RD

I love the gleaming look of a clean drivetrain!

 
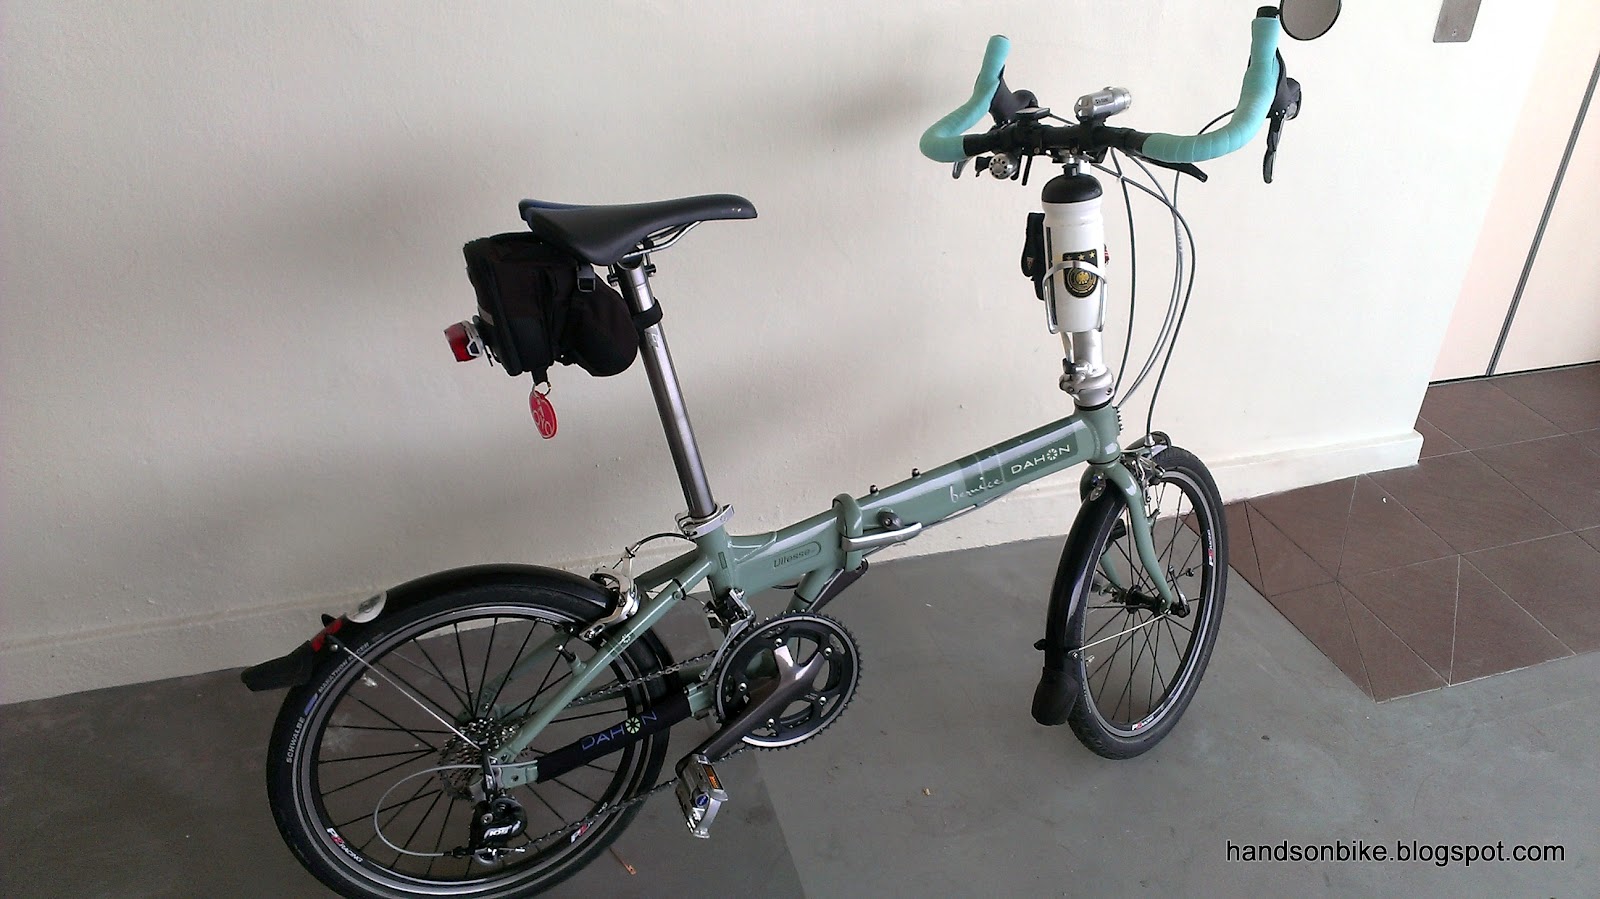
New bar tape in Bianchi Green! Definitely eye-catching.


Overall view of the Dahon Vitesse X20-TT

I have brought the bike out for a few test rides, and it rides awesomely well! In fact, sometimes I feel that it rides better than my own Boardwalk. With the new 12-30T cassette, the gear range is now 26"-88". Great for climbing, ready to tackle any slopes! The shifting is also buttery smooth, you got to try it to believe it. Personally, I feel that the shifting is at the Dura-Ace level, smooth, light and precise, especially for the front shifting.

It was a fun and great upgrade. Definitely worth the time, money and effort spent!

Monday, August 20, 2012

New Bar End Lights for Drop Bars

Running out of places to install a light on your bike? If you have a drop bar installed, you can add bar end lights to make your bike even more visible at night!

I previously used another set of bar end lights, but they were not meant for drop bars, as the light beam is mainly directed out from the side windows. Those lights are actually meant for flat handlebars, which will position the light in such a way that the bright beam shines out from the side window towards the rear.

This time, I got the proper bar end lights for drop bars.

Simple packaging, at a not so cheap price.

Only 33 grams for a pair! Can add on to your road bike without increasing the weight much.

Light beam mainly shines out from the window on top, although it is still visible from the side window.

Uses 1xAAA battery each. I prefer it over the use of small button cells.

This light may seem very similar to the one I previously used, but the main difference here is the light beam. This new bar end lights is meant for the ends of drop bars, thus the light beam mainly shines from the ends, and is directed towards the rear. This makes it very visible from the back.

Simple addition to the bike, quite useful in making the bike look wider, and hopefully vehicles will give you a wider berth when overtaking.

Some pictures to show the lights in action:

Rear view of the bike, without bar end lights.

With bar end lights turned on. Slightly more visible, but not by much, unless it is dark.

Another view from the rear, without the bar end lights.

With the bar end lights turned on. They are not very visible, perhaps because my main rear light is so bright!


Meanwhile, the previous bar end lights are not wasted. They have been installed on the Carry Me instead!

Tuesday, July 31, 2012

Carry Me Delight! Avid Brake Levers and Ergon Grips

A new addition to the bike family! In addition to the Dahon Boardwalk X20-R, Dahon Vitesse P18-TT, and Flamingo London S7R, we now have a Carry Me!

If you don't already know, the Carry Me is a folding bike with tiny 8" wheels that folds really compactly. It is made by Pacific Cycles in Taiwan. When fully folded, it has an extremely small footprint and can literally go on any public transport at any time. It rides surprisingly well and it always brings a smile to someone who is riding it for the first time.

I got the bike second hand, but the condition is practically new! The previous owner did not really use the bike a lot and so I got a really good deal. Best of all, it was a really nice blue colour!

Overall view of the Carry Me

Front knob for locking down the main frame. I tried using a QR lever instead of the knob, but found the knob easier to use.

Came with upgraded Ezy Wheels! Very smooth rolling indeed.

Rear caliper brakes. Not of high quality, but it works.

Front caliper brakes. Seems that this bike needs long reach caliper brakes and thick but short brake pads.

Special drivetrain system, with half-pitch chain and gears. Crank arm is only 160mm to minimise pedal strike.

Front chainring with 84 tiny teeth. The bike is in such good condition that the plastic wrapping is still on the frame!

Rear sprocket with 14 tiny teeth.

With the 84T in front and 14T behind, it gives a driving ratio of 6. Together with the 8" wheels, the gear inch for this single speed bike is 48". This is not a high ratio, equivalent to about 52/21 on a 20 inch bike, but it feels just right for the Carry Me.

I have already started to zhng the bike! There wasn't any investment in components needed, thus I just made the switch. Also, I checked every bolt and nut on the bike to make sure that none of them are loose.

The stock brake levers are pretty bad, thus I switched in a pair of Avid FR5 brake levers that I had lying around as spare. At the same time, I also installed a set of Ergon grips which were previously used for the flat handlebar Dahon Vitesse.

Original brake levers and grips

Upgraded Avid FR5 brake levers and Ergon grips!

It is now more comfortable to grip the handlebars, and the brake levers seem to feel less squishy. Other accessories added are a set of small front and rear blinkers for night riding.

Riding this bike can be quite fun, as the turning radius is so small that you can practically keep turning on the spot. It takes a while to get used to the narrow handlebars, which makes the steering more twitchy. But it is very useful for getting through tight spots! Riding on the roads is not really recommended due to the slow speed and also small size which makes you less visible.

The small wheels means that you will feel every little bump on the road! But when pumped up to the recommended 80 PSI, the bike is surprisingly comfortable given such small wheels.

Some pictures of the folded Carry Me below!

 Only occupies one small corner

Takes up only 6x6 dots on the MRT platform!

Express fold, only half folded. Handlebar and seatpost not lowered.

Fully folded view. Tucks in anywhere discreetly.

Takes up less space than a rubbish bin!

This bike is perfect for mixed mode commuting. With a bike this small, you can go onto the MRT at any time. Very useful for getting to places within 3km of an MRT station/bus stop. Any further than that is still possible, but be prepared to sweat a little more and take a while longer!


Overall pictures of the Carry Me! Note where I wrapped the rear light.

Sunday, July 29, 2012

Qbicle Folding Bike Roller Wheel on the Dahon Vitesse P18-TT

Have you ever had trouble rolling your Dahon bike around when folded? Most of the time, it is difficult to roll the bike when it is folded because the front and rear wheels are not parallel. Trying to pull or push it along on both wheels will just cause the bike to unfold itself.

An alternative way is to roll the folded bike on just a single wheel, on either the front or rear. This can also be tricky as it is difficult to balance the bike on only one wheel, and the bike often ends up unfolding itself.

If you have a double kickstand, you can fold and roll the bike this way. But not everyone has a double kickstand, so what to do?

Enter the Qbicle Folding Bike Roller Wheel! This is an innovative roller wheel that is attached to the bottom of your seatpost. This was bought at the recent lelong sale!

When the bike is folded, your seatpost usually only acts as a leg to help the bike balance. However, with the roller wheel, your seatpost becomes much more useful!

The Qbicle roller wheel. Comes in different sizes for different seatpost diameters.

This is how it attaches to the bottom of the seatpost.

Roller wheel that looks good and rolls well.

Installation is as easy as it can be. With the seatpost already inserted in the seat tube, just put on the roller wheel and tighten the bolt with an M5 Allen key. Done!

Some points to take note regarding the usage of this roller wheel. During normal riding, at the proper saddle height for the rider, the seatpost must protrude below the bottom of the seat tube by at least 3cm in order to use this roller wheel. If not, the roller wheel cannot be attached. This means that taller riders that extend their seatpost higher up cannot use this roller wheel.

The roller wheel also cannot be attached if the seatpost is lowered too much, such as when children are riding the folding bike. The roller wheel needs to have some clearance off the ground in order not to hit road humps.

Lastly, the seatpost cannot be pulled out from the bike when the roller wheel is attached to the seatpost. This can be a problem if the seatpost needs to be removed for more compact storage.

Roller wheel lowered to the ground

Roller wheel resting on the ground

With this roller wheel, rolling the folded bike around is easy! I find that the best way to do it is to tilt the bike such that only the seatpost roller wheel and the front wheel are touching the ground. Rolling the bike around is then very easy and balanced.

This roller wheel will be very useful if you have to wheel your folded bike around often, such as in MRT stations. Other than that, the roller wheel is not very useful. Depending on your usage and situation, the roller wheel may be a godsend or it may just be additional weight.

Monday, July 2, 2012

Modifications to Flamingo London NX7: Flat Handlebar

In my previous post, I had attempted to put on a riser bar onto my Flamingo London NX7. However, it was not possible as the bends on the riser bar could not fit through the clamp on the handlepost.

Someone then suggested using a special stem to raise the height of the clamp area, and then insert a straight bar through. That is actually a pretty good idea! The special stem is actually the same type that I had used on my Dahon Boardwalk, to increase the reach of the handlebar. Check out my bling bling gold stem here!

Alas, I could not get a stem in silver colour to match with my handlepost. Also, I was worried that with the clamp, there is a chance that the stem will rotate around the clamp when the handlebar is pulled hard.

At the recent lelong sale, I chanced upon a very nice flat handlebar! It was in fact an original Brompton flat handlebar. Since it was going for a good price, I decided to get it first and think later. Thanks Wei Shuan for offering it for sale!

With that handlebar, I thought I would just install the flat handlebar directly onto the handlepost! No need for any riser bar or stem to increase the height. Just go for a low sporty position! The clamp area on the Flamingo handlepost is 920mm off the ground, which is quite similar to the Brompton S2L (935mm, as seen from the brochure).

Also, I managed to get bar ends during the lelong sale, thanks Desmond!

Nice bar ends with grippy soft rubber, and very comfortable support for the palm!

 
The bar ends as mounted on the flat handlebar


Installing the new handlebars was not difficult, but quite troublesome as I had to remove and reinstall everything on the handlebar. I wanted to try the riding position with the flat handlebars before shortening the cables, as it will be quite troublesome to shorten the cables.

New flat handlebar, with lots of excess cable slack!


The ride feel is definitely very different! With the low handlebar position, there are both positives and negatives for me. But first, let us look at some more pictures of the transformed bike!

All accessories on the flat handlebar.

Front view. The brake levers have to be tilted down this way so as not to have interference when the handlepost is folded down

Great bar ends. Really really comfortable shape and texture! Although some bits of rubber does come off and stick to your hand. Not an issue though.

The flat handlebar when folded down. Much further away from the ground!

Some clearance between bar ends and the front tire

Some clearance between brake lever and brake caliper


 Handlebars, before and after. The handlebars have been lowered by about 16cm! The cable housings have also been shortened to remove the slack.

Positives:
Very agile and light feel to the bike. Transforms the bike into a sporty bike.
No flex even when pulling hard on the handlebars, due to the low handlebar position.
More aerodynamic position. Not really important for me though.
Lower weight compared to the original M handlebars. Not so important and significant anyway.
Bar ends are great for improving the comfort. Usually I will just set to gear 5 and pedal on!

Negatives:
Low body position might not be comfortable over longer distances. But then again, I wouldn't use this bike for long rides anyway.
Body weight shifted more towards the front. Got to be more careful when going down slopes.

This is a pretty big modification to the bike, as I have totally changed the riding characteristics of the bike. Quite an interesting mod, and it really livens up the ride! If I may suggest naming this Flamingo after the Brompton model naming norm, this would be a Flamingo S7R? More pictures below!