Saturday, November 9, 2013

NiteRider Solas 2 Watt USB Tail Light

With a new bike, we need new lights! After getting the Avanti Inc 3 recently, I needed to get some new lights to fit on the bike. This gave me the chance to check out some of the latest lights which are always advertised to be brighter and cheaper.

At Hup Leong, I came across this Solas 2 Watt rear light. As introduced to me by a few other cyclists, this light is super bright, as evident by the use of a 2 watt LED. I also like the USB charging option which avoids the problem of discarding used batteries.

NiteRider Solas 2 Watt USB Rear Light

Battery indicator function, which will be further described below.

I use the first flash mode, which can last 18 hrs. If I commute to work 3 times a week on the Avanti, taking 2 hours each day (2 way), this light can last 3 weeks, which is pretty sufficient.

The mounting clamps and the Micro USB charging cable.

Clip at the rear of the light can be mounted onto the supplied bracket, or clipped onto the saddle bag.

ON button located at the top of the light. Press to cycle through the OFF mode +  the 4 flashing/ steady modes.

USB charging port at the bottom of the light, sealed by a snug fitting rubber plug. It should be quite rain resistant as the plug fits tightly, and is located at the bottom of the light.

Bright LED! A picture or video will not show how bright it is, you need to see the actual light to appreciate its brightness. No excuse for anyone behind not to see me!

The LED with an advanced-looking lens that focuses the light tightly.

When turning the light off, the red or blue LED will blink for 10 seconds. A blue LED means that >25% of the battery capacity remains, while a blinking red LED means that the battery level is <25% and should be charged soon.

The weight of the light alone if anyone is interested.

 The light clipped onto the rear of the saddle bag. I tried to mount the rear light onto the rack itself, but could not find a suitable mounting spot even with L-shaped brackets and other accessories.

This rear light is really bright, and the battery life is quite good. So far it has been working well with no problem so far. Riding in light rain is no problem, and in heavier rain I would probably be taking shelter somewhere. Therefore I think water intrusion should not be an issue for me.

As the LED is really bright, this light is suitable for daytime use, as it can still be seen even in the day. If you only plan to use the rear light at night, then a less powerful rear light will probably be sufficient.

Feedback Sports RAKK Bike Stand

With the recent addition of the Avanti Inc 3 to my bike stable, there is a need to get some sort of bicycle stand for it. Due to the tight constraints of the Avanti frame, there is no space to mount a Pletscher double kickstand like the one on my Dahon Boardwalk. Mounting a kickstand on the left side chainstay is possible, but it does not look so good, and there is a high chance that the left foot will brush against the kickstand when pedaling.

Due to these reasons, I decided to go without a kickstand on the bike itself. Although it is not so convenient, the plus side is that the bike will weigh a little bit lighter! However, when the bike is at home, I will still need some sort of bike stand or rack to hold the bike. It is not ideal to lean the bike against the wall as it can be quite unstable, and may leave marks on the white wall.

I used this commonly available bike stand to hold the Avanti upright when at home. Although it works, it can be a little troublesome to have to stretch the bike stand and put it over the rear axle. This is especially difficult with the long rear axle nuts on the Alfine 11 internal hub.

Standard bike stand available at many bike shops, costs less than $20. Works well but not so convenient to put the bike on and off the stand.

In order to make it easier to put the bike on a stand, I decided to get the well-reviewed Feedback Sports RAKK Bike Stand. It is a bike stand that grabs onto the tire of the bike. Not only is this bike stand very easy to use, it also prevents spoke damage, which can happen if those slotted frame bike stands are used.

Slotted frame bike stand. Very simple and easy to use. However, the downside is that the wheel spokes will lean on one side of the bike stand, which may cause damage if the bike is heavy or knocked over.
 
Packaging of the Feedback Sports RAKK Bike Stand. There are other cheaper brands available, but I decided to get the original one. Hopefully it is worth the money!

Packs flat, which is good for storage or transportation.

These are the official part names for the various parts of the bike stand.

Various possible layouts are possible for shop display, by linking multiple units of the bike stand together.

 The pivot clips that are used to join multiple RAKK bike stands together. I removed them as they are not needed.

Button to lock the swing arm in the lowered or raised positions. Just press the button and swivel the swing arm into position. 

The wheel stabilizer that grips onto the tire. Multiple steps cater to all wheel widths, from narrow road tires to fat MTB tires.

RAKK bike stand with the swing arm in the raised position. The height of the wheel stabilizer is fixed, but it has been designed so that it fits wheels of size 18" to 29".

The RAKK bike stand is not suitable to be used on the rear wheel of the Avanti, as I have installed a rear fender. The rear fender is quite long and covers all the way down, and this means that the wheel stabilizer cannot fit onto the tire.

In this case, I will be placing the front wheel into the RAKK bike stand. It is still quite stable and holds the bike nicely.

With this RAKK bike stand, putting the bike away is very simple. Just roll the front wheel into the bike stand and it is done! The spring on the swing arm will apply firm pressure on the tire and secure it nicely. To remove the bike, just push the bike and let it roll off the bike stand.

Although this bike stand is quite expensive, it really works very well. There is no need to set it up or spend time putting the bike onto a stand. The initial cost of the bike stand is easily offset by the time and effort saved. Recommended for bike storage if your bike does not have a kickstand!

Tuesday, November 5, 2013

Avanti Inc 3: Eccentric BB for Belt Tension Adjustment

While doing some upgrades for the Avanti Inc 3, I realised that the bike is quite different from any other bike that I have previously tinkered with. The most special part of this Avanti bike is no doubt the belt drive system.

A belt drive system is somewhat like a single speed bike, whereby there is no rear derailleur or front derailleur. To get more speeds on a belt drive bike, the only way is to use an internal hub. Some possible hubs that can be used would be the SRAM Automatix 2 speed hub, Sturmey Archer or Shimano 3 speed hubs, Shimano Nexus 5/7/8 speeds hubs, Shimano Alfine 8/11 speed hubs and the Rohloff 14 speed internal hub. These are some of the most commonly used internal hubs.

However, unlike a chain, the Gates belt drive system for bikes cannot use a chain/belt tensioner to apply tension on the belt. This means that the belt tension has to be adjusted by changing the distance between the bottom bracket and the rear axle.

The more common method would be to use horizontal dropouts, such as on most single speed bikes. A horizontal dropout would allow a pretty generous range of adjustment, and is probably the cheapest way of adjusting belt or chain tension. However, the downside is that once the wheel is removed, it is difficult to set it back to the correct belt tension, which is bad because belts are sensitive to belt tension. Brakes will also need to be adjusted if the wheel position is shifted, to ensure that the brake pads are still touching the rims properly.

To avoid these problems, well designed belt drive bikes use an eccentric bottom bracket for belt tensioning. An eccentric BB is basically an adaptor that goes in the frame, and the actual bottom bracket is then fixed onto this eccentric BB. As the BB is not centralised in the eccentric BB, the rear-axle-to-BB distance (or chainstay length) can be adjusted by rotating the eccentric BB in the frame. This allows the rear dropout to be of the vertical type, which ensures that the rear wheel always sits in the same position in the frame. Not only does this ensure that the brake pad alignment with respect to the rims / rotor does not change, it also makes rear wheel removal and installation much easier as there is no need to adjust belt tension repeatedly.

Default eccentric BB position. The BB centre is almost at the lowest position, which means that there is an equal range of adjustment forward (increase tension) or backward (decrease tension).

The belt tension that was the stock bike seemed about right. To actually measure and adjust the belt tension accurately, Gates recommend using one of their belt tensioning devices or iPhone apps. I have read that these devices are not really accurate, unless you get the high end devices which are really expensive. In the end I gauged the belt tension just based on my gut feeling, which is totally unscientific!

Anyway, after reinstalling the rear wheel, having changed out the tires to Schwalbe Marathon Supremes, the belt tension seemed to be lower. No idea why, as the BB position has not been adjusted. The bike was still creaking, and I have already ruled out the crankset, the BB and the pedals.

Due to the slack belt tension, I decided to try to adjust the eccentric BB to increase the belt tension. The eccentric BB looked simple enough, it seems that just by loosening the bolt, the eccentric BB will be free to rotate. I will also be able to grease the eccentric BB as that has been known to be a source of creaking.

 Eccentric BB with bolt for loosening or tightening it onto the frame.

After loosening the bolt, the eccentric BB was still stuck really tight in the frame. No amount of knocking around the adaptor could make it budge in the frame. Although there are holes along the eccentric BB, the pin spanner that I had could not hook onto the holes properly, and it could not be used.

 Pin spanner. Distance between pins are such that it does not fit into any 2 holes on the eccentric BB.

I tried using the Hollowtech BB tool to rotate the eccentric BB, by using the tool around the installed BB cups. However, I only succeeded in loosening or tightening the BB, the eccentric BB itself did not move at all.

Lastly, I tried knocking the bolt itself, as it might dislodge the wedge inside and allow the eccentric BB to move. It actually worked! By hammering the bolt (gently), the wedge will be pushed to the other side, and this actually frees up the eccentric BB. If only this was provided in a manual (if it ever came with a manual!).

Upon loosening the eccentric BB, I thought that it would be a good idea to remove the entire eccentric BB, and then apply some grease to prevent creaking.

Construction of the eccentric BB. By tightening the bolt, the wedge is drawn closer to the centre of the eccentric BB, and this tends to expand the outer diameter of the eccentric BB. This will tighten the eccentric BB against the inside of the frame.

Once again, pardon me for the lack of pictures as my hands were greasy most of the time. After I greased everything, I reinstalled everything, including the crankset, and went for a test ride.

Unfortunately the creaking sound was still present, and I have now narrowed it down to the rear hub area. The creaking sound is very regular, and is heard only during pedaling, and not coasting. It was possible that the interface between the rear sprocket and the Alfine hub is causing the creaking sound, thus I took out the rear wheel again, and removed the rear sprocket.

The retaining ring was really difficult to remove and install, as it was the flat type specially made for Gates belt drive sprockets. I greased all the contact surfaces between the sprocket and the splines on the rear hub, and reinstalled everything. By this time I think you can see how many times I have installed and removed the rear wheel and the crankset.

To my frustration, the creaking sound was still present. This meant that there was a possibility that the creaking sound could come from the Alfine 11 hub itself.

Creaking sound on the Avanti Inc 3 drivetrain.

At this point, I had already greased every conceivable part that could make noise, from the BB, crankset to the rear sprocket. However, the creaking sound was still there. It came from the rear hub area, and seemed to be from the internal hub itself.

As a last resort, I decided to adjust the belt tension to see if it makes a difference. Once again, this means removing the left crankarm, knocking the bolt on the eccentric BB, and adjusting the belt tension again. Finally, I found the cause for all the creaking!

The creaking sound was caused by the high tension of the belt acting on the internal hub. Although the tension is not high when I feel it by hand, it is too high for the rear hub to bear constantly. When I reduced the belt tension and turned the cranks, the creaking sound went away. It came back when the belt tension was increased. Finally, what I did was to adjust the belt tension a little bit, and turn the cranks to see if there was any creaking sound. Bit by bit I increased the tension, till the creaking sound came back. From there, I reduced the belt tension slightly, so that I get the highest belt tension possible WITHOUT causing that annoying creaking sound.

The final belt tension was quite a bit lower than I thought, but you don't feel any lag or stretch while riding. The belt also does not skip even when pedaling hard, so I guess the belt tension is sufficient.

All of that trouble, all because of the annoying creaking sound. As I have said at the beginning of this post, this Avanti belt drive bike is not a normal bike at all. It tends to be rather sensitive, especially for the belt drive system. A certain amount of hands on work and tinkering is required to get it running smoothly and silently. Although it takes quite a bit of work, the final result is really good!

The bike is now running so smoothly and quietly, and is a real joy to ride. Schwalbe Marathon Supremes are smooth and comfortable, although it can feel a bit narrow on certain patches of rough roads.

As for the gearing, I find myself using only Gears 1 to 8 so far. Have not had the chance to use gears 9,10 and 11, as they are too high for normal usage. Perhaps in the future I will lower the entire gear range, so that gears 9,10 and 11 can get used, and reserve the lower gears for climbing.

Saturday, November 2, 2013

Avanti Inc 3: New Tires, Fenders, Rack and Lights

After spending much effort resolving the new crankset issue, I could finally continue with the bike modifications. These bike modifications are not to increase speed or make the bike lighter. Rather, these additions are to make the bike more suitable for commuting.

First up, the tires! The stock Continental SportContact tires are quite OK, but I would like something more puncture resistant and maybe slighter faster. This will help to avoid having to repair punctures and also make the ride slightly smoother. After much research comparing a few Schwalbe tires, I finally decided on the Marathon Supremes.

Folding tires for easier installation and removal from the rims!

One of the tires with a good balance between puncture resistance and rolling resistance.

700x32C size for the Marathon Supreme, versus the wider 700x37C size for the Continental SportContact tires. Just a little bit narrower.

As a true commuting bike, the bike must be able to handle wet weather as well. Fenders are a must to minimise road spray onto the rider and the bike. The stock bike does not come with fenders, but it does have fender mounts. I decided to get a good set of SKS full fenders for maximum protection against wet roads.

 New set of fenders for 700C wheels! Matte black to go with the matte black frame.

I ordered the 45mm wide fenders, after researching on the suitable fender width for the 700x32C tires. It turned out to be a good size! A narrower set would get too close to the tires.

The metal stays and the plastic fenders. They were actually quite a pain to setup, with the over complicated way of fixing the stays to the fenders. The nut and bolt fixing method was very fiddly, and when you manage to fix up one of it, the other side comes out. Very time consuming.

Fixing the front fenders onto the front fork. The bolt provided (M5x45mm) was not long enough to go through the thick front fork, I had to look for a 60mm long bolt to install the fenders.

Front fender fits the wheel nicely! Slightly large gap between the tire and the fenders. If not for the cumbersome method of removing and fixing the fenders, I would have taken out the stays to cut off maybe 10mm, for a better fit. Probably next time.

As for the rear fenders, the fitting was not so good out of the box. But before that, let's take a look at the rear rack. A rear rack is another important part of a commuting bike, as it is very useful for bringing things along.

I selected a matte black rack to go with the matte black frame. Although the bike has disc brakes, the disc brake parts are neatly hidden within the rear triangle, so I can just use a standard rear rack instead of requiring special disc-specific rear racks.

Rear brake caliper mounted on the inside of the rear triangle, instead of on top of the seat stay. This enables the use of a standard rear rack.

Double rails for greater flexibility. I can mount panniers and still fix something onto the top of the rack.

Rear rack and rear fenders shares the same mounting point on the frame.

 
Rack is slightly tilted forward as the seat stay fixing rods were too short. Not a big issue though. 

The rear fender stays have been cut short by 20mm, in order to put the fenders closer to the tires. The initial lengths were too long, and there was a big gap between the fenders and the tires. It was troublesome but necessary to remove the rear fender stays, and to cut them before reinstalling them again.

When I was selecting the new components and accessories for the new Avanti Inc 3, I took care to use similar and compatible components as my Dahon Boardwalk. What I mean by this is that I used the same PD-A530 SPD pedals, and selected a rear rack with a similar tubing diameter (10mm) as the Biologic Arclite Rear Rack, so that I can swap the panniers between the bikes without adjusting anything.

Same Shimano PD-A530 SPD/Platform pedals on both the bikes. This allows me to use the same RT82 Road Touring SPD shoes on both the bikes.

With compatible pedals and racks, I can basically prepare the same shoes and panniers for cycling, and depending on the weather in the morning, I just grab the appropriate bike and go. Dahon Boardwalk for dry weather, and the Avanti for wet weather.

Although the Schwalbe Marathon Supreme tires should greatly lower the chance of getting a puncture, I still feel more prepared if I have the correct equipment to fix a puncture if required. The Alfine 11 rear hub of the Avanti means that I need a size 15 spanner to remove the locknuts on the rear axle, in order to remove the rear wheel if required.

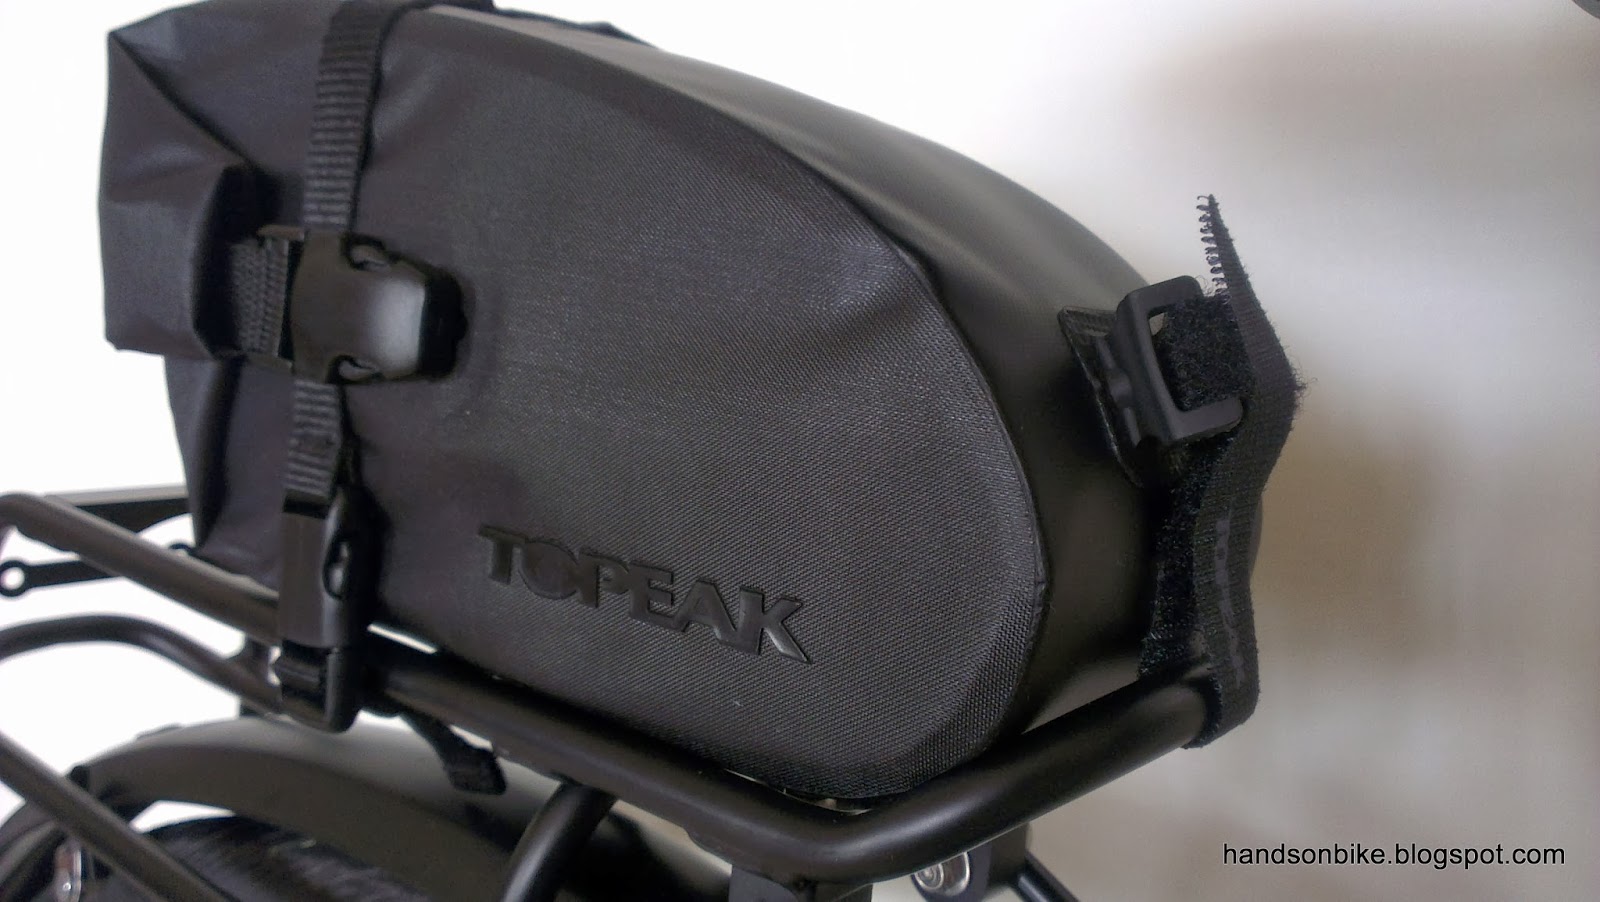
I added a Topeak Wedge DryBag, Large with Strap Mount as a rainproof saddle bag. It will be permanently fixed to the Avanti and will have some basic tools. This is the same saddle bag that I am using on my Polygon Cosmic CX 3.0 MTB.

The Topeak saddle bag with the tools: Topeak Mini 9 Tool, Topeak RaceRocket High Pressure pump, Schwalbe tire levers, a spare tube and a size 15 spanner.

This was the initial position where I mounted the saddle bag. 

Due to the size of the bag and the rack, the saddle cannot be lowered further, although it is at the right height for me. But the problem is that when cycling, the inner thighs will touch the saddle bag, as the saddle bag is rather wide and close to the saddle.

I found an alternative way of mounting the saddle bag, using the rear rack instead of the saddle rails. This avoids the problem of the legs touching the saddle bag when pedaling.

Saddle bag mounted on the rear rack instead.

It is actually a very secure way of mounting the saddle bag! I am quite surprised at the stability.

The only problem is that the rear light tends to tilt downwards when mounted on the saddle bag. I have tried mounting it on the rear rack, but I just can't seem to find a good place to mount it, even with L-shaped brackets and other spare parts.

I have also gotten new lights for the Avanti. The new lights will be introduced soon in separate blog posts, but here is just a sneak preview.

Ultra bright 2 watt Solas rear light by NiteRider!

Goes onto the light clip on the saddle bag.

  Also from NiteRider, the Mako 200 front light.

Mako 200 mounted on the handlebar.

The reason these lights are chosen is because of the relatively long battery life (18hrs for the rear and 42hrs for the front, in the flashing modes), which minimises the need to change batteries often. Matte black casing of the front light also matches the bike, and the ultra bright rear light would really catch attention! Detailed light reviews to posted separately.

Topeak Modula Cage, to fit various water bottle sizes. The one that I have is the older version without the rubber grips on the cage.

LitePro copper bell for a lovely ringing sound!

I had planned to write about the adjustment of the eccentric BB and the belt tension, but this post is getting too long! Shall write about it in the next post instead.

With the accessories such as the fenders and the rear rack added, the bike is now ready for commuting duties! Just rode the bike after rain on wet roads, and the feeling is great!

All ready!


What I love about the Avanti Inc 3:
1) No need to dry, clean and re-lube any bike parts after getting home. There is nothing to rust!
2) Hydraulic disc brakes work well in all weather conditions, and there is no need to clean the rims after riding in the rain.
3) Full fenders blocks most of the road spray, keeping me and my bike mostly dry.
4) Belt drive system is super smooth, quiet and clean. Also does not rust or require lubing like a metal chain.

I could go on about other points which I like, but these are the major ones that really differentiates this bike from other bikes.