Tuesday, August 27, 2013

Difference between Good and Bad QR Skewers

The quick release skewer is an often overlooked component on a bike. Despite looking small and flimsy, it plays an important role on the bike: Holding the wheels in place! Without a quick release skewer, the wheel would pop out whenever you go over a bump. Contrary to popular belief, the QR skewer does not bear weight on its axle. Rather, the load is borne by the ends of the hub, and the QR skewer merely clamps everything in place.

Of course, QR skewers did not always exist. Before it was invented by Mr. Campagnolo in the 1930's, cyclists have to loosen axle nuts before they could remove the wheel from the frame, which is comparatively more troublesome. Nowadays, QR skewers are found on most mid to high end bikes, with only the most basic entry level bikes still using traditional nutted axles for the wheels.

However, not all QR skewers are made the same! There are 2 main types of QR skewers: The internal cam type and the external cam type. From the pictures below, you can see the difference.

Dura-Ace QR skewer with an internal cam mechanism

QR skewer with an external cam mechanism

The most common type of QR skewers that we see nowadays are the external type. It is usually lighter in weight, and easier to manufacture. This makes it cheaper too. However, compared to the internal type with all metal parts, it does not have such a strong clamping force, and the performance is also poorer due to inferior parts being used (further elaborated below).

For normal usage, either type of QR skewer will work fine. However, if you want to know more about the difference between good and bad QR skewers, read on!

Let us take a look at the external cam type of QR skewers, as it is more common and the mechanism can be seen easily. Look at the two pictures below. They are both external cam type QR skewers, and they also look similar, but there is actually a crucial difference.

QR skewers that come with the Wheelsport wheelset

 New QR skewers from TAT

Did you spot the difference? If yes, good for you. You can tell the difference between a well designed QR skewer and a normal QR skewer. If not, read on to find out!

Look at the concave shaped washer under the lever cam. On most (90%) QR skewers, this piece is made of hard rubber or plastic (1st picture). When the lever is closed, the rubber compresses and some of the clamping force is lost. This is why you get a mushy feeling when you use this type of QR skewer. What you are feeling is the concave rubber washer compressing under load. Although it will still work, you will need to apply a higher force at the lever to close the QR skewer properly, as some of the force is used to compress the soft rubber washer instead of clamping the hub tightly.

On the other hand, look at the concave washer on the QR skewer in the 2nd picture. It is a solid metal washer made of brass. When closing the lever, the brass washer reduces the amount of friction in the cam mechanism (compared to the rubber washer), and it gives a nice, solid locking action. The brass washer does not compress and the clamping force is fully utilized to secure the wheel. Not only does the locking action feel smoother, the clamping force is easily achieved with less effort.

Another difference is the material used to make the QR skewer. This also indirectly affects the weight of the QR skewer.

QR skewers from the Wheelsport wheelset. All the pivots and axle are made of normal steel, with aluminium levers.

 TAT Alloy/Titanium QR skewers. Titanium pivots and axle, aluminium levers and nut.


The titanium QR skewer is a good 40 grams lighter than the normal steel QR. This is despite it using a heavier brass washer. Another important feature is that because there is no steel used (besides the spring), it does not rust! Compare this to another QR skewer that has some rust on the exposed steel pivot.

Rusted pivot on the PZ Racing QR skewer

More pictures of the TAT Titanium QR Skewer below:

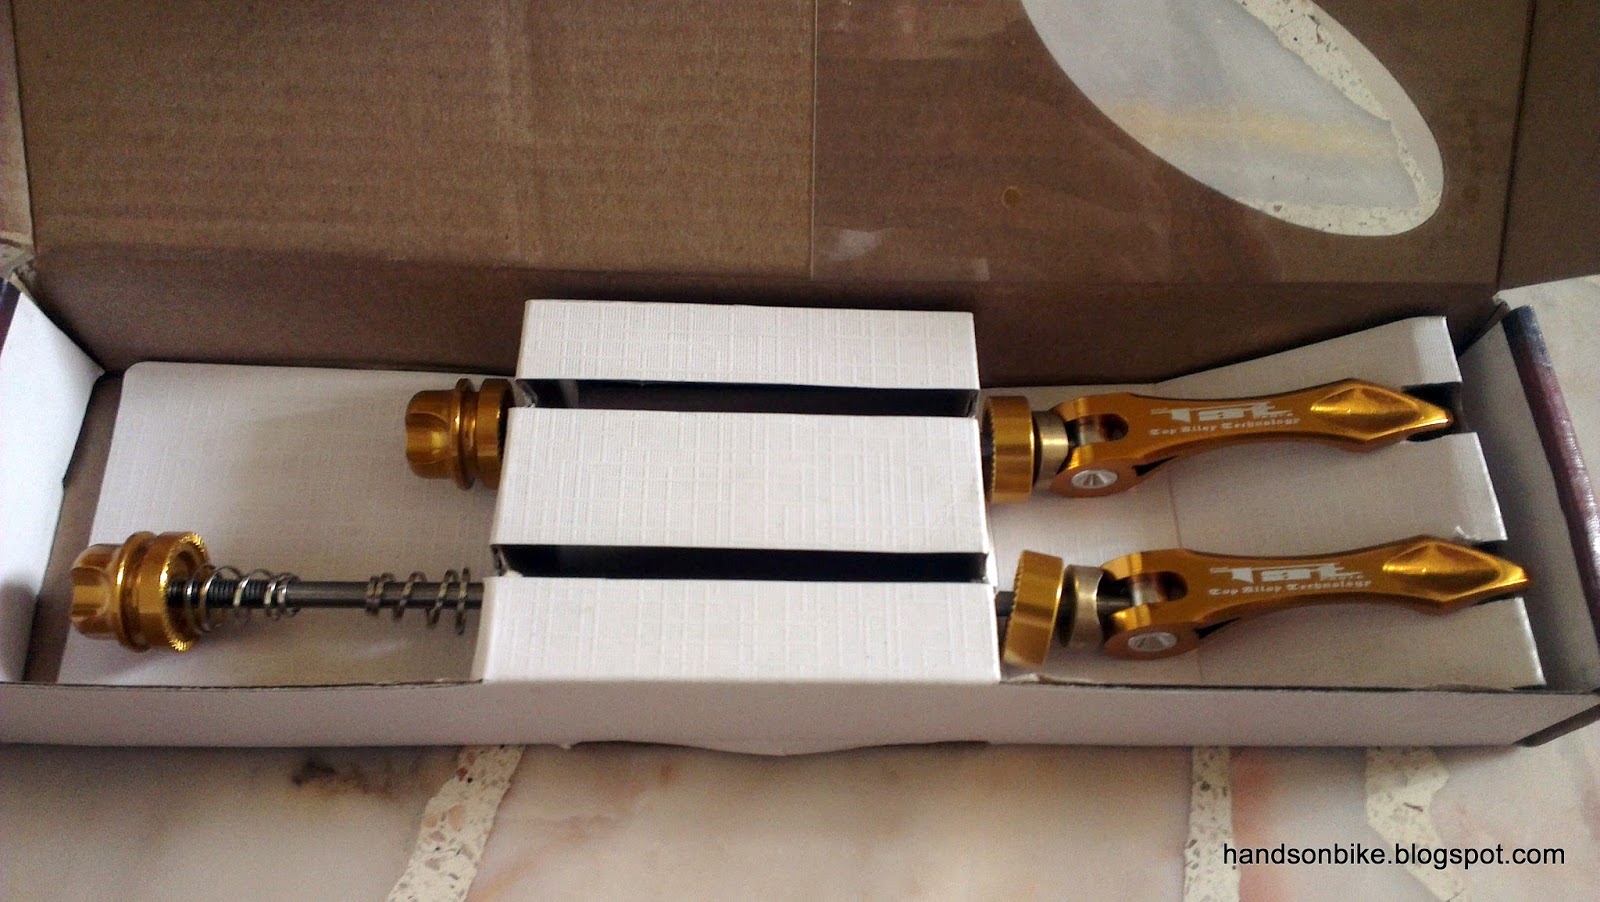
Comes in 74/130mm lengths for Dahon/Tern bikes

Nice shiny hardware


Bought both the black and the gold coloured QR skewers

Now you know the difference between good and normal QR skewers. Besides looking at the material used (titanium or steel) and the weight, also look at the type of concave washer that is used! A QR skewer with a brass washer will have a smoother operation and also more solid clamping action. Although this may not make a difference to most people, the quality shows up in the details.

This "brass washer" concept also applies for seatpost QR levers, but that is a story for another day...
 
Seatpost QR lever with brass shim (instead of rubber/plastic washer)

For more info about QR skewers, you can refer to the links below.
Good vs Bad QR Skewers
Sheldon Brown - QR Skewers

Saturday, August 24, 2013

Torque Wrench by GIANT

Do you have carbon parts on your bike? If yes, do you know what is the recommended torque setting for tightening the bolts and clamps onto the carbon parts? Carbon parts are sensitive to excessive torque. Although carbon fiber is a very strong material, it is also very brittle. Speaking in terms of materials engineering, carbon fiber is stiff and strong but not tough.

In view of the carbon fiber parts that is becoming more common on bikes, an accurate way to judge and control the tightening torque is very important. For example, carbon fiber seat posts, handlebars, and cranksets are very popular nowadays. It is necessary to clamp these parts securely, but not over tighten them.

The dilemma with these parts is that you need to tighten them up securely to prevent slipping, but with carbon fiber parts, you risk over tightening. Steel and aluminium parts are not so prone to over tightening as they will not crack or get crushed so easily. If you hear a cracking sound while clamping a carbon fiber part, you have most likely cracked the part and it is dangerous to continue using it.

This is where a good torque wrench can prove to be very useful. It allows you to know and control exactly how much torque you want to use to tighten the part. Let us take a look at this torque wrench which I bought recently.

Torque wrench by Giant. Highly recommended by the bike shop.

Good array of bit sizes to use. Hex 3-10mm, Torx T25 and T30. There is also an extension for the M5 hex key. Some torque wrenches are cheaper, but they don't come with the bits so you have to find and buy them separately.

A little lever that can be flicked to change the direction of turning between clockwise and anti-clockwise. There is also a built in ratchet mechanism for ease of use. I was wondering why I needed to control the torque for the loosening direction (anti-clockwise) until I tried to use it to tighten my left side pedal (left hand thread).

Torque control ranges from 2-24 Nm. Easy to read gauge on the handle.

Just turn the black handle to control the torque setting. The head of the torque wrench will give way when it reaches the preset torque, to indicate that the torque has been reached.

Trying it on my Ultegra 6700 crankset!

The sticker is still there. Recommended torque setting is 12-14 Nm.

 Use an M5 bit for this

I measured the current torque setting and found that it was 10 Nm, below the spec of 12-14 Nm. Adjusted the torque wrench to 12 Nm and turned it till the head of the wrench clicked.

Used it on the Fnhon handlepost with the 2 bolts on top. No idea what the setting should be, but for M5 bolts that clamp onto the handlebar, it is usually 5-8 Nm. Not so critical as I am not using a carbon handlebar.

Can also use on the chainring bolts. For this Ultegra crankset, it uses Torx bolts.

The stem bolts that clamps onto the steerer tube. 5 Nm, M4 sized.

The stem bolts that clamps onto the handlebar. Also 5 Nm.

The Shimano Saint MX80 pedals. 10 Nm, use M6 hex key on the rear of the pedal spindle.

This torque wrench may be useful, but it is probably not so important to me as I have very few carbon parts on my bikes. However, if you have a carbon handlebar/seatpost, please take note and do not clamp it too tightly. If you have already reached the maximum recommended torque spec, and the handlebar/seatpost is still slipping, then you will need to use Fiber Grip or some other carbon paste to help hold it in place.

Overall, I feel that this torque wrench is of high quality, and deserves to be used in a proper bike workshop. It is a tool that is good to have, but not necessary unless you use carbon fiber bicycle components.

Friday, August 9, 2013

Light & Motion Vis 180 Rear Light

Introducing a new rear light for my Dahon Boardwalk! Yes I already have too many rear lights, but this one is different. Not just the good but common blinker rear light. Read on to learn about its features!

This light by Light & Motion was only bought recently. I bought it from City Bike Depot in Sydney, Australia when I went there for a holiday.

City Bike Depot in Sydney!

Dazzling array of accessories to be found inside!

Lots of bike tools to choose from. I had not felt so poisoned in a long time...

In fact you cannot find any Light & Motion products in Singapore bike shops. I guess there is no local distributor for this brand. Generally, I think that this brand has a solid reputation for being bright and reliable, but also rather expensive. Let us take a look at this new rear light.

The Light & Motion Vis 180. As what it says, "Simply Better". Let's see how true that is!

Lots of information at the rear. 4 modes of operation with the corresponding runtime.

Comes with a USB charging cable, a seat post mount and a sticker.

The clamp with rubber strap is easy to use. Just wrap around the seat post, loop it through the slot...

 ...bend it back and clip the strap onto the little round knob.

What I like about this mounting is that it can be removed from the seat post easily without tools when I need to lower the seat post. Which is not so often these days anyway.

Red LED on top, with 2 orange side lights. The orange light is also visible from the rear.

 The USB charging port, protected by a rubber flap. I have rode in rain with this light and it is still working fine.

The innovative mechanism for adjusting the angle of the light!
 
To adjust the lighting angle, press the red button and adjust the angle of the holder.

The notches on the body that clicks in to secure the chosen lighting angle.

The bronze coloured body is made of aluminium, which is a nice quality touch to this product.

Before we see the light in action, let us take a look at the mounting. It comes with a seat post strap mount, but can also be clipped in onto a rear saddle bag. However, online reviews have said that clipping onto the saddle bag is not secure and the light can jump out rather easily.

Goes under my saddle bag onto the long exposed seat post 

The only downside to the mounting is that the remaining strap is too long


One of the difference for this rear light is that instead of flashing, it pulses with a varying brightness. This means that the light is always visible as it doesn't go dark between flashes.

Another interesting feature is that it has 2 orange side lights for side visibility. Not too bright compared to the main red light, but hopefully it is useful.

There are 4 modes of operation for this light:
1) 50 lumens red LED pulsing + flashing orange side lights (6 hrs runtime)
2) 25 lumens red LED pulsing + flashing orange side lights (12 hr runtime)
3) 50 lumens red LED steady + flashing orange side lights (4 hr runtime)
4) Red LED off, only flashing orange side light (20 hr runtime)

The last mode is designed for paceline/group riding, with the main red LED off so that you don't blind your buddy behind you. Thoughtful design by the light designers.

As for the red LED, it is very bright! In fact it seems to be even brighter than the SMART 0.5 watt or 1 watt light. I might be wrong, but that is how it feels to me. The viewing angle is also very wide, as the LED appears very bright even when viewed 45 degrees off to the side.

The red LED is truly bright! It basically works as a red coloured torch light.

You can see how wide the lighting angle and how bright the red LED is. Dwarfs the other rear lights that I have.

 Paceline mode, with only the orange light visible from the rear and the sides.


Advantages:
1) Strong and powerful red light
2) Side lights for improved side visibility
3) Easy rubber strap mounting for easy installation/removal without tools
4) Good battery life especially for a USB charged light

Disadvantages:
1) Expensive
2) Cannot be mounted securely on saddle bag hook
3) Rubber strap is excessively long with no good way of tucking away the excess
4) Battery indicator is at the bottom of the light which is difficult to see

This light is so bright that I usually just use it in the 25 lumen pulsing mode, as the 50 lumens is overpowering and perhaps not necessary. Also, I also use this light together with another rear light, which I have mounted onto the rear rack.


The Bontrager Flare 3 rear light. What is unique about is light is that it has a m5 threaded hole at the rear

With this threaded hole, I can easily fix it onto the rear rack with a short M5 bolt.

 Easily done! An extra light can be fixed on the bike without taking up any space elsewhere.


 Too many lights? From top to bottom: SMART 0.5W rear light on saddle bag, Light & Motion Vis 180 on seat post, spare white/red Geeego light, and the Bontrager Flare 3.

With this new Light & Motion Vis 180, I now usually use it with one other blinker, either the SMART 0.5 watt on the saddle bag or the Bontrager Flare 3. This would be sufficient for night riding.

Sunday, August 4, 2013

Shimano Click'R Pedals PD-T400

What is SPD? SPD is an acronym for Shimano Pedaling Dynamics, which refers to the system used to bind the cycling shoes to the pedals. There are also many other clipless systems out there, by other pedal/shoe companies, such as Look, Crankbrothers, Time, etc.

For cyclists who are new to clipless pedals, fixing the shoe to the pedal can be scary. The main worry is that you cannot or forget to remove the shoe from the pedal when you stop, ending in a fall. But this risk can be minimised with the new Click'R SPD pedals from Shimano.

Before you read further, do read up more on clipless pedals at the post here. It will be useful info when you decide to use SPD pedals on your bike.

A Beginner's Guide to Clipless Pedals

Shimano came out with the new series of Click'R pedals last year. The main selling point of these pedals is that the clipping in and out force is much lower than other pedals, making it easy for beginners to learn the basics of cycling with SPD. With that in mind, I found the Shimano PD-T400 which seemed like an ideal training SPD pedal.

The weight of these pedals is slightly over 500grams, which means it is not for weight weenies. However, the large platform and easy clipping in/out makes it ideal for beginners.

Bought half a year ago, but didn't have the chance to install it till now...

Good looking pair of SPD pedals! It comes in white colour too.

The two sided spring mechanism

 The front part of the spring naturally pops up, making it easy to locate and clip in the cleat

Click'R logo clearly visible on the pedals.

As installed on the Dahon Vitesse X20-TT! Swapping the pedals is a simple 10 min job.

Close up look. The spring tension can be easily adjusted using an M3 allen key. Remember to adjust for both sides of the pedal!


Yup the SPD shoe clips in fine. All ready a la triathlon style.

Yes the pedal looks really huge. Which is good for beginners for a stable pedaling platform.

I have tried the pedals, with the spring tension adjusted 2 clicks up from the weakest position. I have been using SPD pedals for over a year, and I find the spring action too light as I am used to it. But for beginners, this is perfect, as they can clip in easily, and can also yank their foot out in emergencies.

As I have stated earlier, these Click'R pedals are designed more as a training set of SPD pedals. Once you are used to clipping in and out, you can turn up the tension for more secure clipping, or upgrade to a nicer and lighter set of SPD pedals.

This means that once the SPD pedals on the Vitesse have been upgraded, I will have one pair of PD-T400 to pass to the next person to try SPD...

I found this very detailed and honest review of the PD-T400 pedals by another writer. It is worth a read as it provides so much more information than my short review. Here it is!

Shimano Click'R Pedals - Less is Much More