This gives me an excuse to get a new front light for the Brompton. Many Brompton owners like to install the Cateye Volt 300 front light onto the front of the Brompton, using a custom light bracket available from Mighty Velo. I wanted to try and see if I could reuse the stock light bracket or not.
Cateye Volt 400 front light. More powerful than the Volt 300, at only 5 dollars more.
Rechargeable via USB or a removable cartridge battery.
Decent battery runtime for the different lighting modes.
Can turn on the light either by pressing and holding it, or double clicking it. Double clicking jumps directly to the high beam mode, while pressing and holding brings you to the last selected mode before it was turned off.
The stuff that comes with the light.
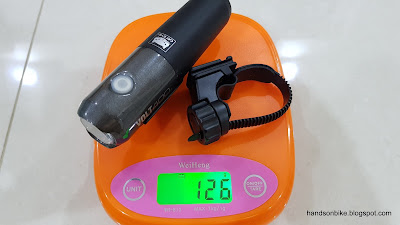
Light weighs 108 grams
Light plus Cateye light bracket is 126 grams
Lens for focusing the light at the front, with the power/mode button on top
Micro USB charging port is at the bottom, protected by a rubber cover to make it splash proof.
Original light bracket, with the top half secured to the clamp band by a single fixing bolt.
After testing it out, I have an idea on how to attach the Cateye light bracket to the original light bracket on the Brompton. First, the Brompton light bracket needs to be removed for some modifications.
Brompton light bracket is mounted to the front fork using the axle from the front brake caliper. A quick photo to show the arrangement of the spacers before removing it.
Just before the light bracket is removed from the front fork. Note the small clearance to the bottom cup of the external headset.
Light bracket resides within a custom casted metal part, to ensure that the clamping force of tightening the front brake axle is evenly distributed to the frame.
Original light bracket from the Brompton, before modification.
Top part of the Cateye light bracket can be removed by just unscrewing the single fixing bolt.
After that, just slide the top part off the clamp band. We will only need the top part to hold the light.
Top part of the Cateye light bracket. This part will be fixed to the Brompton light bracket, acting as an adapter between the light and the Brompton light bracket.
The Brompton light bracket will be widened slightly, where it will then be slotted into the Cateye light bracket.
After some work with a bench vise and some straightening of the Brompton light bracket, here is the result.
Due to contact with the tools and vise, the surface coating on the light bracket has been worn off, exposing bare metal.
To protect the bare metal and to improve the appearance, a black marker is used to touch up the exposed metal surfaces.
This modified Brompton light bracket is then slotted into the Cateye light bracket. It is a good fit!
View from the top
With the light installed to test out the fitting. All seems good!
The two brackets are then fixed together with a bolt and nut plus some washers.
Reinstalling the Brompton light bracket to the front fork. No interference between the tail end of the light and the frame!
Sufficient clearance between the light and the surrounding parts when folded.
Light can be easily removed for charging when required
The actual modification required for this is only the original Brompton light bracket, which had to be straightened out. It is rather difficult if you don't have the proper tool or equipment to straighten it nicely, otherwise this is not a challenging modification.


Excatly what I was looking for !! will do the same!! thanks
ReplyDeleteThanks very useful. I am doing the same to my Brompton
ReplyDeleteI did the same way you did. The problem is once you put on your carrier block there it won't work.
ReplyDeletehi there. What is the problem once the carrier block is there? I would have thought that the clearance would be the same as for the bespoke Brompton light fitting.
DeleteI think this setup places the front light higher than usual, which will interfere with the Brompton front bag.
ReplyDeleteWould like to check, with this mod, will this affect the Brompton front bag or carrier?
ReplyDeleteI'm not sure as I don't use a front carrier. But it seems to be a bit higher than normal.
Delete