Friday, April 12, 2024

Magicshine Seemee DV Rear Camera + Rear Light

Ever since the first Cycliq Fly 6 rear camera + rear light came out, I was surprised that there are so few competitors on the market. I believed that there is probably some kind of patent protecting this design, which is why there are no credible alternatives. I have used a few different generations of Cycliq Fly 6, can see the reviews here.

For such a device, the most important features are:
1) Clear video - Requires some kind of stabilization technology, as well as good low light performance.
2) Good rear light - Does not have to be super bright, but should be "good enough".
3) Relatively long battery life - At least 4 hours in my opinion, for a standard Sunday morning ride.
4) Water resistant - Needs to survive rain and wet rides.

Other features such as fast charging, quick release connection, compact size, Wifi connection, etc are good to have but not as important as the four I listed above. Without any one of the four features, the rear camera + rear light will not be good enough.

Recently I heard of the Seemee DV rear camera + rear light, which has some good reviews online. Decided to get it to try it out for myself, as it is just one-third the price of a Fly 6. 

One thing to take note: The Seemee DV does NOT have audio recording. This probably makes it easy to seal against water ingress, but also means that there is no audio record of anything that happens.

Seemee DV Smart Tail Light

Made in China like most other consumer electronics.

Free saddle rail bracket given as a gift.

Unit is well protected and well packaged.

All the parts that come with the standard package

Weight of unit + seat post mount is 114 grams.

Weight wise, the Seemee DV is lighter than the Fly 6 (Gen 3), which weighs 113 (unit) + 15 (strap) = 128 grams. In any case, it is a small difference.

Looks like a mini Garmin mount. Enables the strap to stay on the seat post, while the unit is twisted off for charging.

Some lens specifications listed. Hope it is scratch-resistant as it is located at a position where lots of road debris is thrown up against it.

LEDs at the rear and also the sides, which is good for visibility.

Type C charging port covered by a rubber flap

Micro SD card slot located at the other side, also covered by a rubber flap.

The Micro SD card slot is a bit annoying, as the spring mechanism does not keep the SD card locked in properly. When closing the rubber flap, it tends to cause the SD card to pop out. Basically the rubber flap is critical to holding the SD card in place. Feels like it might vibrate loose during a ride and stop recording.

Mini Garmin mount to secure the unit to the seat post mount.

Buttons are on top! Power button and camera button, as well as status LEDs.

With the video recording on, and in Flash mode (my preferred option), it can supposedly last 9 hours! That is like double the Fly 6 runtime.

Colour of LED at different battery levels

Fly 6 Gen 3 vs Seemee DV. The Seemee DV is a lot longer, although slightly slimmer.

Seemee DV has a teardrop shape, and also side LEDs which are useful.

There is a ton of regulatory info on the large Fly 6 sticker, while there is none on the Seemee DV.
This probably means that the Seemee DV did not apply for regulatory approval in those territories and cannot be sold there.

Both use their own proprietary Garmin-style quarter-turn locking designs.

Top view. I prefer buttons on top like the Seemee DV.

Rear and side LEDs lighted! I like the additional side visibility.

Additional side visibility is always safer.

There is also a circling red light around the camera lens when it is recording, much like the Fly 6.

As mounted onto the seat post

Looks quite slim, I have no problems with the size.

The Seemee DV has good battery life as well as a good rear light. Not sure about water resistance, it will only be known after it goes through a wet ride.

However, I found the video quality to be quite poor, even under broad daylight. As shown below from the still shots taken from the videos, the car plate numbers are not legible at all. 

These videos were taken when I was riding steadily on a smooth flat road, under good lighting conditions, and I still could not see the car plate numbers with the vehicles directly behind me. If that is the case, there is no hope for seeing the car plate numbers under less-than-ideal conditions.


It seems that the video image vibrates quite a bit even when rolling over smooth roads. From this, I can conclude that there is no effective video stabilization technology being used to smoothen out the videos.

From what I observe, another big contributor to the unstable video is the seat post mount. If you look at a few pictures above, where the Seemee DV is mounted onto the seat post, you will notice a few things that is different from the Fly 6 mount.

1) The mount is located at one end of the unit instead of in the middle, this enables the unit to vibrate more as it is not supported adequately.
2) Mount (mini Garmin) is very small, which enables the unit to shake more easily.
3) Strap of the mount is made of rubber, which is stretchy and also allows the light to shake more.

Together, these factors cause the Seemee DV unit to be "floppy", enabling it to bounce more than the bike itself. This can be shown by lifting up the bike from the ground, and letting it bounce on the tires. When I do that, the Seemee DV swings around a lot, which is terrible for video stability.

Conversely, the Fly 6 mount is larger, and uses a non-stretchy velcro strap to reduce vibration. The Fly 6 also has Electronic Image Stabilization which helps to steady the video. 

The Seemee DV is a well-packaged rear camera + rear light, with good battery life and bright LEDs. Unfortunately, it is let down by a mount design that is not good enough. In my opinion, if the mount design is improved to be more beefy, as well as adding in some video stabilization technology, this Seemee DV will be a serious challenger to the Fly 6. However, in this current iteration, I cannot recommend it as the video quality is just not good enough.

Sunday, April 7, 2024

Specialized Aethos: Installation of CL900 Brake Rotors

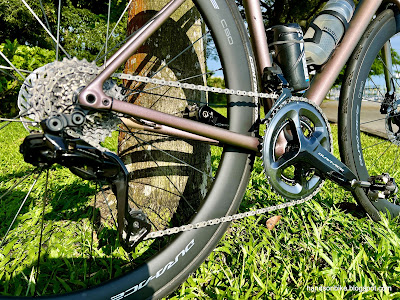
In the previous post I introduced the new Dura-Ace CL900 disc brake rotors, and in this post I will show how it looks when installed onto the Specialized Aethos road bike.

Dura-Ace CL900 rotor on the Aethos! I think it looks better than the XTR MT900 rotor.

Close up look at the front 160 mm rotor

The CL900 rotor has a more "rounded" appearance that makes it more suited for a road bike's image.

Rear 140 mm rotor

Looks so new...

View of the full bike with the new CL900 rotors. Nice!

Outdoor pictures of the Dura-Ace shifters, PRO handlebar and Garmin Edge 530.

Trying some artistic shots...


Last picture of the Specialized Aethos, before the next chapter begins...

Specialized Aethos: Dura-Ace CL900 Centerlock Brake Rotors

It has been nearly a year since I changed the disc brake rotors on the Specialized Aethos, but have not managed to write about it. The pace of my blogging is lagging way way behind when the modifications actually took place.

Nevertheless, I strive to continue writing about all the changes to my bikes, for archive and comparison purposes.

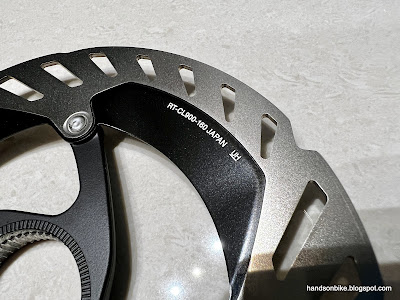
These are the newer RT-CL900 Dura-Ace rotors, which have a different appearance from the MT900 XTR rotors. They are cross compatible, but the CL900 rotors are supposedly more warpage resistant. For me, I usually choose rotors based on how they look and weigh, not really about performance.

Dura-Ace grade rotors CL900, in 160 and 140 mm diameters.

These rotors look more refined, compared to the aggressive and edgy appearance of the XTR rotors.

Size difference of the 140 and 160 mm rotors.

Black painted fins to help dissipate heat a bit faster.

The aluminium spider arms have been carefully designed to minimize any warpage due to heat.

I prefer this rotor design for road bikes, as the asymmetric arms look better.

Another picture of the brand new rotors, before they get used.

CL900 rotor in 160 mm diameter weighs 112 grams, 6 more than MT900 rotor.

CL900 rotor in 140 mm diameter weighs 95 grams, about 8 more than MT900 rotor.

The rotor weights shown above are without the aluminium lock ring. The lock ring will add 7 grams to the weight. I will be comparing the CL900 and MT900 rotors in a separate post, to discuss the appearance, weight, and other differences.

Crank Arm Door Handles

I have always had the idea to use bicycle crank arms as door handles, as they seem perfectly shaped for that purpose. When I finally had my own dedicated bike cabinet, I decided to mount my spare crank arms onto the doors, to be used as door handles.

It is not a straightforward task to mount the crank arm onto the door, as there is no readily available mounting option. I decided to create my own 3D CAD for the adapters, and got it 3D printed! With the right design used, the crank arms can be securely attached to the cabinet doors.

My idea is to connect both ends of the crank arms to the door, and this requires a pair of adapters to work. See the pictures below for the design.

Two 3D printed parts are needed. The left adapter screws into the thread, while the right adapter is to match the Hollowtech spindle splines.

The spindle splines makes it more secure, although I think a circular shaft of the right diameter will work as well. I made a little square cutout at the back surface, in case I need to pry off the part later.

3M mounting tape pasted at the back, and trimmed to match the shape of the adapter.

Fits nicely! Need the correct length so that...

...the plastic Crank Arm Fixing Bolt can be screwed on properly.

Notice that I am using the old type of Crank Arm Fixing Bolt, which has a smaller M15 thread instead of the later M20 thread. This is so that I can make the wall of the adapter shaft thicker for the 3D printed threads. If I used M20 threads, the shaft walls of the 3D printed part will only be 2 mm thick, since the spindle outer diameter is 24 mm.

You can also make the design solid, or cored out from the back. Or just leave it as a hollow interior without fixing the bolt, just that it will not look as neat. You can just tighten the two clamp bolts lightly to fix the crank arm to this adapter.

On the other end, where the pedal thread is, another adapter is designed. 

3D printed adapter at the pedal axle thread. For left side crank arms, the pedal threads are left hand threads.

As each crank arm has a different Q-factor, the adapter needs to adapt to different distances from the cabinet door. A screw thread enables the adapter to be inserted at different depths.

Adjusting the adapters so that they will rest flat on the cabinet door. Both adapters will be pasted onto the cabinet door together with the crank arm.

Crank arms mounted onto the cabinet doors! Ultegra R8000 on the left side, Dura-Ace R9100 on the right side.

These premium door handles look nice and shiny!

I have a spare Dura-Ace R9100 left crank arm, as I am using the 4iiii power meter version on the bike.

Overall view of the bike cabinet and new door handles.

Testing to see how an old Dura-Ace 7800 crank arm will look.

Swapped to different crank arms after 2 years. The 3D printed adapters have held up surprisingly well with no issues at all!

By sheer luck, the crank arm door handles managed to avoid hitting the Omnidesk when the cabinet doors are opened.

I am really pleased with the crank arm door handles, as it makes the bike cabinet really unique. It enables me to put the extra crank arms to good use, while displaying them at the same time. The longevity of the 3D printed adapters have surprised me as well, as they are still working fine after 3 years.

Lumos Firefly: Quad Charging Mat and Handlebar End Mount

One of the cool accessories that the Lumos Firefly has is the Quad Charging Mat. The original Charging Cradle can only charge 1 light at a time, which is troublesome as I would usually charge at least 2 lights at one go.

With the Quad Charging Mat, I can charge 4 Lumos Firefly lights at the same time! Check out the pictures below to see how it works.

Quad Charging Mat for Lumos Firefly lights, available as an add-on accessory.

Plug in a USB cable into the Quad Charging Mat, and insert up to 4 lights to be charged wirelessly, at the same time!

Lumos Firefly: Bike Lights

Here are some modern bike lights with good connectivity! These are the Lumos Firefly which first launched on Kickstarter. It is very well funded on Kickstarter, and they provide detailed updates. Although the first shipment was slightly delayed, as per expected for almost all Kickstarter projects, it was not a big delay.

What's interesting to me is that the co-founded and CEO of Lumos, Eu-Wen, is based in Singapore. This meant that the backers in Singapore were the first to collect the Lumos lights in person, from a collection party at Kian Hong Cycle at East Coast Park.

Other than the lights, I also ordered other accessories as you can see below.

The lights and accessories are packed in a modular format, which makes it easy to customize the package according to what the user needs.

Pack of 4 lights! Includes stickers if you need to identify your lights.