I have been hearing good reviews of this suspension stem from Redshift Sports, especially when used on gravel bikes. It is apparently very effective in dampening out small vibrations when riding on gravel, which improves comfort.
On my Cervelo Aspero, I am using wide and comfortable WTB Venture 47 650B tires, which are already pretty good. However, if I improve the comfort by lowering the tire pressure, it makes the bike more draggy, especially when riding on paved sections. There is a trade off between comfort and speed, when I adjust the tire pressure.
I am hoping to see if adding a suspension stem will improve the comfort further, without increasing the rolling resistance. The idea is that I can still maintain a good tire pressure of around 30 PSI for the front tire, which is the lowest that I can accept without it feeling too draggy. At the same time, the suspension stem will be able to absorb any bumps that actually travel up the fork, and dampen it before my hands feel it.
There are 2 versions of this stem, the standard ShockStop and the ShockStop Pro. The Pro version is lighter in weight, due to more machining and also uses titanium hardware instead of steel. The appearance also looks better on the Pro version. In my case, I value the improved appearance and lower weight, which is why I got the Pro version even though it costs more for the same performance.
Here it is! The Pro version.
It provides 10-20 mm of suspension travel in the stem. I wonder how it will feel?
It may look complicated, but the construction is actually quite simple and clever. This is the 80 mm version.
It is very important to follow the instructions carefully, to avoid damaging the stem or create any safety issue. This step shows how to remove the elastomers.
The elastomers can be changed to those of different hardness, to suit your body weight and your riding preference.
Here are the different combinations of elastomers which you can use, to customize the stiffness that you want.
There is a large pivot on the stem which rotates to absorb the bumps, while being dampened by the elastomers.
There is a gap to allow the front part of the stem to move relative to the steerer tube clamp portion.
This 80 mm stem weighs 226 grams, less than 100 grams more than the 80 mm PRO Vibe stem that I was using previously. Very acceptable weight increase for the comfort.
I can't use the stem straightaway, as the rise of the stem is wrong for me. It comes stock with the stem rising upwards, but I want to use it with the stem tilting downwards. In this case, I cannot just flip the stem and install it like conventional stems, as the suspension parts will be upside down.
What I need to do is to remove the internal elastomers and wedge, and install it upside down, so that I can use the stem with a downward tilt. Good chance to see how to assemble the internal parts.
The instructions state that to swap elastomers, the stem must first be clamped on a steerer tube, so that a pre-load can be added during installation. Instead of using the steerer tube on the bike, I made a tube of diameter 28.6 mm instead.
From my spare parts area, I placed an adapter of 28.6 mm --> 25.4 mm (used on the Bike Friday Haul-A-Day) over a 25.4 mm tube (from Litepro stems), creating this tube.
ShockStop stem clamped lightly onto this 28.6 mm diameter tube.
With the stem face plate removed. The elastomers and wedge needs to be flipped to the other side.
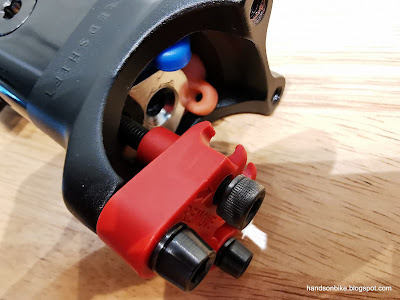
Extra elastomers of different hardness provided, along with a cool tool to remove the wedge.
The tool has two sides to it. One side is for removing the wedge, while the other side is used to install the wedge.
Use two of the stem bolts to fix the tool to the stem. Then, use the supplied bolt to pass through the red tool, and thread into the wedge.
When you turn the bolt, it will pull out the wedge, much like a crank puller. Very clever.
Wedge removed! The stock elastomers used are of 60 and 70 hardness. I believe it is Shore A hardness, which is used to measure how hard an elastomer is.
All 5 of the elastomers, ranging from 60 to 90. By using a combination of these elastomers, a wide range of stem stiffness can be created.
In the next post, I will continue with the reinstallation of the elastomers, followed by some test riding comments.


