Sunday, May 26, 2024

Bestrider Pump Pro 20: Assembly Part 2

Although I already had new tires for the Bestrider Pump Pro 20 kids bike, they were not ideal. The stock Kenda tires were too knobbly and not suitable for smooth roads. On the other hand, the Innova slick tires that I got earlier were too narrow. The claimed tire width is 37 mm, but the actual measured tire width is just 32 mm.

For road bikes, 32 mm is considered wider than usual. However, on kids bikes, 32 mm feels too narrow to be safe. It is still quite easy for the tire to fall into a crack or drain grille. Therefore, I decided to keep looking for wider slick tires.

Finally I found a tire that seems to be suitable for kids bikes. A suitable tire in my opinion needs to be relatively wide (35 mm or more), slick (light treads are OK), and hopefully not too heavy.

This is a relatively new-to-market 20 inch 406 tire, which is not commonly seen on folding bikes or small wheel bikes.

Continental Contact Urban tires

A size of 20x1.60 translates to 42-406, which means a claimed tire width of 42 mm.
Also available in a narrower 20x1.25 width.

Some light patterns and treads on the tire, which is fine. The centreline looks to be nearly continuous, which is good for lower rolling resistance.

The rotation direction should be followed, as the directional grooves will help to displace water safely.

Unfortunately these tires are heavy, at 347 grams each. Just a bit lighter than the stock Kenda tires which are 369 grams each.

One downside of these tires is the weight. Due to the steel wire bead construction, relatively thick rubber, and the wider width, this all adds up. The claimed weight is 330 grams, so actual weight is about 5% more. I think this weight is similar to the Schwalbe Marathon Racer (40-406 spec).

Decided to change to a high quality Zefal cloth rim tape as well, instead of the flimsy stock plastic rim tape.

Actual width when mounted on the rim is 40 mm! Safer for kids to ride without worrying too much.

Remember, these tires are mounted on the same stock rims, which have a good internal width of 20 mm.

Innova Tire Width: Claimed 37 mm, actual 32 mm
Continental Tire Width: Claimed 42 mm, actual 40 mm

Even for the Continental tires, they are slightly undersized when installed, although not as much as the Innova tires. When choosing tires based on the width, you never know what you will get, as the actual width can turn out to be narrower (Birdy AXS) or wider (Avanti Inc 3) than the claimed width, with the internal rim width playing a big part. Or you might be lucky and get the tire width spot on (Cervelo Aspero).

Tire height of previous Innova tires is about 26 mm. 

Tire height of Continental tire is about 36 mm. This radial increase of 10 mm will increase the tire outer diameter by 20 mm.

Overall wheel diameter with the new Continental tires is 490 mm, a significant increase from 470 mm with the Innova tires.

Comparing the front and rear wheels, when I have changed the rear tire but not the front tire yet. Due to the brown sidewalls and shorter tire height, the Innova tires look a lot smaller.

Comparing with tire tread side by side

The tire width difference of 8 mm can be seen clearly in this comparison.

Lastly, new pedals for the bike! These are high quality Early Rider pedals, which was also used on the previous Bestrider Pump Pro 16.

Front tire also changed to the Continental Contact Urban.

Still plenty of clearance with the V brakes even with a taller and wider tire.

Using lightweight titanium quick release axles to save a tiny bit of weight.

The tread pattern on the tires look pretty good! And I think I prefer black sidewalls over brown sidewalls.

Max tire pressure is 87 PSI, but I found that around 50 PSI is sufficient based on the kid's weight.

Nearly continuous centreline on the tire, apart from the grooves for displacing water.

I'm happy with the new tires, as they are nice and wide at 40 mm, which makes it much safer for riding, without worrying about falling into cracks. Although they are relatively heavy, this also makes them pretty tough which I guess is a fair tradeoff.

Sunday, May 19, 2024

Bestrider Pump Pro 20: Assembly Part 1

With all the components (new and also stock) of the Bestrider Pump Pro 20 kids bike in place, proper assembly can now take place!

As discussed in the earlier posts, some of the stock components are of good quality and will be reused. Examples include the wheelset, crankset and brake system.
On the other hand, other components which are not good enough will be upgraded. These include the handlebar, seat post and saddle, as well as the full drivetrain.

The stock Kenda Small Block Eight tires are more suited for light off-road riding, which is not needed here as the kids bike will be used on smooth paths only. Therefore, slick tires will be installed to reduce rolling resistance and also reduce the weight.

There are many tire choices for 20" 406 wheels, but slick ones that are wide and lightweight are not common. One of them is this Innova brand which I found, which have a claimed width of 37 mm (37-406).

Innova slick tires, 37-406 for 20" 406 wheels.

It has a folded bead which reduces the weight greatly compared to a steel wire bead. Weight is 222 grams per tire which is not that lightweight though.

One of the other tires which I considered is the Panaracer Minits Lite 32-406, which weighs just 167 grams per tire. However, the claimed width is just 32 mm, and from my experience, the actual tire width is always narrower than claimed. This makes them less suitable for the kids bike, as I prefer to install wider tires that will minimize the risk of the tire getting caught in cracks or drain grilles.

To match the new tires, I got Schwalbe SV6 inner tubes which weigh 89 grams each. No need for lightweight TPU inner tubes here.

The brown coloured side walls look good! Deore XT 11-36T 10 speed cassette has also been installed.

Weight Comparison
Stock Kenda tire: 369 grams each
Stock inner tube: 145 grams each
Stock weight per bike: 2 x (369 + 145) = 1028 grams

New Innova tire: 222 grams each
New Schwalbe SV6 inner tube: 89 grams each
New weight per bike: 2 x (222 + 89) = 622 grams

Just by swapping the tires and inner tube, over 400 grams of rotational weight can be saved! Also, changing from a knobbly tire to a slick tire will reduce rolling resistance significantly. In all, this change will greatly improve the ease of cycling by making the bike feel lighter and faster.

Another view of the stock wheelset, with new tires and cassette.

With a 1.85 mm spacer installed behind the cassette, this setup is correct, with the 11T sprocket protruding slightly above the freehub body, before tightening the lock ring.

However, actual tire width is measured to be only 32 mm wide, even though the tire is claimed to be 37 mm wide.

The rim internal width is already 20 mm, which is not considered narrow for 20 inch wheels. Therefore, the undersized tire width is not due to a narrow rim width. Rather, one trick that some tire manufacturers use is to mis-label their tire width.

In this case, even though the claimed tire width is 37 mm, the actual width is much narrower. This allows the tire manufacturer to use lesser material to make the tire, and thus claim a lower weight compared to other tires.

Not happy with this situation, so I will continue to look for wider lightweight slick tires.

Wheel diameter inclusive of tire is 470 mm.

With the wheelset settled, let's move to other parts of the bike assembly. The next focus is at the handlebar area, where the new carbon handlebar will be used.

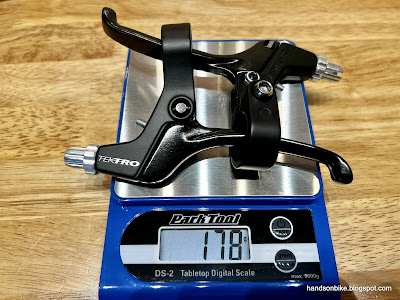
Stock Tektro short reach brake levers, which are excellent for kids bikes. 178 grams per pair.

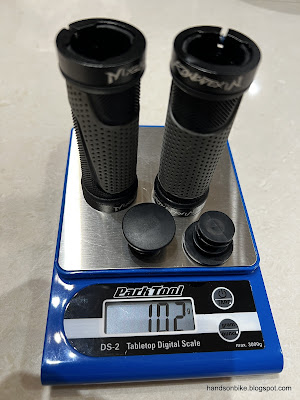
New lock on grips which are 95 mm instead of 130 mm long, which makes them more suited for kids bikes.

The Tektro short reach brake levers are good and will be reused, while the grips will be changed to a shorter lock-on type. At the same time, I decided to swap all the brake and shifter outer housing and also inner cables to a new set, to ensure that it is as smooth as can be. This took up quite a bit of time as I wanted to get the cable length just right.

Grips, brake levers and shifter installed on the new carbon handlebar, with ideal cable lengths.

Stock crankset with new chain ring bolts reinstalled onto the bike.

Brand new 10 speed cassette and rear derailleur installed onto the bike.

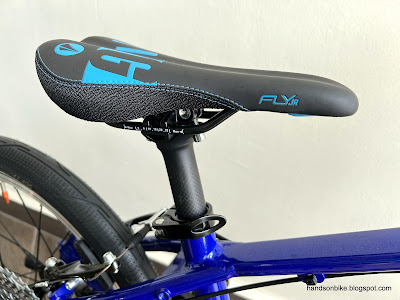
New saddle and carbon seat post installed onto the bike. I think this is the lowest position, after cutting the seat post.

The stock cable routing had the shifter cable routed on the right side of the bike, but I swapped it to the left side to run it alongside the rear brake cable.

First part of the bike assembly completed!

There is still some more work to be done to complete the bike assembly, but there is nothing much to be concerned about.

Saturday, May 18, 2024

Bestrider Pump Pro 20: Crankset and Chain Ring

On a kids bike, the choice of crankset is very important. The crank arm length, saddle height, and bottom bracket height are all related to each other. If the dimensions are not specified properly, the pedaling ergonomics will be completely wrong, making it uncomfortable for cycling.

If you look at the different kids bikes, there are many different crank arm lengths. From the 90 mm found on the Early Rider Seeker 14 bike, to the 102 mm found on the Bestrider Pump Pro 16, it varies quite a lot across kids bikes. Generally, the crank arm length gets longer for larger kids bikes, until it stabilizes at about 170 mm for adult bikes.

On the Bestrider Pump Pro 20, the crank arm length is 127 mm. I am not sure how all these crank arm lengths are derived, but I know that at least for Bestrider bikes, these are carefully considered and chosen.

Generally, when kids ride bikes, they want to be able to put their foot on the ground when stopped. This means that the saddle height needs to be low enough. However, in order to ensure proper leg extension during pedaling, the saddle height cannot be too low relative to the crankset.

If the bottom bracket is lowered, then the crank arm length also needs to be reduced to ensure sufficient ground clearance. Therefore, all these inter-related dimensions have to be considered together, to ensure correct pedaling ergonomics.

The stock crank arm length is 127 mm which seems like a suitable length, so I will continue to use this crankset. Let's take a closer look at the crankset and the chain ring.

Right crank arm weighs 336 grams, which is pretty decent. Only slightly lighter than Ultegra R8100 right crank arm, even though it is much shorter.

Left crank arm is 180 grams which is also quite decent. Ultegra R8100 left crank arm is 193 grams.

So far I am very happy with the crank arm weights, as they are decently light and look good. However, the same can't be said for the chain ring...

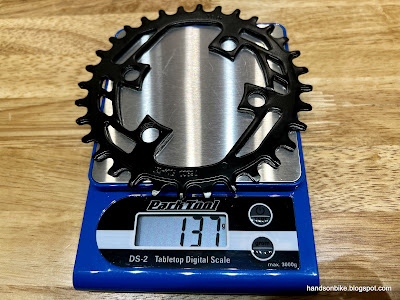
32T chain ring weighs 137 grams! This is very heavy given the small size, as it is made of steel instead of aluminium.

I tried to find replacement aluminium chain rings that are lighter, but could not find any suitable ones, due to the unusual 76 mm Bolt Circle Diameter (BCD) and non-symmetric 4 arm of the crankset.

Stock steel chain ring bolts weigh 19 grams. Will be replaced by aluminium ones.

Plastic crank arm fixing bolt, 4 grams. Different in design from Shimano type.

Stock chain ring thickness is 3.6 mm, which is pretty thick and thus heavy. This is due to the narrow-wide teeth to improve chain retention.

Need to choose a chain ring bolt length that is long enough to pass through the chain ring completely, and be supported by the crank arm holes as far as possible.

4 sets (male + female) of aluminium chain ring bolts only weigh 7 grams!

Crankset modified with my signature colourful chain ring bolts! I use the same chain ring bolt colours on my other front single bikes as well.

Next step is to replace the stock bottom bracket. Although there is no problem with the stock Hollowtech bottom bracket, I decided to replace it with a Shimano SM-BBR60 since I have a few of them lying around unused.

On the stock setup, quite a few bottom bracket spacers are used. Since the frame bottom bracket width is a standard 68 mm, while the bottom bracket adapters are a standard thickness (around 11 mm), the usage of spacers imply that the crank set spindle is longer than usual. Normally, if a road crankset is used, spacers are not required.

Spindle length of stock kids bike crankset is about 116 mm (rounded up).

For reference, the spindle length of a standard Shimano road double crankset is 110 mm (rounded up).

This means that the spindle of the kids bike crankset is about 6 mm longer than a standard Shimano road crankset. Therefore, assuming the same frame bottom bracket width and same bottom bracket, about 6 mm of spacers is required.

After experimenting with a few different combinations, I found that 5 mm of spacers is sufficient, while ensuring that the crank arm fixing bolt can be installed without bottoming out.

5 mm of bottom bracket spacers, made by combining two 2.5 mm spacers.

SM-BBR60 bottom bracket with 5 mm of spacers weigh 77 grams.

Since I have two 2.5 mm spacers, I can balance them out by installing one on each side of the frame.

New bottom bracket installed, with a 2.5 mm spacer on each side of the frame. Looking good!

With 5 mm of spacers, the spindle will not protrude from the left side crank arm, allowing the crank arm fixing bolt to be fixed properly.

Here is the stock crank arm fixing bolt! With a tool pattern that is different from others that I have used before.

Fits a Size 6 Allen Key, but the plastic hexagon hole rounds off too easily even when applying very little torque. Due to this slippage, I am unable to tighten the crank arm fixing bolt properly for bearing pre-load.

Taking out a standard Shimano road crank arm fixing bolt for comparison, to see if it can be a substitute.

Different length is OK, but the different thread diameter means it cannot be used.

The thread diameter on this crank arm fixing bolt is about 18 mm, which is different from the 15 mm or 20 mm types that I have.

As a replacement, I got these M18 aluminium crank arm fixing bolts. I could not decide on a colour so I got both blue and black.

Problem is, the new aluminium crank arm fixing bolts do not fit, as the flange diameter is larger than the stock plastic flange diameter. I could grind it away if I wanted to make it fit...

Comparing the different flange diameters. This is not a dimension that is specified, so I would not have known until I have them in hand to compare.

The original plastic crank arm fixing bolt has a flange diameter of 25.7 mm. Any larger and it will not fit inside the left crank arm.

In the end, I decided to get the special tool to fix the original plastic crank arm fixing bolt. I found that this crankset is made by Prowheel, and uses the Prowheel bolt and tool.

Prowheel tool for crank arm fixing bolt.

The tool fits nicely! Now I am able to tighten the crank arm fixing bolt properly.


Key takeaways from this crankset study:
1) Spindle length is longer than usual, requiring the use of bottom bracket spacers.
2) Stock chain ring is thick and made of steel, making it unusually heavy.
3) Crank arm BCD and 4 arm angle is unusual and a replacement chain ring is not available.
4) Crank arm fixing bolt uses the Prowheel standard, and a Prowheel tool is recommended.

Overall, the items I swapped out from the stock setup would be the bottom bracket and spacers, as well as the chain ring bolts. The other parts shown here will be reused as they are of good quality and in good condition.