Friday, July 2, 2021

Focus Paralane: Geometry Comparison and Tire Clearance

While in the process of building the Focus Paralane, I took the chance to compare the geometry with that of the Cervelo Aspero.

These bikes serve quite different purposes for me, although to the untrained eye, they may look very similar. In fact, they are both green in colour, but otherwise, they are quite different bikes.

Comparing the Cervelo Aspero gravel bike with the Focus Paralane commuting bike

Before comparing anything else, I aligned both bikes at the bottom bracket center, as this will serve as the datum for other geometry comparisons.

Focus Paralane has a BB to ground distance of about 270 mm, a little higher than the Cervelo Aspero at 261 mm.

Focus Paralane has a sloping top tube, resulting in a head tube that is much higher (150 mm vs 107 mm).

This also means a higher standover height on the Paralane which is about 780 mm, compared to 732 mm on the Aspero.

Aspero has a relatively short chainstay length of 420 mm, while the Paralane has an even shorter chainstay length of 415 mm.

Front center distance from BB to front axle is 587 mm, while the Aspero is 592 mm with the Trail Mixer in the rearward position.

Overall, the wheelbase of the Paralane is 990 mm, which is road-bike like, while the Aspero has a slightly longer wheelbase of 1000 mm for a bit more stability. These are small differences, but might have an effect on the overall bike handling.

Moving on, let's check out the geometry around the handlebar area. I used the Aspero as a reference, to determine how much of the steerer tube I should cut from the Paralane.

I first tried the 90 mm BBB stem that came with the Paralane.

However, this will end up putting the handlebar too far forward, as the Paralane already has a pretty long frame reach of 379 mm vs 369 mm on the Aspero.

I then used the 80 mm PRO PLT stem, which seems to place the handlebar in a more similar position compared to the Aspero.

Looks misaligned from this angle, as the handlebar is not installed.
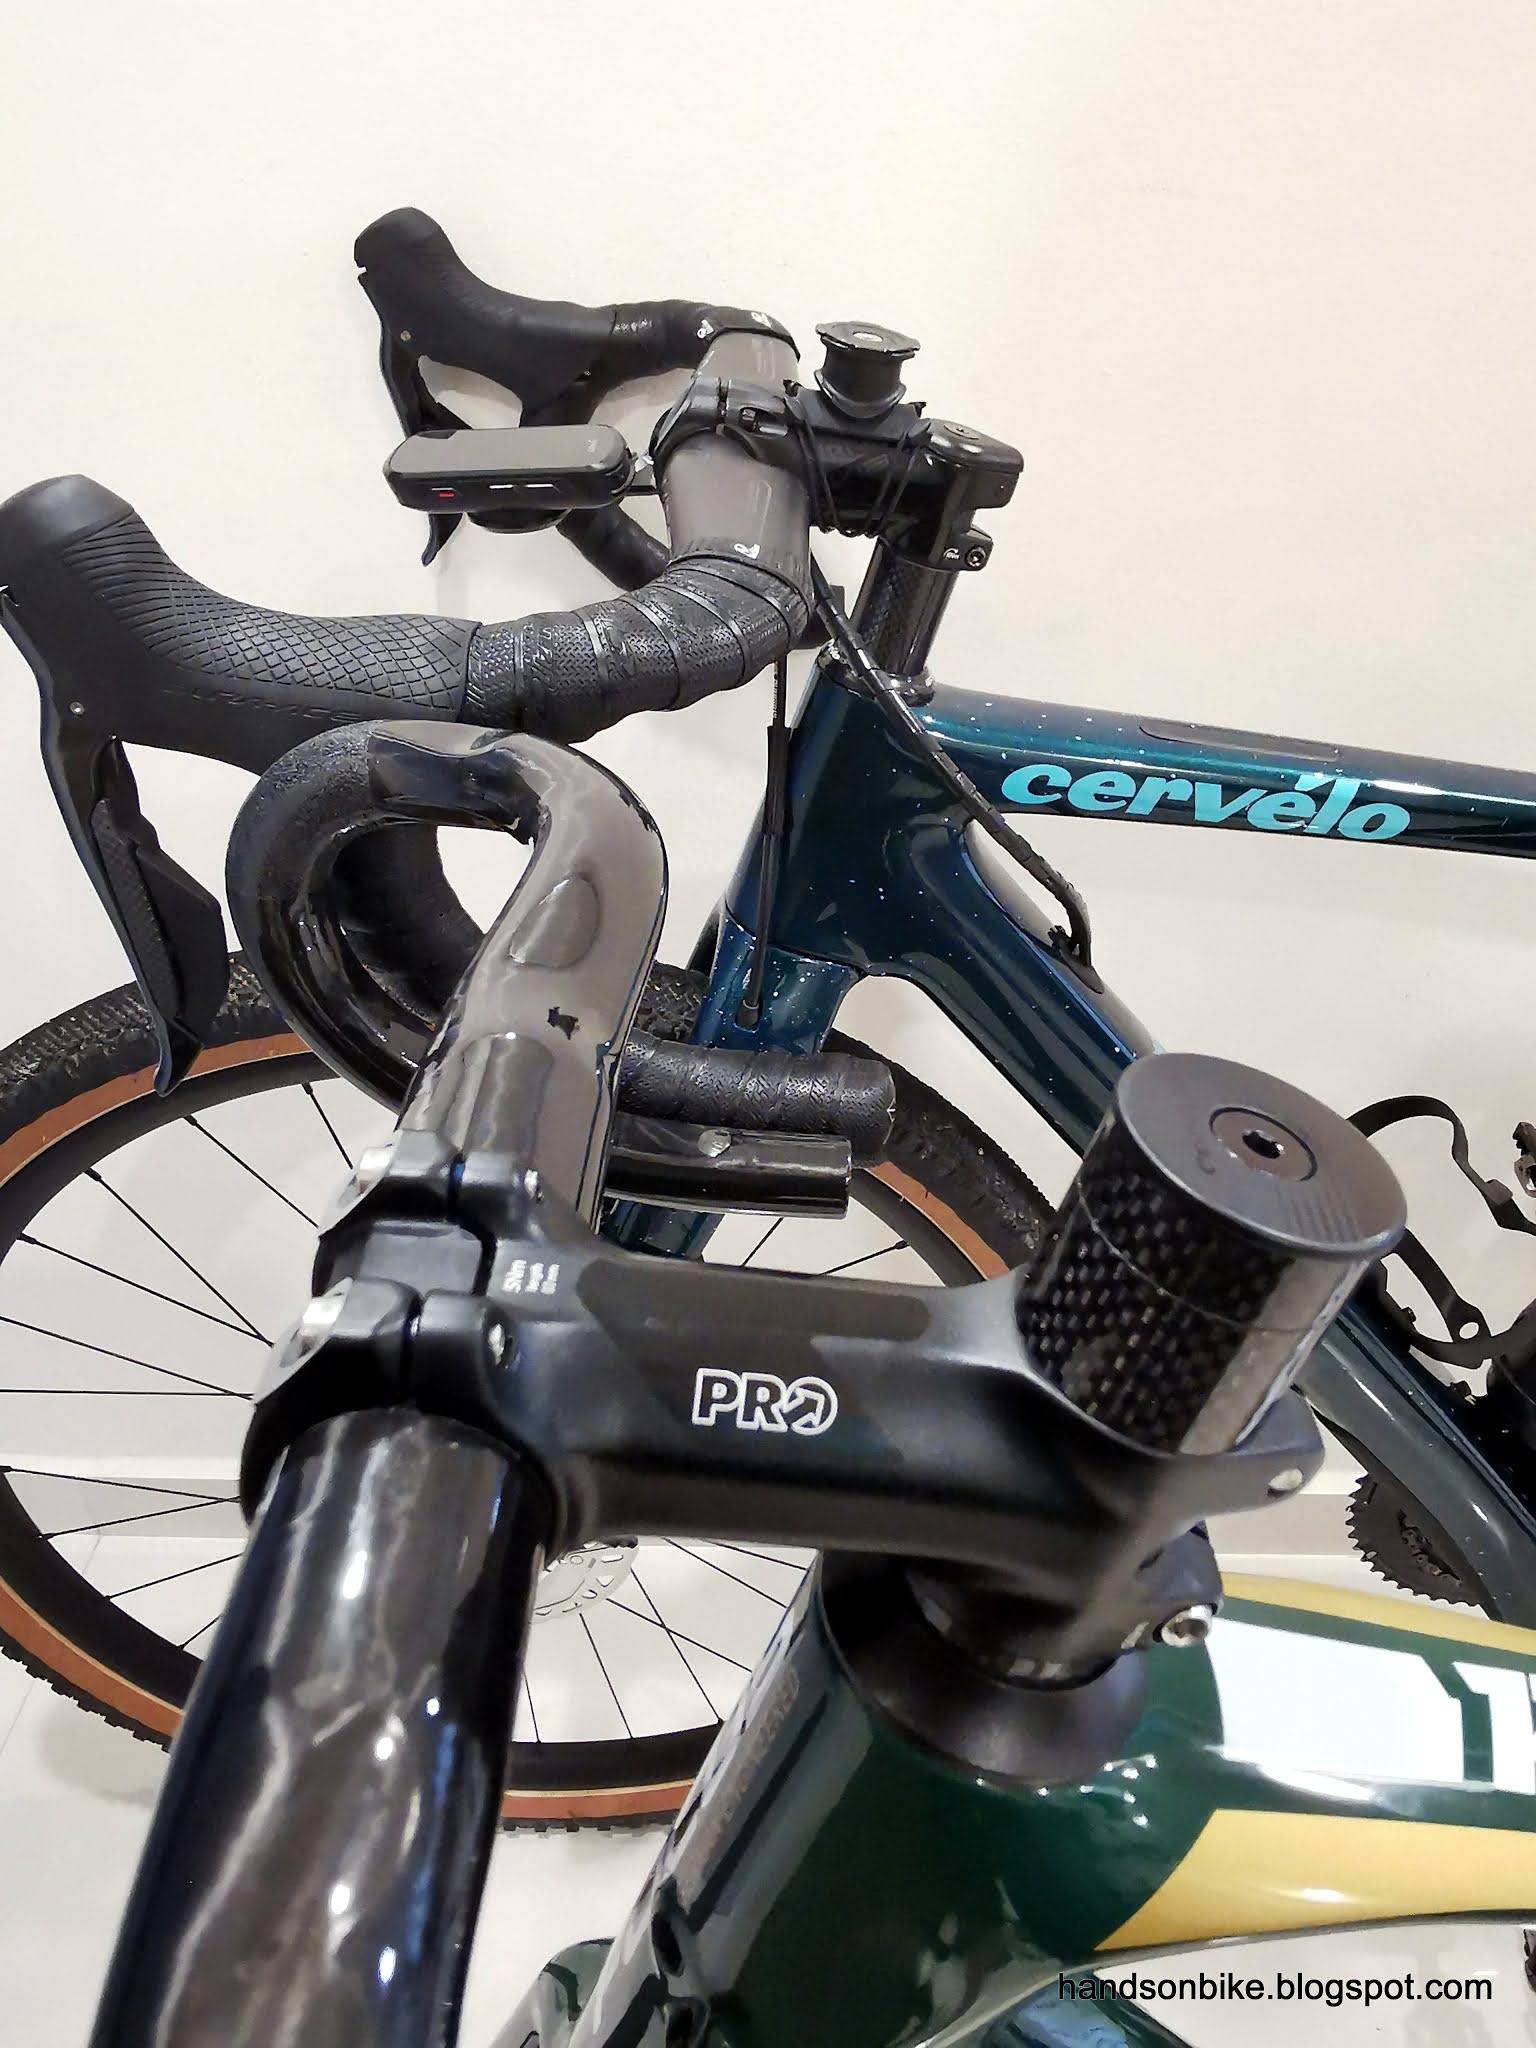
With the handlebar installed, the reach is still longer than the Aspero. The length on top of the stem is what needs to be cut from the steerer tube.

Both handlebars are at the same height, but the handlebar is just a bit more forward on the Paralane. This should be OK since I purposely shortened the stem on the Aspero for gravel riding.

Here is how it looks later, with the shifters installed and bar tape wrapped.

The Paralane came with an offset seatpost, which is not ideal for me as I need a zero offset seatpost. However, it is hard to find a suitable replacement for a 25.4 mm diameter seatpost. Some have saddle clamps that are not suitable for carbon saddle rails, while some are not able to accept a Di2 battery inside. Some are very heavy aluminium types with a chunky clamp.

Pushing the saddle all the way to the front, to compensate for the offset seatpost.

Not ideal, but it will have to do for now, until I find a zero offset seatpost.

Saddle on the Paralane is further back, due to the offset seatpost.

Distance from handlebar to saddle sit bone point:
Cervelo Aspero: 64 cm
Fabike C3: 66 cm
Focus Paralane: 65.5 cm

Comparing the outline of the Paralane with the Aspero.

View from the top

The Aspero has very big tire clearance, as it is a gravel bike. However, the Paralane has pretty decent tire clearance as well for a road bike, as it is meant to be an endurance bike.

Good tire clearance around the rear 28 mm wide tire.

Also good tire clearance around the bottom bracket area. Probably can use a tire that is a few millimeters wider.

Good tire clearance around the fork, which is good for putting standard mudguards.

Overall, I used the Aspero as a reference, to set the geometry for the Paralane. It is useful, as otherwise I cannot determine the handlebar position and the amount to cut from the fork steerer tube.

Friday, June 25, 2021

Shimano XTR MT900 vs Deore XT MT800 Centerlock Brake Rotors

I recently bought some new rotors, and it gives me a chance to do a quick comparison. The new rotor is the XTR MT900 rotor, which is very similar to the Deore XT MT800 rotor. I previously installed the MT800 rotors on two different bikes, the Canyon Endurace (gravel wheelset) and the Fnhon DB11 folding bike.

At first glance, these rotors look very similar, with only a different colour on the cooling fins. Let's take a closer look to see if there are any other differences.

Black paint on the cooling fins are claimed to help dissipate heat faster. Theoretically it is true, but does it make a discernible difference?

XTR MT900 rotor

Side by side comparison of MT900 vs MT800 rotors.

The cutouts are the same, and the shape of the cooling fins are the same as well.

View from the rear

XTR MT900 rotor has big cutouts at the back of the aluminium spider for weight reduction.

Deore XT MT800 rotor spider has an extra round holder, which is not used in this case. It is probably for the E-Bike type of rotor which has a magnet installed here for the speed sensor.

Weight of MT800 160 mm rotor, only 106 grams. 

Add 8 grams for the aluminium lockring, and it weighs 114 grams.

MT900 rotor also weighs the same

Same lockring, thus same weight. 114 grams for 160 mm rotor (MT900/MT800).

As seen from the weight comparison, MT900 and MT800 rotors weigh the same. However, they are a bit lighter than the Dura-Ace RT900 rotors. You can also check out the comparison to the older RT99 rotors.

Trying out the MT900 rotors on the wheels.

Putting the rotors on the Hunt gravel wheelset to see how it looks.

Here is the RS770 wheelset as used on the Focus Paralane, it currently uses Dura-Ace RT900 rotors.

Changed to the new XTR MT900 rotors. Visually there is not a big difference.

Shown as installed on the Focus Paralane front wheel.

Rear wheel with XTR MT900 rotors.

Rotors changed from RT900 to MT900. Not a big visual difference.

The conclusion is that the MT900 and MT800 rotors are very similar, with only the colour of the fins separating it. They weigh the same and performance would be the same as well.

Ultimately which rotor you choose will depend on your budget and also the appearance. Some people like how the black cooling fins look, but it is also more expensive.

Wednesday, June 23, 2021

Cervelo Aspero: Front Single Conversion - Part 2

With the front single drivetrain components prepared earlier, now I can replace the current front double drivetrain with a front single drivetrain on the Cervelo Aspero

Last time, when I went off-road riding on the Aspero, there were some damage to the chain stay. That was due to insufficient clearance between the chainring and the chain stay for mud. After that I pasted a layer of protective film to prevent future damage.

Unfortunately, some time after that, there was another incident which again caused damage to the chain stay. This time, the chain derailed during a downshift on the chainrings, during an uphill climb. I'm not too sure how it happened, as it was the first time the chain derailed on the Aspero, it being a rare event for me.

Fortunately, I felt a weird sensation when the chain came off, and I immediately stopped pedaling. This avoided further damage to the chain stay.

Protective film damaged by the derailed chain.

After the incident where the chain derailed, I did not take any action, as the damage had already been done. I left the half-peeled off protective film on the chain stay for quite a while, as I was lazy to remove the crankset and replace the protective film.

Now, since I will be replacing the crankset, I finally took the chance to check out the damage and replace the protective film.

Ouch! It doesn't look pretty, but I'm glad the protective film took the brunt of the damage from the dropped chain, as it could have been much worse.

Pasting a new layer of protective film, after removing the torn parts and cleaning the frame.

It's like magic! The scratches are mostly covered up by the transparent protective film.

The next step is to install the new crankset with the new chainring. Since it is a front single crankset, and with a relatively small 38T chainring, I expect the chain stay clearance to be more than the 2 mm found on the previous Dura-Ace 50/34T crankset.

Checked with an Allen key, the clearance is 3 mm. Not as big as I thought.

View from the top. OK clearance, but thought it would be more than 3 mm.

Next step is to replace the current Sunrace 11-36T cassette with the SLX 11-42T cassette onto the Hunt 650B gravel wheelset. Replacing the 11-36T cassette with a larger 11-42T cassette, and dropping from two to one chain ring will result in an overall decrease in gear range. That's because the new cassette does not have a gear range that is wide enough to replace the double chain rings. Gear ratios to be compared at the end of this post.

11-42T cassette next to the 11-36T cassette.

Front single drivetrain completed! Here it is shown at the lowest gear, with the rear derailleur cage fully stretched.

SLX CS-M7000 11-42T cassette with GRX Di2 RD-RX817 rear derailleur.

Adjusting the B-tension on the rear derailleur, such that the guide pulley is as close to the cassette as feasible. This will help to ensure good shifting performance at the top gears (Eg. shifting between 12T and 11T).

The chain is now at the 11T top sprocket, with the rear derailleur cage fully retracted.

Still enough chain capacity, as the chain is still some distance away from the guide pulley.

Maybe not as much margin as I first thought, as the stopper pin is already quite close to the stopper.

Here it is shown at the middle of the cassette.

The 105 R7000 left crankarm with 4iiii power meter was also transferred over, along with the Deore XT M8020 pedals. This does not match the Ultegra crankset on the right, but I don't mind.

Small clearance between the 4iiii power meter and the chain stay. Similar to that with Dura-Ace crankset.

Testing the new drivetrain out on some real gravel

Looking good with the new front single crankset!

Love the new front single drivetrain, as it is simpler to use. It's awesome to test the drivetrain and tires on freshly laid gravel.

Overall bike picture with the front single drivetrain, it suits this Aspero gravel bike well.

By making this drivetrain modification, there is a change in overall bike weight and also the gear range. Let's take a look at the differences.

Weight comparison of the front double vs front single drivetrain that I used.

By comparing the weight of the components that I have changed, I found that I saved a grand total of 1 gram! Perhaps it is a few grams more if I include the front derailleur Di2 wire that I removed, but in the end it is a very small difference. Most of the weight reduction up front has been added to the larger cassette at the back.

Other than the weight, the gear range has also been changed. Here is a comparison before and after.

Previous gear range with 50/34T crankset and 11-36T cassette: 
25.5 - 123 gear inches over 15 unique gears.

New gear range with 38T chainring and 11-42T cassette: 
24.4 - 93 gear inches over 11 unique gears.

By converting to front single, I lose the top 3 gears which I almost never use when gravel riding, as it is just too high for me. Since I no longer use this Aspero for fast road rides, this is acceptable. Also, there is a big gear step from the 13T to the 11T sprocket, which is unavoidable on all the larger cassettes.

On the other hand, with a small 38T chain ring and a low 42T sprocket, I do get an easier low gear which is always welcome, especially when climbing steep off-road slopes.

In summary, changing from a front double to a front single drivetrain has no weight savings, while it retains most of the gears that I use during gravel riding. I will be using the 650B wheelset and tires as my primary wheelset on the Aspero, since it is now a gravel bike. A gravel bike can basically go anywhere, as it transits from smooth road to park connectors to gravel tracks easily.

Great 1x11 speed drivetrain!

Front single chain ring for simplicity

Wide range 11 speed rear cassette