With all the new 12 speed components in place, it is now time to assemble them onto the Fnhon folding bike! This is an ambitious modification, where there is no existing bike to take reference from. Also, I would not know if everything was going to work, until I actually install them. And this is why I took on this challenge, as it is new to me, and allows me to learn many new things.
All the new components needed for the 12 speed AXS drivetrain conversion!
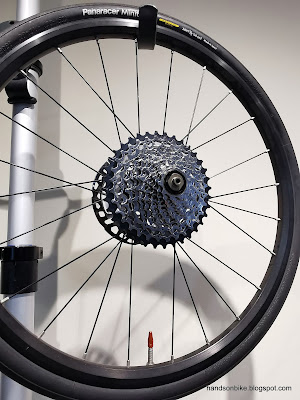
Force AXS 10-36T 12 speed cassette, mounted on the XDR freehub body.
Force AXS wireless rear derailleur, rated for up to 36T cassettes.
GX AXS wireless shifter, taken from the MTB side to be used on this flat handlebar bike.
New 44T Wolf Tooth narrow wide chain ring, with a revised teeth profile to work with the Flattop chain that has larger chain rollers. I will be using the same Shimano Ultegra 6800 crankset.
New bottom bracket from Ascent Bikes. Not necessary for this 12 speed modification, but I took the chance to try out this new bottom bracket.
Before I could install the new 12 speed components, I had to remove all the existing 11 speed Di2 components. During removal of these components, I found it liberating, as I no longer need to attach a battery to the seat post, nor run Di2 wires along the handlebar and frame.
All these Di2 components can be removed!
Existing Di2 handlebar setup, with a display (Junction A), a Di2 switch and wires running around.
It felt good to remove all these wires and Di2 parts from the bike, as the handlebar looks so much neater. One thing I would miss is the Di2 gear display, which shows me the selected gear and also the battery level. Technically this can be done by pairing the AXS system with a Garmin head unit, much like the Di2 version, but this would require a Garmin to be added to the folding bike, which I think is not necessary.
After installing the wheelset, now with the 10-36T 12 speed cassette, next is to install the Force AXS wireless rear derailleur. As there are no wires or cables, I just had to secure it on the hanger, that's all! Extremely easy and convenient to do.
To optimize the shifting performance, the guide pulley of the rear derailleur should be adjusted to the recommended distance from the cassette sprocket. In this case, I need to set it to 5 mm.
A tool is helpfully supplied together with the rear derailleur, for setting the distance. You could also do it with a ruler.
Using the printed markings, adjust the B-tension bolt on the rear derailleur, to adjust the distance as required.
Chain length would be pretty important as well. In this case, I plan to keep the chain as long as feasible, to reduce chain tension, so I did not follow the recommendations.
Only 4 links left, as I made the chain as long as possible (without chain slack), instead of as short as possible (without overstretching the rear derailleur). This is possible only because it is a front single drivetrain, where the rear derailleur cage has extra chain capacity.
Using the full chain weight + box (299 grams) minus off the remaining chain + box (47 grams), gives the actual chain weight that is on the bike as 252 grams.
Comparing the stock clamp band with the third-party adapter (I-Spec EV type).
On the I-Spec EV brake lever, this nut needs to be installed onto the clamp band first. The shifter will then be attached to it.
Some problem with tool access, making it difficult to tighten the bolt at certain positions.
Handlebar looks clean with only one clamp band per side. I added loctite to the bolt to prevent self-loosening.
Final shifter position, after multiple trials and adjustments.
Lastly, the rear derailleur position will need some fine-tuning, to align the guide pulley with the sprocket. On the previous Di2, this was done by pressing the function button on Junction A, to enter adjustment mode.
On this AXS system, it is done by holding the function button on the shifter, and pressing the upshift or downshift button for small adjustments in either direction. Off the bike this can be done with one hand. However, it is nearly impossible to do adjustments while riding, as my fingers cannot press both the function button and shifting button simultaneously.
Instructions for adjusting the rear derailleur position, from the shifter side.
Additional function to shift the rear derailleur without a shifter!
While fiddling with the AXS system, I found that if I pressed the rear derailleur function button once, it would shift the rear derailleur outwards by one gear. A double press shifts it inwards by one gear. I thought this was brilliant, as it can ensure that I can still set my rear derailleur to a preferred "single speed" gear to get home, in the event that the shifter runs out of battery or gets damaged.
In the next post, I will share the final setup on this Fnhon folding bike, along with many more close up pictures. Did I manage to reduce any weight by changing to this wireless 12 speed drivetrain?


No comments:
Post a Comment
Every comment is moderated before publishing due to spam bots. If you don't see your comment yet, it is likely that it is currently being reviewed. Thank you for your patience!