Here is the first post on the reborn Fnhon drop bar folding bike! This frameset was first assembled as a 1x11 speed flat handlebar setup, using premium XTR, Dura-Ace and Di2 components.
After that, it was converted to a 1x12 speed setup, using SRAM eTap AXS for the drivetrain components.
Since then, most of the SRAM components have been transferred to the Birdy AXS 12 speed, and this is also because I want to use this Fnhon frameset for another project. This project is part of the 3-way swap that I did with the Dahon MuSP and the Birdy AXS.
If you look at the 3-way swap diagram above, you will see that I will be removing the 11 speed Ultegra Di2 components from these bikes, and putting in fresh Ultegra Di2 12 speed components into the mix. This is part of the component renewal that I always do, which is to replace older, last generation components on the bikes with the latest components.
I'm taking this chance to change the Fnhon to a drop bar folding bike, replacing the Dahon MuSP. Main reason is because the Dahon MuSP uses road caliper brakes, which are rim brakes. I want to phase out rim brakes from my bikes, as I prefer disc brakes. Therefore, the Fnhon is useful as it is a disc brake frameset, and thus it is possible to repurpose it as a drop bar folding bike.
The Birdy AXS 12 speed will be the new flat handlebar folding bike, while this Fnhon Ultegra Di2 12 speed will be the new drop bar folding bike.
After this project is completed, I will have four 12 speed bikes.
On the Dahon MuSP, the external Di2 battery was placed behind the seat tube. The same Di2 battery mounting was also used on the Fnhon DB11/DB12.
However, for 12 speed Di2, it only uses the BT-DN300 internal Di2 battery, which comes in a long cylindrical shape. Since there is no way to place it inside the Fnhon frame, the only place would be to house it externally. I have been thinking of this issue for a long time, and it seems that the only way is to custom design a battery mount that can be used to attach the BT-DN300 Di2 battery to the outside of the frame.
Trying to find the optimum battery placement. Behind the seat tube is feasible, but is rather unsightly and will collect a lot of dirt from the rear wheel.
Lowering it helps a bit, but sticks out more from the seat tube due to the protrusion of the cable stopper.
In front of the seat tube seems to be a better location. Protected by the frame from dirt thrown up by the front wheel and rear wheel. Space is a bit tight near the bottom bracket area.
Using the actual bike frame and Di2 battery, and taking lots of measurements plus estimations, I used 3D CAD software to create a model of the Di2 battery holder.
Requirements:
1) Hold Di2 battery securely.
2) Battery holder needs to be attached to the bike frame.
3) Low profile design to take up less space.
4) Opening at bottom to allow Di2 wire to exit.
Here is a rough model that I created, and 3D printed for initial fitting.
Hole at the bottom to allow the Di2 wire to exit. Difficult to seal this bottom side, unless there is a wire grommet.
Lots of slots on the side, for cable ties to be used to secure the holder to the seat tube.
Seems that there is still space to lower the battery holder, just need to trim off the corner that is touching the curved frame tube.
Battery holder is purposely made shorter than the battery, so that I can pull out the battery easily.
The red lines denote the area that will be trimmed off, so that the battery holder mounting position can be lowered.
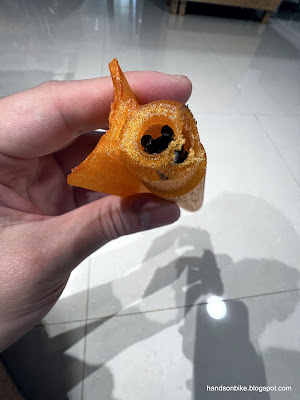
After trimming off the corner of the 3D printed battery holder. This material is soft and thus easy to cut.
Through holes in the battery holder after trimming, but this will be fixed in the next version.
With the 3D printed prototype shown above, I was able to modify the CAD model to make improvements. I was confident that the improved design will be OK, so I decided to get the improved design 3D printed by a commercial company.
Zelta3D has a wide range of 3D printing capabilities, and they are able to make parts using processes and materials that are not available or suitable for home based 3D printers. For the new battery holder, I chose the Nylon PA12 material, which will be printed by the Multi Jet Fusion method. This material is chosen because it is strong and watertight, thermally and dimensionally stable.
New battery holder printed in Nylon PA12 by Zelta3D! Relatively expensive as I only printed one set. Note the additional battery cover.
There was some powder residue on the inside which was not cleaned properly. Managed to clean it out by using an old toothbrush.
Di2 battery fits in nicely! There was a little bit of free play (as per design), which is eliminated by wrapping the battery in a layer of black tape.
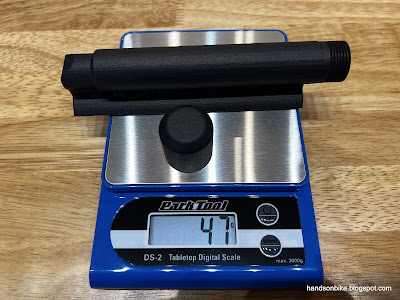
Custom Di2 battery holder + cap weighs 47 grams. Can be made lighter.
Due to my error in exporting the STL file, there were visible steps on the circular areas when the part was printed (orange CAD above). Can be solved by exporting the part with tighter tolerances (pink CAD below).
If there is a next iteration, improvements I would make are:
1) Reduce wall thickness to save weight, as PA12 is strong and can be made thinner while still providing sufficient strength and stiffness. This version is over-built.
2) Exporting the parts in tighter tolerance, to get a better surface finish.
3) Redesigning the cap to improve the appearance when screwed onto the battery holder.
This custom Di2 battery holder is able to hold the Di2 battery well, with no free play inside. The screw-on cap just acts as a lid, to prevent water from getting in easily.
With this, the problem of how to attach the Di2 battery to the bike has been solved.


No comments:
Post a Comment
Every comment is moderated before publishing due to spam bots. If you don't see your comment yet, it is likely that it is currently being reviewed. Thank you for your patience!