Friday, June 18, 2021

Cervelo Aspero: Front Single Conversion - Part 1

Ever since I built the Focus Paralane to be my primary road bike, this Cervelo Aspero no longer needs to be a dual purpose road and gravel bike. As such, I have more freedom to change out some of the components, to better suit its new purpose as a pure gravel bike.

One of the differences of the gravel bike from a road bike is the gearing required. On a road bike, you will need a higher gear ratio due to faster speeds on the road, and also closer gear steps if you need to optimize your cadence during group riding.

On a gravel bike, you are usually riding slower, more often on unpaved roads than paved roads, thus the gearing can be lower. Also, there is less group riding on gravel, therefore cadence control is not so important. You can basically pedal at your own preferred cadence and speed, thus bigger gear steps are acceptable.

I considered swapping out the crankset, from the Dura-Ace R9100 50/34T to the GRX RX600 46/30T combination. This will lower the gearing to make it more suitable for gravel riding, while still keeping closer gear steps.

However, I found that the RX600 46/30T crankset is really heavy! As it uses solid crankarms instead of hollow crankarms, it weighs a lot more than the Dura-Ace crankset.

Right side of the RX600 46/30T crankset weighs 536 grams.

Left crankarm weighs 276 grams, excluding the plastic crankarm fixing bolt.

This gives a total crankset weight of 812 grams, which is even heavier than the 105 crankset. In comparison, the Dura-Ace R9100 crankset only weighs 610 grams, which is more than 200 grams lighter. With such a big weight difference, I could not accept this change.

Therefore, I decided to go for a front single drivetrain, which simplifies the drivetrain setup and might reduce a bit of weight at the same time.

As mentioned in the other post on the Focus Paralane, I decided to swap the cranksets between the Focus Paralane and the Cervelo Aspero. The Dura-Ace crankset thus goes onto the Paralane road bike, while the Ultegra crankset and 38T Wolf Tooth chainring will go onto the Aspero gravel bike. This is better as the smaller chainring is suitable for gravel riding. This right side crank arm plus chain ring weighs just 396 grams, a whole lot lesser than the GRX RX600 right side which weighs 536 grams.

Ultegra R8000 crankset with 38T Wolf Tooth chainring. With multi-coloured chainring bolts for decoration.

With a front single crankset, I will need a wide range cassette at the back, in order to get enough gear range. Unlike with the front double drivetrain, there are much lesser restrictions as to what cassette I can use, since there is no front derailleur or total chain capacity to worry about.

In this case, I can use the dedicated GRX Di2 rear derailleur, RD-RX817 which is designed for front single drivetrains. Check out the detailed comparison between the rear derailleurs for front double or front single drivetrains. The RD-RX817 is basically very similar to the Deore XT Di2 MTB rear derailleur.

RD-RX815 for 2x11 speed on the left, RD-RX817 for 1x11 speed on the right.

With the front single crankset and front single specific rear derailleur prepared, the next component we need is a wide ratio cassette. The widest Shimano cassette available is actually a 12 speed MTB cassette, with a range of 10-51T. However, it requires a Microspline freehub, while there is also no 12 speed Di2 system from Shimano.

Therefore, what I need is a 11 speed MTB cassette. I can choose between the ratios 11-40T, 11-42T, and 11-46T. I have used the 11-40T cassette on the Bike Friday Haul-A-Day cargo bike, and the 11-46T cassette on the Polygon Cozmic MTB.

A wide ratio is nice, but a huge gear step jump is still not preferred. The 11-46T cassette has a wide gear range but also a big gear step from the 37T to the 46T. I did not like this, which is why I decided to use a smaller 11-42T cassette now instead. The low gear difference between a 11-40T and 11-42T cassette is small at just about 5% difference.

11-42T cassette can be found on the SLX CS-M7000 cassette.

It has one large aluminium spider, with the rest being full spline sprockets. The Deore XT version has two aluminium spiders for lower weight.

7 sided aluminium spider joins up the 3 largest sprockets.

3 largest gears are 32T, 37T, and 42T.

A spider spacer is used to help support the sprocket during sideways bending loads.

This 11-42T cassette weighs 478 grams, which is not lightweight. 

Although weight is saved from the removal of one chainring and front derailleur, it is added back by the use of a wide ratio cassette. I don't expect to save much weight by converting from front double to front single drivetrain, let's check out the weight comparison later. This SLX cassette is much heavier compared to the Sunrace 11-36T cassette, the Ultegra 11-34T cassette, or the Dura-Ace 11-30T cassette.

Finally, with the removal of the front derailleur, the front derailleur mount on the frame can be removed as well. It is not necessary, but since the replacement cover is available, I decided to change it. This cover was provided with the frameset.

Cover with front derailleur mounting on the left, blank cover on the right. The screws used are the same.

Used the blank grommet to replace the previous grommet which has a hole for the front derailleur Di2 wire.

Blank cover and rubber grommet installed! Now it becomes 1x ready. See how it looked like previously.

Here is the first part of the front single conversion, where I have gathered all the parts, ready for bike modification. To be continued!

Sunday, June 13, 2021

Vertical Bike Stand

There are many ways of bike storage at home, each with their pros and cons. Some people prefer to hide the bikes from view, such as putting them in the yard, in the storeroom, or under a table in the case of folding bikes.

Others prefer to just place them in plain view, as part of the house decorations, or just out of space limitations. For me, I prefer to place my frequently used bikes near the the main door, so that I can bring it out of the house easily.

For most people, maximizing the storage space is also necessary, especially if you have multiple bikes. One of the best ways is to use a bike rack or bike tower that stacks one bike above another. This makes use of the vertical space available above the bike below. I have been using the Minoura Bike Tower 10 for many years, and it is great at saving space.

However, sometimes the bike tower is not suitable for certain bikes. In my case, it is not suitable for my Cervelo Aspero, when I have the frame bag fitted to the bike. That is because the frame bag blocks the bike cradle from hooking onto the top tube.

It is too troublesome to remove the frame bag every time I want to store it on the bike stand, and reinstall the bag when I want to use it on the ride. Therefore, I decided to get a new bike storage stand that can address this issue.

Frame bag from Bike Bag Dude, custom made to match this bike frame.

I decided to get a vertical bike stand, as this will allow the frame bag to remain attached to the bike. Also, storing the bike vertically makes use of the empty space above the bike.

There are cheap versions of vertical bike stands, but they are flimsy and not stable. I decided to get a more robust version that looks more stable. Although I got it online, I think it is available in the local bike shops as well.

Here is how it will look once assembled.

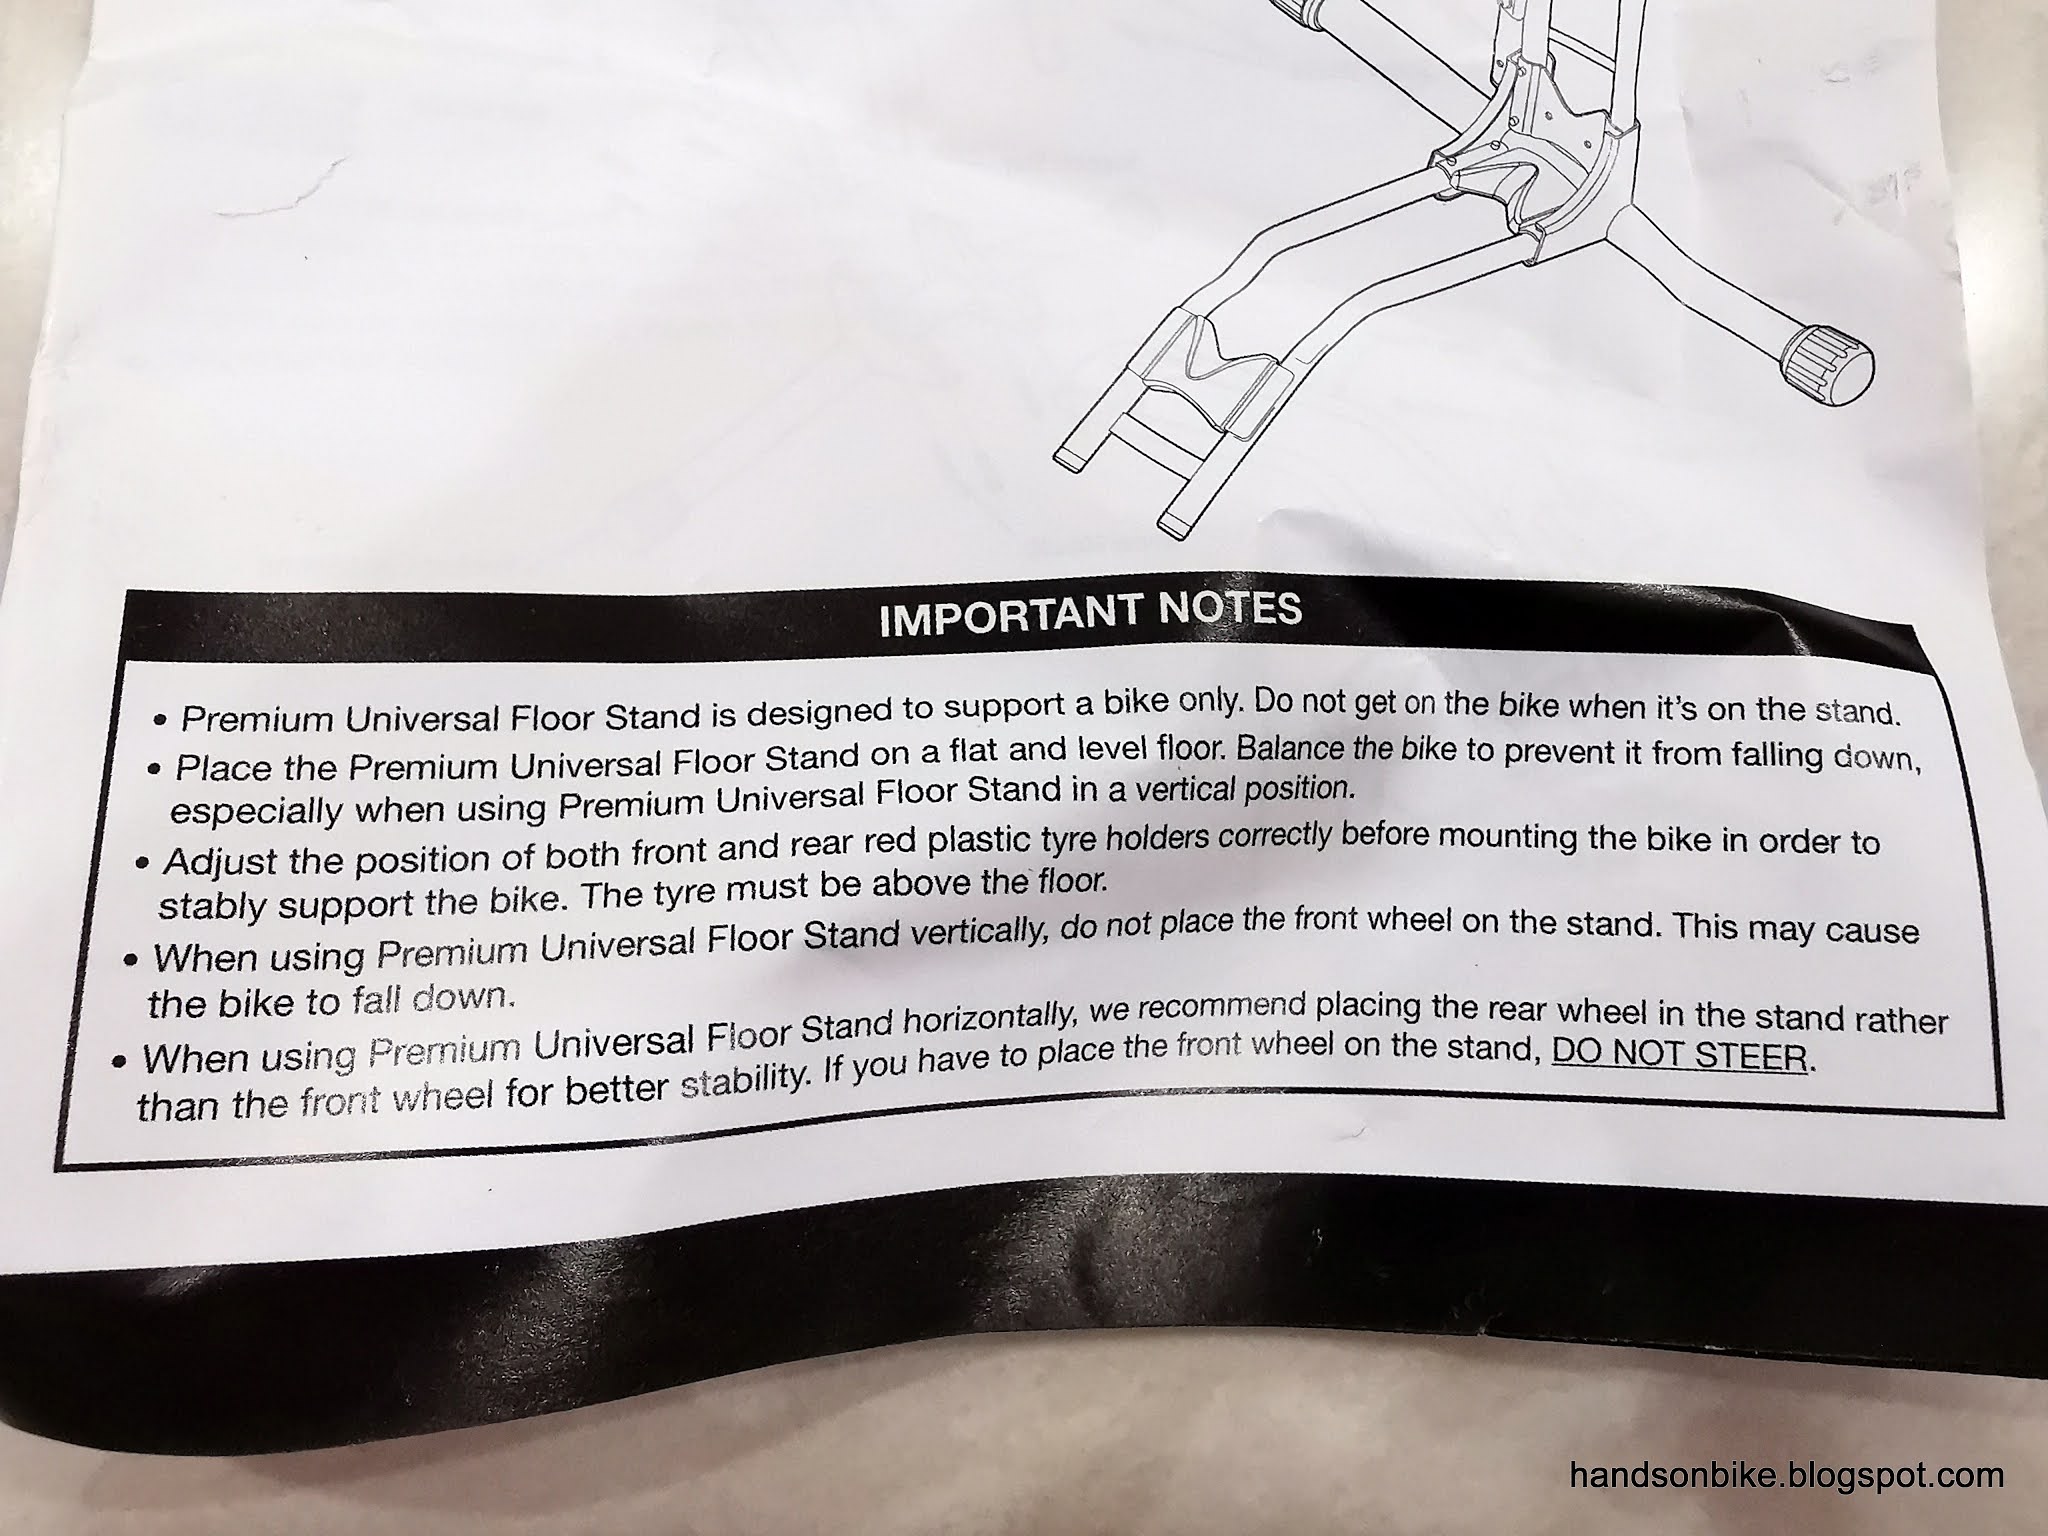
Some points to take note when using this bike stand. Good to know.

Parts of the bike stand, made of steel tubes that are powder coated for durability. Better than cheap flimsy versions that use steel rods instead of tubes.

Lots of bolts and nuts for fixing all the parts together.

Assembly is not so straightforward, luckily the instructions are provided.

I believe these instructions are copied from the original bike stand designer, because the English instructions are quite good.

Adjusting the position of the red holder, to match the wheel size.

Vertical bike stand completed!

If adjusted correctly, the rear tire should touch all 3 red holders at the same time for maximum stability.

Top hook holds the front wheel, and is rubber coated to avoid scratching your carbon rim. Shown here is the Hunt 650B Adventure Carbon Disc wheelset.

Top hook is a bit slanted to the side, but no big issue. It can be bent back to straight if needed.

Both the Cervelo Aspero and the Bike Friday Haul-A-Day stored vertically, side by side to minimize the storage footprint.

I'm quite happy with this vertical bike stand, as it takes up just a small space on the ground. Also, the frame bag can remain on the Aspero all the time.

The downside of this vertical bike stand is that I cannot store a bike that has mudguards on the rear wheel, as the mudguards will be damaged. My Focus Paralane all-weather commuting bike will still be stored on the bike tower as it has mudguards.

This vertical bike stand is pretty stable, as the bike does not fall over even when knocked accidentally. Parking the bike in the bike stand is also easy, as I just need to roll the bike onto the stand using the rear wheel, then hook the front wheel. Removing the bike is just the opposite.

Sunday, June 6, 2021

Shimano RX8 Gravel Shoes - Cactus Berry

I have been using the Shimano RX8 gravel shoes for about 1.5 years, since end of 2019. As mentioned in that post, it is a perfect blend of MTB SPD cleats and road shoe aesthetics. It is lightweight, uses the convenient Boa dials, and feels really good. Other cycling shoes that I have used can be found here.

As with all shoes, it experiences wear and tear over time, especially with frequent usage during gravel riding. Therefore, I wanted to get another pair of it as a backup, or to use it in rotation, so that I can wash one pair while still using the other.

A new colour option was available, which is the unique Cactus Berry colour shown below. It is quite a weird colour combination, you either love it or hate it. I decided to try out this new colour, instead of getting the exact same camo silver colour.

New RX8 gravel shoes! This colour is also called purple/green.

I have never seen this Cactus Berry colour combination before!

Comes with sole inserts if you wish to adjust the foot arch height.

Reflective purple colour at the front

Uses the same single velcro strap at the front of the toe box area. Normally it will not need to be adjusted once set.

Uses the same two-way Boa dial at the side, for adjusting the fit around the top of the foot.

Colour transits to a pale green colour at the back of the shoe.

Inside of shoe is lightly padded. Feels comfortable and still maintains good power transfer.

This side of the shoe is completely free of features, to avoid interference with the crank arm and chain stay during pedaling.

See how the purple and green colour fades into each other. Someone told me it looks like a fish!

Here is how it looks on the foot

Looks stunning under sunlight, as it is reflective.

Definitely an eye-catching colour for a shoe!

Comparing side by side with the other pair

Front view

Side view

Top view

Side view

Bottom view. Looks completely different between the new and used pair.

The features and fit of the new shoe are the same as the previous pair, just that now I have two pairs that I can rotate and use. If you are considering getting one, check out the comparison and decide which colour you like! There is also plain black colour if you prefer.

Wednesday, June 2, 2021

Fnhon DB11: Long Term Review

I have had the Fnhon DB11 folding bike for about 1.5 years now, and it seems like a good time to write a long term review about this bike. There are obviously good and bad points about every bike, and here are the key points which I want to share regarding this bike.

Note that your personal experience will vary, even if you have the same frameset, as the components used and riding preferences may be completely different from mine.

Before going into the details, I just want to share some pictures of the bike, and where I have ridden it so far during my long term evaluation.


Light gravel surface, found on the newer side of the Ulu Pandan Park Connector, between Jurong East and Clementi.

48T chainring with 11-32T cassette is used on this bike.


I used to put gold bling on my Dahon Boardwalk, but now prefer a more muted look.

Riding on the Green Corridor in August 2020, before the southern stretch was all linked up.

This was with the shorter 29 cm Elosix handlepost that provides a more sporty riding posture.

Rougher gravel, not so suitable for the slick and narrow tires.

OK to ride slowly, but it still gets really bumpy due to the higher pressure needed for narrow, small diameter tires.

Main highlights of this bike

1) Does not feel as planted on the ground, compared to my full sized bikes.
When I ride most folding bikes, it feels like I am floating on the bike, instead of riding "in" the bike, like how I feel when I ride my full sized bikes. This might be due to the higher bottom bracket and higher handlebar, which puts my centre of gravity higher up.

2) Not rigid enough for sprinting or putting out high power.
This is natural, as the folding bike frame is not as rigid as a conventional frame with a rigid triangle. When pedaling hard out of the saddle, the frame will flex noticeably between the touch points (handlebar and pedals).

3) Takes more effort to maintain higher speeds of >28 km/h, compared to my road bikes.
Due to the smaller wheels, it is harder to maintain higher speeds compared full sized bikes. Also, the flat handlebar makes it more difficult to ride fast, unlike drop bars.

4) Di2 gear shifting works really well.
As proven on all my bikes, Di2 electronic shifting works well and effortlessly every time.

5) Wheelset rolls well with low rolling resistance.
This is a custom-built 451 wheelset by Ascent Bikes, as I wanted a lightweight 451 wheelset with Centerlock hubs, which are pretty much impossible to find as a standard wheelset.

6) No problem with the folding joints, no looseness or creaking.
The build quality of this bike frame is pretty good, with no issues so far. Of course, you have to adjust them properly so that they close firmly with no free play. Also, don't ride it off-road too often, or the folding joints will be put under high stress.

7) Hydraulic disc brakes enable effortless braking, with no concerns even when riding in wet weather.
XTR hydraulic disc brakes definitely work well, and are probably overkill on a folding bike. Best of all, the disc brake pads does not leave brake residue on the rims when there is rain, unlike on conventional rim brake bikes. This is the main reason I decided to build this bike.

8) Gear ratio is slightly high, would be better if a smaller chain ring is used.
As I ported over the drivetrain from my previous Dahon MuEX, the same 48T chain ring and 11-32T cassette was used. However, the 48T chain ring was sized for 406 wheels, while this new Fnhon DB11 is using 451 wheels, which is roughly 2" inches larger in diameter.

This means that the entire gear range of the Fnhon DB11 is about 10% higher than the Dahon MuEX. The gear range is thus increased from 30-87 gear inches, to 33-96 gear inches.
At the low end, the increase of 3 gear inches is not that much. However, at the top end, increasing from 87 to 96 gear inches is a big increase, which means that I will almost never get to use the top gear.

Overall, I am happy with this Fnhon DB11, as it is a high end disc brake folding bike that rides well. It is also quite lightweight (for a disc brake folding bike) at 9.4 kg, inclusive of kickstand and pedals. 

I might get a smaller chain ring, to adjust the gearing to suit my riding style and ability. Otherwise, the shifting and braking performance of this bike is as good as it gets.