Saturday, May 29, 2021

Focus Paralane: Final Assembly

Building up a frameset from scratch is always challenging, as each bike frame has its own quirks and requirements. I always learn new things when building a new bike, which is interesting and also challenging.

This time, I built a Focus Paralane, to use as my all-weather commuting bike. One major reason I chose this bike was the presence of proper mudguard mounts. Besides, it has a normal road bike geometry, instead of a more upright hybrid bike geometry. Lastly, it has a lightweight frameset that is hard to find, in combination with the other two factors listed here.


Here is the bare bike, without any accessories. Looks just like a normal road bike!

Using PRO handlebar tape, which is cheap and good. I used to like Lizard Skins bar tape, but they start peeling far too quickly and easily.

Wrapping the handlebars with bar tape, once the shifter positions have been tested and fixed.

Making the cockpit look neat

Here is how it looks with the mudguards installed. At this point it is ready for wet weather riding!

Unfortunately the setback seatpost is still in use at this point in time, due to the lack of good 25.4 mm diameter alternatives.

Normally I would not ride the bike without other accessories such as lights, tools, water bottle, etc. Therefore, my actual bike weight during usage is always higher than the bare bike weight. How much weight do I add onto my bike, when I attach all the accessories?

1 kg is added to the bike, when I include all the accessories such as tool bottle (with tools), lights, bottle cages, lights, cycle computer, bell, etc.

Added the Garmin outfront mount and the Edge 530 head unit, the Quad Lock mount, and the Spurcycle bell.

Cycliq Fly 6 CE rear light + camera, spare D-Light rear light, Lezyne portable pump, tool bottle and water bottle added too.

Complete with all the accessories! Now it looks more like a commuter bike...

It doesn't look as sleek after adding all the accessories, but they are considered essential for safe and practical commuting.

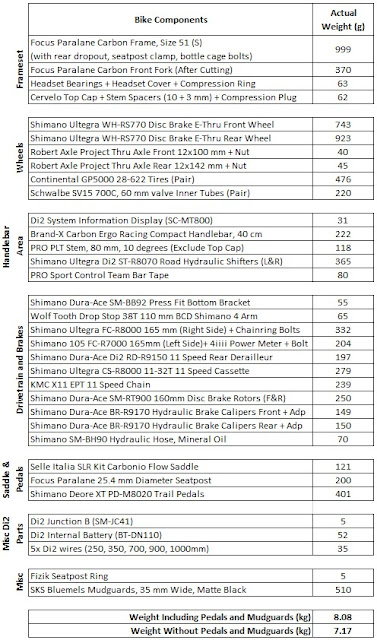
Here is the actual part list and weight as shown, without accessories. Add 1 kg if accessories are included.

If I use it as a pure road bike, without mudguards and accessories, it actually weighs just 7.2 kg without pedals. It is a very good weight, compared to my previous Canyon Endurace and the current Cervelo Aspero.

My pedals usually weigh close to 400 grams, as I use SPD pedals. The mudguards add about 500 grams to the bike, which is quite substantial.

If compared to my previous Fabike C3 commuting bike, there is a huge difference of 1.9 kg!

Road bike spec, without pedals:
Focus Paralane: 7.2 kg

Overall I am happy with the substantial weight reduction over the previous Fabike C3. Not only is it now lighter in weight, the drivetrain is also more efficient, which means that it rides even more like a proper road bike. I have achieved my objective to have an all-weather road bike!

I no longer have to choose between my Fabike C3 (good for wet weather, but heavier and slower), or the Cervelo Aspero (lighter and faster, but cannot handle wet weather) when commuting. Now, the Focus Paralane is lighter, faster, and yet also all-weather capable. Basically I can use this bike for my commute 100% of the time, without any compromises.

If I want to commute even faster, I can put on my set of Ascent Zenith Elite carbon wheelset, which would make it slightly more aero and also lighter in weight. Not sure how aero they will be though, with those mudguards in place...

Fast all-weather commuting bike, with 50 mm carbon rims on the Ascent Zenith Elite wheelset.

Saturday, May 22, 2021

Focus Paralane: SKS Bluemels Mudguards

One of the most important accessories for an all-weather rain bike is mudguards. It is necessary to avoid road spray onto the bike and rider, when the road is wet. This is what allows me to ride at normal speed through puddles, instead of having to slow down a lot.

Although the Focus Paralane comes with its own special set of mudguards, it cannot be used due to a variety of factors as listed here. Therefore, I got a separate set of mudguards that can be mounted onto the Focus Paralane.

As previously used, the SKS Bluemels is a solid set of mudguards that has never given me any problem. Although installation is a bit tricky, it has never needed any adjustments after that. 

The mudguards come in a large variety of widths and wheel sizes, in addition to matte or gloss finishing.

I chose the 35 mm wide, matte black version, for 28" (or 700C) wheels.

Actual width is accurate at 35 mm wide.

The set of mudguards for front and rear wheels

Lots of hardware provided for mounting the mudguards to the bike! Choose the suitable ones depending on your frame.

These are the parts that I will use, and they weigh 510 grams for the set. 

Test mounting the rear mudguards, to see if it fits properly.

Added a plastic spacer under the chainstay mount, to avoid direct metal contact onto the frame.

Also added a spacer at the mounting point behind the bottom bracket junction, to make the curve of the mudguard match the curve of the tire. Comfortable clearance here.

Using the original bridge to fix the mudguard bracket to the frame. Does not look very secure though as it is only held by friction.

Small but sufficient clearance with the 28 mm wide tires.

35 mm wide mudguard is just enough to cover the entire tire, which is the ideal case. The previous mudguard was 45 mm wide which looked bulky.

Mudguard mounted on the front wheel as well. Note the long and low flap which is important to minimize water spraying onto the shoes.

Added spacer behind the fork bridge, so that the metal bracket will not touch the frame.

Small clearance between the tire and the mudguard

Also added spacer at the fork mounting points, to push out the mudguard stays from the brake caliper.

Sufficient clearance between the tire and the mudguard stays. The metal stays have not been cut to the correct length yet.

After cutting the metal stays to the correct length, the rubber caps can be attached to cover the tip, which also prevents the nut from self-loosening.

Front mudguards completed!

Curve of the mudguard matches the curve of the tires closely, to improve the appearance.

Neatly balanced and aligned with the tires

Rear mudguard also adjusted to match the curve of the tires.

Once the mudguards have been attached, the whole appearance of the bike changes. It immediately looks like a commuting bike. However, it still has proper road bike components and geometry, which means that it will still ride like a proper road bike.

In the next post, you can see how it looks once fully equipped for all-weather riding. The objective of this project is to have a bike that rides 100% like a road bike, just with some weather resistant features for all-weather riding.

Sunday, May 16, 2021

Focus Paralane: Drivetrain

Here is a closer look at the drivetrain of the Focus Paralane. It is a mixture of components from different series, but it will all work together.


Dura-Ace R9170 rear derailleur. Moved across a few different bikes, such as the Canyon Endurace, Fnhon DB11, etc.

Rust-proof KMC EPT chain for this all-weather bike.

Press-fit bottom bracket

Ultegra CS-R8000 11-32T cassette, for a good 1x11 speed gear range with close spacing for road riding.

Here is the drivetrain! With a mixture of components depending on what I have available...

The left crank arm is a 105 crankarm with power meter, which is relatively cheap. I don't mind the appearance mismatch with the Ultegra right crankarm, as long as the arm length is the same.

Lots of frame clearance for the crank arm power meter, not like the Cervelo Aspero which has much smaller clearance.

There is little clearance between the chain ring bolts and the chain stay. 

Rear hub from the RS770 wheelset

Dura-Ace rear derailleur with Ultegra cassette and KMC EPT chain.

I am pleased with the drivetrain, as it is a pure road drivetrain, which means very little drag compared to the Alfine 11 internal hub drivetrain that I had on the Fabike C3. This would make this bike ride exactly like a road bike, which is my objective.

Friday, May 7, 2021

Focus Paralane: Assembly Begins

Now it is time to start the Focus Paralane bike assembly! This was actually done many months ago in September 2020, but I just did not have the time to write about it until now.

One problem I saw on this frameset is the big opening under the bottom bracket. Since I am not using a mechanical front derailleur, I removed the entire front derailleur cable guide. However, this also leaves a big hole underneath which will collect a lot of water and dirt, more so since this will be an all-weather bike. Therefore, it is necessary to cover up the hole properly, to seal it against the weather.

I used the leftover protective film that I pasted onto the Cervelo Aspero, where it was used to protect the chainstay. In this case, it will be used to cover up the big holes under the frame.

Leftover protective film to be used to seal up the holes under the frame.

Two big holes covered with the protective film, and a small hole covered with a rubber grommet. The small hole might be useful to let excess water drain out.

Protective film covers the hole, but I purposely made a tiny opening to allow water to drain out instead of collecting inside. Water will definitely enter the frame from other openings such as the headtube area or seatpost area.

The slot at the back of the seat tube was also covered with the protective film, together with the Fizik rubber ring around the seatpost.

Added some grease around the headset bearings for additional protection against rain.

The steerer tube length is pretty much perfect after cutting, leaving just enough space for a thin spacer on top.

Using a 80 mm PRO PLT stem that is more conventional, not the unique PRO Vibe stem.

I wrapped foam around Junction B, and stuffed it into the frame, outside the bottom bracket area.

Ultegra R8000 11-32T cassette installed onto the wheelset. This was what I tested previously on the Fabike C3.

Shimano RS770 wheelset, with GP5000 tires, 11-32T cassette and RT900 rotors.

Using a handlebar holder to prevent the handlebar from moving when bleeding the hydraulic brakes.

Before bleeding the brakes, I had already made sure that the shifters and handlebar are in the correct positions, as this is necessary to ensure correct brake hose length. This was what I prepared earlier.

Pressing in the press-fit bottom brackets with a proper bottom bracket tool. Prior to this, I had already tested to make sure that the brakes and shifting work fine.

Pressing in the bottom bracket cups carefully and evenly. Grease it to avoid creaking issues later on.

Ready for a test ride! Now is the time to make fine adjustments to the shifter positions if needed.

Routing the brake hoses and Di2 wire neatly with black cable wrap. Hose length is very important if you want a neat setup.

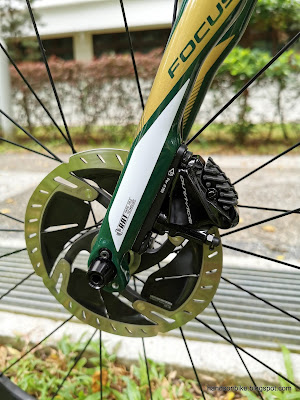
Dura-Ace brake calipers and brake rotor. Also note the Robert Axle thru axles!

Looking good!

Front wheel installed, also with the aftermarket thru axles.

Also using Dura-Ace brake components at the front.

At this point, it looks like a lightweight race bike!

Test ride completed, now I am ready to lock in this position.

Once the shifter position has been fixed, the bar tape can be wrapped to complete the bike. If I was using it as a race bike, this is all that is needed. However, since I will require it to be an all-weather bike, more parts need to be added to the bike...